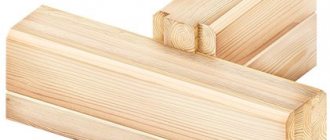
In carpentry, there are quite a large number of connections between parts. One of them is the dovetail. This type of connection can be seen on drawers, chairs and other structures. It is one of the reliable connections. The grooves are made in such a way that if you try to break the connection, they will rest against each other. In order to make a dovetail with your own hands, you will need a minimum of tools and a little experience in carpentry.
Dovetail: theory and practice
To make a dovetail by hand you will need the following set of tools:
TOOLS
- marking thicknesser;
- malka or special marker;
- carpenter's square;
- axing saw;
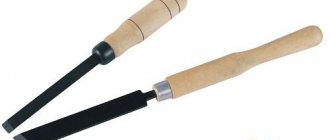
- carpenter's chisel and mallet;
- marking knife or pencil.
Sawing the joint begins with preparing the part with spikes. This is important as it will be used to mark the dovetails. To avoid confusion in orientation, temporary markings are made on the parts, marking the front and back sides, top and bottom edges.
Read on the topic: All about carpentry chisels: types, characteristics, subtleties of choice
- Creating stud markings
We mark the shoulder line on all four edges with a thicknesser. Having decided on the number of studs, using a special template we apply markings first on the end and then on the face of the part. For the convenience of subsequent work, we mark the areas that will be removed.
The same procedure can be performed using a crowbar and a carpenter's square.
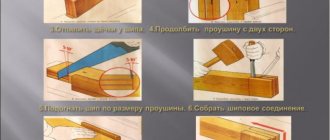
- Sawing out thorns
Using a back saw, we make even cuts to the shoulder line marked with a surface planer. We hold the canvas strictly perpendicular to the end; we saw with uniform movements without jerking. To prevent the saw from being pulled to the side, you can use a small carpenter's square as an improvised guide.
- Removing waste part
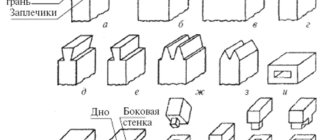
The waste between the spines can be removed in two ways:
The first is with a jigsaw. In this case, the main part of the waste is removed, and small remnants are carefully trimmed and cleaned with a chisel.
Selecting waste is not much more difficult using one chisel. Having fixed the part on the workbench, we remove the wood layer by layer, as shown in the diagram.
- Dovetail markings
We use the part with the spikes as a template for marking the dovetails. Aligning the end of the first part with the line of the shoulders, we apply the markings of the dovetails as shown in the photo. For convenience, we shade the waste sections.
- Sawing out dovetails
We make cuts with a saw blade. We clamp the workpiece in a vice at an angle, so that the marking lines are not inclined, but vertical. This will increase ease of use and allow you to make cuts more accurately.
We make the cut not strictly along the marking line, but next to it, so as to create a small margin for subsequent trimming of the joint. We cut smoothly, without jerking, stopping at the shoulder line.
Having made all the cuts, use a chisel to remove the waste between the dovetails. This process is similar to stripping the tenons, except that the master is faced with the task of carefully and evenly trimming the left allowance.
We cut out the hangers. We saw off the waste with a small allowance, then trim it with a chisel to the marking line.
- Dry assembly and connection adjustment
Before gluing, dry assembly is carried out to check the tightness of the fit. We insert the part with the spikes into the dovetails and carefully tap it with a mallet. To avoid breaking tenons and tails, cover the joint with a piece of wood that will distribute the impact.
The spikes and tails should fit snugly together. When the joint is properly assembled, a light tap with a mallet is all it takes to assemble. If the connection is too tight, the parts are disassembled, the problematic thickening is identified and very carefully trimmed with a chisel.
- Dovetail gluing
The glue is applied in a thin layer to all contact surfaces of both parts of the box joint. The assembled structure is tightened with clamps. To distribute pressure over the entire joint area, wooden blocks are placed under the jaws of the clamps.
You can learn more about the intricacies of this process from our materials on the choice of glue and the rules of carpentry gluing.
Advice! Details of box connections are always made in several copies. You can optimize the workflow by collecting the blanks in a stack and sawing the entire series at one time.
What should you consider when designing a connection?
When designing a dovetail, there are a number of considerations that will affect both its strength and appearance.
Interval between spikes . The distance between the tenons and their size determine the strength of the connection.
At equal intervals (ratio 1:1), the mechanical strength is the highest. But this configuration is rarely used. Because due to the larger number of elements, manufacturing the part takes corresponding time. The likelihood of making mistakes that will cause a loose fit is also higher. Typically a ratio of 2:1 or 3:1 is used. In these cases, the strength of the connection remains just as high.
When joining wide parts, additional tenons are made at the edges at small intervals. This solution helps to effectively combat wood warping.
The dovetail angle is an important parameter that determines the mechanical characteristics of the joint. If the angle is too small, the lock will not lock and the fastening will turn into a regular tenon joint. If the angle is too large, the tapered part of the dovetail may split during assembly and the tenon will fall off.
For soft wood, the dovetail angle is made steeper, since it is more susceptible to crushing and deformation under loads. The optimal ratio is 1:6. For hardwood, the angle is made less steep - 1:8.
The design principle of the dovetail shape is shown in the drawing.
State standards
The main standard that establishes the rules for the manufacture of fastening elements for wooden parts is GOST 9330-2016. It specifies the sizes of teeth, grooves, dowels of various types of assembly. The standard provides diagrams with examples of such fastenings. The rounding rules and symbols used in the drawings are indicated.
The rules for gear connections are specified by GOST 19414-90. It shows the sizes of the teeth, the order of their arrangement and methods of connecting them.
When constructing wooden houses, GOST 30974-2002 is used. It defines the rules for preparing dovetail cuts for logs in low-rise construction. It details the types of structures, classification and dimensions of each element.
If you find an error, please select a piece of text and press Ctrl+Enter.
Source: stankiexpert.ru
Manufacturing of equipment for box connection
This product allows you to mill box joint grooves one at a time on a milling table. In our case, it is simply an additional board, screwed onto an angle stop and having a key, with which we will determine the exact interval between the grooves.
simple device for making box joints
Install a straight cutter with the diameter of the required groove width; Place the router on the table. Set the routing depth equal to the thickness of the existing board and mill a groove into it. After this, unscrew the board from the miter gauge and move it so that the gap between the groove and the cutter is equal to the width of the cutter.
Mill a groove in the board again, this time the second one (on the right). Cut a key out of the wood so that it fits exactly into the first groove and place it on the glue, so that it will be approximately 25 mm from the groove on the additional board.
Milling grooves in the first workpiece
Place the workpiece with its front surface against the additional miter fence board, pressing one of its edges against the key. Turn on the router and, holding the workpiece firmly against the fence, move it onto the cutter, milling the first groove. U
place the first groove on the key and make a second pass. Continue routing in the same manner until you reach the opposite edge of the workpiece.
Milling slots in a mating workpiece
Install the last groove of the first blank onto the key. Press the edge of the mating second piece against the edge of the first and move the entire set to rout the first groove on the second board; Keep both workpieces pressed against the miter gauge. Mill the remaining workpieces using the same technology as when making the first one.
The tenoning device makes it easier to select grooves of any configuration, including dovetail - video
There are too many dovetail patterns to talk about each one in this article. Shall I just provide a link to the document? by downloading which you will find all sizes? and even drawings for making a dovetail template with your own hands.
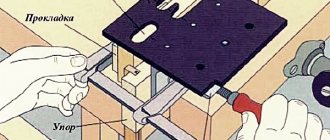
Universal device for tongue and groove connection
factory plate for making a tongue and groove connection
Used with a router to cut the corresponding grooves and tenons, it is installed in a vice and the part is pressed against the device with a clamp. Typically sold in stores.
connection appearance
Consider devices for milling grooves
Cut out the top part - a tabletop from 18 mm plywood, 40 cm long and sufficiently wide to process the thickest workpiece that you plan to join with a tenon.
Cut two 5x10 cm bars, sawing them to the same length as the top. The bars will subsequently play the role of pressing the workpiece and centering it relative to the groove in the tabletop. To prepare the top, draw a line down the center of the top, then rout a mortise along the line at one end.
schematic representation of equipment
To use our equipment, draw a groove on the workpiece and mark the center line on it. Loosen the screws and place the workpieces between the bars so that the center line is connected to the top line of the jig, check that the edge of the workpiece is opposite the edge of the top.
Pinch the lambs. Align the router bit to one end of the mortise drawing, then mark guide lines on the top surface of the table along the edge of the router base.
How to work correctly with tongue and groove equipment
Repeat this again to mark the lines of the other end. Route the slot by starting the cut at the bottom by aligning the router base with the first construction line, and stop routing when the insert reaches the second construction line.
Let's make a device for making spikes with our own hands
Product for making spikes
The wood and plywood jig shown above allows you to cut rectangular tenons with two shoulders. The object being processed is located with its front surface underneath the jig, while the router moves along the stop from above, removing excess in two passes.
Tools
To make a corner connection, you should prepare:
- board;
- Beam;
- Wood glue.
If you need to join the outer corners of the house, then experts advise purchasing also a sealant for additional processing of the gaps.
To make tenons and grooves, you need:
- Square;
- Knife;
- Set of chisels;
- Crafting table;
- A saw suitable for the desired type of fastening;
- Hammer;
- Sander.
If you plan to use a connection on large elements, for example, when constructing a building, then it is recommended to make a series of calculations, select the appropriate type, determine the number of tenons, the angle of inclination, etc.
How to make accurate markings?
When making a dovetail with your own hands, the accuracy of the markings is of primary importance. To apply it, they traditionally use a grinder and a square.
A more practical and convenient device for these purposes is a special template. These markers come in different angles and are designed for soft or hard wood.