When the phrase “wooden box” is mentioned, many people immediately imagine a standard fruit box. Although in fact boxes can be very different and used for all sorts of purposes.
This is a very useful product that can be used in everyday life, not only somewhere in the country, but also just in the house. Let's figure out how to make a wooden box with your own hands, because only a homemade thing can be not only unique and as convenient as possible, but also completely safe.
DIY wooden box
Features of making a tool box
Things often get lost. It's better if they have their own place. Then they won't get lost. And all the necessary things will always be at hand.
- The boxes can be made in different ways. They can have different shapes and colors.
- It's easy to do. Almost everyone can do it themselves if they wish.
- It doesn't require a lot of money to make.
- Plywood is easy to process.
- You can put heavy things. After all, it can withstand a heavy load.
- Thickness may vary.
- You can store both small and large things.
- Boxes can be of different sizes.
You can decorate them as you wish. They can be of different colors. Suitable for any interior.
What should be in the shield
Both in an apartment and in a private house there are several options for the layout of the shield. This mainly concerns the installation location of the input machine and the counter. In a private house, the meter can be placed on a pole, and the machine can be placed on the wall of the house, almost under the roof. Sometimes a meter is installed in a house, but this is if it was built a couple of decades ago. Recently, metering devices are installed in the house extremely rarely, although there are no regulations or instructions on this matter. If the meter is located indoors, it can be placed in a panel; then when choosing a panel model, it is necessary to take into account the dimensions of the meter.
Read about how to connect electricity from a pole to a house here.
In some apartment buildings, meters are located in boxes on the staircases. In this case, the cabinet is needed only for RCDs and automatic machines. In other houses it is located in the apartment. When upgrading the electrical network, you will have to buy a cabinet so that the meter can fit in there, too, or buy a separate box for the meter with an input machine.
A simple electrical circuit diagram for a small house or apartment
Safety is very important when designing a power supply. First of all, it is provided for people: with the help of an RCD - a residual current device (number 3 in the photo), which is installed immediately after the meter. This device is triggered if the leakage current exceeds a threshold value (there is a short circuit to ground or someone sticks their fingers into the socket). This device breaks the circuit, minimizing the possibility of electric shock. From the RCD, the phase is supplied to the inputs of the machines, which are also triggered when the load is exceeded or when there is a short circuit in the circuit, but each in its own section.
Secondly, it is necessary to ensure the normal operation of household appliances and electrical appliances. Modern complex technology is controlled by microprocessors. They require stable power to function properly. Having observed the voltage in our network for some time, it cannot be called stable: it varies from 150-160 V to 280 V. Imported equipment cannot withstand such a variation. Therefore, it is better to turn on at least some groups of automatic machines that supply power to complex equipment through a stabilizer. Yes, it costs a lot. But during voltage surges, the control boards are the first to “fly”. They are not repaired here, but simply replaced. The cost of such a replacement is about half the cost of the device (more or less depends on the type of device). It's hardly cheaper. When assembling the electrical panel with your own hands, or just planning it for now, remember this.
One example of a panel layout for a small circuit - for 6 machines
The stabilizer is installed on one or several groups and is turned on after the RCD and before the group circuit breakers. Since this is a rather large device, it won’t be possible to install it in a panel, but you can install it next to it.
Also, two buses are installed in the panel: grounding and grounding. All grounding wires from instruments and devices are connected to the grounding bus. The wire comes to the “zero” bus from the RCD and is fed to the corresponding inputs of the machines. Zero is usually designated by the letter N; when wiring, it is customary to use a blue wire. For grounding - white or yellow-green, the phase is carried out with a red or brown wire.
One of the options for an assembled small shield
When assembling an electrical panel yourself, you will need to purchase the cabinet itself, as well as rails (called DIN rails or DIN rails) on which circuit breakers, RCDs and switches are attached. When installing the slats, check with a level that they are horizontal: there will be no problems with fastening the machines.
One of the options for DIN rails in the panel housing
All machines must be connected to each other. This can be done using conductors - connecting their inputs in series, or using a ready-made connecting comb. A comb is more reliable, although it costs more, but if you take into account the time that you will spend connecting all the machines, it is unlikely that a few tens of rubles are of such fundamental importance.
Connecting comb for circuit breakers in an electrical panel: will speed up the self-assembly process
Scheme for several groups
Power supply schemes are not always simple: groups of consumers are divided into floors, outbuildings, lighting for the garage, basement, yard and local area are installed separately. If there are a large number of consumers, in addition to the general RCD after the meter, they install the same devices, only of lower power, for each group. Separately, with the obligatory installation of a personal protective device, the power supply to the bathroom is removed: this is one of the most dangerous rooms in a house or apartment.
It is very advisable to install protective devices on each of the inputs that go to powerful household appliances (more than 2.5 kW, and even a hair dryer can have such power). Together with a stabilizer, they will create normal conditions for the operation of electronics.
Also not the most complex circuit, but with a higher degree of protection - more RCDs
In general, when designing the exact design, you will have to find a compromise: make the system safe without spending too much money. It is better to buy equipment from trusted companies, but it costs a lot. But power grids are not an area where you can save money.
Read how to connect an electric hob here, and about connecting an electric water heater (storage or instantaneous) read this article.
Box making process
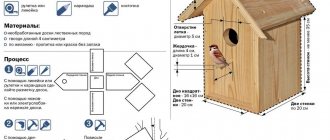
You need to understand what size the box will be. The drawer will have sides measuring 19.5 cm by 13 cm. The bottom of the drawer will measure 19.5 cm by 31.5 cm.
- Then they draw a drawing of the box.
- Draw patterns for the components of the box on sheets of plywood. The bottom of the box will be six millimeters thick. And to make the sides you will need plywood eight millimeters thick.
- The elements are cut out using an electric jigsaw or a hand router. There should be five parts in total. Four side walls and a bottom. If necessary, also cut out the lid. The walls can be in the shape of a cone if the box has a lid.
- Once the parts are prepared, the box is assembled. The walls are placed at the bottom of the box.
- The seams are glued with a special glue for wooden products. Excess glue is then removed with a regular rag. After gluing the box, place it under a press so that the parts stick together better.
- Then connect the parts with self-tapping screws.
- Then they make holes for the handle of the plywood box lid.
- You can make internal partitions in the box. But a box with partitions is suitable for experienced craftsmen. For novice craftsmen, it is better to make the box simple, without internal partitions.
If the box is large, then special wheels can be attached to the bottom. This will make the drawers easier to move around the room.
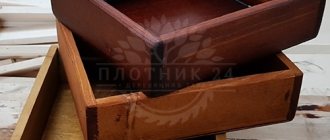
We nail the fiberboard bottom
From the bottom of the resulting box we nail a structural part made of fiberboard, having previously aligned the quadrangle along two diagonals
It is very important that the diagonal sizes are equal! Otherwise, you will have problems using the furniture box; it will constantly jam when moving, and will not fit completely
We nail the fiberboard bottom
Plywood box finishing
- After making the plywood box, we begin to decorate it.
- You can paint it with varnish. The entire box is varnished. This not only adds beauty, but also extends the life of the plywood box.
- The box can also be decorated with special overlays.
- It is also better to cover the outside of the box with color. This will give a beautiful appearance to the box.
- Before decorating the box, all holes must be filled with a special product for wooden products. The putty is applied very easily. Dries within three hours. After puttying, the box can be varnished.
- Afterwards, the plywood box is sanded using sandpaper. You can also putty a plywood box using a sanding machine.
Gift containers
Oddly enough, even the most ordinary item can be beautifully packaged in a beautiful gift box, which can cause a storm of positive emotions in the birthday boy. We can offer to make a wooden box for gifts.
Gift boxes can even be made from wood. It's interesting, unique and presentable. Wood is a durable material. It will be able to serve the hero of the occasion for a very long time, because it will not be thrown into the trash and will become an excellent interior decoration. A very interesting idea is to collect money in such boxes.
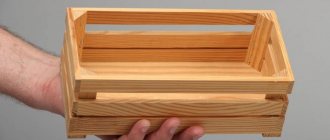
Plywood box with sliding lid
- You will need plywood 0.5 cm and 1.5 cm thick.
- Parts are cut out. The back wall should be 20 by 15 cm. The front wall should be 18 by 35 cm. The lid should be 34.3 by 33.3 cm. The bottom of the drawer should be 33.8 by 33.4 cm. The handle of the drawer will be 5 by 2 cm. These parts are cut from plywood with a smaller thickness. The side parts of the box are cut from other plywood. Their size will be 33.8 by 33.4 cm. There will be two such parts.
- Using a saw, the parts of the future box are cut out.
- Then the parts must be sanded using fine paper.
- Grooves measuring 0.6 cm are made on the sides of the box.
- It is necessary to make holes 0.4 cm in size on the walls of the box. This is necessary so that they can then be connected to the side walls of the future box using self-tapping screws.
- First, the parts are connected using a special glue. You can use both wood glue and PVA glue.
- Remains of glue are removed with a regular rag.
- View the edges whether they are suitable or not.
- Check whether the cover moves along the grooves. If necessary, process using sandpaper.
- The handle is glued to the lid using glue. You can also attach it to the lid using a special stapler.
- After everything is dry, it is better to sand the box again on all sides.
The top can be coated with special paint or varnish. The color of the box may vary.
What materials are used to build structures?
Most often, boxes are made of wood and other materials. For instruments, it is better to choose solid pine or maple. Alder or aspen is suitable for products. These tree species are distinguished by their durability and strength. They do not emit resinous secretions and do not dry out over time.
Plywood is suitable for making decorative products. You can place all sorts of little things here. To fix the parts, a special adhesive composition is used.
Tips for making a plywood box
The thickness of plywood may vary. When making a plywood box where toys, clothes, and food will be stored, plywood with a thickness of 0.5 cm is suitable. And, if the box is to be stored outdoors, then the thickness of the plywood should be more than one centimeter.
- Before you start work, you need to understand whether the drawing is made correctly.
- You need to buy or rent the necessary tools to make the box.
- When purchasing plywood, you need to carefully examine the appearance of the material. There should be no chipped pieces or other defects on it.
- To ensure that the place where the plywood is cut is clear. You need to use tape to glue the place where the plywood will be cut.
- It is necessary to apply varnish to the plywood box. It gives not only a beautiful appearance, but also protects from various external influences.
- It is better to choose fine sandpaper for sanding a plywood box.
- If you need to make several identical boxes, you can make a template for the side walls.
- It is better to paint boxes in neutral colors.
- If the boxes will be located outdoors, it is prohibited to paint them with bright colors. After all, in the sun the color of the box will quickly fade.
- It is better to remove excess glue with a wet cloth.
Why exactly a tree?
Wood is the very material that is most often used to create products for the home. The reasons why this happens are simple. First of all, it is important to say that wood is an environmentally friendly material that does not pose a danger to human health . It does not emit an unpleasant odor and does not release any toxic substances into the air, so you do not have to worry about allergies or health problems.
Wood is easy to work with
Wood is also one of those materials that you can easily work with at home. You don’t have to use complex specialized equipment; it’s enough to have a sawing tool, drill and screwdriver or screwdriver on hand. Also, grinding and other processing of the material may require a minimum of cost and effort.
The wood is durable and beautiful and, varnished, can maintain its appearance for many years. Only uncoated material can darken over time and lose its former natural beauty. Fresh wood looks very nice.
Why wood is the best material for making boxes
It is not surprising that wood has been and remains one of the most popular types of materials. Although now in almost any specialized store you can buy its derivatives - plywood, panels, furniture board, etc. But none of these options, in any case, will be better than ordinary natural fresh board.
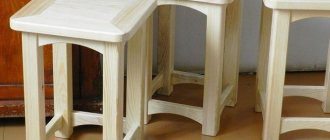
Photo of a homemade plywood box
For seedlings
The size and shape of wooden planting boxes will depend on how you grow your flowers. Bulky items take up a lot of space and spoil the overall interior of the apartment. Therefore, if you plan to grow cucumbers and tomatoes on a windowsill, it is better to limit yourself to small wooden plywood boxes.
A garden plot offers more opportunities for the DIYer. So, a large and functional box for seedlings can be made from an old pallet. In fact, a pallet initially represents a finished product. The gardener can only make the bottom and walls from pieces of multi-layer plywood. To do this you will need decorative nails and a hammer. After this, the internal space is filled with earth, the seeds are sown between the top rows of boards.