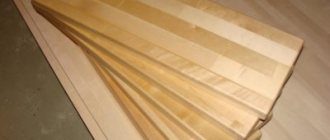
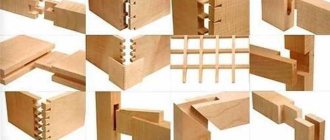
Width joining
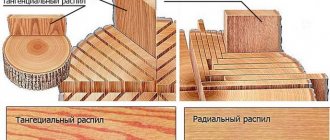
Used to increase the width of the product. When using bonding methods, it is important to pay attention to the location of the tree’s annual rings. It is important to alternate the boards depending on their direction. The payment options are:
- Butt-to-end - parts need to be trimmed and jointed using a square.
- In tongue and groove - the height and width of the ridge is equal to 1/3 of the thickness of the board.
- Using a hacksaw - the edges need to be cut at an acute angle to the wide plane of the board.
- With a comb with a height of 1/3 to half of the board.
- A quarter with a ledge equal to half the thickness of the board.
- In a tongue and groove with slats - in each board, select grooves into which you need to insert a rail that is twice as wide as the depth of the groove.
T-shaped connection with overlay
To make such a connection of wooden parts, you need to place one piece on top of another and fasten them to each other using bolts, screws or nails. Wooden blanks can be placed either at a certain angle to each other or along one line.
To ensure that the angle of connection of the parts does not change, use at least 4 nails. If there are only two nails, then they are driven in diagonally. To make the fixation more durable, the nails must pass through both parts, and the protruding ends must be bent and deepened into the wood.
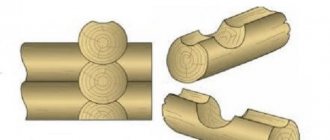
Increase in height
From the name it is clear that the essence is to lengthen the beams or logs in the vertical direction. The axes of the elements are on the same vertical line. Types of extensions are:
- End-to-end extension. To absorb random loads, a barbed pin is inserted on the sides.
- Extension with one or two spikes. The width and height of one tenon must be at least one third of the thickness of the timber. The depth of the nest is slightly greater than the height of the thorn.
- Half-tree extension. The ends of both logs need to be cut to half their thickness by 3-3.5 diameters in length.
- Tongue building. In one beam you need to cut a fork into which you need to insert the correspondingly cut end of another piece. The connection itself must be wrapped in tin.
Types of connection
When connecting wooden parts, you need to remember an important point - a thin part is always attached to a thick one, but not vice versa.
According to the relative arrangement of the elements, the following methods of connecting wooden parts are distinguished:
- extension - increasing the height of a part;
- splicing - elongation of the workpiece;
- consolidation—increasing the element’s width;
- knitting - joining at an angle.
The most commonly used methods for joining wooden parts in furniture making are:
- gluing;
- "dovetail";
- end-to-end;
- grooved;
- overlap;
- deaf on spikes;
- through tenon.
Let's look at the technologies of some connections in more detail.
Gluing
Gluing wooden parts is carried out as follows:
- The surfaces to be glued are cleaned with a lint-free cloth, and rough spots are smoothed out with fine sandpaper.
- Using a cardboard stick, apply wood glue in an even, thin layer over all necessary surfaces.
- Surfaces coated with glue should be rubbed against each other. This will ensure even contact and strong adhesion.
- The parts need to be pulled together to ensure reliable retention at the joints. Measuring the diagonals will make sure the angles are straight. They must be equal. If this is not the case, the position of the elements needs to be corrected.
- The connection is strengthened by drilling pilot holes into which finishing nails or screws are driven. The screw heads must be recessed; for this, the holes must be bored out. The nails are deepened using a punch.
- Holes with nails are covered with wood putty. The holes bored out for the screws are closed with hardwood wooden plugs coated with glue. When the glue or putty has dried, the surface is sanded so that it is smooth and then varnished.
Length splicing
This type of joining of wooden parts has some nuances. At its core, this is the elongation of elements in the horizontal direction. Splicing can be:
- Butt-end - the ends are cut at right angles and aligned with each other. A bracket is hammered into both beams (logs).
- Oblique butt - the cuts are made at an angle, and the ends are fastened with a pin or nail.
- End butt with ridge.
- Direct overlay - the length of the cutting is 1.5-2 times greater than the thickness of the timber (log).
- Oblique trim - the ends are cut at an angle and secured with bolts.
- Overlay with an oblique cut - at the ends of the parts, end ridges are made, having a width and length of one third of the thickness of the beam.
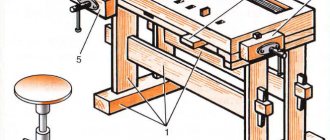
Necessary tools and equipment
The tools for execution are very diverse. They are selected depending on the type of work performed. Since in carpentry the elements being processed are larger than in carpentry, therefore, the tool must be suitable.
To connect wooden parts use the following:
- axe;
- plane, straight and curved planes, bear, sherhebel - more thorough surface treatment;
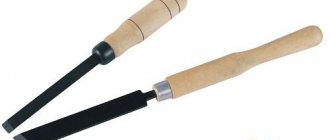
- chisel - chiseling holes and sockets;
- chisel - for cleaning cuts;
- drills with different tips - for through holes;
- various saws - for sawing lengthwise and crosswise;
- hammer, hammer, sledgehammer, mallet;
- square, compass, level and other auxiliary tools;
- nails, metal staples, bolts with nuts, screws and other fastening products.