Dovetail design
Fastening the beams together in a “dovetail” manner is considered one of the most airtight and warm locking options for building a house from timber.
It is carried out in accordance with GOST 30974 - 2002 “Corner connections of wooden block and log low-rise buildings. Classification, designs, sizes." The design is similar in structure to a “root thorn”; we’ll talk about it in more detail below. A tenon and groove are cut out at the end of the beam. They must be identical and connected into a sealed unit. The shape of the spike is trapezoidal, this is the main difference.
Dovetail fastenings are used for T-shaped, long and corner connections. For a T-shaped structure, this technique makes it possible to build a house from timber without additional overlaps on the internal walls. This will make it possible to use timber of a smaller cross-section for internal walls.
During installation, the corner fastenings of the beams to each other are insulated with jute fiber, although the system does not have wind permeability. The dovetail in the corner fasteners can be cut off. The cutting is made in a manner similar to that of a half-tree log or timber, but it must have the shape of a trapezoid. Such beams are stacked half a tree on top of each other.
What should you consider when designing a connection?
The strength characteristics of the dovetail will depend on the type of tenon joints. Therefore, you need to take into account all the nuances and know the dovetail connection options before the stage of manufacturing parts. The distance between the spikes is taken into account. The strongest fastening will be obtained with equal spaces between the tenons, but this option is the most difficult to make, so it is used quite rarely. Most often, a distance of 2:1 or 3:1 is chosen - the connection with such a gap will be quite strong, and making the workpiece is much easier. When connecting wide elements, spikes are added along the edges of the product, placing them at short intervals. This helps avoid deformation of the wood. The angle of the studs also matters. If the load on the connection is strong enough, then a small angle of inclination can reduce the strength of the structure. Then wood glue is used for additional strengthening.
Dovetail T-shaped connection
It is also not worth making the angle of inclination very large, since the bottom of the tenon will turn out thin and the connection itself will be fragile. A dovetail connection with a steep angle of inclination will ensure reliable joining of products made of soft wood. Softwood is susceptible to changes under the influence of environmental factors, so it is especially important for it to consider the strength of the joint. A ratio of 1:6 will be optimal for this type of wood. To connect parts made of hardwood, a tenon angle in proportions of 1:8 is suitable. Different types of dovetail joints may be used in different conditions. They have their own specific differences. The through type of connection is usually used when creating furniture: with this method, all elements are carefully sanded and glued, because the tenon covers the entire width of the part. With a rough type of fastening, the tails and spikes are clearly visible from the outside. If a hidden connection is made, then the technology is not visible, and the spikes are hidden under the surface of the second part. This type of connection looks aesthetically pleasing, but requires more time and experience to create. Sometimes connections are made with a single-sided dovetail.
Connection "Dovetail 45/135 degrees"
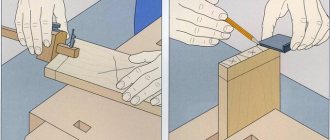
How to make accurate markings?
Before the marking stage, the number of spikes is measured - it depends on the size of the workpiece itself. For marking and testing operations, it is best to use a square and a small tool. You can also use a special template, which already indicates various angle indicators relative to a particular type of wood. Markings are applied to the end part and to the side surfaces. The strength of the fastening will largely depend on the accuracy of the markings, so it is important to avoid mistakes at this stage. Areas that will be removed during sawing are marked with markers or shaded with a pencil.
Cutting logs with corners without residue
As we said earlier, the corners are colder without any residue, but they allow you to significantly save on building materials.
Angle "to the paw"
Among the joints of logs in the corners, the “paw” method is popular. It is easy to implement, and at the same time provides high strength and reliability of the connection. Also, the presence of inclined cuts makes it possible to achieve high tightness. The method has been tested for a long time, even GOST standards have been developed: size tables for each log diameter (see photo).
Table of foot joint sizes for different log diameters
All dimensions are plotted relative to the found middle of the log and a vertical line drawn from it (it is drawn using a plumb line).
Connecting logs without leaving any residue.
Angle into the paw The order of work is as follows:
- Find the length of the cut part (called the block). It must be no less than the diameter of the largest log available (in the figure it is marked L). We set this value aside from the edge of the log (let it be 250 mm), draw vertical lines in these places. They will be the boundaries of the idiot.
- Let the diameter of the processed log be 200 mm. From the middle line, 1/2 of the value of A is set aside. D for a 200 mm log is 141 mm. We divide this value in half and put it on both sides of the center. We draw vertical lines.
- We trim (cut with a chain saw). As a result, you should get the same picture as in figure a).
- We take the appropriate dimensions from the table and mark them on the block.
- We trim off the excess (cut it off). The result should be a figure like in Figure b).
This is what the angle from the logs into the paw looks like (dovetail due to the fact that the connection is in the form of a trapezoid)
All logs are processed in this way one by one. As you can see, the dimensions depend on the diameters of the logs. In order not to have to worry about drawing every time, they make templates from thin plywood according to the diameters of the logs that are available (they label them). Then, having found the middle and made a block, they apply and trace a suitable template. With this order of work, there is less chance of making mistakes, and chopping bowls takes less time.
Tool
Let's start the description of this technology with a list of tools that will be needed in the work.
The elementary set includes the following: 1. Roulette. A 7-meter length is enough, because the timber is supplied in 6-meter lengths.
2. Construction pencil.
3. Metal square 25-30cm.
4. Chainsaw. In our opinion, it is more convenient and more mobile to work with a gasoline saw on a construction site. When working with an electric saw, you always have to keep an eye on the cord, which distracts your attention a little and limits your actions.
Addition:
Stihl MS 180
chainsaw model in their work . The model is very popular, so in order not to overpay or purchase fakes, it is better to buy it from official dealers. If you do not buy it from an official store, check the authenticity of the saw.
5. Ax
6. Chisel
In addition to this set, the following will not be superfluous:
7. Hand circular saw
8. Wood saw with fine teeth.
9. Template made of wooden board/plywood or metal sheet or prefabricated. Here, everyone’s ingenuity and imagination work differently, so there are a huge variety of options for executing templates. The main thing is to understand that a well-fitted template greatly facilitates and speeds up the work of marking the timber.
Joining the timber with the remainder
The easiest way to join timber in the corners of a log house is “into the floor of the tree”. A rectangular groove is cut, the dimensions of which depend on the thickness of the timber and are: The depth of the notch is half the thickness of the timber. That’s why it’s called “half a tree”.
We suggest you read: How to quickly dry firewood at home
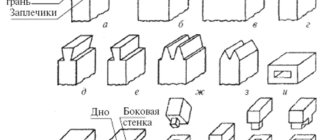
Connecting the timber in the corners with the remainder - in half a tree, in a fat tail, in an okhryap
The “tail tail” method is distinguished by the presence of an additional tenon, which provides a stronger and more reliable connection, but requires more carpentry skill. More difficult is connecting the timber into an okhryap. Here you cannot make a mistake when calculating the width of the jumper, but it is much easier to implement than on a log: the geometry here is standard and you can use a template, which significantly speeds up the work, and then an error can only occur when cutting.
There are several types of connection. Traditionally, “half-tree” and “paw” are used for bathhouses and houses. They differ only in shape. Half a tree has smooth, parallel edges. It's easy to implement. When joining the timber “into the paw”, the shape of the tenons is made trapezoidal. It is a little more difficult to perform, but there is less chance of through holes occurring.
Joining a beam in a corner without leaving a trace: in half a tree and in a paw.
There are several other types of butt jointing of timber. They are not very reliable and do not provide proper tightness, although they are economical in terms of material consumption. They are rarely used for residential buildings, mainly for the construction of outbuildings.
A simple butt connection occurs with alternation. This makes the angle stronger. For reinforcement, you can use steel plates or knock down the beam with long nails at an angle.
Butt joint of timber
There are also methods for butt assembly with dowels of different shapes.
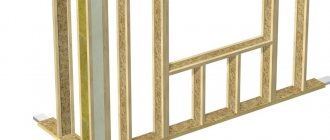
Another method of construction: using frame-timber technology. Then, in the corners and at the joints of the timber along the length, a vertical stand is placed with grooves formed in the required planes. At the ends of the beam, a spike is formed into the appropriate shape. When laying, you have to “put on” each element from above.
The advantage is that you can mold all the studs according to a single template, and then simply assemble everything like a construction set (not forgetting to lay inter-crown insulation). The connection turns out to be airtight and quite reliable, moreover, the joint itself is not visible and the appearance is very attractive.
Connecting timber using panel technology: quickly, warmly and reliably
Materials used
Forming the corner of a house is an indispensable part of the wall laying work, and it is also the most difficult, since the shape of traditional lumber does not require special devices for this. This problem, of course, was also encountered during the construction of log structures and was solved through different assembly methods. So all the methods used today have stood the test of time.
Modern builders rarely deal with logs, but lumber for houses is used very widely.
- Planed - has 2 opposite or 4 planes, thanks to which the material can be laid quite tightly.
- Profiled - in addition to the fact that the 150*150 beam has a clear geometric shape and size, grooves and protrusions are formed in it, allowing for a much more dense and reliable joining of the material. This option itself provides better thermal insulation.
- Glued - made by gluing wooden lamellas under pressure. In terms of strength and density of masonry, it does not differ from profiled masonry. However, it has another valuable quality: it practically does not shrink. This means that over time the density of the masonry does not change and there is no need for additional thermal insulation.
Advantage of lumber: it is much easier to make additional grooves here.
Features of the “paw” knot
Fastening the beams together “in a paw” can be used not only for corners, but also for T-shaped joints for the construction of a house made of laminated veneer lumber. For the T-shaped look, a hidden tenon is made into the structure.
When constructing a knot “in the paw,” a cut is made, which is a distinctive feature from other types of knots. But it is not recommended to connect load-bearing walls in this way, since the ventilation of corners and walls is high. To prevent blowing, horizontal planes are made slightly inclined. It is better if the slope is in both directions.
With a “claw” corner connection, you can make walls with or without a remainder. Experts generally complete walls in this way without leaving a trace, but you can do the first option with your own hands.
To do this, a notch is cut out in the timber and secured. And to give greater strength, wooden dowels with a diameter of 25-30 cm are driven in. The design of the T-shaped connection of the beam “into the paw” is shown in more detail in the diagram - pictures below, with descriptions and drawings. Using it, it won’t be difficult to make a knot design with your own hands.
Straight tenon
This type of corner connection is well suited for small structures. It is important that more than one timber is not used per length of the building.
Having fulfilled this simple condition, you don’t have to worry about the reliability of the building; it can easily withstand any cataclysm, even an earthquake. With this connection method, the load is distributed evenly between all elements, so the weakened part of the beam will not be exposed to danger.
Evgeniy Filimonov
Ask a Question
An important rule to follow is the ratio of the stud parameters. Its thickness and length should be in proportion 1 to 2 in relation to the main part of the beam.
How to connect beads lengthwise
The easiest way is half a tree. Its configuration and shape are similar to those made when connecting a corner. But the disadvantage of this splicing method is that when longitudinal forces arise, which can occur during drying or movement of the soil, such a connection is easily broken. A continuous gap is formed.
Long beam connection
The oblique rim lock has the same disadvantage: it is easy to disengage. If you need reliable joining of timber, use a straight rim lock. As you can see, due to the protrusion, pressed by the crowns located on top and the weight of the roof, it will resist the forces of longitudinal tension (and compression too). It is more difficult to implement, but much more reliable.
Spring unit “Strength”
The timber gradually dries out and shrinks. This always creates gaps. The spring assembly pulls the upper beam towards the lower one. Gaps and cracks do not appear. Therefore, no caulking is required. Only slight sealing is possible. Moreover, it is faster and easier to work with a spring assembly.
Such an invention costs from 50 rubles. a piece. To work, you still need a low-speed drill and an attachment.
Source:Go
Read us on Odnoklassniki VKontakte Telegram
Features of the “half-tree” node
The “half-tree” design bears this name because the cuttings that are made in the timber are half the size of the section. Half-tree installation is carried out mainly in the corners. It is possible to connect the timber in length in this way, but you need to use dowels for fastening.
We invite you to familiarize yourself with: Tape insulation for timber
For a corner connection, a notch is made at the top of one link and at the bottom of the other. To make the connection more durable, wooden bushings are used, which are mounted at the end of the cutting. Another option is oblique cutting, this option is shown in detail in the diagram below.
This corner fastening is used for residential construction, for example, for the construction of a house from profiled timber, only after carefully insulating the joint. In order to reduce the ventilation of the structure, the cuttings are made not at right angles, but with a slight slope.
Any of the listed types can be used for a T-shaped connection. But the most appropriate and cost-effective are those that do not require allowances, for example, “root spike”, “dovetail”.
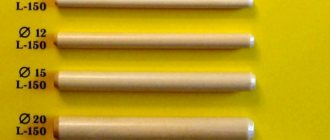
When is it advisable to use a wooden dowel in the construction of timber houses?
So, we've sorted out the warm corner. Now we need to find out what the notorious wooden dowels are and why they are so good!?
Let's start with the fact that wooden dowels are actually wooden nails. Their widespread use in wooden construction, both in the present and in the past, is due to the fact that correctly installed dowels allow walls made of timber with natural moisture to “sit” more or less evenly during the first year of life.
Whereas on hammered nails the timber can “hang”. (however, it can also get stuck on the dowels).
Wooden pins were also used by our grandfathers, who built in Pestovo. The timber houses that we build today are also built using these simple, but often necessary devices. We use wooden dowels in the construction of log houses and bathhouses from profiled timber of natural moisture to prevent the beams from moving.
At the same time, the dowels are installed in such a way as not to interfere with the natural shrinkage of your wooden house. In all rows of timber, our carpenters drill special holes into which dowels are subsequently inserted and tapped - what is important, strictly vertically! It has been proven that a house built in this way produces a minimum number of cracks and is characterized by uniform shrinkage. The process can be considered labor-intensive, but the technology can be called optimal!
Why then iron nails?
Here's why: to work normally with chamber-drying timber. Such timber actually does not shrink - after all, it is dried to 20% humidity. Putting him on the dowels is quite a bit of work. When drying (even with the obligatory presence of longitudinal compensation cuts), the beam slightly changes its geometry, which makes its subsequent assembly on dowels difficult. If you don’t believe me, try it, just take really dry timber! To work with such material, we use metal nails. Many years of empirical experience have proven the validity of this practice.
Drawings and markings of logs
Before you begin assembly, you need to mark the logs. Early marking will greatly facilitate and speed up the construction process.
This operation is divided into certain stages that must be strictly followed.
- The logs are trimmed.
- A horizontal line is drawn through the center of each element from the end. The correctness of the procedure must be monitored using a laser level.
- A template is attached, pre-made from plywood or thick cardboard along the paw on the first log. Two vertical lines are drawn along it. A vertical building level will help check that the lines are drawn correctly.
- The threads are pulled along the pre-drawn lines of the cheeks of the paws. Along them, longitudinal details of the cheeks are drawn with a length equal to the diameter of the logs.
- Using the prepared markings, cut out the cheeks and check how well the part matches the template.
A log house in the paw is considered colder than, for example, the same log house with a removal. The reason is that the corners of the house are open to “all winds,” and from the outside, rainwater can get into the cracks between the parts and spoil the logs, while in a log house with an offset, the corners are closed by protruding parts of the logs.
A classic five-wall structure, even a small one (for example, 6x4), will require additional protection of both the internal sides of the corner joints and the external ones. Although this may spoil the appearance of the house, such an operation is necessary in order to make the house warmer and protect it from cold and winds.
When using round timber in the construction of houses, it is necessary to ensure the tightest possible fit of one element to another. To do this, most often a groove is cut along the entire length of the upper log so that it fits snugly against the lower one. In addition, the junction of the logs is carefully laid with tow, jute or any other insulation.
More complex shaped connections
A variety of shaped tenons can be made using a router and a special tenon-cutting device - a tenon cutter
But such connections can only be made with special templates
using a tenoning device - Leigh tenoner:
How to chop?
Building a house from logs with your own hands is not such a difficult task. The main thing is to prepare the materials correctly, follow certain rules, observe all the subtleties of this process, and then cutting itself becomes a fairly easy task.
The finishing of the corners is no less important. Any technology can be used here, the main thing is to protect the house from wind and cold, which can penetrate through loosely fitting elements or cracks in cracked corner joints.
From the outside, corners can be covered with siding, artificial stone, natural or pseudo-brickwork. The inside of the joint can be sewn up with the same clapboard. Another thing is that a house made of logs is aesthetically pleasing in itself, it is a real classic of its kind, and covering it with clapboard or, even worse, siding means destroying the very image of a log house.
We suggest you read: How to decorate a stove
For this purpose, it is better to use coniferous wood. Important indicators are natural humidity, the time when the tree was cut down (preferably in winter), the place of growth (optimally - northern regions). Pine is well suited for construction (its cost is lower); larch or cedar are also often used (these species are more expensive, but they have higher strength and a longer service life).
The assembly itself includes several main steps.
- Preparation of blanks. The top and bottom are hewn to a depth equal to the width of the workpieces. The appearance of the workpieces should be in the shape of a parallelogram, turned towards the master with the side that has a square cross-section.
- The parallelogram is divided from the end into eight horizontal components.
- Next you need to place the necessary points on the plane. The location of the points depends on the selected paw type.
- They indicate future challenges. Lines are drawn from them at an angle, which depends on the location of the intersections.
- Excess material is cut off and the connection elements are hewn out.
- A template is made on plywood or thick cardboard along the first joint, which will serve as a sample.
It is recommended to apply a special protective compound to the prepared blanks, which will reduce the risk of rot, protect against parasites, and increase the fire resistance of the entire building. In addition to protection, it is necessary to provide additional insulation of the log house.
To avoid the “spreading” of the paws during operation, the joints of the logs on the inside are equipped with a special spike, which reliably fastens the upper and lower logs.
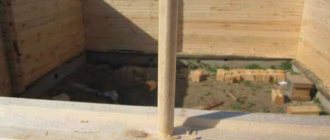
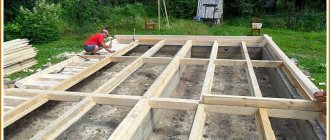
Before proceeding directly to the assembly, the foundation is poured. A log house does not have a very large mass, so it is quite acceptable to use a columnar or shallow foundation strip.
Thicker logs go to the lower crown. They are laid directly on the foundation strip, laid with roofing felt or unloading board, the thickness of which is fifty-five millimeters.
Before you begin laying the next crown, you need to make a special semicircular groove on the logs along the entire length of the log. To do this, one log is laid on top of another, and, using a carpenter's line, a line is drawn on the overlying log parallel to the underlying one.
Next, the top log is removed, turned over, and a groove is selected in it. Once the sampling is completed, the log is re-laid on top and tapped along its entire length. The purpose of this operation is to determine how well the sampling was done and how tightly the logs are connected to each other. If everything is in order, the groove is made with high quality, the connection is laid with insulation (tow, jute, moss), and the log with the groove is finally installed in place. And so - with each log of the upper tier.
What determines the choice of connection?
If you cannot decide how to connect the timber when building a house, it is important to pay attention to what structures it will be used for.
For the construction of outbuildings and baths, beams can be connected half-timbered or end-to-end. These connections are simple, you can make them yourself, you just need to secure them with dowels, pins or staples. But such methods cannot be used in the construction of a residential building.
Experienced craftsmen will not use longitudinal joints of workpieces to lay out load-bearing walls, but will try to use only solid lumber. As a last resort, they choose a rigid connection, for example, with a key. Only the key in this case must be of high quality.
The oblique lock connection can also be used on load-bearing walls, but for this the structure must be rigid with precise dimensions. And it is almost impossible to do this on your own.
Adviсe
A log house is the most common option for constructing such a building. The assembly process itself takes a little time, especially if all the preparatory work was carried out efficiently.
Although it is possible to build such a house yourself, it is better to consult with an experienced craftsman before starting work. It is necessary to take into account every little detail, because the strength and safety of the new building may depend on it.
Of course, reviews about this cutting method are contradictory. But it is supported not only by its obvious, well-known advantages, but also by the fact that this method is still the most common, despite certain difficulties and disadvantages inherent in it.
A reasonable approach to business, strict adherence to all the necessary rules will help you successfully complete this work and get a warm, cozy, durable and safe log house.
See below for information on how to cut into a paw.
Tags: beam, paw, template
« Previous entry
Pros of technology
Correct application of technology contributes to the tightness of the structure, but not only that.
Pros:
- reduction in fastening costs;
- improving the quality of house construction;
- significant reduction in heat loss;
- increased operating efficiency;
- aesthetic significance of the building;
- saving building material.
When dry, profiled timber with natural moisture changes its geometry and can warp or bend. After installation, the wood shrinks in a fixed position, which prevents the timber from deforming. Since cutting out the tongue-and-groove elements is done in advance, at the preparation stage, the assembly of the house itself does not require a lot of time and labor. Anyone can assemble a house with their own hands, saving money.
Evgeniy Filimonov
Ask a Question
At the preliminary stage, you should not refuse consultations with experienced craftsmen; first, you should learn how to make blanks, understand the intricacies of the technological process, and only then, independently assemble a house or bathhouse.
The disadvantages of the technology include the complexity of its implementation. To cut connecting elements correctly with a perfect fit requires practical knowledge and skills. An incorrectly cut tenon during shrinkage can lead to cracking of the timber.
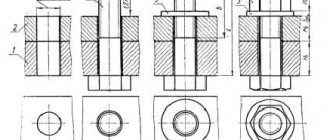
Connection into a “root tenon”
The “root tenon” connection is one of the simplest types of locks. It is used to splice two elements into an invisible and reliable fastening. The design of the main tenon consists of a rectangular tenon and a groove for it. You can cut out the tenon and groove with your own hands according to the diagrams. Below is a picture with exact drawings and dimensions.
In the picture we see a tenon, which is the easiest to cut out, since it is located on the side. The tenon has a height of 4 cm and a width of 4 cm. The cross-section of the timber in question is 150 mm.