Parallel stop Guide rail Copy rings and templates Devices for milling round grooves Milling grooves on narrow surfaces Devices for processing rotational bodies Devices for milling tenons
To fully work with a hand router, in addition to the tool itself, the material and the corresponding set of cutters, you need to have one more component - accessories.
In order for the cutter to be able to shape the workpiece in accordance with the master's plan - cutting the material exactly where it is required - it must be in a strictly defined position relative to the workpiece at every moment of time. Numerous accessories for a hand router are used to ensure this. Some of them - the most necessary ones - are included in the delivery package of the tool.
Other devices for milling can be purchased or made by yourself. Moreover, homemade devices are so simple that to make them you can do without drawings, using only their drawings.
Tools used
In this case, the sampling of material is carried out on the surface of the beams and boards from the side. The main thing is that the proposed connection maintains its dimensions in terms of geometry.
To complete the process using a milling cutter, it is possible to use tools equipped with shanks with a diameter of 8 or 12 millimeters. The so-called groove cutter will become a universal option when performing any type of work. The device is equipped with a cutting part, the basic operating principle of which is described as follows:
- The side surface is involved in the formation of the sides of the tenon, the wall part of the grooves.
- The side with the end part is used when processing the bottom. After this, the required layer of material is removed from the base of the spike.
The result is the simultaneous formation of both tenons and grooves on the surface on the sides. The sizes can be individually adjusted, and the owner has quite a wide range of options in this regard.
Sometimes for grooves and tenons they choose not a rectangular shape, but the so-called “dovetail” type. This option is relevant if increased requirements are placed on connection reliability. Accordingly, the cutter used is also called a “dovetail” in this case. Such work can be easily done with hand tools if the need arises.
How to make a tongue and groove connection
How to make a tongue and groove connection?
Tenon and groove - what is it?
First of all, you need to define what a tenon and groove is. This is nothing more than a way of connecting parts.
It is used most often in carpentry, as well as in other types of production. There are many types of grooves and tenons, but we'll talk about that another time.
Properly executed tenons and grooves are sufficiently firmly connected to each other. This connection is considered one of the strongest.
Tongue and groove connection method
First you need to determine for what purpose this connection method is needed. If this is a table, then the jumpers in it are usually connected to the vertical legs.
Consequently, the wood fibers run vertically and horizontally. If this is a wall table or a bedside table with drawers, then the jumpers here will be located a little differently. They will be horizontal relative to the legs.
In any case, such a connection will be the most reliable. When making a large number of tongue-and-groove joints, special machines are used. If you need one or more tongue and groove joints, and there is no carpentry equipment at hand, then it would be advisable to do this manually. To do this you will need a set of carpentry tools, including:
- hacksaw;
- clamp - 2 pcs;
- measuring instrument;
- pencil for marking.
- First we will make a spike for the future connection.
- To do this, you need to take a bar and mark the dimensions of the future tenon on it.
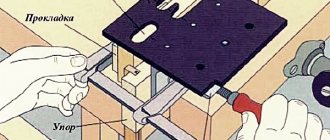
Making a device for picking out a tenon
When parts are processed manually, the milling cutter itself does not have additional spatial fixation. But the overall result of the work and the accuracy of the connection itself in the future depend on this.
To assemble the simplest design that can cope with the task, you will need to use:
- Several guides that remain stationary. They should be side and top or bottom.
- The length of the sample is adjusted through the use of an appropriate movable bar.
For manufacturing, the following sequence of actions is used:
- A plywood sheet is taken, from one edge of which the side elements are mounted in a vertical plane. It is necessary to create appropriate cutouts in the center of the material.
- The sides are equipped with guides. The base of the hand cutter moves along them later.
- The side strips are fixed on the upper guides. Then the movement of the working milling cutter associated with these parts becomes limited.
- The plywood sheet, which became the basis for the installation, also serves as a surface for installing the moving element. Then the amount of edge overhang for the future workpiece is easier to control under any circumstances. Fixation is ensured with ordinary screws and other types of fixing devices.
How to make a tenon groove with a hand router: tools, instructions
Using tongue-and-groove joints at home will allow you to independently create beautiful furniture that is also reliable. Even the frames of low-rise buildings are connected using this scheme, especially when it comes to serious loads during operation. Therefore, it will be useful to understand how to make a tenon and groove using manual milling cutters.
Tools used
In this case, the sampling of material is carried out on the surface of the beams and boards from the side. The main thing is that the proposed connection maintains its dimensions in terms of geometry.
To complete the process using a milling cutter, it is possible to use tools equipped with shanks with a diameter of 8 or 12 millimeters. The so-called groove cutter will become a universal option when performing any type of work. The device is equipped with a cutting part, the basic operating principle of which is described as follows:
- The side surface is involved in the formation of the sides of the tenon, the wall part of the grooves.
- The side with the end part is used when processing the bottom. After this, the required layer of material is removed from the base of the spike.
The result is the simultaneous formation of both tenons and grooves on the surface on the sides. The sizes can be individually adjusted, and the owner has quite a wide range of options in this regard.
Sometimes for grooves and tenons they choose not a rectangular shape, but the so-called “dovetail” type. This option is relevant if increased requirements are placed on connection reliability. Accordingly, the cutter used is also called a “dovetail” in this case. Such work can be easily done with hand tools if the need arises.
Making a device for picking out a tenon
When parts are processed manually, the milling cutter itself does not have additional spatial fixation. But the overall result of the work and the accuracy of the connection itself in the future depend on this.
To assemble the simplest design that can cope with the task, you will need to use:
- Several guides that remain stationary. They should be side and top or bottom.
- The length of the sample is adjusted through the use of an appropriate movable bar.
For manufacturing, the following sequence of actions is used:
- A plywood sheet is taken, from one edge of which the side elements are mounted in a vertical plane. It is necessary to create appropriate cutouts in the center of the material.
- The sides are equipped with guides. The base of the hand cutter moves along them later.
- The side strips are fixed on the upper guides. Then the movement of the working milling cutter associated with these parts becomes limited.
- The plywood sheet, which became the basis for the installation, also serves as a surface for installing the moving element. Then the amount of edge overhang for the future workpiece is easier to control under any circumstances. Fixation is ensured with ordinary screws and other types of fixing devices.
What are CNC milling machines?
There are several points during manufacturing that require special consideration:
- The upper guides have a height corresponding to the sum of the thickness for the part under processing and a small gap at which the wedge involved in fixation is installed.
- The forming tenon has a certain length, which is taken into account when determining the vertical thickness of the cutouts in the side elements.
- When such devices are used, the work is carried out with the participation of hand-held milling cutters of any modern model.
- Fixtures are made in the following way if dovetail connections are required.
- A hole is created inside a sheet of plywood with several layers. The cutting part at the cutter itself protrudes from this part.
- A plywood sheet is prepared in advance, on the bottom of which the manual router itself is fixed. Clamps and screws are perfect for doing the job, as are other types of fastenings.
- The board, 2.5 centimeters thick, is attached to a plywood sheet, which subsequently participates in the movement of the prepared part. The function of the guides is taken over by the design. Boards are consumables with one-time use.
Creating tenons on bars and boards
Processing is performed using the following sequence of actions:
- The part to be processed is mounted on a plane from the bottom side.
- The edge of the part where the tenon is formed accommodates the cutouts at the guides at the top. The structure moves inward until it hits the end.
- A movable type element must be fixed while maintaining a certain position.
- We use a wedge tool to connect the guides and the plane located at the top to each other.
- Connection of a hand router with the upper guides.
- Using a router tool on a home router table, wood is removed from one side.
- When the first side of the workpiece is processed, begin the second.
The operation will be successful only with high performance and accuracy parameters. Setup refers to the required steps before the instruments are turned on. To resolve the issue, actions are performed in the following sequence:
- The milling tool is lowered until it reaches the surface of the base.
- Measuring the thickness of a part.
- The thickness result is divided by 4. The result is the distance parameter that is maintained when lifting the cutter above the base.
Wood cutter "Dovetail"
For mortises and tenons under similar circumstances: only half the normal width. This is explained by the characteristics that compounds of this type have.
The main thing is to set up the device correctly and fix it in a suitable position.
The tongue-and-groove joint should end up with some clearance. It is necessary so that later you can conveniently use the adhesive composition.
How to choose a groove with a router?
The solution to the problem depends on where the grooves are located and what size they are. Here are some recommendations for home craftsmen:
- The use of open grooves involves securing it to the tabletop and guiding the workpiece along the cutter.
- Accuracy is determined by the height of the cutter and the location of the bar.
- It is recommended to use wood waste for trial operations. This allows you to avoid mistakes.
- Sampling is carried out in stages, with several passes being carried out.
The main thing is to get rid of wood waste in a timely manner after completing each stage. Then the instrument will definitely not suffer from overheating. When doing the work, it is easiest to use a template cut out of plywood. They pass through it with the cutter itself, with the bearing installed.
Conclusion
It is best to use leftover wooden blocks for training. If the holes and joints line up perfectly, you can move directly to the actual building material.
If there are any errors, it is recommended to double-check whether the preliminary markings are applied correctly. After this, repeated training is carried out. Only when everything is correct does the actual implementation of the main work begin.
Source: https://VseOChpu.ru/kak-sdelat-ship-paz-ruchnym-frezerom/
Creating tenons on bars and boards
Processing is performed using the following sequence of actions:
- The part to be processed is mounted on a plane from the bottom side.
- The edge of the part where the tenon is formed accommodates the cutouts at the guides at the top. The structure moves inward until it hits the end.
- A movable type element must be fixed while maintaining a certain position.
- We use a wedge tool to connect the guides and the plane located at the top to each other.
- Connection of a hand router with the upper guides.
- Using a router tool on a home router table, wood is removed from one side.
- When the first side of the workpiece is processed, begin the second.
The operation will be successful only with high performance and accuracy parameters. Setup refers to the required steps before the instruments are turned on. To resolve the issue, actions are performed in the following sequence:
- The milling tool is lowered until it reaches the surface of the base.
- Measuring the thickness of a part.
- The thickness result is divided by 4. The result is the distance parameter that is maintained when lifting the cutter above the base.
Board with a groove: varieties, making a groove with a circular saw, drill and hacksaw
All photos from the article
The type of connection based on the insertion of a tenon into a groove appeared in Europe almost simultaneously with floorboards and lining. The finishing material is simple and easy to install and has a lot of advantages. True, the cost is more expensive than ordinary boards and strips, but the joints are much neater, and the service life is much longer.
The groove connection increases the strength of the coating.
Using a hacksaw on wood
Making a transverse groove with a hacksaw.
Well-done markings will help a lot here.
Select a hacksaw blade that is smooth and durable:
- To avoid mistakes, draw two lines along the length of the board, on opposite sides. The distance from the top plane to them will be the depth.
- Securely secure the block and begin sawing.
- It is important to monitor, checking the lines, how far the canvas fits into the wood.
- If the tool is skewed, you can ruin everything, so periodically watch the hacksaw’s entry into the material from the side angles.
- With a wide groove and a thin blade, it is more effective to make two cuts, again along the inner sides of the cut.
- All excess is carefully removed with a chisel and cleaned.
Conclusion
For small volumes of finishing work, and especially for household DIY projects, it is not necessary to buy ready-made, expensive material. All you need to do is take some free time and make the preparations yourself. Moreover, for a thrifty owner this will not be difficult.
Source: https://rubankom.com/materialy/pilomaterialy/doski/1459-doska-s-pazom
Wood cutter "Dovetail"
For mortises and tenons under similar circumstances: only half the normal width. This is explained by the characteristics that compounds of this type have.
The main thing is to set up the device correctly and fix it in a suitable position.
The tongue-and-groove joint should end up with some clearance. It is necessary so that later you can conveniently use the adhesive composition.
How to cut a groove in a board?
The type of connection based on the insertion of a tenon into a groove appeared in Europe almost simultaneously with floorboards and lining. The finishing material is simple and easy to install and has a lot of advantages. True, the cost is more expensive than ordinary boards and strips, but the joints are much neater, and the service life is much longer.
Types of groove boards
Symmetrical groove
Many users have no idea how to choose a groove in a board, believing that the store will offer them only one option for connection and material.
How to choose a groove with a router?
The solution to the problem depends on where the grooves are located and what size they are. Here are some recommendations for home craftsmen:
- The use of open grooves involves securing it to the tabletop and guiding the workpiece along the cutter.
- Accuracy is determined by the height of the cutter and the location of the bar.
- It is recommended to use wood waste for trial operations. This allows you to avoid mistakes.
- Sampling is carried out in stages, with several passes being carried out.
The main thing is to get rid of wood waste in a timely manner after completing each stage. Then the instrument will definitely not suffer from overheating. When doing the work, it is easiest to use a template cut out of plywood. They pass through it with the cutter itself, with the bearing installed.
Payment Online.
You can pay an invoice using the details specified in it through your personal account on your bank’s website or through your bank’s mobile application. To pay, go to the website (for example: Sberbank Online .) On the “Payments and Transfers” page, click on the “Organization Transfer” link (note: in the bank’s mobile application this menu item is called “Payment by details”). Fill in the details of the payment recipient (see previous paragraph). Attention:
- The “Account number” field corresponds to the current account;
- In the “Recipient’s Bank” block, select from the directory the name of the bank in which the recipient’s account is opened. To use the directory, click on the “Select from directory” link. In the window that opens, check the box next to the desired bank and click on the “Select” button. As a result, the “BIC” field will be filled in automatically.
- In the “Purpose of payment” field (if required), enter the order number. It is assigned after successful ordering. Check the entered data and confirm the operation with a one-time password. After this, the payment will be sent to Sberbank for processing. The payment is credited to the recipient's account no later than the next business day after the payment is made.
- When filling out the Full Name field - you must enter your Last Name, First Name and Patronymic
- In the address field - you enter your address.
How to combine several of your orders into one?
Open the desired order. In the order control panel, click the “add to cart” button. Then click the “archive” button or the “cancel order” button - so that there is no confusion. That. you can transfer the contents of all your orders to the basket, and then opening the last order, add the entire contents of the basket to it, as described in the previous paragraph. If, in the process of combining several orders into one, you need to add something from the site catalog itself, then you can also add the necessary products to the cart or remove unnecessary items from the cart and then transfer the contents of the cart to the desired order. IMPORTANT!!! This operation is available for orders with the “preliminary” category. If the order category is different, then this operation is not available!
How to buy several products with one order?
Find the product you need. Click on the Add to Cart . Please indicate the quantity. After this, the product will appear in your cart. Similarly, place all the necessary items in the cart. Then click on the trash icon in the top right corner. After this, you will find yourself on the page with the selected products. If you don’t need to change anything, then click the buy , fill in your contact information and click the Send at the bottom of the window. If you need to remove something from your cart, click on the cross at the beginning of the line with the desired product.