One of the main stages of building a house with your own hands from timber or rounded logs is raising - erecting a log house. Before you begin practice (construction), you must know how to connect timber, otherwise the consequences can be disastrous.
The need for connection arises in two circumstances:
- When cutting a corner of a house
- When lengthening a beam or log - when the length is not enough (sometimes, for example, someone cut it to length).
Depending on what is needed, different methods are used, so I will try to clearly show the main methods of connecting timber and rounded logs.
Why do you need the correct joining of timber and logs?
Correct joining of timber and log materials during the construction of a wooden building is necessary to ensure the overall reliability of the structure. The use of special connection rules allows you to improve the load-bearing capacity of the house at the corners, as well as increase the overall rigidity of the structure. For each type of lumber, the method of joining elements is selected individually. Also, correct docking may be necessary in cases where the standard dimensions of materials are not sufficient for the construction of a specific structure. To increase the length of logs or beams, it is necessary to lay them correctly, which will ensure good rigidity and reliability of the connection.
Making an extension to an existing house
Now let's consider the option of adding a house extension. In my opinion, this strategy for increasing housing is the least troublesome of all those considered and even allows for a combination of work and living in the house. If your site allows, then a foundation or foundations for new premises are made next to the old house. It is better not to connect the foundations, to make adjacent old and new walls independent, using either sliding connecting nodes, or to combine rooms through small galleries. The roofs of the old house and its new parts must also be made independent. If these conditions are met, small mutual seasonal movements of old and new premises will not only not cause inconvenience, but will generally be unnoticeable.
Methods for joining logs
A log is round lumber from which further construction of a log house is possible. Logs have a long service life, so they are used for the construction of various types of buildings. The technology of construction from these materials is the oldest and most practical. The connection of elements can occur using two main methods: with and without extension. When using the 1st method, part of the laid log will protrude onto the extreme plane of the wall, which gives the building an overall unique aesthetic appearance and a certain style. In the case of using the second technology, lumber is laid in such a way that in the end perfectly even corners are obtained. The advantage of laying with an overhang is that this design is more stable and protected from external factors.
The main methods of laying solid logs:
- In a bowl or cloud.
- In a huff.
- Into the Siberian bowl or into the hole.
- In the paw.
These methods are the most reliable and popular, therefore they are actively used for laying logs with an outward protrusion. However, this installation option requires much more lumber.
Method of joining logs No. 1: “In a bowl or in a bowl”
This method of joining lumber is the oldest, time-tested and reliable option for the construction of residential and technical buildings.
The technology has three main subtypes:
1. In half a tree - the easiest way to connect a corner. In addition to the main cut bowl, it is necessary to plan an additional longitudinal groove for installing subsequent logs. To seal the fastening, any material for caulking the finished log house is placed between the logs.
Joining logs: a simple bowl - half a tree
2. Oval ridge - this option is similar to the “half-wood” installation, but differs in the location of the cutout for the main longitudinal groove. With this installation method, fastening cutouts are made from the bottom, which ensures maximum tightness of the seam.
Connection of logs: simple bowl - oval ridge
3. The fat tail is a modernization of the “oval comb”. This connection option involves cutting additional protrusions inside the cutout, which will ensure the best joining of the logs at the corners.
Connecting logs: a simple bowl - into a fat tail
The installation method is quite simple and does not require the use of additional materials. A special round groove is cut in the upper part of the logs, which is shaped like a bowl (previously the cutout was called “oblo”). Each subsequent log is fixed in the finished groove. In this way, several walls can be built at once.
Finished buildings built using this method of laying logs:
Log house built using the simplest bowl method
Log house built using the simplest bowl method
The main advantage of laying “in a bowl” is that logs of any quality and grade can be used to construct a building. This method is used both for the rapid construction of residential buildings and for the construction of technical premises. Each option is universal and popular in use.
Method of joining logs No. 2: “In the okhryap”
The method of joining logs is “in the okhryap”
The method of joining logs “in the okhryap” is quite reliable, provided that the general technology for laying the log house is followed. The main advantage of this option is the high stability of corner joints. Due to the grooves that are cut out on the logs, the building has good stability and tightness of the seams. During cutting, the lower grooves are equipped with small notches and teeth.
Joining logs using the “in-hole” method is considered a middle option between the main connection of lumber with an outward protrusion and without a protrusion. When constructing buildings using this installation option, virtually no additional processing of intermediate joints is required.
Method of joining logs No. 3: “Into the okhlop or Siberian bowl”
The “hollow” or “Siberian bowl” type connection is a universal technology that is very similar to the “half-tree” device method. This option does not require special knowledge and skills and is quite simple to set up. Before laying, each log undergoes processing, in particular, special bowls are cut out in the lower part. In the manufactured bowls, specialists plan an additional deep longitudinal groove.
Joining logs “into a clap” or “Siberian bowl”
This groove will be used to secure the top log. The main feature and difference between laying lumber “in the lap” is that the location of the bowl cut can change in the crown, depending on the needs of the structure. Most often, the bowl is cut out at the bottom of the log.
The finished structure is characterized by high tightness of seams, as well as strength and load-bearing capacity of the corners.
Method of joining logs No. 4: “In the paw”
This connection option does not provide for excessive projections of logs beyond the general plane of the wall. An angle constructed in this way will have strict outlines and a geometric shape. The installation technology is generally similar to the method of installing logs “in the okhryap”, but has some design differences.
There are two subtypes of joining round logs without protrusions:
- Paw with a cut.
- Dovetail.
Connecting logs “into a paw”
The angular type of installation of round logs is the most complex and is a rather complex system of grooves and channels that provide the most reliable fixation of all the crowns of the base to each other.
Before the installation procedure, each log is trimmed in certain planes, in particular, the surface is trimmed at the joints and at the ends. Using a special tool, grooves for fastening are formed at the ends of the log. Due to these grooves, large logs are reliably connected to each other.
In turn, the dovetail fastening option is quite simple in manufacturing technology, but requires certain installation skills. Each log is mounted taking into account the inclination of the tenons, which should ensure wedging of the joints. This installation option increases the overall stability of the building.
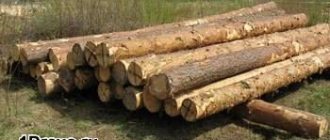
From trunk to log
Of the three varieties of wood - construction, lumber and timber - the first, growing on sandy soils and reaching a height of more than 24 m, belongs to the “extra” class materials and is optimal for the construction of houses. Sawlog, due to its knotty and conical nature (significant difference in the diameters of the butt and top), is considered not the best option for house building. The same is true for the podtovarnik, which grows up to 15–18 m and has a small taper, but due to its small diameter (11–20 cm) is not able to provide the walls with sufficient thermal protection.
After cutting, the tree is debarked - the bark is removed from it. Since this is usually done without the use of mechanized tools, the wood fibers are ultimately preserved intact, but in some places traces of the subbark (or bast)—the lower layer of bark adjacent to the trunk—remain on the log. As it dries, it darkens, giving the surface a natural “spotty” appearance. True, this decorative effect has a downside - the bast can become a source of rotting. That is why it is advisable not only to debark the log, but also to plan it with an electric planer, completely removing the underbark.
According to their shape, logs for log houses are divided into round timber, carriage (hewn on both sides - into two edges) and semi-carriage (hewn only on the inside - into one edge).
The latter are preferable when finishing interior walls with clapboard or panels, since this consumes less usable space. Please note: cutting a log by one edge increases the cost of a log house by 35–50%.
Making openings in a freshly built log house inevitably leads to skewing of the walls, so cutting them and installing window and door structures should only be done after the initial settlement of the log house
Methods for connecting timber
Timber is lumber made from natural wood of square or rectangular shape with a diagonal cross-section of at least 100 millimeters. Less than 100mm. - this is a block.
Due to the processed ends and sides, it is considered the most versatile and widely used material in construction. Virtually any building can be built from timber, and the installation technology is quite simple and reliable. The main advantage of this lumber in the construction industry is its ease of installation and machining.
There are 4 main connection methods:
- Connection with residues.
- Connection without residue.
- T-shaped.
- Longitudinal.
Like logs, timber can be secured with or without projections. At the same time, depending on the specific design of the building, only one technology for connecting materials is selected.
Method of connecting timber No. 1: “With the remainder”
The technology of connecting wooden beams “with the rest” can only be used for installation options “in the area”.
“In the area” - the beams are installed with the remainder of the material outside the general plane of the wall.
In total, there are three main systems for installing timber “in the oblo”:
- One-way connection type.
- Double-sided.
- Quadruple.
Single-sided is considered the simplest and easiest to install. To do this, a transverse groove is cut out on top of the timber using a special tool, the total width of which is equal to the width of the lumber. Installation and fastening of each subsequent row is carried out thanks to these grooves.
One-sided timber connection
Two-way is a more practical connection. When arranging timber using this technology, grooves are cut on both sides. The depth and nominal width of the groove are selected depending on the height and width of the material itself, however, the minimum value should not be less than 1:4 of the height of the beam. Two grooves provide greater reliability of the entire structure.
Double-sided timber connection
Quadrilateral is the most complex but effective way to connect timber. In this case, special grooves are cut out from all 4 sides of the beam. Sawing takes quite a long time, but thanks to this processing it is possible to ensure maximum tightness of the lumber to each other. Due to the high density of construction of the corners, the building is the most durable and structurally resistant to various influences.
Four-way timber connection
Timber installation method No. 2: “Without remainder”
Joining wooden beams using the “residue-free” method is used quite rarely in general construction, since the reliability of this method is somewhat lower than joining “in a flash”. The technology is successfully used in the construction of low-rise residential and technical buildings.
There are three main subtypes of installation of timber “without residue”:
- Butt.
- On the dowels.
- On the root spines.
Each method is used individually, but the most reliable of the three types is the butt connection method.
End-to-end installation of beams
The installation of butt beams is reliable and has been successfully used in the construction of residential civil, low-rise buildings and other technical structures.
Butt joint of timber
Reliability is due to the fact that lumber is laid at its ends and securely knocked down with special metal staples, knitting needles or large nails. The overall load-bearing capacity of such a structure will depend on the evenness of the ends, so when using this method it is necessary to cut the ends strictly at an angle. As a rule, regardless of the evenness of the timber, this installation option will necessarily require additional processing of the connecting seams to increase the tightness of the walls.
Installation of timber “on dowels”
Connecting timber with special dowels is the preferred option for the construction of small technical and residential buildings. When using this method, special slots and holes are cut out on the beams, into which a key of a certain size is subsequently inserted. The beams are laid end to end and connected with dowels. The size of the slot should take into account the deepening of the lumber by 8-15 centimeters, depending on the size of the timber. The dowel is made from hardwood, most commonly oak or maple.
Connecting timber with dowels
It is worth noting that connections using wooden dowels can be made not only horizontally, but also vertically and at a certain angle. When arranging walls, it is recommended to combine all possible options.
Installation of timber “on the main tenons”
Installing wooden beams “on the main tenons” is a popular method of connecting corners and walls, which is used in the field of industrial and civil construction. This option is widely used due to the high stability of the connections. For installation, a beam of a certain cross-section with no deformation along the planes is selected. Special tenons are cut at the ends of the timber, which are designed to connect two lumber.
Connecting timber “to the main tenons”
When cutting tenons, it should be taken into account that the surface being processed should be as flat as possible relative to the other end of the beam with which the connection is planned. Docking is carried out with the ends facing each other, and sealing material is laid between the tenons. Burlap, jute or any other suitable material can be used as a sealing material.
Beam connection method No. 3: “T-shaped”
“T-shaped” connection is often used in cases where the construction of internal or external partitions is required. Making a T-shaped end takes less time than cutting special grooves in logs.
There are 4 types of T-shaped connections:
- With locking slots.
Connecting timber with key grooves - With a symmetrical tenon in the form of a trapezoid inside the beam.
Connecting timber with a symmetrical tenon in the form of a trapezoid - With rectangular insert tenon.
Connecting timber with a rectangular push-in tenon - With directional grooves on the main tenons.
Connecting timber with root tenons and directional grooves
Each method is selected individually, taking into account all the design features and type of building. Insert tenons must be made from a type of wood that is an order of magnitude stiffer than the wood from which the timber is made.
Timber installation method No. 4: “Longitudinal connection”
Unlike a corner connection, a longitudinal connection is most often used in the construction of dimensional walls, when the standard length of the material is not enough and it is necessary to “grow” it to the design size. The most reliable and effective way to increase the length of a beam is considered to be its serial connection using grooves.
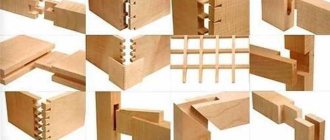
There are 4 types of longitudinal connection:
- Half-wood - used for connecting timber during the construction of non-residential buildings for technical purposes. The beams are fastened with grooves cut out, which are subsequently fastened with steel nails at an angle of 45 degrees.
- With a main tenon - considered the most reliable way to secure two materials horizontally. To do this, one end of the beam is cut out with a special groove, and a special tenon is formed on the second. Two finished parts are connected to form a solid beam.
- With a longitudinal tenon on a key - ensures reliable connection of the timber along its entire length. The technology is completely similar to the corner installation of lumber. The two ends are cut into a groove for a special tenon.
- With an oblique lock - the most reliable and complex connection, which requires processing of two parts of the timber. Special tenons and hooks are cut on one part of the timber, and grooves for fastening them on the second. The parts connected in this way form a strong lock.
Types of longitudinal connections of timber
When making dowels that are used for connections, it is necessary to use hard wood (most often oak, maple or ash). Additionally, sealing materials are used to ensure reliable fastenings. Compliance with all technologies is a guarantee of long-term trouble-free operation of the building.
WHAT AFFECTS SHRINKAGE?
Fortunately, shrinkage is not a completely random process - it can be completely controlled. In particular, we can identify the main factors influencing the rate and duration of shrinkage:
- Type of wood (the denser the material, the less shrinkage, but the longer its effects can take effect).
- Origin of wood (wood from harsh mountain regions is considered the best).
- Cutting time (summer or winter).
- Duration of lumber production (the longer the process lasts, the more the lumber dries out during processing).
- The magnitude of the load on the wooden element - the higher the load, the faster the shrinkage will occur (however, there is a risk of the formation of zones with increased stress and cracks).
- The presence of proper ventilation (if it is absent, moisture in the wood can lead to the development of rotting).
- Time of creation of the log house (a log house erected in winter will lose moisture more slowly; accordingly, shrinkage will be less pronounced, but longer).
How to connect beads lengthwise
The easiest way is half a tree. Its configuration and shape are similar to those made when connecting a corner. But the disadvantage of this splicing method is that when longitudinal forces arise, which can occur during drying or movement of the soil, such a connection is easily broken. A continuous gap is formed.
Long beam connection
The oblique rim lock has the same disadvantage: it is easy to disengage. If you need reliable joining of timber, use a straight rim lock. As you can see, due to the protrusion, pressed by the crowns located on top and the weight of the roof, it will resist the forces of longitudinal tension (and compression too). It is more difficult to implement, but much more reliable.
Required Tools
Few tools were required to build a log bathhouse:
- chain saw (it would take a very long time to cut with a hacksaw);
- drill with a wood drill with a diameter of 12 mm;
- hammer;
- axe;
- hand plane (the volumes are small, and carrying a wire behind an electric plane would be inconvenient);
- slick;
- stapler and staples for it 12 mm high;
- roulette;
- marking pencil.
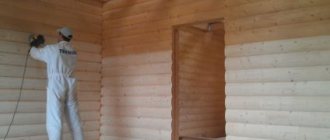
Since the weather was not always conducive to the successful progress of the work, we also had to stock up on covering material so that the fresh impregnation would not be washed off from the wood.
Half swallowtail
With this connection, the tenon is sawed down into a cone. The characteristics of the half dovetail connection do not differ from the knot described earlier. But the strength indicator increases. The conical cut securely holds the beams and prevents them from moving apart. This connection is used in the construction of walls with a length greater than the length of the beam.
There is no difference in the complexity of manufacturing when joining a half dovetail and a straight tenon. Both methods are performed with or without a template. For an experienced professional, the difference in the labor intensity of making these joints is almost imperceptible.
The half dovetail tenon should not be more than 5cm at its widest point. Otherwise, a crack will appear in the timber with the groove. This happens due to uneven shrinkage. The picture shows this place.