Installation of windows in a frame house – the task is complex and confusing. I would like to immediately note that I am only considering the option with plastic windows, since only 1% of people install wooden ones and I haven’t even tried to figure it out. So, if we talk about PVC windows, I found at least 20 reports on window installation on the forum and each time there was something new, and each one assured that his method of installing windows was the most correct. I had to re-read these reports, GOST for installation, and also think a lot and collect information. After which I still ordered installation of windows by installers (because my windows are all thick and very heavy and installing them alone is very time-consuming and ineffective). But by that time I already had the necessary information and could argue with the installers and push through the necessary solutions during the installation process.
Soon I’ll be installing windows myself, so first of all I’m doing it for myself, but I think it will also save you a month or two of research if you’re planning to install windows in a frame house with your own hands , and even if installers install them for you. Otherwise, most installers do not know GOST, especially for frame houses.
Installing windows in a frame house: Practice
First I’ll tell you how this happens in practice, and then I’ll develop a big and tedious theory.
So. We have a window, for example, a standard 1.4 by 1.3 meters. The installers unglaze it: the opening sashes are easily removed from their hinges, the glazing beads are removed from the blind sashes, and then the double-glazed windows are removed (in this case, there is no need to lose the straightening plates from the blind glass unit, they will then need to be put back and this is the most difficult thing, as it seemed to me, I and understood the pattern of their installation).
Now the window is turned over, the stand profile and the Psul , after which the stand profile is quickly put back on (until the psul expands). Moreover, the capsule is placed so that it is not just inside the stand, but is pinched between its chambers and does not allow air to pass there. The stand profile is snapped into place (with some difficulty and often with a hammer), and then screwed with two short screws to the window profile.
By the way, I just started finishing the windows and cursed everything. The window sills fit into the stand profile very poorly, you have to heat them with a hairdryer.
a vapor barrier film is glued to the inside of the window (it is two-layer, the second part does not come off, it will then stick to the vapor barrier of the house). It’s better to glue the vapor barrier in a single contour, but my installers did it according to GOST - in strips overlapping each other , and didn’t glue it from the bottom at all (the window sill will tear, they said - and indeed, I have a stand with a hole for snapping the window sill, it’s not clear how to glue it there film).
Now, in the profile from the inside, using a 6.5 mm drill (and Torx screws with a diameter of 7 mm and a length of 92 and 132 mm), holes are drilled in the required places (150-180 mm from the edges and from the imposts). For a standard window 1.4 by 1.3 meters, there were 3 holes on the sides and top.
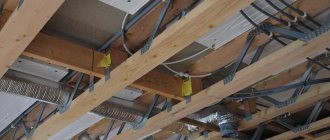
Then the window is placed in the opening (in a pre-selected place - in my case, the window was placed as far inside as possible - along the edge of the opening, in the insulation area, but in front of the internal insulated block).
The installers look at the gaps from below and above and remove half of the gap with plastic lining wedges (there was a gap of about 2.5 cm at the bottom and also 2.5 cm at the top). By the way, I insisted that the wedges be placed not across the opening, but along them , so that later they could be foamed (since the guest requires not to tear the foam seam).
After that, wedges are also placed on one side and they begin to screw self-tapping screws into the side holes, constantly checking the level in two planes. The self-tapping screws did not enter the tree at once; they either deepened them or twisted them back, like when a car is pushed out of a hole - with a rocking motion.
The installers did not fasten the windows from below and I did not argue, since I saw somewhere (I think in Rehau) that it is undesirable to fasten them from below. Although the Guest Guide says that it needs to be secured.
After installing the window, a waterproofing tape , but it is glued to the profile from the outside, and not from the inside (at least, my Robiband could only be secured this way). And the second part of the tape is glued to Tyvek waterproofing tape , which was already installed on my outside walls.
What I didn’t like about this was that I would have to cover an extra 1.5 centimeters of the window with the outer slope to cover the gray film, which means the window might not look very aesthetically pleasing (we’ll see).
After that, we open the windows and check how they work, and then, if everything is ok (and in a couple of cases a hexagon adjustment was still needed), the installers foam the seams. Also, in some places I didn’t like that the foam squeezed out the outer film and now it will be difficult to install an external slope there (the finishing strip of siding will not fit), I will think about how to deal with this.
Spoiler: I’m coping poorly. There will be a separate post on window treatments coming soon.
Everything else is ok, the windows work and I'm happy. For installation and foaming with films according to GOST, I paid 800 rubles per sq.m. That is, IMHO this is a normal price for installing a plastic window in a frame. I would like to note that the films, capsules, fasteners and other consumables (except foam) are mine . I paid another 5,000 rubles for them. Slopes, window sills, etc. I will do the finishing myself, this is not included in the costs at all yet.
IMPORTANT (update from 2022): even when you have the vapor barrier of the walls ready, do not connect it with the window films in advance - do this right before installing the slopes - you will save a lot of time. I’m in a lot of pain right now and am cutting out the film in places to install the slopes
Here is a photo after installing this standard window:
Finishing after installation
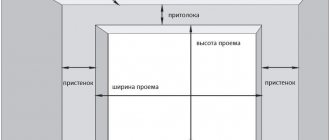
We install the ebb (the width can be chosen tightly or with a protrusion of 1–3 cm according to the preference of the home owner):
- We measure the opening between the trims, take a value 1 cm less so that the part fits in easily and presses.
- We mark 1.5-2 cm on the sides of the ebb for bending.
- Using metal scissors, we make cuts along the marks on both sides, but only on the curved edges; we cut off these pieces altogether.
- Using a corner, draw an oblique line along the remaining protrusion (45° angle), starting from the end of the cut. We do this only on one side, the one that will be adjacent to the house. We bend the protrusion with pliers, clamping it in two blocks of wood. We do the same on the other end.
- We place the ebb on the window, you can screw it to the profile with short self-tapping screws with a press washer (3-4 pieces are enough) or insert it into the lower groove, which is provided specifically for this part.
- It is advisable to treat the gap between the wall (bottom of the opening) on which the ebb is placed, and it with Stiz sealant, and also foam it, in the way we will describe later for the window sill (with fixing blocks).
Slopes:
- The interior is paneled and plastered.
- External ones can be decorated with platbands and overlays, which will also create a pseudo-quarter.
How to install a window sill:
- We screw two blocks to the side walls from below so that they hold its top exactly at the level of the cutout in the window profile, that is, so that it does not fall behind or go higher.
- We insert it from below. There will be a small gap along the entire plane, since the installation seam cannot be accurately calculated to fit the window sill.
- We press the window sill to the blocks with clamps, and where they cannot be installed, we screw it in with self-tapping screws - one on each side is enough, you only need to hook the very top, that is, screw it in shallowly.
- Next, we place a board along the entire length that will keep it from rising when the foam expands, and secure it to the wall with screws. We put a second one on it, a little shorter, so that it fits between the blocks. We fasten it with self-tapping screws to the first board. We foam the bottom and install a decorative trim like a plinth.
It is advisable to treat all joints, especially where there is foam, as well as the plane on which the ebb is installed, near the window sill (this is especially important here) with Stiz sealant for external and internal work (there are compounds marked A, B, D depending on the purpose) . It is also advisable to apply this substance to surfaces before foaming, which will increase adhesion.
Assembly seam
One of the most important points is the design of the assembly seam. This is the space between the window profile and our frame studs.
Typically, the installation seam includes three layers: The central layer provides thermal insulation and sound insulation. Usually this is polyurethane foam. Outer layer - protects the central assembly seam from moisture from the outside, as well as the foam from exposure to the sun. Combined with the external contour of the hydro-wind protection (usually a vapor-permeable membrane) Inner layer - protects the central assembly seam from steam from the inside, and is also combined with the internal contour of the house's vapor barrier to protect wooden structures and insulation from steam.
General diagram of the assembly seam organization in the picture:
1 — central layer (foam); 2 — outer layer (Psul and/ilite waterproof film); 3 — inner layer (vapor barrier film); 4 — additional layer of sealing (waterproof film); 5 - low tide; 6 - window sill. The picture also shows installation on plates.
After installing the window, the central layer must be filled with foam for thermal insulation and covered with films from the sun and moisture outside and from steam inside, then covered with ebb and window sill.
And this is a picture from Gost of the top and side mounting unit at the same time:
Dimensions of the installation gap for foam for different types of windows:
Here we must also not forget the fact that a stand profile is added to the bottom of the window, so if your opening is for example 1400×1300 , then the size of the window in it will be: 1315-1320 (30 stand, 25-30 mm gap at the bottom, since the tide you need to set a slope for draining water and a 25 mm gap at the top) in height by 1240 mm in width (30 mm on 2 sides).
What length and thickness should the window frame be?
The thickness of the frame should be such that condensation is located directly between the glass panes. In other words, the inner glass should not be fogged up, otherwise cleaning it or drying it will be problematic, almost impossible.
The frame size is selected based on the average temperatures of the coldest months of the year. That is, the length should be within 180-220 mm.
If the size is exceeded, be sure to take care of thermal insulation or install additional glass, which, for example, is successfully practiced in the northern territories.
If the length of your frame exceeds 220 mm, but you planned to install a thin double-glazed window, do not rush into installation. In this case, it is more practical to purchase ordinary glass. Despite the fact that this option will cost a little more, it still has a significant advantage: the absence of condensation in inappropriate places. If you have a fundamental preference for thin double-glazed windows, you can install two double-glazed windows in one opening, the result will be the same. But again, it all comes down to money.
Do not forget that the window opening must also be consistent with the thickness of the external wall. The slope inside should not be less than 170 mm, outside - no less than 100 mm.
Bottom of the opening
Separately, it is necessary to say about the bottom of the opening. If the windows are installed on plates, then they are attached through a stand profile to the frame using a self-tapping screw with a press washer and a drill about 50 mm in size.
But from GOST :
In addition to this Feng Shui standard, you essentially need to install
an elastic EPDM tape , bent on the vertical of the opening for the hydrofilm by 150 mm.
Wrong device - what to do?
Improper installation can lead to errors. This is due to the incompetence of the specialist, violation of technical rules for laying window elements that do not meet standards and do not have certifications, and were initially poorly assembled.
and the step-by-step process of installation work, breakage of fasteners and fittings, as well as the use of low-quality materials or work under unfavorable conditions are also important
Improper installation of windows also includes the formation of large linings for double-glazed windows (remote), much larger than the supporting ones, which leads to disruption of the functionality of the entire structure, geometric deformation and sagging of the sashes.
The matching of the fittings strips, the joining of elements and moving pins are also important so that the tightness of the sealing gaskets is not disturbed and the moving parts do not break.
During installation, you need to correctly select and fasten PVC amplifiers; they must be present. If they are not there, this will lead to deflection of the window block beam. If there is a discrepancy in dimensions, for example, the length and width of wood profiles, then the technology of joints along the edges of the tongue-and-groove, as well as glued elements, will be disrupted.
Also, you cannot deviate the vertical beam from the vertical by making a bend . Because of this, there will be obvious problems with closing and operating the windows, their loose fit, and as a result, hardware will periodically break down.
If a horizontal beam with a bend is deviated, there will be a problem with the accumulation of precipitation (rain, snow) in the drainage system of the structure, which will lead to its flow into the room. Incorrect installation can occur if the technology of using polyurethane foam is broken, the opening is not prepared, or debris is not collected, which will prevent good adhesion and tight fit of the surfaces of the block and the wall.
It is advisable to involve specialists in working with window openings and correcting defects, who will perform installation or remove errors in a short time, providing guarantees.
Installation location of window opening
Windows should be installed in a frame house in the area of insulation. If there is a ventilation gap or external insulation, they are often installed flush with the sheathing. If there is no external insulation, then the window is usually recessed by 1/3 of the width of the insulation. But in which direction is up to you, but the deeper the better (since it’s warmer there).
I “recessed” the window 2/3 into the insulation ( when viewed from the outside) and placed it along the inner edge of the stud, i.e. after it there will be another 5 centimeters of the block and internal insulation (cross block with insulation). And outside there will be a slope of siding (near-window strip) of 15 cm (post 8 (15-7) +2.5 sheathing +2.5 ventilation gap +2 the strip itself).
The main thing is not to place windows in a place where there is no insulation on the side of it (ventilation gap), then the window may fog up, cry, in general, you will not like it.
Selection of systems
Wooden systems vary in quality of workmanship. Their cost depends on this parameter.
Ordinary wooden windows are sold without double glazing. In this case, the glass is separately mounted in the grooves, after which glazing beads are nailed on top. Most often, finished wooden windows are sold not only without glass, but also without painting and without seals. The frame can be single or double. There are also wooden structures with installed double-glazed windows. Such systems cost several times more. As a rule, they are made of oak or larch.
Plastic windows can differ in the quality of the profile, as well as the design of the double-glazed window itself, the width of the air gap, the quality of the profile joints and seals made, and the quality of the fittings.
You can safely install both wooden and plastic structures. Several options are available:
- unpainted wooden windows with two frames (similar ones used to be installed in most five-story buildings), no glazing beads or glass;
- painted wooden windows with two separate frames and standard vents, with glass, seals and handles;
- plastic windows with different numbers of double-glazed windows, seals, handles and other accessories.
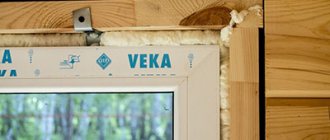
Stand profile.
It is now customary for almost all manufacturers of window profiles to install a stand profile under the window profile. It is needed in order to prevent damage to windows during transportation, as well as for the standard installation of ebb and window sill . Before installing a window with a stand , it is recommended to remove it and put insulation inside (PSUL or isolon sausage) and quickly screw it back. Sometimes it is simply foamed (as I understand it, depending on the design).
To be honest, during finishing I realized that the thing was not very convenient. Or maybe I just don’t have enough experience yet.
How to make a window block
You can make a window unit yourself, but making high-quality and complex frames with your own hands will not be easy. This requires professional carpentry tools and woodworking skills.
Wanting to save money, home owners create simple designs and buy ready-made double-glazed windows. But this option is suitable for a country house or veranda.
To assemble wooden windows with your own hands, you need to prepare a hacksaw, chisel, square, drill and hammer. To ensure a tight fit of the elements, grooves are created. The profile is assembled from bars, which, after joining, are fastened with wood glue and screws.
For reliability, corner connections are reinforced with metal plates. But you will have to buy ready-made accessories for homemade frames.
After manufacturing, the glass of the required size is cut out and inserted into the frame, secured with a glazing bead. You can also buy ready-made double-glazed windows.
If ready-made windows are purchased, in wooden and panel houses they are secured with anchor plates made of metal. If the product needs to be fixed in the opening, a casing box is made. It is necessary to protect the structure from distortion during shrinkage of the building.
The casing is made from 100x100 mm timber so that the side parts have a vertical groove. This helps protect against stress when shrinkage occurs.
Tools and consumables
Hammer with a silicone striker Dull chisel (for deglazing) Drill and drill bit 6 (for the dowel, drilling into the profile) and 12 mm (countersinking the profile for installing a furniture lid over the dowel) Screwdriver and Torx bit Foam gun Level Laser level (optional) Square ( optional) Straightening plates (inside the profile) Films (hydro, steam and PSUL) Plates or Torx concrete screws Special supporting plastic pads (under the stand, as well as to the left and right of the profile) Polyurethane foam
How to blow out a crack with foam
Polyurethane foam is blown into the holes using a mounting gun. If you do not have such a device, you will have to buy or rent one from the nearest hardware store. The holes are filled with foam in two or three layers, and the main thing is that from the inside to the outside, but not vice versa. This is explained by the fact that with this blowing method, the pressure from the foam growing during the hardening process will be distributed equally along the entire perimeter of the installation, and the frame will remain intact and unharmed.
Rice. 4. An example of how to properly blow in cracks with foam
Process
A very convenient way to align a window evenly in an opening from one of the forum members: Somewhere there are photos of another stage of preparing the opening, I’ll have to explain it in words. We measure the width of the assembly seam on all 4 sides. We nail plastic wedges from the bottom and some side (for example, from the left). The ones with teeth. Then we place them there and nail the pairs for these wedges. It is convenient to set the required distance equal to the width of the installation gap using a level (one pair of wedges along the square, the rest by applying a level). Then, when the bottom and side are ready and have even vertical and horizontal planes, we insert the window and move it towards the installed wedges. Thus, we have two of the four sides ready. All that remains is to wedge the opposite side and top
Options for fastening structures
The general principles for installing conventional windows and euro windows, when preparing surfaces and assembling, are completely the same. The differences concern only some nuances. following options are used :
- using mechanical fasteners (screws, nails, rivets, metal plates, bolts, anchors);
- with nodal stops (notches, tenons, dowels);
- on an adhesive joint (grades of glue with non-toxicity ratings 1, 2 3).
The connection of nodes for structures occurs by splicing according:
- length;
- width;
- verticals.
For standard windows, with a completely finished opening (insulated, with steam and waterproofing, plastered), the following steps are performed:
- A box is made from boards (4 pcs.), with a cross-section of 15 x 5 (cm), which is then inserted into the opening.
- L-shaped grooves are made, with a depth of 1.5 (cm). The resulting parts are connected with wood glue.
- Holes are drilled in the required elements of the window structure at a depth of 3 (cm). The pins are fastened at right angles, and the inserts for them are well coated with carpentry adhesive.
- Preparing places for fittings. Then the frames are inserted, followed by the glass into the grooves. The frames are fastened with squares after the glass is placed and secured with prepared wooden structural elements (6 x 4 cm bars).
- Then they put on the fittings and check the operation of the window structure.
All other installation work consists of further sealing the seams. To do this, the joints are foamed with mounting balloon sealant, the excess parts of which, after hardening, are removed with a carpenter's knife.
Euro-windows are manufactured with ready-made double-glazed windows, according to the specified dimensions of the drawing, so their installation is quick and without any particular difficulties.
In order to install or replace windows, perform the following steps :
- the opening with the finished frame is inserted through the end-to-end method;
- fix and compact it, observing the geometric line;
- existing irregularities are removed, and double-glazed windows are secured with self-tapping screws;
- then the joints are sealed.
When installing any type of window system, the block is of great importance. The larger it is, the thicker the finished lumber is taken for it.
Fasteners
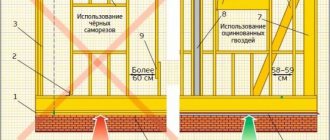
In a frame house, two types of fasteners - either self-tapping screws/dowels for concrete, or anchor plates . The first method is more correct and stronger . But it takes longer and is more dangerous if you do it yourself (you can break a double-glazed window or warp it if you do not place the straightening plates under it correctly). Installing windows on plates is a faster and technologically advanced method, but large windows on plates may not stand firmly and wobble a little when opened (in fact, this is about windows larger than 1400 by 1300).
Concrete screw MRS (or other self-tapping screws)
The diameter of the screw for concrete is 7.2 mm , the head is usually Torx (you must have the appropriate bit). For it, you first need to drill 6-6.5mm drill. The length of the screw for side mounting is usually 92 mm, for bottom mounting - 132 mm (but check your mounting clearances). Do not overtighten the dowels, otherwise you will twist the frame.
The better the screws : They hold tightly The frame will not be able to move along the window Installation is more difficult and longer Recommended for windows larger than 1.4 by 1.3 meters.
Plates.
Anchor plates are made from galvanized sheet steel with a thickness of at least 1.5 mm by stamping (but this is according to GOST, but in fact 1.2 mm still needs to be looked for, and 1.5 mm is generally unrealistic). The plates are attached to the window blocks before they are installed in the openings using construction screws with a diameter of at least 5 mm and a length of at least 40 mm.
The plate snaps into the end of the frame and is attached to it for reliability with one 25 mm self-tapping screw with a drill and a press washer. The plate itself is screwed to the opening using black screws 4.8x90 or 4.8x110.
Pros and cons of the plates: Installation is a little easier Doesn’t hold as tightly as screws Demanding on the finishing of internal slopes (you understand, the plates need to be covered) Not recommended for large windows (larger than standard 1.4 by 1.3)
Installation of a wooden window in wood
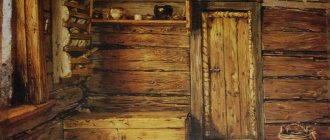
Wooden houses always look aesthetically attractive and create a feeling of comfort with their appearance. The whole secret is that modern type windows (plastic) are rarely installed in wooden houses, since they do not harmonize well with the naturalness of wood. In such buildings, wooden windows are the most common and widespread phenomenon.
The peculiarity of installing a wooden window into a wall built from the same material is the use of liquid nails. To give the frame strength and immobility, through fixation with ordinary nails or self-tapping screws is sometimes used as additional fastener.
If the house settles, you must first level the shape of the opening and eliminate all defects on its surface. Leveling is carried out using the same liquid nails, or ordinary wooden blocks.
Rice. 5. Wooden window: installation according to all the rules
Fastener placement intervals
Regardless of the type of fastener, the distance from the inner corner of the box to the fastening element should not exceed 150-180 mm (but it is impossible to fasten it closer than 150 mm to the corner of the box), and the distance from the mullion connection unit to the fastening element is 120-180 mm.
The distances between fastening elements should not exceed those indicated in Table D.1:
The amount of fasteners on fixed windows is slightly different
Safety precautions
In order not to cause harm to health during work, you need to follow several rules.
- Installation of wooden windows requires the use of a suitable set of clothing. It should not restrict movement and have hanging elements. Gloves are also important, as they will protect horses from minor injuries. When dismantling old products or cleaning the opening, you should use safety glasses.
- When working, it is necessary to hold the working tool correctly, avoiding accidents. When it can do harm. For example, it is a mistake to hold metal fasteners near a working drill, as it can jump off onto your fingers.
- Only two people can lift the frames. This will protect against back injuries and help preserve the structure.
- If the window frame is installed at a height, you cannot fully stand on the window sill without a safety net. In this case, all actions must be carried out from inside the premises.
- To protect your respiratory system from dust, it is important to use masks. Ventilating the room and removing construction debris that remains after preparing the openings helps prevent dust.
- There should be no draft in the room.
If you underestimate these rules, you can get serious injuries.
Window unglazing
In any case, during installation you will need to glaze the profile. There is no problem with opening sashes - everything is removed from the hinges, but fixed windows are more difficult to unglaze.
First you need to place the window horizontally . Now you need a blunt chisel or something similar, you need to carefully insert the chisel in the center into the gap between the glazing beads and the glass unit. We beat it with a mallet and turn the chisel to the side, after which the glazing bead comes out. At the factory, the glazing bead is deliberately not fully latched to make it easier for installers to remove it.
The glass unit in the frame is placed with two sets of straightening plates - spacers - one between the lower part of the frame and the packet closer to the reference corner - the one near which the hinge (when the window is installed, the plate will be lying in the horizon), the other diagonally but vertically between the packet and the outer part frames closer to the top corner without a hinge. The glass unit is very sharp at the edges, it cuts your hands unnoticed, work with gloves!
Now you need to install the window and then glaze it . Before closing the glazing beads back, re-center the glass unit with straightening pads. Drive the short beads first, then the long ones. Start from the ends. Stock up on some other hard, thin material; there may not be enough of what you have. Note: this point is from the words of a pro, but it’s better not to rush to do it yourself, consult other pros
Theoretical basis
It is useful to know how the above nuances of installing window units are justified from a theoretical point of view.
Connecting the frame to the opening
The first important point in filling window openings is the connection of the window frame to the opening. If this unit is performed correctly, a structure consisting of three layers is formed.
- Inner layer
Serves to protect the installation seam from moisture coming from the room. Combines with the internal vapor barrier circuit of the building to protect the frame and thermal insulation from steam.
- Central layer
Serves for thermal insulation and sound insulation (as a rule, it is polyurethane foam).
- Outer layer
Protects the mounting seam from external moisture and the mounting foam from solar exposure. Connects to the outer contour of the hydro-wind protection (most often it is a vapor-permeable membrane).
Mounting clearances
The gaps at the top rail and sides of the frame should be approximately 20mm. This distance is necessary in order to level the window unit and for the convenience of filling the seam with polyurethane foam.
As for the lower part of the window block, to which the stand profile is attached, you need to keep in mind that the profile has a height sufficient to install the window sill and give the necessary slope to the external ebb.
Installation location
An important point in installing a window in a frame house is its location relative to the inside and outside of the opening. The entire supporting structure of the frame structure is made of timber about 150 mm wide. After sheathing, approximately another 50 mm is added to this value: plasterboard from the inside of the wall and OSB board from the outside.
The question arises: how to install the block in relation to the internal and external planes of the wall?
Typically, the window unit is installed in the area of the insulation. In the event that a ventilated gap or external insulation is planned, the window is often mounted flush with the casing. If there are no additional layers on the outside, then the block is recessed by a third of the thickness of the insulation layer.
The main thing is not to install windows in places where there is no insulation, otherwise condensation will form on the window. In addition, you need to keep in mind that a window installed too far from the outer plane of the wall will leave a significant part of the supporting beam exposed, which will ultimately lead to its freezing.
Useful: How to calculate dew point
Stander
Attaching the stand profile to the bottom crossbar of the frame forms a leak-proof connection to the window. At the same time, well-foamed installation gaps in the area of the junction of the frame and the stand will allow air and moisture to pass through.
To eliminate this drawback, the stand profile is temporarily removed and PSUL (self-expanding tape) is glued to the window profile.
Fasteners
Fastening window blocks in openings is carried out in two ways:
Using anchor dowels
Provides a more reliable fastening, but at the same time through holes are drilled in the profile for installing dowels, which negatively affects the heat-shielding properties of the frame. For example, to attach a frame with a total area of more than 2 square meters. m., you will need at least 6 such holes - one at the bottom and top in the crossbars, two at the sides and next to the impost.
It is important to note that the correct installation of the anchor must be done in such a way that its head passes through the plastic from the inside and is fixed to a metal frame located inside the profile. The resulting hole after installation is closed with a special plug.
Using metal mortgages
Installing plastic windows using plates is faster and easier, but large windows on such a mount may not hold tightly and dangle when opened.
The essence of this fastening is that the anchor plates snap into grooves on the outside of the frame and are fixed using short self-tapping screws. There are no traces of fastenings left on the inside of the frame.
This mounting option becomes the only possible in two cases:
- when installing the window flush with the siding of the house.
- when in the slopes, in places directly adjacent to the frame, there is no solid base for installing anchors.
There should be more fastening elements on the sides, in places where the sashes open, than on the blind side. The minimum number of plates is two for each side post.
Fastener placement intervals
Regardless of the fastening method, the distance from the fastening element to the inner corner of the box should be 15-18 cm, and from the impost to the fastening element - 12-18 cm.
Removing double glazed windows
Opening sashes are simply removed from their hinges; with blind doors things are different. In this case, for subsequent installation of the window unit, it is necessary to glaze the profile.
- The window is laid horizontally on the floor.
- A blunt chisel is carefully inserted in the center into the small gap between the glass unit and the glazing bead, hammered with a mallet and turned, as a result of which the glazing bead bounces off.
- The glass unit in the frame is secured with straightening plates (one closer to the supporting corner, where the hinge is, the other diagonally closer to the upper corner without the hinge.
It is better to work with double-glazed windows while wearing gloves, as they have sharp edges. It would be better if these were rubberized gloves so that the glass unit would not slip out of your hands.
After installing the window, it is glazed again. Before putting the glazing beads in place, the position of the glass unit is centered using straightening pads. Next, short beads are put in place, and then long ones.
Support pads
The stand profile rests on the window sill with the help of support pads, which can be made of plastic or antiseptic-treated wood.
For a three-leaf window, four support points are sufficient - two under the vertical imposts and two at the edges; for a double-leaf window - three.
The wedges should not interrupt the contour formed by the polyurethane foam and should not extend beyond it. That is, after foaming they should not be visible, otherwise there will be cold bridges. The bottom pads remain in place, the side pads can be removed and the installation areas can be filled with foam.
Polyurethane foam
When installing windows in a frame house, foam is of no small importance, since it provides sound insulation to the room, retains heat and fills the space between the frame and the opening. Therefore, it is so important to know the differences between household and professional foam.
Professional foam:
- has a denser structure than household;
- applied using a special gun;
- does not exert noticeable pressure upon expansion on adjacent structures;
- there is 2-3 times more of it in the cylinder than household foam;
- if the cylinder has not been completely used, it can be stored and used for some time.
Excess polyurethane foam that extends beyond the seam is almost impossible to remove without leaving a trace from the surface of the frame profile. And in the case when the profile is covered with a laminated film, it will not be possible to remove the foam at all.
In some cases, polyurethane foam can be used for gluing surfaces. The properties of the foam, which ensure gluing of the opening wall and the window frame together, play a role in strengthening the fastening of the window in the opening, but only when the installer did not forget about moistening the assembly seam.
Quarter
In stone houses, a quarter is installed during the masonry process; it creates reliable protection for the installation seam and serves as the basis for external slopes.
In a frame building, a quarter can be formed using frame cladding, or a false quarter can be created using various materials (EPS, wooden blocks, boards).
The width of the quarter should be 40-50 mm (25 mm is required to cover the seam and another 15-25 mm to stop the window in the quarter).
In addition, the quarter must be arranged in such a way that the hygroscopic materials used in its formation can dry freely after getting wet.
Low tide installation
Even when installing the frame, the necessary tolerance must be provided for the installation of a low tide slope, ensuring unhindered drainage of water.
Don’t forget to glue a sound-absorbing pad to the surface of the ebb on the inside.
Window sill device
An important point in installing a window sill is filling the space under the window sill with foam. If it is not enough and empty areas appear under the windowsill, this will lead to drafts and freezing. If there is too much foam, it can bend the window sill under its pressure. The likelihood of this is even greater when non-professional foam is used.
mosquito net
Fastenings for the mosquito net are installed using self-tapping screws 8-10 mm long. It is better to do this from below and from the sides - this way the mesh will sag less in the middle.
Support pads
To support the stand profile on the window sill, you need to use support pads. They can be either made of plastic (it is recommended to use special ones) or made of hardwood impregnated with an antiseptic.
A three-leaf window should have four support points. Two at the edges and two under the vertical imposts of the frame, and in the double-leaf - three. The wedges should not interrupt the foam contour everywhere and should stand along the window, or be trimmed after installing the window so that they do not extend beyond the foam contour. That is, you should not see them after foaming for several hours (otherwise it will be a cold bridge). The bottom ones should remain, but the side ones can be removed after installation and the holes can be foamed after them.
Possible difficulties and errors
Let's list common mistakes:
- The use of non-special vapor-permeable film (external, external). Using polyethylene and the like instead is a gross mistake.
- Failure to comply with the rules for installing insulation (the tapes are glued carelessly, are not smoothed, and the ends are not overlapped).
- Non-foaming of the support profile inside, if one is used.
- Poor quality foaming. This procedure must be done slowly, carefully, so that there are no voids or cavities.
- PSUL tape is applied long before installing the window and pressing it to the quarter. This material expands over time, so it must be fixed immediately before inserting the glass unit into the opening.
- Incorrect depth selection and fastener spacing.
- Checking the level of evenness of the position of the window block is ignored. This must be done often several times at each stage of work.
Attention! If wedges are used, then a good solution would be to take even ones so that they can be placed not across, but along the opening - this way the foam seam will be unbreakable, as required by GOST.
The bottom of the opening is insulated especially carefully:
Quarter
What is a quarter for? In stone houses it is usually present initially, it helps to protect the installation seam and serves as the basis for external slopes or putty.
In a frame house, you can make a quarter using frame cladding or make a false quarter from different materials: EPS (penoplex, etc.), wooden block/pieces of board/board, isoplaat. The width of the quarter should be 4-5 cm, since 2.5 cm is needed to close the seam and a couple more centimeters to rest on the window quarter.
The main thing to remember is that everything that can get wet should be able to dry without hindrance. Especially hygroscopic materials in the quarter, such as isoplaate. In the case of wood or MDVP, psul is optional. But if your quarter is made of EPS or other pane-proof material, then you definitely need a psul between the window and the quarter, which will release steam through itself. I decided not to give myself a quarter at all; it’s not necessary, although it’s recommended.
And this is what a quarter of the MVDP
How will a wooden window open?
In order to correctly plan the opening direction, you need to take into account the following features:
- In the case of through fastening of the window opening, the opening direction can be chosen at your own discretion.
- In the case of anchor fasteners, it is advisable to provide for single opening: for example, with swing doors or rotary, folding, etc.
Rice. 2. Types of window opening
Why do you need to strictly adhere to these rules? This is explained by the fact that frames made of natural wood are easily subject to distortion and various types of deformation. If you observe a discrepancy in levels between two corners in your opening, it means that the building has settled unevenly. In this case, the through fastener is unsafe because it very firmly fixes the frame in the wall, therefore, incorrectly designed opening of the sash can simply jam the window and it will be very difficult to correct the situation.
Films
This is a separate conversation
External waterproof film.
If the wall is covered with a membrane (as in the picture), then we bend the membrane inside the opening. Thus, only the corners remain uncovered by the membrane. We cut the membrane into pieces and secure it in the corners with tape and staples.
If there is no membrane on the wall, then we simply attach strips of windproof film according to the Tyvek manual.
At the same time, they should overlap each other and cover each other’s corners, that is, the sides overlap the bottom, the top overlaps the sides.
The next layer of waterproofing film is attached to the window profile itself on one side and on the general contour of the waterproofing film of the house on the other.
There are at least two ways to install this unit . 1. We buy a waterproofing self-adhesive double-sided diffusion film (for example, Robiband NL). In this case, we simply glue it to the window profile and to our film on the wall, inserted into the opening. 2. We buy special double-sided tape (for example, SP1 Juta or Tacoflex). We glue it on one side to the profile, and on the other side we simply glue a piece of ordinary windproof film (cut ourselves). And again we attach this piece to the opening with tape.
Vapor barrier tape
The vapor barrier tape is installed in the same way, but inside and with an allowance for further covering of the foam.
We install ebb tides
For some reason, this stage is ignored by many, but in vain. This action takes little time, is quite simple and guarantees maximum protection of the lower part of the window opening from moisture.
These window sills can be found in retail outlets that sell metal tiles and additional elements. You can purchase the shimmer in the size and color you want. Before attaching it, you should waterproof it using self-adhesive waterproofing tape. After the foam has been cut, a tape should be placed on it, thereby covering the empty space separating the base of the window and the window itself. The most acceptable tape width is ten centimeters. Next, you need to screw the ebb itself onto the window to a special substitution profile using small self-tapping screws.
The final step will be attaching the trim to the windows. This is done so that the place that we have foamed does not deteriorate over time (under the influence of moisture and direct exposure to the sun). In this regard, it is recommended to attach the platbands maximum on the second day after installing the window.
The parameters of the platband are purely subjective. All it has to do is block off the unsightly space. If the window system itself already has a flashing, installing a second one is not required. Professionals recommend treating the inside of the casing with an antiseptic so that this surface, which is not particularly adjacent to the wall, does not come under the influence of fungal infections.
The main advantages and advantages of wooden windows
Only for a short time did wooden windows give up the top line of the hit parade of window designs to plastic products, only to return with a large supply of new advantages, without losing the traditional ones. Windows, as a wood product, differ:
- environmental friendliness and safety for human health;
- high thermal insulation characteristics guaranteed by the low thermal conductivity coefficient of the material;
- vapor permeability;
- high levels of noise insulation;
- beautiful appearance, aesthetics, as well as the ability to easily integrate into the style of any interior or architectural form;
- long service life.
You should also pay attention to the ease of maintenance of the products, and the possibility of carrying out cosmetic repairs to the surface: repairing cracks and scratches.
Advantages and disadvantages
You can install wooden windows yourself, but this is associated with some difficulties:
- an assistant is needed for the work, since it will not be possible to cope alone;
- if you have no work experience, you can get the frame dirty or make mistakes that will lead to its distortion;
- It may take several days to measure, dismantle old ones and install new ones, while professional builders do it in a few hours.
Installing a wooden window yourself means significant money savings. If you carry out the work, paying attention to every detail, you can do everything efficiently and without the involvement of builders.