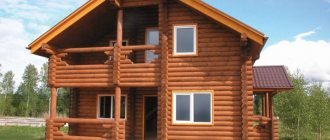
Appearing more than one and a half hundred years ago, screw piles serve as a good foundation in places where traditional structures are not applicable. At first these were industrial and port facilities, but since the mid-20th century they have penetrated into the construction of houses. An important point in laying a pile foundation is the strapping (grillage).
General view of the foundation with a partially installed grillage
What is the harness for?
After installing the piles, they are often tied.
This procedure makes it possible to ensure the most uniform distribution of the entire load that falls on the piles during the operation of the structure. If the strapping is not done, there is a risk of shrinkage of the foundation, which can cause deformation of the supporting structure of the house. In addition, the harness is needed to solve the following problems:
- increasing the stability of the pile foundation;
- effective protection of the pile from soil influence;
- reducing the risk of deformation of screw piles;
- increasing the safety margin of a screw foundation.
Is strapping necessary during construction?
Very often, future owners of private houses wonder whether they need tying screw piles or not. A foundation on piles is a structure of supports buried in the ground. The installation of these supports is carried out very carefully, but even so they will not be able to meet the maximum strength requirements and will not be fully reliable. The floors may well become distorted during the subsequent use of the house, and the strapping will definitely not allow the foundation of the building to lose strength, which will make it very strong, and, therefore, the house will last for many years.
Important: it is necessary to use very strong building materials. The timber will fully allow you to get a fairly strong foundation that can withstand impressive loads.
Types of strapping and which one is better to use
Tying piles under the foundation of a house is necessary to ensure rigidity of the structure and to create a foundation for further installation of the building. At the design stage it is done
detailed calculation of the foundation based on static loads from the building in several options. The most economical and practical option under the given conditions is selected.
When making calculations, they take into account the natural characteristics of the soil at the base of the site and their heaving, freezing depth, groundwater level, and seismicity of the area. The category of the designed building according to classes of responsibility and service life is taken into account
To impart rigidity to the entire structure, maintain the design position, and install the foundation for the installation of building walls, 2 types of strapping are used:
Bottom trim for reinforced concrete piles is not required due to the rigidity of the reinforced structure. The connections at the ends are made from various materials using certain technologies that ensure the stability of the structure and the possibility of further wall installation.
Screw piles are used in the construction of structures of 2-3 categories, light frame houses, wooden ones, with walls made of blocks with a density of D400 - D700. The load-bearing capacity of screw piles allows the construction of lightweight structures with a service life
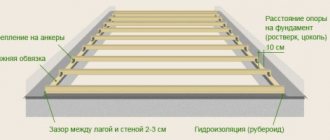
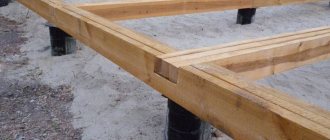
For screw piles with a head protruding above the surface >400 mm, it is necessary to use a lower frame in addition to the top. This makes it possible to increase the rigidity of screw piles and the stability of the entire structure.
An example of a correctly executed lower frame of screw piles with high heads.
Standard pile binding is made from materials such as:
- wooden beam with a section of 150*200 mm, 200*200 mm, 200*250 mm;
- package of 3 boards 50*200 mm;
- channel 140-300 mm;
- corner >50 mm;
- thick-walled profile pipes;
- two channels in a pair or an I-beam;
- hanging reinforced concrete grillage supported on piles.
The tying is carried out after complete installation of the pile field, trimming of the heads at one design level, and pouring with concrete, if provided for by the project. Concreting screw piles increases their rigidity by an order of magnitude.
Features of the harness
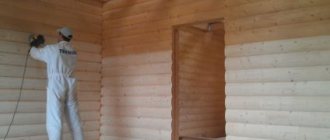
Before you begin tying the pile-screw foundation with timber, the wood should be treated with antiseptic compounds to reliably protect it from the formation of fungi and mold. An additional precaution would be to treat the timber with anti-foaming agents, which reduce the wood's flammability.
While the treated wooden elements dry out, caps are installed at the end sections of the piles - steel structures welded onto the screw shafts. The shape of the head resembles the letter “P”, and the gap between its legs is determined depending on the size of the timber section. It is also recommended to prepare holes for fasteners in advance.
To get a more reliable harness, it should be done in a double row. In this case, cuts will not have to be made, which will have a positive effect on the strength indicator. For the second row, a beam with a smaller cross-section is used (15 by 10 versus 20 by 20 cm). Installation of the second level is carried out on the edge; the connecting areas of the lower row must overlap.
The bottom trim is most often made of coniferous material, which has certain advantages:
- long operational period;
- good strength indicator;
- low moisture content;
- reasonable cost.
When purchasing lumber, check it for cracks so as not to reduce the quality of the assembled structure. In addition, in calculations of demand, an additional ten to fifteen percent of the total volume should be included.
Let's figure out what is better to use for tying on a pile foundation - timber or boards.
Standards approved in the construction industry allow the use of solid timber with a cross-section of 15 by 15, 15 by 20, 20 by 20 cm, or a timber prepared by connecting several boards and having a cross-section of dimensions 5 by 20 cm. A stacked analogue perfectly replaces a solid element, according to certain indicators are even considered more reliable. Three boards combined into one can replace a beam with a section of 15 by 20 cm, and four - 20 by 20 cm.
The timber material, the size of one side of which is 20 cm, is mounted on the pile heads with a smaller edge, and the height of the strapping belt in this case is 200 mm.
Each of the options is popular and considered correct. Note that after studying all the advantages and disadvantages of materials, developers in most cases use boards sewn together.
The solid form of timber is considered a heavy type of building material, and if the number of workers on the site is limited, it will be difficult to transport such elements to installation sites. In addition, solid beams have poor bending resistance, which reduces their practicality. But the boards have to be joined before installation, which entails additional costs.
Features of the pile foundation
These types of foundations are considered popular for the construction of low-rise structures - objects made of timber or frame buildings that are lightweight.
This is explained by some advantages of pile foundations:
- They can be installed in areas with heaving and complex soils. This condition applies to construction sites that have slopes, when the terrain features do not allow the construction of other foundations;
- long operational period. If you fully comply with the technological features of installation work and use high-quality materials, then with proper operation the pile foundation will serve you for at least a hundred years;
- reasonable cost of materials and work;
- ease of installation. Screw piles can be immersed in the ground within a few hours using special equipment. If there are a sufficient number of workers, this process is performed manually.
By laying a screw pile foundation, you completely eliminate the need for excavation work, which takes a lot of time and effort. It is only necessary to accurately determine the depth of immersion of the piles and the distance between them.
To carry out the calculation, the weight of the proposed object, the characteristics of the soil composition, the groundwater level, and the freezing depth are taken into account.
When installing a pile foundation, you will also have to take into account the fact that the structure will not have continuous support, which will create certain difficulties during the construction of interior partitions. But this problem can be solved by tying the piles. If this procedure is performed in accordance with the requirements, the strength indicator of the finished structure will increase.
Load calculation
When installing a pile foundation on screw supports, you have to work with the base for a light load. This scheme is well suited for small sheds, garages and bathhouses made from timber. The weak support will be more than compensated by the significant speed of construction and very low costs. The foundation on screw piles is constructed from supports installed vertically and piping horizontally. There are usually four supports for the entire system, although there may be more.
The piping in this case is represented by a grillage. It is created from a material suitable for creating a beam. It can be either concrete, wood, or metal. Wood is used as the base of the beam, a corner is made from metal, and blocks are made from concrete. The lashing of screw piles connects the beams to each other and to the grillage. The success of the process directly depends on careful compliance with all requirements of the installation and installation instructions.
The pile heads must be on the same horizontal line, which is controlled when the supports are immersed in the ground. The width of the beam should be one and a half times greater than the diameter of the piles. Another mandatory requirement is that the axis in the center of the supports must go only through the center of the beam. Screw pile tying connects supports and beams with a threaded connection, either welded or clamped.
Differences between the grillage and the lower frame of the foundation
The horizontal frame, which connects the support pillars to each other, scans the plan of the first floor of the house and is at the same time a supporting platform for the walls of the house, is called a grillage. It performs two functions at once - it makes the pile field a single support system and creates a platform for the construction of external and internal walls.
Additional diagonal and transverse beams, called the bottom frame, serve to evenly distribute the load and ensure stability of the supports.
This building element is used in the following situations:
- when the foundation is built on a complex rugged terrain, where the piles have different heights above ground level;
- when the structure is raised above the ground by more than 1 meter;
- for massive structures;
- for structures on moving soils.
The introduction of the lower frame increases the rigidity of the bundle of individual piles and at the same time increases the strength of the grillage.
Application of channel and I-beam
On lightly loaded structures, you can build a grillage from a channel. Such structures include, for example, bathhouses and sheds. A grillage made of piles and metal is tied together by welding. The base and structural elements are attached to a circular seam. The assembly procedure involves installing the channel on the pile heads. The element can be strengthened in such a way that the side edges will “look” down. The channel tying of screw piles is also carried out in the opposite direction, in which case the edges are directed upward.
When the channel is positioned along such a system, the resistance to loads on the transverse parts of the structure is much better. The result is formwork, which must be filled with mortar, this is how the wall masonry for the reinforcing belt is formed. To ensure high strength strapping, an I-beam of equal dimensions is used instead of a channel. When channels and beams are joined at the corners, then welding is used. After tying the supports, the grillage is coated with an anti-corrosion agent.
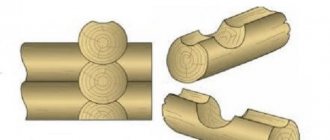
Wooden
A beam with a cross-section of 200:200 mm is used, or a pack of edged boards 50:200. The beams are installed around the perimeter of the house (under the external load-bearing walls), along the lines of the internal load-bearing walls, and also connect the remaining supports in order to equalize the loads and tie all the trunks to the common system .
Corner joints are made into the wood floor, fastening to the ends is done through a double layer of roofing material for waterproofing.
The advantages of this solution are:
- Ease of processing, availability of material.
- The wood has sufficient strength and relatively low weight, which does not load the foundation.
- Installation is possible in the field, without the use of construction equipment or even without power tools.
The disadvantages of wooden types of strapping can be considered:
- Features of wood, tendency to warp or crack, need for high-quality waterproofing, etc.
- Fire hazard of wood.
- Possibility of material damage by insects or rodents.
Despite the obvious disadvantages of wood, a timber grillage is a common and popular option.
Recommendations from experts
Experts advise following a number of rules that will eliminate common mistakes.
Recommendations:
Before installing a wooden structure, you will need to make sure that all pile heads are located at the same height. Otherwise, you will need to make small grooves in the beams.- The fastening element must be located along the longitudinal axis of the beam, since otherwise the safety margin is reduced and the integrity of the log is compromised.
- Before attaching the wooden frame, embedded elements must be installed.
- The beam should be twice the cross-section of the pile. This will increase the reliability and stability of the structure.
- For waterproofing you will need 2-3 layers of roofing felt. This will improve moisture protection.
- Geometry checks are carried out at every stage of installation and fastening of a wooden structure, including after installation and full fastening. All shortcomings fit into the project.
When forming a grillage for massive buildings, in particular residential ones, it is advisable to first check all calculations with specialists. In some cases, creating a foundation will require special skills and experience.
Timber tying
A timber grillage is used when a frame or timber house is planned. In this case, the strapping can be done independently by a couple of people. Do not forget that you should pay attention to the strength of the selected wood. It is better if it is oak, larch or cedar - these are the strongest and most resistant species.
The work is carried out in the following order:
- the timber is mounted on the heads, which are treated with antiseptic impregnations before installation - the wooden parts must be completely dry;
- After installing the piles, steel platforms 4 mm thick with a size of 20x20 cm are welded onto them, holes with a diameter of 8-10 mm are made to fix the beams;
- then the welding seams and caps are coated with nitro paint or anti-corrosion agents;
- Bicrost or roofing material is laid on metal platforms;
- the first crown - a row of timber is laid on them, the ends are placed paw to paw;
- using a measuring tape, the accuracy of the geometry of the structure is checked, after which the beam is fixed to the piles with platforms with screws 150 mm long and 8-10 mm in diameter; additionally, fastening with bolts can be carried out by drilling through the beams.
The height of piles can be measured using a hydraulic level. Only after checking all the parameters can further construction be carried out.
board
If the future house is planned to be framed, or it will be a log house, then tying the pile foundation with a package of boards is used in most options. The following types of trees are used for tying:
- Spruce;
- Cedar;
- Pine;
- Larch.
You should immediately pay attention to the advantages of using boards as a grillage:
- It does not deform or crack, unlike timber. The massive cross-section of the latter often leads to the appearance of cracks during installation;
- The beams are difficult to connect into one long beam;
- The weight of the finished timber is significant and more workers are needed to move, install and adjust its position. The boards are lighter, the beam is assembled directly at the installation site. Therefore, the number of workers does not increase;
- The boards do not require pre-drying;
- A beam assembled from individual boards can support more weight than a beam of the same thickness.
There are two ways to tie a board:
- Half a tree. Each board is coated with glue and connected to another board. Then the finished beam is additionally fastened with screws and nails. If thin boards are used, then additional plywood sheets are laid between them. The finished beam is placed on its edge and secured to the site with screws.
- Herringbone. The piping is preliminarily divided into three contours: middle, outer, inner. Assembly takes place one by one, as does fastening.
Whatever method is chosen, waterproofing must be present to reduce the presence of moisture in the wood.
Wooden beam strapping
Tying screw piles using timber is popular due to the ease of processing, availability and versatility of the material. A grillage of this type also allows you to increase the load-bearing capacity of the foundation and is suitable for wooden and frame houses, cottages, summer buildings and bathhouses.
The main stages of constructing a wooden grillage include:
- coating wood with a special antiseptic composition to increase resistance to external environmental factors;
- applying a bitumen waterproofing layer to give the wooden support water-repellent properties;
- horizontal alignment of blade pipes;
- installation of heads;
- cutting out recesses between logs at the joints to tightly connect the frame;
- installation of the frame along the contour of the structure;
- sealing joints with plaits;
- aligning the frame and carefully checking the corners;
- fixing the heads with self-tapping screws.
For the construction of wooden frames, coniferous trees are most often used - pine, larch, spruce, which have undergone atmospheric drying. It allows you to reduce the risk of wood deformation during its operation.
Preparing timber for installation on piles
Preparing the harness for installation on piles involves treating the wood with antiseptic compounds, as well as cutting pieces of the required length. For antiseptic treatment, bioprotective compounds that can simultaneously perform the functions of a primer are best suited. You can find out the recommendations of developers regarding the use of certain protective compounds here.
Some developers strive to dry the wood to optimal humidity before installing the trim. What should be the moisture content of the timber used for the construction of the frame? Experienced users of FORUMHOUSE believe that if the wood has a marketable appearance, if its humidity is not prohibitive, then it is better to use it for the construction of the frame in the form in which it was purchased. And drying boards or timber at home will do more harm than good.
The timber must be dried in a special chamber, and not behind a barn or under a film. They build the frame immediately after purchasing the wood, and it dries inside the building structure. Everything that had time to sit before construction is then only good for firewood, alas.
This advice is for those who do not want to end up with timber twisted in all possible directions after inept drying.
Metal channel grillage
Channel tying is used in the construction of brick, frame, log and timber buildings. Such a structure is especially stable and reliable. But a profile pipe or a standard I-beam profile with a cross-section of 20 mm can also be used, which provides even greater structural rigidity, especially if heavy construction is planned.
To work with a channel, a U-shaped profile with a cross section of 30-40 mm is used. During such work, the caps are not installed on the piles, and the steel element is simply welded to the support.
The strapping technology includes the following steps:
- after installing the support piles, all pillars must be strictly aligned to the zero mark;
- after measuring the grillage parts, the channel is marked and cut into pieces of the required length;
- all metal elements are treated with anti-corrosion compounds in two layers;
- profiles are mounted on poles and cut at right angles at the joints;
- The grillage is secured by welding, after which the seams are covered with a primer mixture.
In some cases, a professional pipe can be used, which is fixed using a similar method. This material is lightweight and affordable. However, it should be borne in mind that this product is more susceptible to mechanical stress, so the stability of the entire structure will be much lower.
A solid-rolled metal channel is chosen, since it can withstand greater loads than elements made by bending.
Finding out which piping is better - of course, this is installation using an I-beam grillage or channel, but, on the other hand, a lot depends on the type of building.
Reinforced concrete grillage
Reinforced concrete tying of piles is labor-intensive and the most time-consuming. Its installation will take 1-2 months. However, such a frame is cheaper than a metal frame, while at the same time not inferior to it in strength.
Monolithic reinforced concrete reinforcement has the following advantages:
- durability;
- resistance to temperature and humidity changes;
- ability to withstand high load levels.
It is worth considering that due to the characteristics of the concrete solution, it is difficult to carry out construction work at subzero temperatures. Therefore, this tying format is suitable for the warm season.
The construction of a reinforced concrete frame is carried out in several stages:
- screwing bladed pipes into the ground at the same level;
- creating formwork from boards;
- installation of wooden masonry on pile structures;
- creating a double-circuit frame using ropes and wire;
- fastening reinforcement with horizontal jumpers;
- placing the frame in the formwork;
- welding of blade pipes to the frame;
- pouring the formwork with concrete mortar.
After the mixture is poured, you need to wait a few days to strengthen the concrete and remove the formwork.
Reinforced concrete piping of screw piles
Reinforced concrete piping is used in situations where it is necessary to save financial costs on the construction of a building or structure.
This is due to the fact that a reinforced concrete frame is now much cheaper than a similar structure made from metal beams or angles. It should not be forgotten that the process of strengthening piles using a reinforced concrete frame takes much more time. It may take from one to two months. Key steps in creating a reinforced concrete frame to strengthen the foundation of a house:
- first, the bladed pipes are screwed into the ground;
- then a formwork system is created from the boards;
- wooden masonry is installed on pile elements;
- a double-circuit frame is created for additional reinforcement;
- the reinforcement is secured with horizontal jumpers;
- the frame is placed in the prepared formwork;
- the blade pipes are securely welded to the frame;
- The formwork system is filled with concrete mortar.
An important feature of the process is the need to carry out work in the warm season, since at sub-zero temperatures the concrete mixture too quickly loses its useful and unique properties. If you follow this rule, then with such a strapping you will get a strong and reliable reinforcement of the piles, which has several important advantages:
- resistance to temperature and humidity changes;
- ability to withstand heavy loads;
- durability of the entire structure supported on piles.
Bottom frame of piles, strengthening the overall structure of the foundation.
The lower harness is used in the following cases:
- If the foundation is installed in an area with complex, rugged terrain, and the supports will differ significantly in the height of the part protruding above the ground level.
- If the pile foundation according to the project should have a sufficiently high height. That is, for some reason, the structure is planned to be raised above the ground surface by 1000 millimeters or more.
- In the case when a clearly massive structure is being built.
- If the house is being built on unreliable weak soil, in which horizontal movements are not excluded.
In any case, the design of the lower trim must be provided for in the project. It is compiled after calculations have been carried out and the characteristics of the soil on the site have been studied by specialists.
The top frame of screw piles or columnar foundations made of other materials is called a grillage. This is a kind of frame that connects all the foundation piles and evenly distributes the vertical load on them from the erected structure.
Many land owners, when starting to build a house, ask the specialists working on the project the question of whether there is any need to install a grillage on a pile foundation. After all, if you plan to build a frame or cobblestone house, the lower crown beam of the wall can also serve as a frame.
Using reinforced concrete
The creation of reinforced concrete piping is carried out in stages.
Procedure:
- Formwork assembly. Horizontal panels (bottom) are laid on the surface of the heads, the side walls are attached to them and are firmly connected at the top by crossbars. The internal dimensions must correspond to the parameters of the grillage.
- Laying waterproofing. The bottom and inner walls of the formwork are tightly covered with a film or layer of roofing felt. The joints of the material are overlapped by 10 cm and the joint is sealed with tape. The canvas must completely cover the entire surface of the bottom and walls of the formwork and fit tightly to the surface, keeping pace with it.
- Assembly of the reinforcing belt. Reinforcement with a diameter of 10 mm and smooth rods of 6 mm for vertical elements are used. The arm belt is knitted using soft wire, after which it is installed inside the formwork in the desired position. It is necessary to ensure that the horizontal rods are buried 2-5 cm inside the concrete.
- Pouring concrete. It is performed in one step, without long breaks (more than a day). Concrete should be poured from several points so as not to wait for the material to spread throughout the formwork. After pouring, the surface is covered with polyethylene or burlap and left for 28 days to gain structural strength.
- The formwork is removed 10 days after pouring.
- After the end of the exposure time, the surface is waterproofed and proceed to further work.
NOTE! To pour concrete lining, it is necessary to use dense grades of concrete from M200 and higher.
Using clamps
This fixation is used in systems using piles without a flange. In this case, a rectangular platform is welded on top of the pile head, and a grillage beam is placed on it. A U-shaped clamp is laid on top of the beam; its width should be equal to the width of the beam. The edges of the clamp that will hang down are connected by welding or a threaded connection to a vertical support. In the corners of the beam, the connection is made using a metal angle.
Corner
Using a metal corner is considered the most economical way to create a harness. At the same time, if all the work is done correctly, then the reliability of the resulting structure will not be inferior to the channel. There are two important conditions that affect quality:
- How is the corner attached to the pile?
- What is the distance from the ground to the bottom of the harness?
There are several rules used for tying with a corner:
- It is necessary to constantly monitor the distance between the ground and the bottom of the structure. The height should be maintained at least 10-15 centimeters. Failure to comply with this condition can lead to damage to the harness fasteners. In winter, under the influence of low temperatures, soil heaving occurs, which negatively affects installed structures;
- Correct fastening of the angle to the pile. The profile is placed between the axes, under the heads;
- If the foundation is located above one meter, then a diagonal brace will be needed.
The corner that will be used to tie the pile foundation must be equal-flanged, the width of one side is 50 millimeters. The metal itself is at least 5 millimeters thick. The resulting material is reliable.
However, when using a corner, experience is needed; if this is not available, then problems arise with the diagonal brace. It is unknown how much material needs to be cut to make the corners even. There are two options here:
- Measure several times, only then trim. This way you can determine what profile size is needed.
- A rectangular plate is taken (it can be cut from a corner), welded to the pile, maintaining the direction along the axis. Then, a corner is welded to the already installed plate.
Stages of correct tying of screw piles with your own hands
The procedure includes several mandatory steps. Each of them has its own nuances. Construction work must be carried out in accordance with the established procedure. This will eliminate possible errors and omissions.
Working with Heads
All pile heads need to be cleaned and also equipped with a 25x25 cm square plate. This will increase the strength of the base. The plates must be prepared in advance. Holes are drilled in them, with the help of which the timber is secured to the head.
Fastening and connection
During installation, the elements must be laid out around the perimeter according to the design. This will make the process easier and will also allow you to comply with the established dimensions. The beams join each other at an angle of 90 degrees, that is, all angles must be right.
During installation work, installation at the intersection of elements begins with joints, which can be half-body or “claw-to-foot.” The latter option is more popular due to reliability.
All ends of the logs must be trimmed evenly so that the joint is tight. The joints are also treated with an adhesive composition, which improves strength.
Fastening to the head is carried out using self-tapping screws. A frequent case will be the use of hexagonal hardware, which is subsequently tightened with a wrench. Take into account that the timber inside the grillage itself has a “half-length” insert, and the element itself must fit very tightly.
Additional fasteners
To increase the reliability of the connection, special staples with a diametrical cross-section of 0.8 cm are used. They fix the joints. Before additional fixation, it will be necessary to make markings, as well as form primary holes and channels.
Checking the horizontal level
After installing the structure, check the level. Horizontal deviations between two opposite sides should not be more than 0.5 cm.
An important point will be full compliance of the dimensions with the design data, since deviations will affect the further construction process.
Additionally, all angles are re-checked, as well as the perpendicularity of the joints.
Types of strapping
If we consider the location of the strapping belt relative to the soil surface, the following types of strapping are distinguished:
- recessed - immersed in the ground so that the upper surface is at the same level with the ground;
- elevated – placed on the soil surface;
- high - raised above the surface by fifteen centimeters or more.
The latter option is recommended for use in areas with heaving soil compositions. The buried type is used little and only on low-heaving soils.
Based on the materials used, strappings are divided into four groups:
- channel;
- I-beam;
- reinforced concrete monolith strip;
- lumber.
Metal strapping is more durable, but it is difficult to install. Reinforced concrete grillages are not inferior to their metal counterparts in terms of reliability; they can be built with their own hands, but they require a lot of labor. It should be added that they will increase construction time, because the concrete will need time to reach its final strength.
When building a private house from light building materials, it is recommended to use wooden beams as a frame - a durable, inexpensive and easy-to-install material.
Preparation for work and selection of rolled metal
The technological process of strapping is associated with the arrangement of the pile site. The algorithm for preparatory installation work includes:
- Conducting a site survey, marking pile points for drilling.
- Installation of screw columns and leveling the height.
- Pouring concrete mortar into the cavity of screw piles.
To create a single structure after installing the pile elements, there is no need for standing. The columns are not subject to shrinkage, so you can start tying without delay.
For a foundation protruding a meter or more above the ground surface, it is necessary to install an additional grillage or control stiffening rods at a height of 30–50 cm.
A good result is achieved by using black-rolled metal. Hot-rolled strips or I-beams are used for strapping.
For walls with a thickness of 250 mm, you should choose a profile 24P - 30P; for supports with a cross-section of 108 mm, rolled metal 14P is used.
The metal has significant weight. The weight of the prefabricated structure depends on the length of the channel and its weight. Sometimes it is advisable to use lifting construction equipment for installation, which can be difficult in small areas.
Before tying, it is necessary to level the surfaces of the supports. This is the main condition for installing the channel on screw piles.
Method of bundling with a profiled pipe
A profiled pipe has a structure similar to a channel, but in terms of strength it is much inferior to it.
This is due to the less durable metal used to make the profile pipe, thinner walls and other features of the material. To achieve maximum strength, corner joints are made overlapping or overlaying.
As an option, the ends are trimmed at 45°, welded, followed by strengthening the joint with an oblique angle for bolted joints.
Procedure:
- Trimming piles, installing caps.
- Laying beams along the outer perimeter, connecting corners.
- Laying internal beams, welding with external elements.
- Tying the remaining supports to obtain maximum rigidity.
- Applying a layer of protective anti-corrosion coating.
IMPORTANT! If possible, all connections are reinforced with metal gussets installed on bolted connections.
Thermal and waterproofing when closing the base
All types of basement finishing require the installation of a heat- and waterproofing layer, which is covered with asbestos-cement slabs, decorative thermal panels mounted on a sheathing of boards or a slate slab, or bricks. All these materials have their pros and cons:
- Asbestos-cement boards do not look very attractive and are characterized by increased fragility, but they are inexpensive.
Asbestos cement slabs - Decorative panels, cement-sand or clinker tiles are resistant to atmospheric influences, and some types of them can even easily withstand high humidity. However, to lay them, a perfectly smooth and even surface is required, so the base around the perimeter will have to be covered with sheet material, for example, asbestos cement.
Clinker tiles - It is advisable to use brick laying or pouring concrete only when the height of the above-ground part of the base is at least 30-40 cm, which allows you to equip a real basement floor.
Decoration of the base with decorative bricks.
Tying and closing screw piles is a very important stage in the construction of a house, which determines how soon it will need major repairs.
How to tie a wooden house to the foundation before
When building houses in ancient times, when wood was the main building material, our ancestors used wood to construct the foundation. Today this option seems very strange, but many centuries ago this technology was considered correct. How was this accomplished? A clay-sand cushion was laid directly on the ground, and the lower crown of the frame was installed on it. As a rule, the first crown was made of oak. It was well lubricated with tar or resin. We can say that this crown acted as the frame and foundation of the entire structure. The sand provided protection from rain, and the clay protected the crown from the effects of groundwater. Since then, a lot has changed and the technology for laying and fastening timber to the foundation has become different.
When constructing any buildings made of timber, foundations of pile or strip type are very often installed. We will look at attaching the log frame to both of these options.
Work technology
The operating algorithm is as follows:
- Prepare the reinforcement - cut the rods into pieces of the required length using a grinder.
- Smooth rods are bent, giving them the desired shape.
- Place two corrugated fittings parallel to each other on the working surface.
- The prepared squares are placed on the longitudinal rods and fixed by welding or tied with wire.
- Turn the structure over and fix the two remaining longitudinal reinforcements.
- The metal frame is coated with a hydrophobic composition.
The finished reinforced frame is installed inside the well and filled with concrete mortar. The rods for connecting to the grillage should protrude above the concrete surface.
Making a reinforcement cage for bored piles - in the video:
All the most important and useful information about the pile-screw foundation is presented in this section.