Wood carving is a rather complex process that requires not only correct methodological preparation, but also appropriate tools. The result of the work of a particular master depends on its quality, technical characteristics and functionality. Therefore, it is so important to choose the right tools for wood carving; read how to do this in this article.
Basic tools
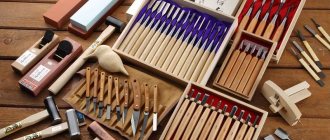
The basic toolkit includes several devices, among which experts primarily highlight knives, wood carving cutters, jamb knives, etc.
Knives
These instruments can have a classic appearance or an unusual shape. Each carver independently determines for himself which knife will be easiest for him to perform a particular job.
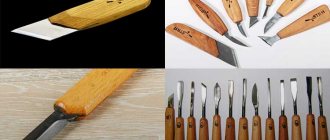
Flag knives have become widespread. They look like a small triangle stuck into the handle. This tool is considered universal. This is due to the fact that all areas of the blade are used for work. These wood cutters are used by almost all craftsmen to perform handmade work.
Blunt knives
These tools are distinguished by several features, such as:
- cutting edge angle;
- blade width.
Depending on the type of sharpening, jamb knives can be either single-chamfered or double-chamfered. Any woodcarver should have several of these tools, differing from each other primarily in width.
Geometric thread cutters
These tools allow you to create not only flat, but also very three-dimensional sculptures. They have a blade on one side only. Using these cutters you can perform the following types of work:
- contour;
- triangular-notched;
- nail (staples).
In many cases, a geometric carving knife is an indispensable tool when creating sculptural compositions.
Bogorodsky knife, “Tatyanka”
This tool is intended for performing power wood carving. With its help you can quite easily create small sculptures with a lot of details.
As a rule, the Bogorodsk Tatyanka knife is used to cut out figures of people or animals. In most cases it is used when working with soft wood.
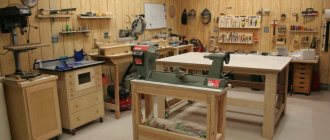
Work safety
- Durable and stable work table.
- Use of fasteners and clamps.
- Sufficient natural and artificial lighting.
- Use gloves, glasses, and a respirator when working with tools.
- It is forbidden to cut towards yourself.
- It is forbidden to clutter the desktop.
- Clean the workplace only with special brushes.
- The tool must be laid out and secured.
- The power tool must be in good working order and tested.
- If the power tool is connected to a three-phase network, it is necessary to equip it with grounding.
Sawdust and shavings should not come into contact with heating devices and heated surfaces. Heating oil or nitro coatings is allowed only on closed heat sources. The work area must be equipped with a complete first aid kit.
Chisels for wood carving
There are several different types of chisels designed for wood carving. Among them it is worth highlighting the following:
- Flat chisels for wood carving . They are one of the simplest tools. On one side, they have a sharp edge, which allows you to cut off the top layer of wood when striking the handle.
- Semicircular chisels . Professionals use them very often, selecting exactly the tool that is best used in a particular situation, depending on the type of wood and the complexity of the work. There are round, medium and sloping chisels of this type. They can be purchased as a whole set or individually.
- V-shaped chisels. They are used by craftsmen during wood carving only in cases where the use of flat tools is not as convenient and justified as possible. Typically, V-shaped chisels have an angular or triangular shape. Among them, it is worth highlighting such tools as straw cutters, spoon cutters, as well as chisels and knives.
For work, it is enough to purchase just one set of wood carving chisels. This will be enough to complete most types of sculptures.
You might be interested in reading: Types of wood carving . Artistic wood carving has developed over centuries. The article discusses types of wood carving - from traditional to the most modern.
Knives
You will need a good knife - one that is comfortable to work with. There are three types of knives - with a folding blade (pocket knife), with a fixed blade and knives with a replaceable blade. I prefer to use fixed blade knives because they are the safest. Knives also vary in blade shape and steel type.
I recommend a high-carbon steel blade with a hardness of 55 to 60 RC—it will stay sharp longer than a stainless or low-carbon steel blade. For finishing and creating shapes, I use a blade 4 mm thick and 3.8 to 5.1 cm long. A knife with a narrower and shorter blade is better for detail work. Some carvers prefer knives with replaceable blades because instead of sharpening the knife, you simply need to change the blade. Another advantage is this. that the handle of such a knife can be used with small chisels.
Special devices
Additionally, some special devices are used for wood carving, among which, first of all, it is necessary to highlight the following:
- Mallets. It is a famous carpentry tool made of hardwood. Recently, mallets have appeared that are made of rubber. This tool is used in cases where it is necessary to work with a chisel across the fibers of the workpiece. Also, a mallet may be necessary in cases where the volume of wood carving is quite significant. With its help, you can significantly facilitate the work and make the load on the master less significant. In most cases, the mallet has a round or semicircular box. This allows you to hit the chisel at almost any angle. The size of this tool can vary - from 75 to 150 millimeters in diameter. For most types of work, craftsmen select medium mallets.
- Tesla. They are carpenter's axes that have an unusual appearance. This is due to the fact that the blades in these tools are perpendicular to the ax handle. Thus, adzes are very similar to small peculiar hoes. In some cases, their blades have a convex or even semicircular shape. As a rule, adzes are used to hollow out various shapes from wood. In addition, with their help you can quite easily make grooves in workpieces. By purchasing one such hatchet cutter for spectacular wood carving, you can significantly speed up your work.
- Mints. They are a variety of metal rods that differ from each other in diameter, length, sharpening and some other important nuances. These instruments have notches on one side. As a rule, they are characterized by clearly defined geometric shapes. In most cases, embossing is used to finish the background if there is a sufficiently rough surface.
Thus, the above special tools for wood carving are also used when it is necessary to create sculptures or any other devices.
Strengthening devices
If you are holding a workpiece in a vise, select a tool that will not leave marks on the workpiece (or insert some material between the workpiece and the vise). I often use a 6mm capercaillie and a wing nut to secure the workpiece to the workbench. If you are a beginner, you can wear a steel wire glove to protect your hand.
I have an old friend, also a carver, who wears a heavy leather apron when working toward the chest. When finishing or dyeing a product, you can use an awl or a paint stick.
SUPPORT
In order for the workpiece to hold better when you cut wood with a snake saw, I advise you to use a support - an ordinary board that supports the wood during sawing. Simply attach it to a workbench or table and hold the saw vertically in the V-section as you cut the workpiece.
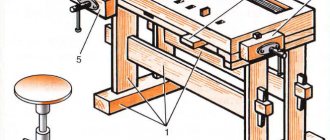
BENCH VICE
If you are planning to do relief carving, I suggest you also make a simple bench vise. One clamp holds the vise at the bottom in a stationary position, while the angle formed by the other two at the top prevents your workpiece or workpiece from slipping out of your hands while you work. Place a bench vise on your work surface.
Electrical tools
Wood carving kits most often contain only those tools that are intended for manual labor. In turn, in some cases electrical devices may be needed, among which the following are most often used:
- Drill. This tool is intended for drilling holes in workpieces. Its motor transmits rotational movements to the drill, which is shaped accordingly. By sharpening its edges in a certain way, a notch is gradually drilled into the wood. Each subsequent rotational movement leads to the drill moving deeper.
- Jigsaw. This hand tool is designed for sawing wood and other lumber by performing corresponding reciprocating movements with its saw blade. Using a jigsaw, you can cut a workpiece, cut a certain shape into it, or cut off the necessary part from it.
In addition to the above-mentioned electric tools, other devices can be used for wood carving. The choice of devices to perform the work is carried out by each master separately.
Types of thread
There are many techniques for processing wood, with the help of which craftsmen create real works of art from it.
As such, a strict classification has not yet been created, but conditionally all techniques can be divided into several types.
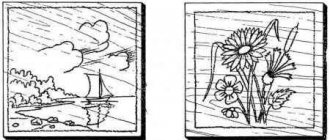
Flat socket carving: a flat wooden surface acts as a background. The pattern is formed using notches of various shapes.
Flat grooved threads are:
- Geometric has a pattern in the form of a bizarre combination of various geometric shapes.
- Contour forms a pattern in the form of a rigidly drawn outline, as if pressed into the surface.
Flat-relief carving highlights a convex pattern on a background deepened with the help of a tool.
Flat relief carving can be:
- Oval - the pattern on it is located in the shape of an oval, often filling the entire space of the canvas with small recesses.
- With a selected background, a large ornament appears against the background of the space scraped out by the tool.
Relief carving: three-dimensional paintings, practically devoid of a flat background.
Relief carving can be:
- The bas-relief has protruding figures of medium height (about half of their volume).
- High relief - the background is deeply recessed, the figures are very voluminous and protrude greatly.
- “Tatyanka” - a convex pattern fills the entire space of the product, the elements merge, turning into each other (usually the theme is botanical).
The slotted thread can have the appearance of flat-relief or relief. The pattern is made by completely removing wood fragments and leaving through voids between the elements of the pattern.
The slotted thread is:
- Openwork: has protruding parts combined with cut holes, widely used for decorating furniture sets in the Baroque and Rococo styles.
- Overlay: made up of figures cut through and with protruding elements, processed only on the front side.
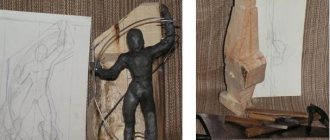
Sculptural carving - the depicted objects are separated from the background and represent a full-fledged sculpture.
House carving is the creation of elements used to decorate wooden buildings.
How to choose a tool and where to buy
Beginning woodcarvers, as a rule, do not understand how to choose and where to buy the tools that suit them. In fact, nowadays there is a huge selection of different devices for performing carpentry work.
When choosing tools, you need to pay attention to such nuances as:
- Difficulty of work . If it is not very high, purchasing several separate devices will be enough. In turn, wood carving tools for beginners are often sold in appropriate sets. Some experts do not advise purchasing them without having the appropriate experience.
- Steel grade . It is necessary to choose tools of better quality and reliability. This affects their service life and ease of use.
- Manufacturer . It is best to give your preference to well-known brands or trusted companies.
- Country of manufacture. In most cases, Chinese instruments are not of high quality. Experienced craftsmen advise purchasing domestic or European tools for wood carving.
Not only the comfort of carving, but also the final result of the work depends on the correct selection of tools.
TOOLS
All beginning carvers ask: “What tools do I need first?” First we will need a small number of tools. Instead of buying a full set of cutting supplies, purchase tools as you need them. Usually, when you buy a set, you don't save a penny, but there are always things left that you hardly need. Buy the best quality tools you can afford; good, sharp, high-carbon steel tools will last you a long time and save you money.
DIY tool
Many professionals advise making your own wood carving tools. This is due to the fact that all devices in this case will be fully suitable for the anthropometric parameters of the master - for example, the size of his hand. It will be easy to work with such tools, which in turn will improve the speed of making the sculpture.
Having the appropriate experience and high-grade steel, you can easily make a Bogorodsk knife or a hatchet knife. For example, in such a situation, you can use a hacksaw blade if its thickness is at least 2 millimeters. The tool must be made using a sharpener powered by electricity.
It is advisable to make various devices with your own hands in the following cases:
- if you have relevant experience;
- if tools and materials are available;
- with a complete lack of money to purchase new products.
You need to transfer the outline of the knife to the workpiece, carefully processing its outline. During the manufacturing process, the canvas should be periodically cooled by dipping it in water.
The handle can be made from a cast made using plasticine held in the hand. After this, you need to select a suitable block. Having marked the surface, this workpiece must be clamped in a vice. Using a hacksaw, you need to remove all excess. In order to finally finish the work, you need to adjust the shape of the handle using a rasp and sandpaper.
Chisels
Chisels come in different widths and curvatures. Curvature is indicated by a number. The steeper the curvature, the larger the number. So, a chisel with number 3 is almost flat, and number 11 has a U-shape. Of course, a number 10 or 11 chisel cuts deeper and removes more wood than a number 3. On the other hand, a number 3 chisel is useful for finishing. The number 12 V-shaped chisel has a wide range from 24 to 90 degrees, but the most common chisels are those with an angle of 60 to 70 degrees.
When choosing a chisel, pay attention to the handle so that the tool does not roll onto the floor when you place it on the table. Otherwise, you will constantly have to repair the blade.
When choosing a chisel, also keep in mind the size and type of carving you want to make. For manual work, palm-sized chisels are more suitable, and for small parts you will need even smaller tools. Sculpted and relief carvings require the use of standard chisels with heavy handles.
Tool sharpening
You need to start sharpening by aligning the tool blade. To do this you need to use coarse sandpaper. It quickly removes various hangnails. This creates a cutting edge.
When sharpening, it is important not to damage the sharpening angle and the geometric shape of the blade. After using a coarse abrasive, you need to move on to finer ones. With its help, the master can remove the remaining roughness.
If the tool gets very hot during sharpening, it should be cooled in water. At the end you need to apply sanding mixtures applied to the felt. They ultimately create a perfectly flat surface.
Instrument care
You should periodically inspect your tools and wipe them with an oily cloth to prevent them from rusting. Store tools in individual compartments or wrapped in cloth to protect them and reduce sharpening time.
TOOL SHARPENING
Make sure your tools are always sharp and stop working from time to time to sharpen them. All the carvers I know have developed their own dressing system; everyone found their own procedure that was convenient for them personally. Some use whetstones with oil, others with water, and others use electrical devices.
The first step is to sharpen the blade using a fine-grained abrasive such as diamond chips or sandpaper. First, one side is processed until burrs appear on the metal, then the other. At the next stage of editing, the surface irregularities that arose initially are eliminated. Finally, you should polish the blade with a special compound to a mirror shine, reducing friction between the blade and the wood.
How can you tell if a blade is sharp enough? Take a piece of scrap wood and run a knife across the grain. If a smooth mark remains, then the blade is sharp. If the fibers stick out in different directions and the mark is rough, then you need to sharpen the blade more.
Selecting material for work
Each type of wood has its own advantages and disadvantages. Soft woods such as linden, birch and aspen are easy to cut, but crafts made from them are more easily rejected by clumsy cutting or excessive pressure.
The hard woods of beech, oak, mahogany and boxwood are more difficult to process and there is a risk of breaking the tool if pressed too hard or causing injury for the same reasons. Be that as it may, when choosing wood, you need to take into account many factors, including the size of the craft, its color, shape, etc.
Birch
This wood is very light and lends itself well to cutting along and across the grain. It is also easy to drill and you can create good crafts from it. It is not recommended to use glued birch bars when cutting, since the directions of the fibers in this case are different and the craft will not have a solid appearance. Birch wood also darkens and warps over time.
Coniferous trees
These rocks are suitable for slotted and contour carving. The large distance between the annual rings and the soft structure make it possible to easily create even large ornaments. Among the disadvantages of spruce and pine, as well as other conifers, is that when carving across growth rings, the knife or chisel will jump slightly. This is due to the uneven distribution of material density in the rings.
Finishing of the finished product
The composition using the contour carving technique can be made both on a plain or on a tinted and polished wood surface. In the second case, no further processing of the material is required. If the ornament was carved on light wood, then it is coated with transparent varnish, after sanding the surface with fine sandpaper. Sanding must be done along the wood fibers. It is better to grind turned products and coat them with a transparent varnish in a clamped state while rotating in the machine. Accordingly, the turned product is not cut from a wooden workpiece, but is removed, covered with threads and re-clamped in the machine, after which it is finished, dried and only then cut.
The type of finish is selected depending on the purpose of the wood product. The surface can be varnished to a shine or remain matte by applying diluted varnish to the threads with a hard brush. Before varnishing with transparent compounds, the polished surface of a contour carving can be tinted in different colors by painting only the background or the background with individual, most in-depth lines. The varnish is applied only to a thoroughly dried wood surface.
Beginning woodworkers perform work using the contour carving technique on flat boards. As you gain experience and improve your skills, you can begin to work with more complex products: pieces of furniture, household items and household items. On such elements, contour carving can act either as a separate independent technique or as an additional artistic decoration, performed in conjunction with other carpentry techniques. Contour carving allows you to create subtle and aesthetic ornaments in various styles.
Kinds
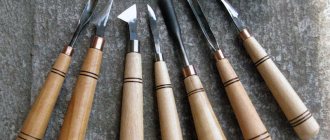
It is believed that virtuoso craftsmen can get by with one or two chisels, however, as practice shows, a good set of special carpentry tools, which includes chisels with blades of various shapes, will help to achieve the best result and make work easier. Experts in this industry recommend adding the following items to your arsenal:
- Jamb knives are a type of wood cutters with short triangular blades. They can have different bevel angles of the cutting part, making them suitable for forming complex relief patterns. Such universal wood knives include three functional sections: blade, toe and heel;
- chisels are the main and most common carpentry tool for figure cutting with an elongated rod and a cutting edge at its end. The chisel, depending on the configuration of the edge, can be flat, angular, semicircular, bracketed and reverse. With such a varied set, you can cut grooves and recesses of various depths, as well as give the surface the desired texture and volume;
- cranberries are devices for manual finishing cutting, characterized by a significantly curved working part, which makes it possible to achieve a clear relief of parts. Like the previous version with a straight handle, the cranberry blade varies in blade shape (bracketed, straight, semicircular, dovetail, goat’s leg, etc.);
- spoon cutters - made in the form of a ring or half ring, as the name suggests, intended for cutting spoons. Very often, cabinetmakers prefer to make such a semicircular wood cutter with their own hands and adapt it to their needs.
Along with devices for cutting openwork elements, there are also additional items that no carpenter can do without. Such tools include hacksaws, jigsaws, drills, wood hacksaws can be intended for roughing or finishing work (reciprocating saws, bow saws).
Those craftsmen who work with large-sized structures acquire not only hacksaw tools, but also include hatchet cutters, or, as they are also called, figured adzes, in their arsenal . Their operating principle is similar to that of smaller cutting tools, with the only difference being the scale and purity of the process. Beginners who are just starting to learn the craft do not understand the types of instruments as thoroughly as experienced craftsmen, so the main thing here is to follow the golden rule - quality above all. Since buying high-quality knives can be expensive, many people make cutters on their own, especially since today it’s easy to find suitable video and photo tutorials on the Internet. Next, we will tell you how to make knives for figured carving with your own hands from scrap materials.
Let's make it ourselves
Let’s say right away that a high price does not always force a carpenter to take radical measures. Often, a good experienced craftsman cannot choose a tool for himself that would meet his requirements, and this also becomes the reason for working on the cutter independently. In principle, this problem can be solved quite successfully; the main thing is to know what to make the cutters from and what technology to use in this case.
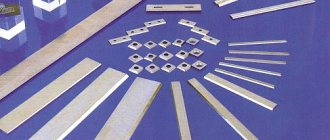
Blade
In most cases, ordinary wood or metal cloth is suitable as a raw material for self-harvesting. You can make an excellent jamb knife from this material - just break it off by hand or cut a segment of the blade on a lathe, and then form a cutting edge. The wood saw blade also has decent characteristics suitable for our product, because it is very important what steel the knife is made from, and here we are dealing with a carbon metal that is easy to sharpen and remains sharp for a long time even when working with hard rocks tree.
If your future homemade cutter is intended for cutting wood, it should have a semicircular blade shape, and in this case it is better to make it from a punch, which can be found in almost every home workshop. In private carpentry workshops you can find homemade bearing cutters, which have also proven themselves to work well.
Lever
When the cutting part of the chisel is ready, you can begin making an equally important part of the tool - the handle. Here we will need a wooden block, and it is better if it is hardwood, from which we will need to cut a holder with a hole in the end. Please note that the shape of the hole must correspond to a similar parameter of the metal shank of a knife for wood carving, made with your own hands from a canvas or disk.
Next, you need to glue the cutting segment into the handle and further strengthen the structure with a metal ring.
If a handle consisting of two parts is used to make a wood cutter, it is recommended to additionally fix the blade with fasteners and carry out the gluing process using a vice or clamps.
Types of knife blades
A classic jamb knife can have blades of different widths, blade angles and a conveniently shaped handle for a specific type of work. The blade of the knife can be made in the form of a triangle (the flag knife is very popular) or have another shape.
The knife can have different sharpening options, smooth or sharp cutting edge shapes. Understanding which blade is needed depends on the specific type of work, the design being performed and the experience of the craftsman.
As in the case of a blunt knife, the prerequisites for the quality of a knife with any blade shape are the sharpness of the blade and the comfort of the handle. The attachment of the knife blade to the handle must be perfect and reliable.