Articles
All photos from the article
In the process of building a log house, the key operation is the connection of logs or beams with each other, so it is simply necessary to know all the nuances of this operation. They are performed when cutting corners, and also if you need to build up elements when their dimensions are insufficient. In both cases, different approaches are used.
Below, in a concise form, we will tell you how to correctly connect long logs and how to cut the corners of a wooden structure.
Logs can be connected to each other for reliable construction in different ways with your own hands
Log joining method
Since ancient times, baths were built only from logs, and therefore the technology of their connection is quite ancient and proven over centuries.
And logs can be joined in two main ways - without a remainder and with a remainder. In the first case, the corners of the bathhouse will turn out to be perfectly even, but the second method looks much more beautiful - when the logs protrude slightly beyond the wall, which, of course, looks much more beautiful. But it also turns out to be more expensive - after all, you will have to use half a meter more logs than in the first method. Although the corners “with a remainder” are much better protected from rain and wind and are much more stable.
So, the logs are combined with the rest in these four options.
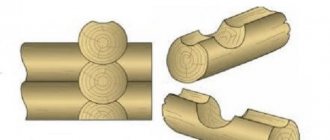
"Into the cloud" or "into the bowl"
The “in the bowl” method is the simplest and most ancient. To do this, you need to cut out a round bowl at the top of the log - which is what “oblo” means in the ancient language. A transverse log with the same bowl is placed there. Moreover, this can be done in three more options: in a fat tail, in half a tree, and in the form of an oval comb.
Since ancient times, baths have been built using the “half-wood bowl” method - this is the simplest method. And in order for the laying to be dense, an additional longitudinal groove is cut out in the upper part of the logs - a laying groove. It is also filled with insulation (flax wool more often) and a second log is placed on top. And in order for the wall to be stable, during assembly, each stacked log is connected with a dowel to the bottom one - this is a wooden dowel of rectangular or round cross-section.
Cutting into the fat tail is the most difficult. In addition to the special ridge, an additional protrusion is made at the very bottom of the bowl, which is located along the log and exactly across the bottom of the bowl.
In the third option, the logs are connected to a landslide-shaped ridge - it must exactly repeat the outline of the laying groove, therefore it is cut not from above the log, but from below - such a log house can withstand even strong winds.
“Into the clap”, or “into the Siberian bowl”
This method is similar to bowl cutting, only now it is cut at the bottom of the log. Those. the log seems to roll onto the prepared corner and slams the lower crown, which is why they say - slam.
"To the brink"
Cutting “in the okhryap” differs from the okhlop in that special straight notches are made both at the bottom and on top of the log - exactly a quarter of the diameter. Essentially, this method falls somewhere between regular angles and paw angles.
"Into the paw"
Cutting “in the paw” is, in fact, the same as “in the paw” - only here the logs that protrude beyond the plane of the wall are deprived of the end part. This way the angle itself is obtained without any residue, and in order for the entire structure to be reliable, special sockets and spikes are left at the ends of the logs - cut. True, such a wall will have a lot of ventilation, and therefore during its construction it is necessary to make the horizontal planes of the cut inclined - in two directions at once. This will already be called a “dovetail” - i.e. the spikes between adjacent logs are firmly interlocked with each other - due to inclined planes.
Log house
The technology of log cabins has been developed and tested for centuries, and the features of constructing log cabins directly depend on the area where they were built. Based on the appearance of the finished log house, the types of connections can be divided into two groups: with a remainder - with the ends of the logs protruding at the corners, and without a remainder - with even corners without protrusions of the logs. A bathhouse built using the first method will have much less ventilation and will last longer. But the second method is more economical, because the logs are needed half a meter shorter.
A. In the corners of the house
Connection with remainder
This means that the ends of the blanks at the corners of the building will protrude somewhat beyond its perimeter. The disadvantage is the increased consumption of building materials. But there is also a “plus” of such a connection - it is more durable, moreover, the corner parts of the building (the most problematic areas) are better protected from precipitation.
The most common method is “in the oblo” (“castle” type). It is also sometimes called "chalice", but this only applies to logs.
Locks:
- Unilateral. It is already clear that the “drank” is done on only one workpiece.
- Double-sided. Accordingly, approximately ¼ of the material is sampled on each of the beams (joining grooves).
- Quadruple. In this case, “cuts” are made on all faces. This connection is much more complex in execution, but is considered the most reliable. In addition, installation is simplified - all that remains is to assemble the individual parts of the “constructor” together.
Without a trace
This means that the corner edges of adjacent walls are absolutely smooth, without protruding ends of the beams ("joint joint").
From the pictures it is clear that there are many varieties of such fastening of workpieces.
About interventional insulation and insulation materials
Classic sealants for log houses are flax tow and moss. Modern ones are jute, tow and... sphagnum moss. Yes, moss is still used today, it has not gone into hoary antiquity and has not become a relic of the past, used out of poverty. Sphagnum is a natural material with unique properties. They say about him that he heals both the owners and the house. And also that log houses rot before the moss between their crowns.
Sphagnum, or peat moss, is a common plant that grows in swamps. Peat and peat bogs are formed from it. After the moss dries, it becomes light-colored, hence another name - white moss. Another name is medicinal moss, because it was used for dressings.
As a building material, moss is distinguished as an environmentally friendly and durable material. A log house that has been sealed with sphagnum acquires healing properties. Moss has antiseptic and bactericidal properties, and its hygroscopicity and breathability smooth out differences in air humidity.
All insulation based on tow and jute fiber, unlike sphagnum, needs to be impregnated with an antiseptic.
Sphagnum harvesting is carried out in all months except winter. Optimally - in the last month of summer, since the length of the moss is already sufficient, about 20 cm, and at this time it is the cleanest, without fallen leaves. Collecting moss is easy, since it is a surface plant, without a root system.
After collection, the moss is squeezed out to remove excess moisture, cleaned of forest debris and collected in bags. Before laying in the walls, the moss is dried for several days under a canopy.
If moss needs to be prepared for future use, drying is necessary. This is not difficult, the moss is laid out in a thin layer, about 20 cm, in a place protected from the wind, and turned over during the drying process. It takes about a week to dry, and it doesn’t matter whether it’s in the sun or in the shade, the moss dries everywhere. Dry moss can be stored in bags without problems for a long time.
Types of corner joints
Strength. It is known that the timber is fixed under the pressure of its own weight, as well as the pressure of the floors and the weight of the roof. But such connections must be resistant to possible changes in the linear dimensions of the timber, and wood, as is known, is susceptible to deformation that occurs with fluctuations in atmospheric humidity and air temperature.
Tightness. One of the main conditions for why we are building a house is to protect ourselves from the external environment; circulating drafts will bring pleasure to few people. The simplest solution to avoid drafts is to complicate the path for air to pass through the connections, i.e. we must make the connection of parts geometrically more complex.
In modern wooden construction, two types of corner joints are used:
- With the rest. The remainder is the end of a log or beam that protrudes outward from the corner of the frame. The advantage of this type of corner connection is better protection of the seams from blowing;
- Without a trace. The crowns of the log house do not protrude beyond the corners of the house.
Corner joints of logs are performed in almost the same way as joining beams. In this case, the landing nest in the lower log is most often made not flat, but semicircular, resembling a cup. Therefore, this method of joining is called cutting “into the bowl”.
Connecting logs “into a bowl” with the remainder
Joining the beams at the corners of the house is done in two ways:
- Single-sided (wood floor)
- Double-sided (in red)
The one-sided joint of the timber is easy to perform, since it is enough to make only one vertical groove.
One-sided joint of profiled timber “half a tree”
Listing the main methods of joining timber in the corners of a house, it is necessary to say a few words about the double-sided cutting method. It is more complicated than one-sided joining of crowns, since vertical cuts have to be made not only on the top, but also on the bottom side of the beams.
After this, the wood between the cuts is cut out, leaving smooth horizontal landing areas. By laying the beams on top of each other, we get a strong joint with two flat seams.
Connecting the timber “in the okhryap” with the remainder
Reliable joining of logs can also be done using the “in-the-hole” method. However, most often specialists use a “bowl” joint, which is optimally suited for the round shape of the log.
Cutting a corner from logs “in okhryap”
The double-sided “bowl” connection and the semicircular “bowl” require highly qualified carpenters. Here you need to work accurately and carefully. Any mistake with the depth of cut or cutting out a groove can lead to a violation of the geometry and a decrease in the strength of the joint.
Connecting the tail angle with the remainder
Considering the types of connections between logs and beams, we note a very popular method of cutting “in the paw”. It is quite simple to implement and at the same time allows you to obtain a fairly strong and airtight joint.
Connecting logs “in the paw” without leaving any residue
The methods of connecting beams during the construction of a log house are significantly different from the joints of logs. Since ancient Rus', wooden construction has been done from logs; since then, centuries-old experience in connecting corners and joints has been accumulated. But this is the 21st century and ancient techniques are gradually acquiring their modified analogues, so first of all I want to introduce you to the technique of laying beams, and we will disassemble the log later.
Nowadays, two connection methods are practiced in wooden construction:
- With the remainder (“to the oblo”, “to the bowl”)
- Without a trace (“in the paw”, “in the tooth”).
Cutting logs with corners without residue
As we said earlier, the corners are colder without any residue, but they allow you to significantly save on building materials.
Angle "to the paw"
Among the joints of logs in the corners, the “paw” method is popular. It is easy to implement, and at the same time provides high strength and reliability of the connection. Also, the presence of inclined cuts makes it possible to achieve high tightness. The method has been tested for a long time, even GOST standards have been developed: size tables for each log diameter (see photo).
Table of foot joint sizes for different log diameters
All dimensions are plotted relative to the found middle of the log and a vertical line drawn from it (it is drawn using a plumb line).
Connecting logs without leaving any residue. Angle to paw
The order of work is as follows:
- Find the length of the cut part (called the block). It must be no less than the diameter of the largest log available (in the figure it is marked L). We set this value aside from the edge of the log (let it be 250 mm), draw vertical lines in these places. They will be the boundaries of the idiot.
- Let the diameter of the processed log be 200 mm. From the middle line, ½ of the value of A is set aside. D for a 200 mm log is 141 mm. We divide this value in half and put it on both sides of the center. We draw vertical lines.
- We trim (cut with a chain saw). As a result, you should get the same picture as in figure a).
- We take the appropriate dimensions from the table and mark them on the block.
- We trim off the excess (cut it off). The result should be a figure like in Figure b).
This is what the angle from the logs into the paw looks like (dovetail due to the fact that the connection is in the form of a trapezoid)
All logs are processed in this way one by one. As you can see, the dimensions depend on the diameters of the logs. In order not to have to worry about drawing every time, they make templates from thin plywood according to the diameters of the logs that are available (they label them). Then, having found the middle and made a block, they apply and trace a suitable template. With this order of work, there is less chance of making mistakes, and chopping bowls takes less time.
Advantages of a log house
Natural wood is the most environmentally friendly material of all possible basic building materials. It is easy and pleasant to breathe in any log house. A natural microclimate, saturated with oxygen, with specific microelements and resins of a particular type of wood will always contribute to the stable health and well-being of residents. Cedar lumber also has an antiseptic and cleansing effect on humans and the environment as a whole. Read more about the properties of cedar in construction.
Fast construction time.
From the moment the material is delivered to the site until the log house is completely erected, it can take only a few days. The construction process by skilled craftsmen does not take much time. With the exception of the construction of large-area log buildings and complex projects. Another thing is its shrinkage, which we will talk about later in the article.
Low thermal conductivity.
A high-quality log house does not need to be additionally insulated with artificial materials. But the wall thickness should not be thinner than 25 cm.
Good sound insulation.
Wooden walls practically do not allow noise to pass through. At a moderate noise level, residents in adjacent rooms will not hear each other. The exception is extreme noise coming from the street, which can be heard in a house made of any material.
Durability.
With normal care and permanent residence, a high-quality log house will last up to a hundred years. In our time, there are quite a lot of examples of such log houses preserved, the strength of which would be the envy of many modern materials.
- Breathing house. The natural and natural gas exchange of a log house always creates an atmosphere saturated with pure oxygen inside the house. At the same time, the log house does not require the installation of additional ventilation. For such a house, natural air flow through windows and doors is sufficient.
- Quite a light house. Compared to heavy stone and brick houses, a wooden frame does not require such a massive and heavy foundation, since it is much lighter. Thus, some savings are possible when constructing the foundation.
- Beautiful appearance. A log house is a structure on which the gaze of any person involuntarily and for a long time lingers. You want to look at it and want to admire it again and again. The log structure, the unique wood pattern of each log and timber makes each log house beautiful in its own way. It is possible to build an ugly stone house, but it is simply impossible to build a log house. Just looking at your own, chopped-up house brings great pleasure.
- Unique and cozy atmosphere. It is impossible not to highlight this ability of a log house as a separate advantage. This kind of atmosphere is created naturally. In such a house, the tree itself seems to endow the residents with its strength and natural inspiration. The beneficial environment of the log house promotes maximum productivity and the creative spirit of its owners.
Connection fastener
With the advent of modern fasteners made of durable alloy and galvanized steel, many construction processes have been simplified, including the installation of reliable connecting units in timber structures. Some of them have been used for a long time and are traditionally popular. Others appeared relatively recently, so they may be unknown to people whose profession and interests are not related to construction.
Traditional fasteners
The simplest and most reliable of them are dowels or dowels made of hard wood. They blend perfectly with the base material without causing it to deform, crack or rot. In combination with adhesives, they allow for durable fastening.
Assembling a log house on steel dowelsSource remontik.org
Pins are also metal. Their main advantage is their high strength and durability, which is why they are often used to fasten timber crowns vertically.
Nails and staples, which used to be almost the only types of fasteners for wood, are now trying not to be used in the construction of permanent buildings, since the ferrous metal from which they are made is incompatible with wood. It corrodes easily, damaging the wood and gradually deteriorating. For the same reason, it is not recommended to use homemade dowels cut from reinforcing bars.
Modern fasteners
A wide variety of fasteners are made from perforated rolled steel with a thickness of at least 2 mm with an anti-corrosion coating. It is made from:
plates of different lengths and widths with holes for screws and anchors. A large assortment of standard sizes allows you to solve problems such as connecting beams together along a length of 150 by 150, fastening rafters at the ridge part, or strengthening a sagging joint without lower support;
Galvanized connecting plateSource www.sibwindows.ru
- connecting corners from the same source material can be simple or reinforced, with an additional stiffening rib. The range of these products includes both equal-shelf corners and those with different shelf lengths. They are used to strengthen the corner connections of a log house, fasten rafters, floor beams, create a frame for internal partitions, etc.;
- supports are fasteners of complex shapes that allow you to create reliable corner T-shaped joints without making locks. For example, attach floor beams to the walls. Their standard sizes correspond to all standard dimensions of timber sections.
An improved analogue of a perforated plate is a nail or serrated plate. With its help, structural elements located in the same plane are reliably fastened.
Using nail plates, you can assemble trusses and splice timber along the lengthSource cdn.mitekea.com
Threaded rods are also very popular in wooden construction. They tighten the joint by tightening the nuts on both sides of it.
And the most modern fastener, which allows not only to connect the crowns with each other, but also to compensate for the shrinkage of the house and the appearance of cracks between the beams, is the “Strength” spring unit.
Connecting timber or logs at an angle and longitudinally
The main technological operation when constructing a log house for a wooden bathhouse is the connection of a log or timber, so anyone who starts independent construction should at least in theory know how to connect a beam or rounded log.
The need for connection arises in 2 cases:
- When cutting a corner
When increasing beams or logs in length, when the dimensions of the standard product are insufficient.
In both cases, various techniques are used, so below we will try to briefly but clearly describe the main methods of connecting timber.
Video description
What it is and how this spring unit works is described in the video:
When building a wooden house, the question always arises of how to connect two beams lengthwise or fasten a corner. Each master has his own preferences in this matter: one adheres to methods that have been proven over centuries, the other trusts more modern methods using special fasteners. And this issue needs to be discussed in advance, after independently studying all the possible options and deciding what is your priority: speed and reasonable cost of installation or quality and reliability.
How to connect beads lengthwise
The easiest way is half a tree. Its configuration and shape are similar to those made when connecting a corner. But the disadvantage of this splicing method is that when longitudinal forces arise, which can occur during drying or movement of the soil, such a connection is easily broken. A continuous gap is formed.
Long beam connection
The oblique rim lock has the same disadvantage: it is easy to disengage. If you need reliable joining of timber, use a straight rim lock. As you can see, due to the protrusion, pressed by the crowns located on top and the weight of the roof, it will resist the forces of longitudinal tension (and compression too). It is more difficult to implement, but much more reliable.
3.1. Connecting the corners of the timber with the remainder “into the bowl”
The bars are connected into the bowl using key grooves, which can be of several types:
- One-liners
- Bilateral
- Quadrilateral.
The fastener with a one-sided groove has a shallow cut in the bar in the form of a transverse groove. As a rule, profiled timber is connected in this way.
When fastening with a double-sided groove, cuts are made on both sides, top and bottom, with a depth of 1/4 of the thickness of the beam.
When making a four-sided groove, cuts are made on 4 sides. The presence of transverse grooves significantly simplifies the process of installing crowns - the logs fit tightly against each other, the stability of this method of connecting beams in the corners increases significantly.
Type of connection of profiled timber into a one-sided key groove
General view of a connection in a one-sided locking groove. Connection element.
With this type of connection, a perpendicular groove in the form of a notch is made in each beam on one side - usually the top. The notch must match the width of the beam perpendicular to the cross-section.
Type of connection in a double-sided keyway
General view of a connection in a double-sided locking groove Connection element
The double-sided groove lock technology means cuts on both sides of the beam, i.e. up and down. The depth of the perpendicular cut is approximately 1/4 of the height of the beam. A high-quality connection, but it requires a lot of experience from carpenters in order to prevent cracks or chips when cutting the groove and installing the beam.
Type of connection of profiled timber into a four-sided key groove
General view of connecting a beam into a four-sided locking groove. Element of connecting a beam.
Type of connection of profiled timber into a four-sided key groove (in the “oblo”)
General view of connecting a beam into a four-sided key groove (in the “oblo”) Element of connecting a beam.
When making a four-sided locking groove, a groove is cut out on all sides of the profiled beam. This fastening option will allow you to achieve greater strength of the log house. The cuts on all sides simplify the construction of the log house - the crowns fit like a construction set. Connecting corners in this way greatly increases reliability.
Cup - is the simplest type of corner arrangement.
Corner fastening using this method is performed in the following variations:
• half a tree; • in the okhryap; • in the fat tail.
"Half a Tree"
This joining method (the simplest) involves cutting a rectangular groove with a depth of half the thickness of the timber - hence the name.
In order to increase the required packing density, an additional longitudinal groove is formed at the top of the beam, in addition to the bowl. After laying and securing the cross beam, the logs of the next crown are installed. Before laying each tier, the longitudinal groove is sealed with insulation. For structural strength, each new log is attached to the previous one using dowels, which enhances the vertical stability of the surface.
"In the fat tail"
An additional spike ensures a strong and reliable joining of the beams. At the bottom of the bowl, another protrusion is cut out along the block and across the cup bottom. And at the bottom, across the groove, a special recess is formed, onto which the fat tail is placed during installation.
Carpenters with a high level of skill are required to perform a quality connection of this type.
"To the brink"
A connection in which the main task is to correctly calculate the width of the jumper. When working with timber, due to its standard geometry, cutting can be done using a template (as opposed to working with a log). Error-free sawing significantly speeds up work.
Okhryap is an intermediate type of connecting timber in the corners between the classical methods with and without a remainder. The difference between cutting “in okhryap” is that bowls of 1/4 diameter are cut from the bottom and top of the beam.
How and why a longitudinal groove is cut out
All logs of the log house must have longitudinal grooves corresponding to the ridges of the bottom of the logs that will be laid on top. These grooves are needed to preserve heat in the log house, and to prevent the log house from being blown by the wind. According to GOST, longitudinal grooves must have a width no less than 0.5 of the log diameter.
The choice of the width of the longitudinal groove depends on the minimum air temperatures and is assigned:
- At - 40⁰С from 140 mm or more
- At - 30⁰С from 120 mm or more
- At - 20⁰С from 100 mm or more
The triangle groove shape is easy to manufacture, but does not provide a tight and durable joint. It is almost impossible to densely fill a triangular cavity with tow or jute, and during operation condensation accumulates there, insects, mold and mildew grow there. Open wood capillaries take water from the insulation when it soaks. Due to excess moisture, logs have low resistance to rotting. The thermal protection of such a log house is unimportant. Another disadvantage is constructive. The greatest load on the log falls precisely on the top of the groove triangle, in the place where the section is weakened, the groove can crack and open, and cracks will appear along the inter-crown joints.
The only advantage of the “triangular cut” is speed. It is only suitable for log houses that will not be heated, for various warehouses and outbuildings. For a residential log house, such a longitudinal groove is not suitable; it is considered rough and cold.
The better the groove follows the shape of the ridge of the log laid in the bottom row, the more difficult it is to fit, and the warmer and denser it is.
Basic methods of connecting timber during installation
At the connection point, you need to choose a specific method that guarantees optimal strength and tightness of the joint. Corner connections can be made:
- with ends protruding beyond the main dimensions;
- without protrusions;
- butt laying, when the beams do not overlap each other;
- T-shaped connection for walls inside the building.
Figure 2. Construction of a rectangular root tenon.
The technology of the method with a remainder provides better quality corner joints, but requires more material consumption. Each beam produces from 0.4 to 0.6 meters of wasted length. With a height of 15 crowns, the total unused length will be from 20 to 36 m. With a beam length of 4 m, this will amount to from 5 to 9 additional products. You can see the corner connection with protruding parts in Fig. 1a.
The first crown in a building is usually placed in a joint with a key groove with a specific name for the joint - “oblo”. This method is used for any method of laying material, with or without protrusions. The sampling is performed at half the thickness of the product. The articulation of the corners of the house without protrusions can be seen in Fig. 1b. To prevent displacement in the main planes, subsequent crowns must be joined using the “root tenons” type with the installation of dowels. The design of a rectangular main tenon is shown in Fig. 2.
The dowel is a round wooden block 25 cm long and about 30 mm thick. In the beam laid on the cushioning material, you need to drill a hole with a depth exceeding the length of the dowel by 20-40 mm, and hammer the part into it.
Butt jointing corners is the easiest way. The quality of such joints is extremely low; creating a warm corner in this way is unrealistic. The timber is fastened with such joining using metal brackets with spikes, nailed down. Laying timber end-to-end is shown in Fig. 1st century How to fasten a beam with a metal bracket can be seen in Fig. 1e.
Figure 3. Dovetail.
The T-shaped connection of capital and internal partitions has several options:
- joint using a key groove;
- “groove-tenon” joint in the form of a symmetrical trapezoid;
- “groove-tenon” joint in the form of an asymmetrical trapezoid with a right angle;
- use of a rectangular mortise-tenon joint.
Spikes in the form of trapezoids are designed to maintain the connection during loosening of the structure and efforts aimed at pulling apart in different directions. The design of such joints is complex, but also more reliable. Because of its appearance, the connection is called “dovetail”. The structure of such a joint can be seen in Fig. 3. Making a dovetail requires care and patience in fitting the surfaces.
Many craftsmen prefer to fasten walls using rectangular tenons. Often, T-shaped joints are fastened with special brackets, long bolts with large diameter washers or nails. An example of a right-angle tenon connection is shown in Fig. 1 year
Caulk of a log house with moss
After the crown logs are finally adjusted, they begin laying the inter-crown insulation. The moss is laid out across the logs with a layer thickness of 15-20 mm, pressing slightly, but not tamping. Lay out the moss to a width greater than the width of the longitudinal groove of the upper logs, by 100 mm. Moss is placed in the bowl and around the bowl in the same layer, with a protrusion of 50 mm beyond the contour of the bowl.
The traditional and correct technology is laying the log house “on moss”. Or on tow, in case of using tow. But assembling log houses without inter-crown seals, in a hurry, and then driving the seal between the crowns is not a technology. Such log houses do not last long; beetles and company settle in the cavities between the logs, and fungus and mold grow. This is because it is simply impossible to hammer a sealant from the outside into a finished frame; cavities always remain. Sealants used in external seams save the situation for a short time. In a short time, such log houses become cold.
After laying the compactor onto the log, lay the top crown log on top, being careful not to move the moss. The stacked logs are tapped with a wooden “woman”.
After laying the logs, caulk the bowls, tucking the protruding fibers between the log and the bowl. The tool for this operation is called a caulk, and the caulk is tapped with a mallet or hammer.
Dry moss is placed in the crowns, and the frame is moistened with caulk. If moss is dried and then soaked, its strength is much greater than that of fresh moss.
They caulk the log house in two passes. First, immediately after assembly, filling the gaps between the crowns with a sealant as tightly as possible. Caulk until the moss begins to spring under the blows of the mallet on the caulk.
The crowns run along the entire contour, first from the outside and then from the inside. This work is not considered difficult, rather long and monotonous. The crowns are caulked from bottom to top, one at a time. Incorrect caulking can cause the frame to warp.
The second pass is made after the frame shrinks, which takes about a year. The second caulk is made in exactly the same way as the first.
Methods for connecting timber
But construction from timber is a new thing, and, in fact, borrowed its technology from logs. So, let's look at the corner connection of the beam:
"To the region"
This connection is made through key grooves - single-line, double-sided and four-sided. In the first case, a notch is made in each beam in the form of a transverse groove, which is made only on the upper side and the width coincides with the cross section of the beam. It is this technology that is always used to connect profiled timber, which has strictly defined parameters.
In the case of a double-sided locking groove, cuts must be made both from above and from below, and the depth of each should be equal to a quarter of the height of the beam itself. But in the third option, cuts are made on four sides at once - this connection of timber is reminiscent of a children's construction set - it is so simple to do.
In the "paw"
The connection of timber “into a paw” is done in the following three options: end-to-end, on main tenons, on dowels. The simplest is the first option.
Joining the timber into a joint is done using metal plates with staples or nails, and how good the angle is depends on how perfectly smooth the ends of the joined beams were. But still, this is not the best option, and completely unsuitable for a bathhouse.
But dowels are a special liner made from the hardest types of wood that prevent the entire wall from moving. The best dowels are oblique, although they are the most complex.
The most popular option for building a bathhouse today is connecting the beams into a root tenon, when a groove is made in one of the beams and a vertical tenon in the other. This is the most reliable connection.
Only during the installation process you will need to put a flax-jute fabric in the groove for improved thermal insulation of the log house, and after laying each crown you will need to hammer a round wooden dowel into the corner.
In the dovetail
This design is the most reliable. The dovetail beam connection is made using a trapezoidal tenon and making the same groove outline at the end of the joined beam.
These are the most basic types of timber connections. There are others - progress is being made, and builders are always looking for ways to make construction easier, without losing quality. Perhaps in the near future, both the longitudinal connection of the beam and the corner connection will become similar to the assembly of children’s “Lego”.
Types of manual cutting, Russian, Canadian, Norwegian cutting, post&beam
Corner notches are the basis of the construction of the walls of wooden houses. Corner joints are of two types - without remainder (into the paw) and with remainder (into the bowl, into the oblo). Types of felling are traditional in their specificity, Russian, Canadian, Norwegian, and Post&Beam frame technology, Diamond cutting.
Types of corner chopped joints
Corner notches are the basis of the construction of the walls of wooden houses. Corner joints are of two types - without remainder (into the paw) and with remainder (into the bowl, into the oblo). Each of the mentioned types of cabins, in turn, has different design options, which differ in the complexity of manufacturing, details and efficiency. Corner chopped joints with a remainder (release) are distinguished by the protruding ends of the logs at the corners of the log house. With this construction method, the size of the room will be slightly smaller than the length of the logs, but such a corner design is the most durable and well protected from precipitation and wind, and has a more beautiful aesthetic appearance. The integrity and strength of the entire structure of a wooden house, thermal qualities and aesthetics depend on the quality of the felling.
Cuttings with residue or release
Felling in the oblo
The leading method of cutting with residue in terms of simplicity and considered one of the oldest in Russian wooden architecture. Another method of chopping is called chopping into a bowl. An inter-crown longitudinal groove (lunar groove) and a special bowl are created in the lower log - a semicircular cavity, into which a transverse log is placed on top. This method is the least labor-intensive, since the log does not have to be turned over - all necessary operations are carried out in the upper part of the log. But, it is worth considering that such a connection cannot boast of high performance properties. Firstly, the design, designed with the bowl up, is poorly protected from atmospheric influences - moisture easily gets into the bowl, due to which the insulation gets wet and rots over the years. The same situation is observed with the groove between the logs. Secondly, the flat inner plane of the bowl, due to the absence of locking or transverse elements, is easily blown by the wind. The situation especially worsens after the logs dry out and shrink, so regular caulking will be necessary.
Cutting in the hole
Cutting into the okhlop is also known as the Siberian bowl or ohlupen. It is an inverted version of the bowl connection. Its design feature is that the inter-crown groove and bowl are now located at the bottom of the upper log. This type of corner connection is more resistant to precipitation. Cutting in the clap requires more labor and skill in execution, in comparison with the above-mentioned chopping in the clap, since the log has to be turned over several times during the fitting process. As practice shows, chopping in the clap can be called chopping in the clap, so it is advisable to clarify everything in detail and discuss in detail with the performers all aspects of the connection - the location of the grooves, bowls and other subtleties.
Cutting into a fat tail
The fat tail cut is distinguished by an improved bowl. A special additional spike called a fat tail is created in the design of the bowl. On the other side of the log, a groove is created into which the tenon of the next log is inserted. This cutting method is notable for the fact that it provides excellent strength and additional sealing of corners, since in this case direct blowing is negated.
When chopping into the fat tail, the bowl can be oriented both up and down. This type of connection is technically much more complex than conventional bowls. However, due to its excellent performance characteristics, fat-tail cutting is widespread. This type of cutting is often called cutting in the area with a notch or with a spike. In fact, this is a completely different type of connection, which is described below.
Hook cutting
When talking about this type of cut-to-hook connection, it is worth noting that in practice and in specialized literature, cut-to-hook can refer to two completely different designs of corner notches. Based on this, we will pay attention to both.
The first option is notable for the fact that the bowl is selected only to the middle of the log (from the axis of the log on one side). A semicircular groove is created from the top side of the log to the unselected remainder of the bowl. Unlike many other notches, thanks to this connection method, the corner is completely protected from through blowing. The hook cutting method is considered very durable and warm. However, it is worth considering that connecting with a hook is a very labor-intensive process and requires great skill.
The second option differs in that it involves cutting off the inside of the logs and achieving a right angle with smooth internal walls. To some extent, the configuration of the joint of this notch resembles the above-mentioned bowl with a notch. The only difference is that from the inside the log is trimmed to a quarter of its diameter, and a tenon-cut is created equal in length to the size of the hem.
Canadian cabin
Canadian cutting, despite having common features with fat tail cutting, differs significantly from it in shape. Unlike the round Russian bowl, the Canadian cutting is trapezoidal in shape. The Canadian bowl is selected from the log at the bottom. Just as when joining a fat tail, in a Canadian cut a spike is left inside the bowl. On the top side of the log, inclined edges are created, repeating the contours of the bowl of the log lying on top and the groove for the tenon. The Canadian bowl is famous for its strength, tightness, and therefore warmth. The most important advantage of the Canadian lock compared to a round bowl is its shrinkage behavior.
In a log house with round bowls, the following situation is observed: as the logs shrink and shrink, their diameter decreases, while the parameters of the bowl remain practically unchanged. This leads to the appearance of cracks in the corners that need to be caulked. But the “cunning” design of the Canadian lock, under the influence of shrinkage, on the contrary, jams even more camo. All this guarantees excellent tightness and absence of cracks.
It is worth noting that the Canadian cabin consists not only of a non-standard shape of the lock, but also includes a whole range of technological nuances, which, only in the case of impeccable execution, ensure excellent tightness of the structure for many years.
One of the advantages of Canadian logging is the complete absence of gaps between the logs. This characteristic feature is observed not only in newly erected log houses, but after their shrinkage and drying. Thanks to this, you only need to put the insulation into the crowns once and never have to think about caulking again.
Cutting into the saddle
Saddle cutting is a simplified method of Canadian cutting with a tenon. The only difference in this option is that a tenon is not made in the bowl and a corresponding groove is not created in the upper part of the log. The rest of the design is similar to the Canadian castle.
Norwegian cabin
Norwegian logging is almost identical to Canadian logging. The only difference between the Canadian and Norwegian deckhouse is the carriage. The Canadian cabin is made from a log, and the Norwegian one is made from a gun carriage. Norwegian cutting is made from a carriage, this is the so-called oval log. Two parallel sides of a log are sawed off or cut down on both sides, which makes the log oval along its entire length. The angle of the lock with ribs and tenon is similar to the Canadian lock. Thanks to the smooth surfaces of the carriage, the walls are smooth, and the volume of the room increases. The appearance of a Norwegian log house made from large-sized carriages is very impressive, the unique design of each carriage, the power and color of the house.
Cuttings without residue
Connection in paw
This type of connection has a number of advantages over cuttings with residue. Firstly, material consumption is significantly reduced, which means construction costs are reduced. Secondly, the rooms are more spacious. Thirdly, from the outside the corners look completely straight. However, this connection method also has significant disadvantages. The main disadvantages of paw cutting are lower structural strength, increased airflow, and susceptibility to the negative effects of precipitation. To eliminate these shortcomings, the corners of the log houses must be additionally lined from the outside.
There are two options for chopping with a paw - an oblique paw (dovetail) and a straight paw.
Straight paw
With this type of felling, a small distance is retreated from the corner and the log begins to be cut from the sides first. Next, a “paw” is made at the end of the log - they create an even rectangle, which must fit perfectly with the identical neighboring one. The main secret that needs to be taken into account at the very beginning of felling is that to create the first “paw” you need to choose a thinner log and start from its narrow edge. Otherwise, if you start the procedure with a large-diameter log, you won’t be able to make a rectangle on thin logs. The resulting width and length on all logs will be the same, but the height will be different, since it is determined by the diameter of the log.
As a rule, they try to supplement a straight paw with a rectangular root spike from its inner corner. This is done in order to achieve better performance properties, since in its pure form a straight paw is a rather weak connection. A tenon is created on the upper edge of the paw, and a groove for it is selected from the lower side.
Koka paw
Cutting into an oblique paw is a more complex joining method. In this case, the shape of the paw is significantly modified; now it represents a trapezoid, two planes of which are inclined. The features of the shape formed the basis for the name “dovetail” (Fig. 2). This joint configuration provides greater corner strength than a “straight paw”. However, this type of connection is very labor-intensive and can only be done by highly qualified craftsmen.
The oblique paw may have an even more improved configuration - with a spike, which significantly improves its strength. When constructing using an “oblique paw” connection, a template is removed from the first paw, for example, from plywood, and the remaining ends are marked according to it.
When cutting with an oblique paw, you can use GOST 30974-2002 to select the correct connection parameters. GOST sets geometric dimensions for the paw, determined by the diameter of the log. This will be especially advisable if the logs have almost the same diameter or if a rounded (calibrated) log is used.
DESIGN FEATURES OF LOG WALLS
Despite the fact that wooden architecture has a long history, traditional technologies gradually undergo changes over time, increasingly acquiring modern features. This also applies to wooden log houses. Traditional structural components, used for the construction of log walls since ancient times, are gradually supplemented with various technical details that make it possible to improve the performance characteristics of log walls. Next, we will touch on various design techniques that can be used to compensate for a number of shortcomings that arise due to shrinkage of logs.
Connecting logs along the length
When building large wooden log houses, developers usually face a situation where the length of the wall exceeds the length of the log. The standard log length is 6 meters. In this case, the logs need to be butted together at their ends. So that the joints are not visible from the outside, the end connections of the logs are made exclusively inside the cuts. It is important to take into account that it is impossible to lay only all butted crowns in a row in height. A solid log must go through at least three rows of joined crowns. However, dressing with a solid log is ideally best done every row. In cases where the house has a long blank wall that does not intersect with other internal walls, an additional cut is made from short sections of logs in this wall, into which all joints are removed.
To connect logs along their length, a dovetail configuration with a tenon is traditionally used. This type of connection is quite simple to perform, but due to the shrinkage of the logs, its strength may decrease over time.
To join logs in a cut, another method is often used. With this connection method, the logs are attached to dowels. For each log being joined, a distance of approximately 1/4 of the log diameter is set aside from the end and a hole is created for the dowels. This hole is continued in the adjacent perpendicular log. The joined logs, after installing the dowels, are carefully connected to the perpendicular logs of the cut.
Another very common way to connect logs is to tie them with threaded rods. In this method, grooves are created on top of the joined logs at a short distance from the ends, and a cut is made from them to the end. Then a pin with nuts and washers at the ends is placed in it, then the nuts are tightened, pulling the logs together. To ensure longevity of the connection, the grooves (ideally also logs) should be antiseptic with special wood preservatives.
Undercut
One of the most important components of the construction of log walls is the design of the interventional groove, also called the lunar groove. To achieve a perfect connection of logs, the inter-crown groove should have a slightly smaller radius than the log itself. Then the log is adjacent to its neighbor with two ribs very tightly, and inter-crown insulation is placed in a small gap in the center of the groove. In this case, the edges of the groove protect the seal from getting wet. This design has another significant advantage. Due to shrinkage of wood, logs become covered with cracks on the bottom side. The log literally “sits” when the edges of the seam slightly diverge. As a result, the logs, after shrinking the frame, fit even more tightly to each other. But if in the design the groove of the upper and the radius of the lower logs are identical in size, then after a crack appears, the edges of the groove will move apart, which will lead to the appearance of cracks between the logs that will need to be caulked.
This specific design of the lunar groove is the main difference between traditional and modern cutting technologies. In the old days, to insulate inter-crown joints, they traditionally used tow or moss, and repeatedly caulked the joints of logs. Nowadays, special rolls made of natural materials, such as tape jute, are used as interventional insulation; the width of the materials is selected depending on the width of the groove.
Compensation cut
The use of a compensation unloading cut carried out on top of the log is another modern improvement of centuries-old technologies. The name itself already eloquently makes it clear that the cut is created in order to relieve excess internal stress in the log. The location of the cut was chosen for a reason, because the cut is securely covered by the next log, which prevents moisture from penetrating into it. The cut expands during the drying process, but the number of cracks throughout the log, and most importantly their depth and size, decreases.
The cut is made along the axis of the logs, but does not protrude to their ends and does not pass through the locks. The absence of a cut at the ends is a very important point. After all, the indentations from the ends and cuts are created not for decoration, but to prevent cold air from penetrating from the street into the wall through the outer ends. This is especially important if the building has walls, the inner end of which faces the house, and the outer end faces the street. In this case, creating a cut along the entire length of the log will lead to through blowing of the wall, which will lead to the need for additional sealing.
Hanging corners
This technology applies to all compounds with a remainder. The technology of hanging external corners can significantly reduce the appearance of inter-crown cracks after shrinkage of the log house. The essence of the technology is that the inter-crown grooves on the protruding ends of the logs are selected a little stronger, so as to achieve a 5-8mm gap between the logs. As a result, the logs stick out freely in the air without leaning on each other.
The advantage of this design solution is that, when exposed to air, the outer ends of the logs dry out much less than the rest of the log. As the log house shrinks, the gaps gradually become smaller, and the ends, in turn, shrink more tightly. While the absence of gaps would lead to the log hanging on the external outlets. In this case, gaps would form on the inner parts of the corner, since the internal diameter of the logs would be slightly larger than the diameter of the outlets.
POST&BEAM frame log technology
The construction of a log house using the Post&Beam frame technology, or so to speak in Russian, post and beam, is now not a new technology, but a forgotten old one. It is believed that North American dams were invented, but in fact this technology has existed for a long time in Rus'. This is how we have been cutting down and erecting sheds, barns, stables, and other prefabricated buildings for a long time. Of course, it’s not as impressive as modern carpenters do today from huge log trunks, and they use all kinds of materials to fill the walls between the logs, made of stone, brick, wood, glass, and composite materials.
This technology of a frame log house allows you to erect walls and immediately begin finishing work, leaving no time for the long period of shrinkage of the log house. So the log shrinks in diameter up to 10%, and in length by only 1%, so the entire frame remains unchanged and does not shrink. And of course, the variety of design, interior, filling the walls between the logs of the frame, for example, with stone, and large stained glass windows, looks very impressive and rich. Post&beam technology has many complex corner connections, notches, length splices, beautiful structural beams and arches, trusses, bay windows, pediments, all these log elements create stunning views of buildings.
Diamond Cutting Diamond
The hand-cut feature with the expensive name diamond, or Diamond, stands out in appearance. The technology of diamond cutting is the upper and lower corner cutting, just like the Norwegian corner cutting, only the Norwegian one is done on a gun carriage, that’s the whole difference. The Diamond log cabin looks more impressive in contrast to the classic Russian or Canadian log cabin, especially if the logs are matched with flared and thick butt skirts.
CONSTRUCTION OF LOOM
When constructing a log house, horizontal waterproofing is laid under the first crown. It does not allow the wood to come into contact with the foundation plane, preventing the penetration of moisture and preventing the appearance of mold and rotting of the log house.
Laying the first crown begins with half-logs, on top of which full-fledged round logs are then laid. Particular attention is paid to laying the first crown; all operations must be carried out with extreme precision. Place it in a horizontal plane on the foundation, maintaining right angles. Be sure to antisepticize the first crown.
An inter-crown seal is laid between the rows of logs. To ensure that the sealing material does not move during the assembly of the crowns, it is recommended to secure it using a furniture stapler.
To join logs, dowels (dowels) are used, placing them at a distance of 1.5-2 m from each other. Dowels used in wooden house construction are round rods (shafts) made from wood of more durable species (oak, birch) than logs; their diameter is 25-30 mm. For them, the installation simultaneously drills a through hole in three logs. The length of the dowel should be 20% less than the hole prepared for it. Nagel in macce walls are placed in a checkerboard pattern.
After installing the entire frame, logs and beams, rafters are cut in, then the subfloor and roof are installed. The roof is made temporarily, covered with roofing felt or film. The log house is treated with an antiseptic, and the construction site is preserved for a year, because... The log house should shrink within a year.
After shrinkage of the log house, the final installation of the rafter system and subfloors is carried out. In the process of shrinking the log house, gaps appear after the wood dries out, so it is necessary to re-caulk the log house, then sand it and cover it with finishing impregnation (oil, varnish, paint, stain, etc.) of which there is a huge amount today. The rafter system is re-tightened and the roof is installed, and then all the necessary internal finishing work. Windows, doors, finished floors and ceilings, electrical and plumbing are installed.
Requirements for connections between timber and logs
Connecting timber during the construction of a bathhouse
When building a bathhouse, timber (or logs) can be connected to each other in the corners and longitudinally. The corner connection of the timber is used in the construction of the entire structure of main walls, as well as when installing partitions in the bathhouse
.
The longitudinal connection of the beam is used if the length of the material is not enough to erect one wall (for example, the wall of a bathhouse should be 6 meters long, and the beam should be 4 meters long).
The following requirements apply to the longitudinal and angular connection of the timber:
- The bath box must be sealed from the outside and inside
- The design of the bathhouse must be stable
- Heat loss from the building should be minimal
These are the main requirements for connecting timber and logs to each other. It should also be noted that depending on your woodworking skills, you need to choose the right connection method, because There are strong but complex types of corner fastening material that you may not be able to do.
Tools and accessories
For careful fixation of workpieces during sharpening, sawing and slotting, a workbench with various accessories is required. Planing tools used in carpentry: sherhebel, planer, jointer, tsinubel, humpback, zenzubel, kalevka, tongue and groove. Chisels and chisels are used to chisel and clean up tenons, sockets, edges of recesses, etc. A brace is used to drill holes. The bow saw is mainly used in carpentry. Hammers are the same as those used by carpenters, but smaller in size.
Types of corners in a log house
Corner joints can be “with remainder” or “without remainder”. The difference is in the ends of the timber, which will either extend beyond the frame or not.
Connecting corner beams with the rest is more expensive (material consumption increases). But the heat capacity and protective functions of such an angle are higher. The most used option for fastening timber with the remainder is “in the fat tail”.
Connection without residue
The splicing of timber without any residue is carried out using several types of knots: “into the bowl”, “into the okhop” or “into the okhryap”. The most common option is in a bowl.
Bowls in timber are made on a special bowl cutter or manually using a saw. The specialists have a mobile cup cutter that they can carry out work right on the construction site. The timber is laid one bowl on top of the other. Felt or jute insulation is laid between them.
The connection of the beam “into the clap” is similar to that “into the bowl”, but differs in the location of the drink. The bowl is cut from the top, not the bottom.
If we compare it with the main types, the connection “in the okhryap” is similar to the “in the paw”. Only in this design the end of the beam is removed, thereby forming an angle without a protrusion. The beam is connected to such a corner using dowels and crosscuts. This type of connection does not have high wind resistance, so often a straight cut is replaced with a trapezoidal one.
Any connection must be discussed with specialists, since the choice must be based on the design features. For profiled timber, connections in length are allowed only according to certain parameters, in accordance with GOST 30974-2002 “Connection of corner wooden and log low-rise structures. Dimensions, design and classification."
Any connection breaks the tightness of the walls, so before installation you need to lay a special insulation and treat the joints with antiseptics, since this will be difficult to do in the future, especially with profiled timber.
There are two main types of log frame corners:
- "without a trace"
- "with the remainder."
When starting construction, you should decide what kind of building it will be, what load the foundation and walls will have to bear, and, accordingly, what kind of timber connection in the corners should be chosen in each specific case.
We invite you to familiarize yourself with: Warm floors in the bathhouse - do-it-yourself options
Considering that correctly set corners are the key to the strength and reliability of the entire structure, corresponding requirements are also imposed on them. This:
- Reliability of fastening. The corner of the house, regardless of how it is constructed, should not be made of lumber with cracks and splits. Wood for construction must be taken with a drying level of up to 20%, which ensures its ability to withstand deformation and environmental changes without damaging the structure.
- Air tightness. The absence of cracks that allow drafts to enter the home is the main requirement for wood corner joints.
Connecting corners to build a house made of timber is divided into:
- Angle with remainder.
- Angle without remainder
The corner connections of the house with the remainder are also called “in oblo”. The design of the unit is key, it can be assembled in several types:
- One-sided.
- Two-way.
- Quadrilateral.
Lap knitting is a universal connection of lumber, used when laying walls made of logs and timber. The workpieces are placed at right angles into cut-out grooves; the size of this groove depends on the size of the material used. Such a lock is used in the construction of log houses and ceilings, the construction of bridges, and the construction of canopies. The main methods of cross fastening:
- Half-tree connection;
- Quarter and third wood joint;
- Notch in one row.
The most widespread cross-shaped connection in half a tree is when cutting corners into a bowl; it is used in the construction of utility structures, residential buildings and baths. The structure is reinforced with building brackets, dowels and dowels.
A variation of the cross-shaped connection is the method of fastening the beams together without any residue; in this case, the two sides of the cross-shaped connection have no continuation. This connection is used when laying corners and is called “no residue in the paw.” Cutting a castle without leaving any residue does not require the use of special tools; the construction of a log house using this method is popular among individual developers.
A more complex method of corner mounting is dovetail installation; a dovetail lock is a reliable but complex fastening. Marking and complex cutting of such a connection requires professional skills; the technology is widely used in the construction of low-rise economy class housing.
How do corners join in modern wooden houses?
You know, in different ways. Depending on the price segment in which Pestov’s teams work, they don’t think too much and don’t spend time on honing tongue-and-groove technologies - they build end-to-end: quickly and cheaply. Well, yes, the customer will then be tormented by caulking cracks two fingers thick, will go broke on heating and the corners of his house will become covered with mold, but who cares. I wanted it cheap, I got it cheap.
And if you want a visual difference, here are real photos - the butt corner during the assembly of the log house and some time after construction. And this is not the saddest case:
We believe that this option is not suitable for building a house, even a dacha. Avoid teams that will convince you, saying, “We’ve been building this way for ten years and no one has complained.” Believe me, every first one complained.
If we talk about the most popular corner connection, then this is, of course, a warm corner. Well, I mean, the builders present it as warm. In fact, it does not ensure the tightness of the corner and cannot cope with cold bridges. Despite the insulation, profiled timber cannot be made airtight when cut into a “warm” corner. Due to the beveled profile chamfers, through holes are obtained, unfortunately. Those who read to the end will see a video where I show directly on pieces of timber why holes appear.
But let me emphasize that this option is, of course, a thousand times better than simple joining (we use it ourselves, but in combination with drilling):
Those companies that work for more demanding clients use more complex units. For example, dovetail. We are just beginning to master this direction, but we can already say - yes, building this way is much more difficult, longer, and more expensive, but the quality cannot be compared with cheaper methods of connecting corners in buildings made of timber. It is this corner that makes sense to be called truly warm.
The secret of the dovetail is that in this corner the slope of the timber cut is made along all planes - it has a cone shape on all sides. Thanks to this, simply under the influence of gravity, the beam clamps on itself, forming a strong, hermetically sealed connection.
One of the most popular corner connections of log houses and baths in the Russian style is assembly into a bowl. As mentioned above, this option is more expensive than dovetail, warm corner and butt. The point is the additional consumption of material for takeouts and the fact that the bowl can only be cut from dry or glued profiled timber. But if you don’t mind the price, then it makes sense to take a closer look at this option (our object is pictured in the photo):
And for those who can afford mansions, the market offers good old-fashioned Canadian hand-cutting. Essentially, this is the same bowl, but made from a powerful log of dead pine (for example). A warm, powerful, beautiful and durable log house that costs a tidy sum of money (our work is also pictured in the photo):
Butt connection
For beginners, the easiest option is to connect profiled timber using the butt method. The ends of the beams are cut evenly and fixed at the corners using steel brackets or plates with spikes.
However, this method of joining timber cannot be called very durable and airtight. Therefore, it is better to use it for non-residential outbuildings.
Butt connection of beams
To strengthen corners assembled end-to-end, dowels are often used - vertical rods made of hard wood (oak, birch, hornbeam).
We invite you to familiarize yourself with: Standard sizes of plastic panels
Joining timber on a straight flat key (dowel)
The optimal joining option is the “warm corner” method, also called the “root tenon” connection. At the end of the beam, an internal protrusion-spike is cut out, which protects the seam from blowing and increases the strength of the corner.
A common corner joint method is the dovetail. It differs from the root tenon in its trapezoidal shape, which makes the contact area of the beams denser and more rigid.
Jaw connection methods
Cutting in the paw (without residue) is characterized by the fact that the ends of the logs or beams are not carried beyond the wall. In this case, the strength of the log house suffers, but the crowns are reinforced with wooden nails (dowels) and tongue-and-groove joints of complex design. These are, for example, trapezoidal cuts, which evolved from rectangular ones with a dovetail joint. Straight paw is the simplest method of cutting without leaving any residue - half of the upper beam (log) at the corner is inserted into half of the lower one.
Varieties of cutting technology without residue:
- Cutting in the paw - end-to-end joint. It is considered the lightest but most fragile knot;
- Keyed connection;
- Logging with a root tenon implies that there will be a tenon in the lower load-bearing element of the log house, and a groove at the top, the corner is reinforced with dowels;
- Joining in a block - cutting down two, three or four longitudinal locks;
- Is it worth starting construction of a stone house in the fall?
Half swallowtail
With this connection, the tenon is sawed down into a cone. The characteristics of the half dovetail connection do not differ from the knot described earlier. But the strength indicator increases. The conical cut securely holds the beams and prevents them from moving apart. This connection is used in the construction of walls with a length greater than the length of the beam.
There is no difference in the complexity of manufacturing when joining a half dovetail and a straight tenon. Both methods are performed with or without a template. For an experienced professional, the difference in the labor intensity of making these joints is almost imperceptible.
The half dovetail tenon should not be more than 5cm at its widest point. Otherwise, a crack will appear in the timber with the groove. This happens due to uneven shrinkage. The picture shows this place.