The strength of the structure and its aesthetic appearance directly depend on the type of connection of all its components. Almost all types of timber - boards, beams or beams - are cut according to standard measurements, which is not always convenient in the construction industry. Therefore, to obtain the necessary parts from wood, builders use various types of connections using notches, which are made according to markings applied with special equipment or manually.
The initial component of the structure - the part - can be made from a single piece of wood material, or from bars jointed together. The joining of the components together forms a unit - a box, which represents the structural constituent elements. All components are connected to each other with iron staples, glue or carpentry. Carpentry joints of wood parts - knitting, can be divided into types depending on the area of application.
Types of connections:
- along the length - the wooden elements are attached to each other at their ends. The joining of the material is carried out by building up or splicing structural elements;
- along the edges - a kind of joining of several boards for rapid growth of the width of the structural element;
- connecting corner end pieces of wood, brought together at different angles, to form a large number of useful components of building elements and frame parts for furniture;
- angular median joints are the joining of two components, of which one part of the part is adjacent with its end to the middle of the other or, to form shields in it, runs along its width;
- box corner - box knitting of wide boards. Wooden joints without nails are used in assembling various types of boxes or crates.
Types of nails
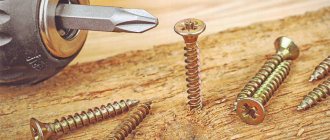
The traditional construction nail is the most common type of nail used for various types of work on construction sites and for repairs at home. A construction nail is a straight rod that has several notches near the head. During operation, these notches increase friction, which improves the quality of the connection. The flat cap is quite small compared to the length of the rod. Today, copper, galvanized and steel nails without any coating are used. The length ranges from 12 to 300 millimeters and even more. For reliable, long-term fastening, nails made from hot-dip galvanized steel are best. Non-galvanized black nails are also suitable for temporary fastening. For example, they are excellent for working with scaffolding. The disadvantage of nails that are not coated is also considered to be their instability to corrosive effects. If nails are chosen for work inside the house, then it is better to choose electro-galvanized nails.
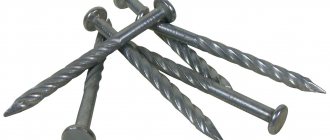
Screw nails are nails whose working body looks like a screw rod. Most often, this type of nails is used to work with structures that may be subject to further deformation under the influence of various factors, for example, under the influence of high humidity levels or large mechanical loads. If we talk about various pier floorings, the external upholstery of buildings or floors, it should be clarified that nails with a hidden head will increase the strength of structures by at least 4 times when compared with traditional nails.
The roofing nail is used to effectively hold sheets of soft materials, such as felting felt, construction paper, roofing shingles, roofing felt or bitumen coating. This type of nail is a round rod with a large flat head that protects against ruptures at penetration points and holds thin material of soft texture.
The finishing nail has a small oval head, which allows it to be used for almost invisible fastening. They are often used to connect various wooden parts together. For example, for fastening parquet, clapboard boards, platbands, decorative trim, and so on. The use of a finishing nail is acceptable wherever the nail head needs to be embedded in wood. To produce this type of nails, low-carbon steel without further coating is used, as well as galvanized, brass-plated and copper-plated steel.
A rough nail is a rod with a transverse notch applied to it, with a conical point and a conical or countersunk head. It is hammered mainly into pre-prepared holes of a slightly smaller size. Only with this method can the tightest nail fit be achieved. Ruff nails provide excellent joint strength. As a rule, it is almost impossible to pull out such a nail. When dismantling it, it will most likely break.
A slate nail is a nail that has a head of relatively large diameter. This cap is coated with an anti-corrosion coating. it is not inseparable from the nail. Based on the name, you can understand that this type of nails is used for installing slate and other roofing coverings. The length of a slate nail can be from 17 to 120 millimeters, and the head in diameter can reach 14. Anti-corrosion coating is applied because slate nails are exposed to excessive temperatures and moisture. To improve waterproofing properties, a rubber gasket can be placed under the foot of the nail. It is necessary to select nails of this category based on the maximum height of the ridge of the slate used. The peculiarity of such nails is the fact that they cannot be bent, since over time a crack may form at the site of the bent fastening.
Screwless fittings
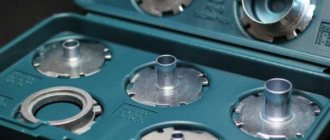
The main holding element when attaching screwless fittings is the dowel element, cast integrally with its body. The dowel has the shape of a sleeve with pointed annular or semi-circular projections.
The fittings are installed by pressing dowels into pre-drilled holes using special equipment. Screwless fittings are technologically advanced. Provides sufficient strength.
Construction nails
The design of construction nails with a flat head corresponds to GOST 4028-63 and is shown in Figure 8.
Symbol of nails with a flat head with a core diameter of 1.2 mm and a length of 25 mm: nails P 1.2 × 25 GOST 4028-63.
Upholstery staple
The general view of the brackets is shown in Figure 9.
Screws with a semicircular head (GOST 1144-80)
Symbol of the screw: screw 3 × 20 GOST 1144-80. The general view of the screws is shown in Figure 10.
| Rice. 8. Construction nail | Rice. 9. Brace | Rice. 10. Screw |
Hex head screws (GOST 11473-75)
The general view of screws with a hexagonal head is shown in Figure 11. Symbol: screw 4 × 50 GOST 11473-75.
Screws with countersunk head (GOST 1145-80)
A general view of screws with a countersunk head is shown in Figure 12.
Symbol: screw 3 × 20 GOST 1145-80.
Bolt with an enlarged semicircular head and a mustache (GOST 7801-81)
The general view of bolts with an enlarged semicircular head and mustache is shown in Figure 13. Symbol: bolt M6 × 40 GOST 7801-81.
Screws with a semi-countersunk head (GOST 1146-80)
The dimensions of screws with a semi-countersunk head are shown in Figure 14. Symbol: screw 3 × 20 GOST 1146-80.
| Rice. 11. Hex head screw | Rice. 12. Countersunk screw |
| Rice. 13. Bolt with an enlarged semicircular head and a mustache | Rice. 14. Screw with a semi-countersunk head |
Hex head bolts (GOST 7798-70)
The main type of hex head bolts is shown in Figure 15. Symbol: bolt M 12 × 60 GOST 7798-70.
Hex nuts (GOST 5927-70) are shown in Figure 16. Symbol: M8 nut (GOST 5927-70), where H is the height of the nut; M – thread diameter; S – turnkey size.
Rice. 15. Hex bolt
| Rice. 16. Hex nut | Rice. 17. Puck |
Washers (GOST 11371-68)
The main type of washers is shown in Figure 17.
Symbol: washer 12 (GOST 11371-68).
Adviсe:
If you are driving a nail into a thin part, you need to blunt its point a little, for example, by hitting it with a hammer. If you douse a small nail with water, it will be easier to hammer into the board. If the nail becomes bent while driving in, pull it out and replace it with a new one.
You can use pliers or pliers to remove small nails. A nail puller is great for removing long nails. In cases where secret fastening is necessary, you can first bite off the head of each nail with pliers.
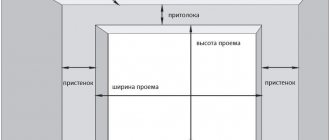
Make sure it is firmly supported before nailing the pieces together. During operation, the support should not vibrate or bend, otherwise the nails will not be driven into the wood well and will often bend. When you use a table, workbench or stool as a work surface, the workpiece must be placed above the leg. If you are working on large structures, you will most likely need to drive nails on the floor. Place all fastened parts in the door opening, this is where the floor vibrates and springs the least. If it is not possible to provide a strong support, you can place an ax, a second hammer or a block of wood under the workpiece.
If you plan to hammer several nails into one board, be sure to arrange them not in one line, but in a checkerboard pattern.
You need to drive a nail with your right hand, holding it with your left. The striking movement should come from the hand, you do not need to apply it with your whole hand, as you will quickly get tired. The blows can be intensified only when the nail “sits” tightly into the wood.
Release the blows when 5–6 mm of the nail remains above the surface of the part to prevent misfire and deformation of the workpiece. To drown the cap in the tree, you can use a center punch or any other core. It is best to fill the resulting recess with putty.
If you need to connect two parts, first drive a nail into one of them so that its point protrudes slightly from the back side. After which you can attach the resulting structure to the second part and hammer in the nails so that the workpieces do not move and the connection remains intact.
To give the connection greater strength, nails can be driven into the workpieces being fastened not completely perpendicularly, but at an angle to the plane of the wood from 75 to 85 degrees. The ends of the nails that will go through must be bent using a triangular file.
In order to easily remove a recessed nail, you need to use a chisel or screwdriver to pry up its curved, sharp end and, if possible, level it. Then, using a hammer, you need to hit the sharp side until the recessed head appears outward, after which you can grab it with pliers and completely remove the nail.
If it is not possible to get to the sharp end of the nail, place a piece of wood under the nail puller and try to pry the head of the nail with it.
The nail should be several times longer than the thickness of the board being attached. If you are working on hard wood or on an outside edge, it is recommended to drill a hole halfway down the depth of the nail. For the work, choose a drill with a diameter equal to the thickness of the nail. If you notice the wood starting to split, clamp it in a vise or dull every nail you use. In order to eliminate the possibility of a gap between the boards, nails should be driven in obliquely in the direction of the joint.
The risk of splitting the workpiece is higher in cases where you choose large nails for the job, especially if you drive them along the edges of the plank or board. To avoid splitting, you need to slightly recess the tip of the nail using a chipper. For the same reason, you should not use too strong hammer blows. Remember, the nail will hold better if it is driven across rather than along the grain.
In some cases, special nails, also called basting nails, can be used. They are driven into the workpieces to be joined before using the main nails. After the work is completed, the basting nails are removed.
Initial information
Connection categories
All connections (in carpentry they are called ties) of wooden parts according to their area of application can be divided into three categories (foreign version of the classification):
- box;
- frame (frame);
- for joining/merging.
Box joints are used, for example, in the manufacture of drawers and cabinets, frame joints are used in window frames and doors, and joining/splicing is used to obtain parts of increased width/length.
Many connections can be used in different categories, for example, butt connections are used in all three categories.
Preparation of material
Even planed lumber may need some preparation.
- Cut the material with a margin of width and thickness for further planing. Don't cut the length yet.
- Choose the best quality surface - the front side. Plane it along its entire length. Check with a straight edge. After final alignment, make a mark for the front side with a pencil.
- Plane the front - clean - edge. Check with a straight edge and a square against the front side. Use planing to smooth out any warping. Mark the clean edge.
- Using a thicknesser, mark the required thickness along all edges of the part contour. Plan to this risk. Check with a straight edge.
- Repeat for width.
- Now mark the length and the actual connections. Mark from the front side to the clean edge.
Marking lumber
Be careful when marking lumber. Make sufficient allowances for the width of cuts, planing thickness and connections.
Take all readings from the front side and the clean edge, on which place the appropriate marks. In frame and cabinet designs, these marks should face inward to improve manufacturing accuracy. To make sorting and assembling easier, number the parts on the front side as they are manufactured, to indicate, for example, that side 1 connects to end 1.
When marking identical parts, carefully align them and make markings on all workpieces at once. This will ensure the markup is identical. When marking profile elements, keep in mind that there may be “right” and “left” parts.
Correct connection of parts with nails
To ensure that the part connected with nails is as reliable and durable as possible, follow several useful recommendations. The first thing to consider is that the nail used for a particular connection must be the correct size. If glue is also used to fasten the workpieces, give preference to thin long nails, which should be at least three times longer than the strip being attached.
Secondly, when installing large structures made of wood, the most effective adhesion when working with T-shaped joints can be achieved by driving the nails crosswise. And thirdly, a reliable, strong connection can be achieved by driving several nails diagonally in relation to each other.
You should also avoid driving multiple nails into the same wood grain. This may cause the surface to crack. Try to place all nails in a checkerboard pattern or simply offset. For the same reason, you should also saw off the end of the driven strip only after all the nails have been driven in.
Always use a support stand when working with wood pieces and nails. This is the only way to avoid vibration during impacts, which can damage both the surface of the product and the nail.
Placing the boards together
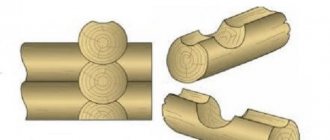
Boxes and components of mock-up cases are made from separate elements of wood. In this case, such types of connections as splicing, bonding or knitting are used. Joining can be called the joining of boards according to their parameters: thickness or width, in which the fibers of the wood material are located in parallel. The joining method is mainly used to create bulky structures.
To produce solid timber from individual components, nails, screws, glue, dowels are used, and when joining split timber, tires and wedges are used. A frequently encountered method of joining is the merging of elements by butting edges or faces together. The thinner the board during the joining process, the less likely it is to deform the material.
During the bonding process, it is important to take into account the placement of the annual layers on the wood. Compared to timber pieces that are joined by edges, blanks welded end-to-end with layers are much more stable and literally cannot be deformed. For detachable cases, the wood material is fused so that the growth rings are positioned with the convex part towards the parting plane, and for the construction of small detachable boxes - in the reverse order. A joint made by joining the boards into a fold and into a tongue and groove will not provide a strong stitched seam line. This type of joining is used to release goods without adhesion, used in conditions of high humidity.
Types of rallying:
- Rallying on a smooth fugue. The boards are pre-jointed, jointed, lubricated with glue, secured with clamps until dry;
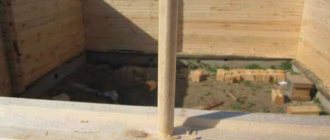
- Cohesion with the introduction of additional connections. The boards are pre-aligned, and holes for the studs are drilled in the gables. Staples are driven in to increase durability;
- Bonding of load-bearing components. Joining boards into half a tree with an overhead part on the joining area of the reinforcing strips.
Nails for special work
Nails necessary for special work are necessarily available in every workshop and are purchased as needed. Only a professional salesperson will tell you which nails, for which type of work and materials you should use. Specialty nails come in a variety of lengths and some come in a variety of shapes and colors. For example, nails used for upholstery may have chrome-plated heads. This coating does an excellent job not only of decorative function, but also resists corrosion. If you purchase special nails, use a little more than the quantity you need.
reference Information
Documents • Laws • Notices • Document approvals • Contracts • Requests for proposals • Technical specifications • Development plans • Document management • Analytics • Events • Competitions • Results • City administrations • Orders • Contracts • Work execution • Protocols for consideration of applications • Auctions • Projects • Protocols • Budgetary organizations Municipalities • Districts • Education • Programs Reports
: • by references • Documentary base • Securities
Regulations
: • Financial documents
Resolutions
: • Categories by topic • Finance • cities of the Russian Federation • regions • by exact dates Regulations
Terms
: • Scientific terminology • Financial • Economic
Time
: • Dates • 2015 • 2016 Documents in the financial sector • in the investment sector • Financial documents - programs
How to disguise a nail?
Nails with small heads can be driven into a wooden surface and disguised so that their heads become almost invisible. To do this, you need to use a chisel to break off a small sliver from the wooden surface. We drive a nail into the resulting hole and close it back with a chipped sliver, which can be fixed with wax or carpenter's putty. To make your task easier, it is best to choose nails with a recessed head that can be driven deeper than the level of the wood piece.
Business and finance
Business
: • Banks • Wealth and prosperity • Corruption • (Crime) • Marketing • Management • Investments • Securities: • Management • Open Joint Stock Companies • Projects • Documents • Securities - control • Securities - valuations • Bonds • Debts • Currency • Real estate • (Rent) • Professions • Work • Trade • Services • Finance • Insurance • Budget • Financial services • Loans • Companies • State enterprises • Economics • Macroeconomics • Microeconomics • Taxes • Audit Industry
:
• Metallurgy • Oil • Agriculture • Energy
Construction
• Architecture • Interior • Floors and ceilings • Construction process • Building materials • Thermal insulation • Exterior • Organization and production management
Photo blogs
Art
• Children's creativity • Paintings • Art • Congratulations • Film review • Musical world • Russian rock
World
• People of the world • The world around us • My homeland is the USSR • Nature Channel • Stones and minerals • Cooking, food • Construction and architecture • Under construction • Transport • Weapons • Military transport
beauty
• Fashion Pandia.ru • Girls and Girls
School
• Tests for the Unified State Exam • Solver books • Unified State Examination • 10th and 11th grades • Various textbooks • 4th grade • Russian language grades 5-9 • 5th grade • 6th grade • 7th grade • 8th grade
Wisdom
• Cliparts • Quotes
Author Directory (private accounts)
AutoAuto service • Auto parts • Products for auto • Auto repair centers • Auto accessories • auto parts for foreign cars • Body repair • Auto repair and maintenance • Car chassis repair • Auto chemicals • oils • technical centers • Gasoline engine repair • auto electrical repair • Automatic transmission repair • Tire fitting BusinessAutomation of business processes • Online stores • Construction • Telephone communications • Wholesale companies LeisureLeisure • Entertainment • Creativity • Catering • Restaurants • Bars • Cafes • Coffee shops • Night clubs • Literature TechnologiesAutomation of production processes • Internet • Internet providers • Communications • Information technologies • IT companies • WEB studios • Website promotion • Software sales • Switching equipment • IP telephony | InfrastructureCity • Authority • District administrations • Courts • Utilities • Teen clubs • Public organizations • City information sites The sciencePedagogy • Education • Schools • Training • Teachers GoodsTrading companies • Trade and service companies • Mobile phones • Accessories for mobile phones • Navigation equipment |
How to hammer small nails?
Connecting parts with small nails. Hammering small nails can cause problems. To work with small nails, use pliers that are convenient for holding them while driving. This way you can avoid accidental and unpleasant hits on your fingers. You should not release a nail that is not yet sufficiently fixed to the surface.
If you are working with nails 15-20 mm long, try using an awl to make small holes where you can later insert the nail to make it easier for you to hammer it in. To make the nail stand more stable on the surface, you can strengthen it with bread crumbs or plasticine.
Education and science
Science
: Tests • Scientific and technological progress • Pedagogy • Work programs • Faculties • Methodological recommendations • School • Vocational education • Student motivation
Subjects
: Biology • Geography • Geology • History • Literature • Literary genres • Literary characters • Mathematics • Medicine • Music • Law • Housing Law • Land Law • Criminal Law • Codes • Psychology (Logic) • Russian Language • Sociology • Physics • Philology • Philosophy • Chemistry • Jurisprudence