Let's touch on an issue that is not obvious, but extremely important for those who are just planning to build a wooden house or bathhouse - connecting timber in the corners.
In the article we will give a brief overview with diagrams of the popular types of connections used today in mass construction, we will go through the advantages and disadvantages, and most importantly, we will answer the question of which timber connection we consider the best and recommend that clients of SK Smirnov choose.
I’ll say right away that the texts for the blog are written by a person who is directly related to the production of timber and construction - therefore, the evaluative opinion will be based on personal experience.
Types of fasteners
Connecting bars at right angles is done using different methods. In fact, they are all divided into 2 types : with and without additional fasteners. This is due to the fact that the fastening for such joints is made of metal, and the properties of the latter are very different from the characteristics of wood.
The corner is a universal fastener. The bars are installed at 90 degrees at any length ratio, a metal corner is placed on one or both sides and secured with self-tapping screws, nails or screws. Since parts are produced with different angles between the plates, the bars can be secured at any desired angle.
Curly steel plates and iron staples can be used .
Assembly without corners is more common, although it requires more experience and skill. In this case, grooves are made in one or two bars and elements are inserted so that they form one whole. Due to the heterogeneous structure of the wood, a very large friction force occurs during adhesion, so the fastener is very reliable.
How to properly lay the crown molding?
The first and most important operation is laying the first (flashing) crown. The dimensions of the first row of the frame are determined at the design stage; they are commensurate with the length and width of the foundation. Using a building level, a basic horizontal line is applied to the flashing crown to control the current height of the masonry.
The foundation material and wood have different physical properties: the concrete base freezes and forms moisture when it thaws, dew also forms in the summer, concrete has a loose structure and is easily saturated with soil moisture. If waterproofing is insufficient, mold and mildew will appear on the lower beams and under the floor. The trim crown is reliably isolated from the negative effects of moisture.
To waterproof the base of a log house, roofing felt, fiberglass or woven geomaterial with bitumen impregnation are used. To adhere to the foundation, eliminate cracks and air cavities, the waterproofing layer is treated with open fire.
Longitudinal connection methods
The connection of wood blocks is possible in the longitudinal direction to lengthen the element and in the transverse direction. To join beams in length , the following technologies are offered.
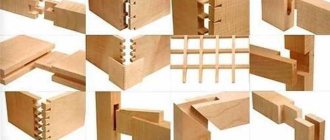
- On the root thorn – a tenon and groove are cut out at the ends of the elements and connected. They are recommended to be shaped into a trapezoid - “ dovetail" This option eliminates the possibility of horizontal vibrations.
- Longitudinal on dowels – cuts are cut at the ends of the timber. Then a key is driven into the resulting groove. This part is made from a harder type of wood. For reliability, the key is lubricated with glue. Then the second beam is literally pushed onto the bar end-to-end with the first.
- "Half a Tree" – at the ends a more complex cut is made with an angle of 90 degrees and a depth of half the thickness of the timber. When connecting longitudinally, the clutch must be duplicated with a key. To do this, drill a hole at the joining point and, after aligning the beams, hammer a wooden dowel or dowel into it. You can duplicate the fasteners with metal staples.
- Oblique lock method – first, the ends of the bars are cut at an angle. The angle is small, so the cut is quite long. Then a rectangular recess is cut out in the upper part at a certain angle. The result is a combination of a recess and a protrusion. The same is done with the second beam. The elements are joined together, a hole is drilled for the fasteners and a wooden dowel is hammered into it. The method is complex, but the connection is very strong.
It is impossible to extend the beam using metal fasteners.
How to organize your workplace?
A workplace for the construction of a log house is organized after the completion of the foundation shrinkage process. The construction site includes: the foundation of the future house, a lumber warehouse and a place where carpentry work will be performed.
The lumber is stacked at a distance of 4-6 meters from the foundation and protected from rain; the stack should not come into contact with the soil and is located on a pallet. Between the foundation and the lumber warehouse, a work area for marking and cutting with a workbench 1.0-1.5 m high is equipped. When using power tools, it is necessary to supply power.
All carpentry work is performed in the work area. The assembly of structures and laying of timber is carried out directly on the walls of the log house. Working on ladders is inconvenient and unsafe; for convenience, industrial scaffolding is used. You can make the scaffolding yourself - place the ceiling on vertical posts and securely fasten the structure with consumable lumber.
The cut parts from the timber are lifted along inclined logs using a rope. All work can be done together.
Corner connection methods
The angular connection of the beams to each other, on the one hand, is simpler, since the adhesion here is much better;
on the other hand, it is more complicated, since it involves cutting out many cuts and tenons of different shapes. There are 2 main technologies .
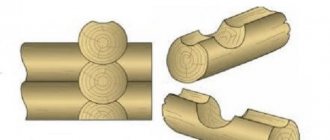
- “ Into the bowl” – more precisely, with the remainder. In this case, after fastening, some part of the beam remains outside the corner.
- “In the paw” - or without a trace. The angle looks straight.
The method is chosen taking into account the parameters of the material and the geometry of the entire building. For example, connecting rounded timber in the corners of a hut using the method without residue makes no sense.
With the remainder
This joining is done using locking grooves. Based on their number and type, there are 3 options .
- One-sided connection - a groove is selected on one beam with a cross-section equal to the cross-section of the second beam, but of less depth. The second element is simply inserted into the first. The method is simple and reliable.
- Double-sided - the cut is made in both bars and the groove is placed in the groove. This results in a double-sided fastening that is equally strong in both directions.
- Quadruple - change the shape of the bar closer to the end so that when connected they fit into the groove, but each subsequent element rises above the joining plane. In this case, the bars are connected and held by adhesion on 4 sides.
The more complex the docking method, the more preparation and calculations it requires.
Without a trace
You can fasten it at right angles without leaving any residue. There are many options here.
- “In half a tree” - as with a longitudinal connection, cuts are made at the ends of the bars to a depth of half the thickness. The material is placed into each other, groove into groove, and a strong bond is obtained. You can duplicate it with a dowel. In this case, another small cut is made in the upper part of the cut, and when joining, a key is driven into the resulting hole.
- Butt joint - simple fastening to brackets or plates. The wood is not processed, but simply laid with tight pressure on the ends and fixed with corners, sometimes even with self-tapping screws. Such fasteners must be duplicated with sealing material, since the joints cannot be made sufficiently tight.
- Root tenon - a groove is cut out in one element, any element, and a tenon of the same size is cut out in the other. When connected, the tenon fits into the groove, literally merging the elements. The technology ensures complete heat retention. Duplication with wooden panels is allowed.
- “Dovetail” - resembles the “half-tree” method, but the grooves are made trapezoidal. It is more difficult to calculate and make them, but this increases the adhesion area and the strength of the joint.
- “In the paw” - a cut is made at the end, which is a characteristic feature of such a connection. The grooves are made approximately half the thickness and with inclined planes. They are a little simpler than dovetail. This option is recommended to be used when constructing interior partitions, since this corner is easily ventilated.
Industrially, grooves and protrusions of more complex shapes are made into the bars. However, this requires special equipment.
How to lay a corner of a house?
After the casing has been laid, you can install the corner of the house. Most often, individual developers ask the question: how to properly lay timber in the corner of a house.
Assembling corners is the most difficult and time-consuming operation; the easiest way is to lay a corner from crowns assembled into a head or paw. The disadvantage is that in both cases significant gaps are formed, depending on the accuracy of cutting out the connecting elements. The corner joints are sealed and insulated.
More practical is a tenon mount, called a “warm corner”; such a connection is more labor-intensive, but has a number of advantages:
- The ends do not protrude beyond the edge of the building, the masonry is called “no residue”;
- The structure has no through gaps, the corner does not require insulation;
- The castle is located inside the structure, the facade takes on an attractive appearance;
- The building can be erected from timber of smaller sizes.
T-shaped beam connection
Such a connection is used when constructing walls inside a house and connecting them with external ones or with each other.
- Semi-pan - a protrusion is cut out on a perpendicular beam with one flat side and the other in the form of a trapezoid. The thickness is about half a block. The mating element has a groove of the same size and configuration.
- Key groove - a cut for a key is cut in the bars. When joining, the key is driven into the hole and held in place by the joint.
- Frying pan - the protrusion in a perpendicular block is made symmetrical in a trapezoidal shape. Docking is more difficult, since driving a perpendicular element into the main bar requires force. But the fasteners are reliable.
- A straight groove on the main tenon is a three-way joint. A groove of complex shape and with small grooves on both sides is cut out at the end of the perpendicular. Two beams of the main wall are joined to a perpendicular edge so as to form one plane on the outside. Retention occurs due to the entry of the spikes into the grooves of the perpendicular.
In a home, it is not recommended to replace the T-shaped joint with corner fasteners. The latter looks extremely unaesthetic.
How to control the assembly of a log house?
During the construction process, a number of parameters are monitored; the following are subject to control:
- Verticality of corners;
- Horizontal masonry;
- Current wall height.
To control verticality, a vertical line is applied to the end of each beam. The line is located at an equal distance from the edge of the corner and is marked using a construction square. When laying the next row, the lines of the bottom and top rows must be aligned. The resulting vertical is controlled using a plumb line; a violation of the integrity of the vertical indicates deformation of the masonry.
When laying the next row, the horizon is set using a building level. The height of the walls is measured from the base horizontal line marked on the rim.
Recommendations for choosing a docking method
The joining method is chosen depending on the load on the node.
The choice of method depends on the load that will be placed on the node. The latter depends on weather conditions, the number of storeys of the building and the characteristics of the soil.
- If the corner or wall is mainly affected by compressive force, the “half-tree” method is preferable. It is quite simple and quite reliable in this case.
- If the wall is subject to tearing force, it is better to join it using a straight overhead lock or a root tenon. Dovetail will also work.
- For high bending loads, an “oblique lock” is chosen. It is more complicated, but allows you to level out multidirectional loads.
At the junction on the outside of the wall, the timber is rounded so that water does not accumulate in the grooves.
How to securely fasten the crowns?
Deciding how to lay and fasten the crowns depends on the type of lumber chosen. The profiled timber is reliably connected by its own tongue-and-groove system; for reinforcement, wooden dowels are used; on one side of the building it is enough to install 6-7 such fastenings. When building from solid timber, dowels are installed every 500 mm.
Simultaneously with the laying and fastening, the inter-crown seams are sealed and insulated. For a log house for shrinkage, this operation is performed after completion of shrinkage.
How to use dowels?
The dowels are installed under tension in specially drilled vertical holes and hammered in with a wooden mallet, the upper ends are recessed to a depth of 20-40 mm. Each dowel connects three rows of masonry. For timber up to 200 mm thick, dowels with a diameter of 25 mm are used, for larger thicknesses - 30 mm.
When temperature and humidity change, wooden dowels and wall beams change their dimensions proportionately without loss of adhesion; metal dowels do not have this property.
Using a manual cup cutter
Cup and groove parameters.
Today it is impossible to determine which cup-cutting equipment allows you to make more accurate and high-quality cuts on profiled timber.
A modern manual cup cutter has a level of accuracy and quality of cuts no less than specialized stationary machines. Very often, to facilitate the assembly of houses from profiled timber, specialists purchase manual devices for cup sawing timber and carry out this type of construction operations directly on the construction site.
Manual cup cutters are used to carry out the process of milling the timber lock. Carrying out such an operation directly at the site of assembly of the log house allows you to achieve the maximum possible perpendicularity of the walls during installation work. A manual cup cutter is convenient in that it can be used directly on a construction site (both for making new cuts from scratch, and for correcting ready-made samples during assembly if defects are detected in the cup cuts). A manual cup cutter is convenient for use in small-scale production. Almost all manual cup cutters have powerful cutter drives, which allow production operations to be performed with high precision, not inferior to the accuracy of similar operations performed on stationary machines.
Working principle of cup cutting machine
Scheme of a cup cutting machine.
To produce cups on profiled timber, various cup-cutting milling machines are used. Some of the most popular devices for making cups are the following devices:
- Makita 3612С;AEG 2050;
- Felisatti RF62/2200VE;
- Interskol FM-62/2200E and their analogues.
The cutter installed on the device has pads with two sharp edges. With the help of these cutters, wood is selected from the body of the timber used. To reduce the load on the device, the plates placed on the cutter are attached at an angle to the axis of rotation of the working tool. These plates are removable and are secured using special screws.
The cutter is mounted on a frame that can move along and across the log. A special device that provides lifting allows you to adjust the cup's depth. In addition, with the help of this device the depth of the manufactured groove lock is adjusted in accordance with the project.
A cup-cutting machine for timber on a frame is attached to the cleats on which the timber is installed. The cup cutter is fastened in the place where the cup cut is supposed to be placed. During operation, the frame of the device can move freely along the base of the device. Simultaneous movement of the cutter along and across the beam allows you to cut a groove of the required depth and width.
Equipment selection
When purchasing a hand tool or a production line, you need to pay great attention to the characteristics of the devices. This will allow the opportunity to optimize work and increase its effectiveness.
What points should you pay attention to?
The equipment must cut the bar at all possible angles.
When choosing a cup cutter for corrugated timber, show interest in its following indicators:
- diameter and shape of the cutting crown;
- the presence of the ability to process material at all possible angles;
- total declared power of the equipment;
- maximum cross-section of the processed bar;
- level of reverse and working feed speed;
- the cutter has a lot of rotation speeds;
- does the stationary machine have a CNC unit;
- Are there any additional options: chain or disk sawing units for trimming logs, the ability to work with a double drill, using a compound cutter, etc.
Certain factors
- Washing down fonts mechanically at woodworking companies has a number of limitations that arise due to the accuracy of the cup-cutting machines used for the block.
- For its part, making connections manually has a number of non-standard limitations, which occur due to the inaccuracy of working hands and mobile tools.
- But now there are highly qualified craftsmen who can assemble a log house from a block into a font by hand even better than using factory connections.
- In production, cups are cut with a gap of 1/1.5 mm. When working with your hands, you can make tight connections, in other words, without a gap.
The most basic difference between factory-made hot tubs and hand-made ones is their configuration. However, the shape of the connections may differ. They also have different angles of inclination.
How to lay the interventional seal?
The slot seal performs the functions of heat and sound insulation and is used in the construction of any wooden structures. The type of sealant and laying technology depend on the size of the lumber. When building from solid timber, a layer of sealant is laid when laying each row. When building from timber with natural moisture, this operation is performed after shrinkage by sealing the cracks. The profiled timber has special grooves for the seal.
The seal for solid timber is produced in the form of a strip of tow, flax, natural moss, for profiled timber - in the form of strips of felt, foamed fine-pored rubber and polyethylene foam. The sealing tape is available in sizes from 100 to 250 mm, the sealing strip is selected according to the standard size.
Mold may appear in a seal that is wet or saturated with atmospheric moisture; it is recommended to recess the seal into the gap to a depth of 20-25 mm, and treat the gap with liquid sealant.