- Features of the material
- Preparation for installation
- Installation of sheathing
- Methods for attaching imitation timber
- Video on installation of imitation timber
- Treatment
- Adviсe
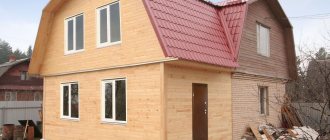
Plastic panels that were used to decorate office premises and houses are a thing of the past, giving way to environmentally friendly finishing materials made from natural wood. Today, when finishing houses, imitation timber is more often used, since this material allows you to create an elegant interior, giving the facades an attractive appearance.
Features of imitation timber
Imitation timber is used for interior finishing, as well as for decorating the façade of a building. This type of cladding is chosen for low-rise buildings.
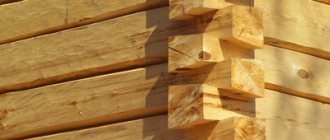
To produce finishing materials, different types of wood are used. Imitation timber is made in the form of small boards, which are attached to each other using a tongue-and-groove system. In appearance, the products are similar to wooden lining.
When choosing such a design, it is possible to obtain a beautiful interior, create a safe coating that is perfectly combined with other interior elements.
The thickness of products for interior finishing must be at least 2.5 cm.
Treatment
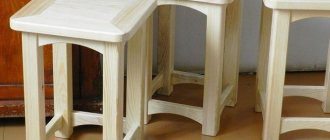
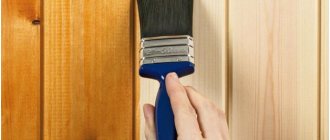
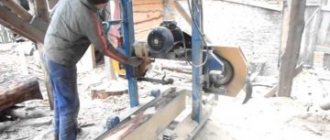
Before installing imitation timber, the panels must be processed. To do this, the boards are sanded, after which an antiseptic is applied to them, and then a primer. When using water-based paints and varnishes, the surface of the panel will dry quickly and acquire the desired shade. It is recommended to apply the coating in two layers; the second time the paint must be applied after the first layer has dried well.
Why choose imitation timber
The main advantages of a material that imitates timber are its environmental composition and simple installation. If the installation technique is followed, it is possible to create a comfortable microclimate inside an enclosed space. The wooden base perfectly allows air to pass through and prevents moisture stagnation.
Stone and concrete surfaces are finished using timber. Among the advantages are the following qualities:
- It is possible to create a durable shell. The dense structure of the material makes it possible to achieve high performance characteristics;
- Eco-friendly composition. To create timber, wood shavings and various types of solid wood are used;
- Minimum consumption;
- Easy installation;
- Moisture resistance;
- Low thermal conductivity;
- Large selection of shades.
Modern models of timber are impregnated with fire-resistant impregnation, which avoids burning of the material. It is recommended to pre-treat the surfaces with antiseptics, which prevent the growth and reproduction of pathogenic microflora under the wooden base.
Assembling the basic frame and insulating the walls
Panels of imitation timber are always installed only horizontally.
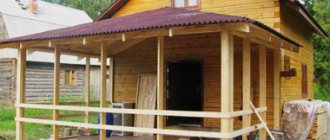
In order to install timber on the facade of a house, or rather its imitation, it is not necessary to insulate the walls. However, it is better and more expedient to take care of thermal insulation right away, even if the walls do not seem too cold. As practice shows, insulation is never superfluous, and thermal insulation made from the inside is less effective and takes up useful living space, so we will consider how to sheathe a building with false timber with preliminary insulation.
Imitation timber panels are always installed only horizontally. Therefore, the counter batten slats should have a vertical direction, and the base sheathing bars should have a horizontal direction.
Let's move on to practice and consider the sequence of work operations using the example of one of the walls of the building.
- We cover the surface of the base wall with a vapor barrier membrane. It is needed in order to protect the basalt insulation from steam penetrating from inside the house.
- At the corners of the wall we install pins, between which, along a plumb line or level, we stretch vertically the threads corresponding to the outer surface of the main beams.
- According to the threads, we install the beams in increments corresponding to the width of the insulation mats (usually 60 cm).
- We lay basalt thermal insulation, making sure that there are as few gaps as possible between the mats, which are cold bridges.
- The next step is windproof film. We roll out the canvas from top to bottom and attach it to the beams with a stapler. The next canvas overlaps the previous one by at least 15 cm.
- We install counter-lattice slats on top of the base horizontal beams, pulling them to the guides with hardened (black) wood screws. The length of the screws is 55-60 mm with a strip thickness of 30 mm.
Types of interior decoration
Before choosing a material that imitates timber for interior finishing, it is recommended to first familiarize yourself with the types of cladding.
These include:
- Monolith. The cladding evenly covers all planes inside the space. It is decorated with floor, walls and ceiling. The panels are attached tightly to each other. As a result, the decor appears seamless;
- Combination. The elements have different textures. This type of cladding is used as bright accents. To create an unusual composition, you can use several wooden elements that match each other in color.
Each type of timber is fastened using a specific technology. And it is also recommended to prepare consumables and tools in advance.
Cost of work
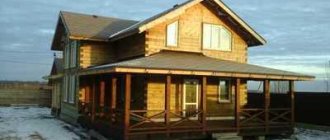
Imitation of timber in the house
If you are not eager to do such basic work yourself, you should take the help of professionals who provide highly qualified services in this area.
The cost of installation of the beam depends on the availability of building materials from the customer, as well as on the territory that needs to be designed in this way.
Also, the cost may be affected by the fame of the performing company, the weather in which the work will be carried out and the required time frame within which you require the delivery of the object.
If we evaluate the pricing policy on the market for such work (which includes laying insulating material, installing sheathing, processing and painting), then on average their cost varies within 1,500 rubles per 1 m 2.
Of course, such a cost may seem a little overpriced, but the work will be completed in a very short time, and the company will vouch for the quality of the finish. As a rule, well-known companies freely provide a guarantee for the work performed for a sufficiently long period, which will be the key to your peace of mind.
Every owner of a private home knows that the appearance of the home is just as important for the comfort of living as the interior comfort. An environmentally friendly and modern material today is imitation timber. It consists of panels that are installed using a certain technology. If you are careful during installation, you can achieve a high-quality finish that will delight your family for several decades.
Stages of interior finishing
Before starting to finish the imitation timber, it is recommended to take into account several stages. It is first recommended to select the right wooden panels, and then prepare their surface. Next, you can proceed to installation work.
How to prepare the material? To cladding the interior of a space, it is necessary to select a material in accordance with several parameters. They are as follows:
- The material must be class B. The fact is that for such timber, wood fibers with a minimum number of defects are chosen. As a result, the wooden base is dense and flexible;
- The width of the wooden part must be at least 20 cm. Working with narrow parts will require a lot of effort and time;
- The thickness of wooden beams should be no higher than 2 cm.
If finishing with imitation timber is intended to retain heat indoors, then the decorative material should consist of deciduous trees.
This list includes:
- Linden;
- Birch;
- Ash.
These types of wood can cope with high humidity and do not respond to temperature changes. Artificial panels should not contain traces of insect activity, rotting processes and mechanical deformation.
Preparation of lumber
Finishing the inside requires special attention to the material. Imitation for interior work should be:
- Made from high-quality wood (classes A, AB and Extra)
- The width of the board is from 10 to 15 centimeters. Boards that are too thin will not look like false timber.
- The thickness of the board is less than 3 cm. A board that is too thick is not suitable for use for decorative cladding.
In an unheated room, use any type of wood. The main condition is treatment with antiseptic and moisture-resistant solutions, as well as solutions that reduce flammability.
The reason for refusing to purchase is a dent on the packaging or wear and tear on the information. The packaging states how the wood was treated, storage conditions and whether the boards require additional sanding.
The desire to save money will not help. Abnormally low prices for products indicate appropriate quality. For the sake of high-quality repairs, choose high-quality materials.
No less important information on the topic: Lining walls
After purchase, the boards are stored warm and dry. If excessive moisture is detected after opening the package, the buyer has the right to return the material to the store. Before starting work, the finishing material is transferred to the room where it will be applied for a couple of days (or better yet, weeks). Before exterior finishing, it is enough to keep the workpieces in the open air for a couple of hours.
All lumber is processed after making the sheathing onto the installation surface. Coating with varnish and other substances occurs after.
No less important information on the topic: Planken on the facade
How to calculate the material
The correct calculation and the exact number of elements can be made by taking into account its thickness and the length of the wooden panels. In addition, it is necessary to take into account the area of the space that will be decorated with timber.
Experts recommend purchasing boards with a small supply. The fact is that during the installation process various difficulties may arise that will require replacing the damaged element with a new part.
When choosing, it is important to carefully check the surface of the boards for defects. The timber should be free of small pieces, cracks and chips. Such boards can be used in the area of window openings, doors and flooring.
- How to prepare the surface for installation? Before installation begins, the base on which the beams will be attached must be prepared. Preliminarily gets rid of large debris and dust.
- To eliminate minor defects, putty is used. The wooden base is first thoroughly impregnated with an antiseptic solution. Brick walls are coated with a primer with antiseptic components.
- Next, we move on to the next stage, which involves the use of thermal insulation. For this purpose, mineral wool and polyethylene film are used. The material can be secured using metal staples. Layers of mineral wool are fixed with thin wooden slats.
The final stage will be the creation of sheathing on the surface of the thermal insulation layer. To do this, choose thin slats. They are attached in the form of identical squares, the pitch of which is 40-50 cm.
An imitation of timber is fixed onto such a sheathing. To make the coating seamless, the protruding elements are attached to the grooves of the previous parts.
Basic qualities
Imitation timber is a material that has recently entered the construction market. Previously, this function was performed by lining made of wood or plastic, which could imitate natural material. But if we compare modern material with its predecessors, it should immediately be noted that it is produced in certain sizes, which are: 0.65–2 m in width, 2–4 m in length. This size is considered optimal for performing external cladding work houses with non-standard shapes and a large number of corners.
So, the positive parameters include:
- It is a fairly environmentally friendly material. For its production, wood is used, which has a breathable effect.
- It has a special type of lock, weighs little, and is therefore easy to install.
- Can be used for finishing walls made of any material.
- Relatively low price and large palette of colors.
- Quite durable. If installed correctly and subsequently used, it can last up to thirty years.
- Acts as additional thermal insulation for the home.
Along with the positive characteristics, the main disadvantages should also be noted:
- A house finished with imitation timber has a high degree of flammability. Despite the fact that manufacturers are quite serious about treating the material with special anti-burning compounds, imitation timber is easily subject to fire. In this case, it is necessary to treat it annually with special solutions, otherwise the material will burn, blacken and crack.
- The need to periodically apply varnish or paints and varnishes.
- Compared to the price of the imitation timber itself, components, corners and other decorative elements are quite expensive.
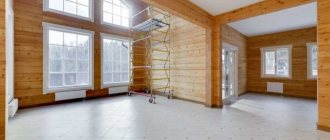
Photo of interior decoration with imitation timber
Lathing fasteners
To get started, you need to get hold of some tools. You will need:
- Planks 30 mm thick;
- Dowels with plastic fasteners;
- A hammer drill or drill with a similar function;
- Level from half a meter long;
- Hammer;
- Crosshead screwdriver.
Depending on the size of the lamella you choose, it is necessary to fix the wooden strips vertically at a distance of 400-800 mm (the width of the lamella). In this way you need to mount it over the entire working area. For ease of fixation, it is best to drill three or four holes (depending on its length) for dowels in each plank.
For each subsequent slat, you should cut out its own vertical, this will allow you not to deviate from the specified dimensions in the upper part of the house. Or mark up in advance using a long rule.
It is necessary to drill holes in the wall along the holes in the rail using the hammer drill function of the hammer drill. Then insert plastic fasteners into the wall and, placing the rail against the wall, drive in the dowels.
Hot-dip galvanized nails for façade boards
As in the case of self-tapping screws, not every galvanized nail is suitable for external fastening of facade boards. We use the recommendations of Finnish experts, who recommend using hot-dip galvanized nails. This type of nails is made in cassettes for a nailer (nail gun), but they can easily be driven in with a hammer by hand. As with a self-tapping screw, the head of the driven nail should be flush with the surface of the painted board. We recommend using this type of fastener when attaching painted Scandinavian style façade boards. This board has a rough, sawn surface, due to this, tinting the nail heads can be done with a regular brush, without any visible differences. The consumption of self-tapping screws per m2 is about 20 pcs.
Interior color scheme
To preserve the natural texture and color of wood, when processing panels, preference should be given to impregnations, colorless varnishes, and wax. It is better to refuse paint. In this case, the color of the board will directly depend on the type of wood. The most common shades are light brown, brown-red, and coffee.
For clarity, let's look at some options (variety - color scheme):
- oak – from light brown to dark brown;
- beech – white with a yellowish-red tint;
- ash – from dark brown to light yellow;
- alder – red-brown;
- walnut – from light brown to black;
- pine - from pale yellow to reddish yellow;
- larch – from light yellowish to reddish;
- yew – yellowish-white.