Where to start building a garden house with your own hands? Nowadays, there are a huge variety of technology options for building garden houses. The market is replete with offers to build a garden house from logs, bricks, cinder blocks and more.
Many experts suggest using plywood sheets, foam blocks, timber, etc. when building a house.
Plywood production
Plywood production
What does plywood production involve? Of course, this is the initial harvesting of wood, heat treatment, cutting into veneer, pressing it and cutting it to the required size.
In addition, when processing plywood, it is sanded, treated with special reagents, and packaged in special containers. There are several ways to make this material:
- basic sawing of wood,
- planing existing workpieces,
- gluing veneer, which is removed in a small layer (peel-peeled plywood).
In Russia, plywood production dates back to the end of the nineteenth century. Previously, this building material was used in almost all industries, from the production of instruments for musicians to the construction of aircraft. And the range of use of this material increased every year. Our country is among the leaders in the production of high-tech plywood, including due to the wealth of wood and developed production.
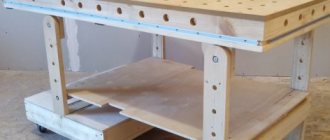
Wall frame
Vertical frame posts are installed on the horizontal frame, secured with transverse crossbars and temporary braces. The span width must be calculated based on the size of the plywood sheet. When using plywood 1500x1500 mm, the optimal span is 375 mm. We mount the upper frame made of timber on the vertical posts.
Figure 5. Wall frame.
Elements of door and window frames are installed according to the project strictly according to the level. It is important to strengthen the frame of window openings to avoid deformation of double-glazed windows.
A ceiling lath with a cell of 500x500mm is laid along the top trim. To avoid distortions, the entire structure is secured with temporary supports and spacers.
Types of plywood
Now we will look at these types of plywood:
- Laminated,
- Moisture resistant
- Construction,
- Fiberboard
Laminated plywood
Laminated plywood
Laminated plywood is a building material that occupies one of the leading positions in the list of building materials used in the construction of houses.
This type owes its popularity to the presence of a laminate layer, which is applied to sheets of plywood. This type is made from larch, birch and other wood species. The advantages of laminated plywood are moisture resistance, impact resistance, and ease of maintenance. Advice! You can use this plywood for furniture assembly and finishing work, and repeatedly.
Moisture-resistant plywood
Moisture-resistant plywood
Moisture-resistant plywood is made by gluing with a special glue made using resin. This type is used for interior finishing work. Russia also produces moisture-resistant plywood with an increased level of moisture resistance. In fact, it differs from the first type of plywood by using an adhesive based on a different resin. Its peculiarity is that it can be used not only indoors, but also outdoors.
Construction plywood
Construction plywood
Construction plywood is indispensable in construction. Construction refers to the construction of various structures using plywood, be it a ceiling, floor, wall, etc. Typically, plywood is a rough material that defines the look and shape of a structure, then it is given a cleaner finish.
This plywood is thicker than other types to give it the necessary rigidity and reliability.
Advice! This type of material is popular due to its lightness, which makes it possible to use this material in any type of residential building structure.
Fiberboard plywood
Plywood Fiberboard
The abbreviation DVP means “fibreboard”. This building material is obtained by hot pressing and subsequent drying of wood fibers. In the woodworking industry, a fairly large amount of wood waste is generated, which is crushed and a fibrous mass is obtained, from which fiberboard is prepared. Depending on what kind of wood the waste was used from, the material gets its specific color.
Fiberboard is a very common building material; its surface is smooth and durable, at the same time it has the necessary flexibility.
Here is an example of a list of advantages of the material:
- good for sawing,
- due to its light weight it is not difficult to attach it to the floor and walls,
- has good sound insulation.
What to cook
In fact, such buildings belong to the frame type. With good strength, they are light, warm, easy to install, and most importantly, their price is low. First of all, you will need to decide on the size of the building.
Note! Since the house will be small, it will only accommodate the necessary minimum of premises: a bedroom, which at the same time plays the role of a living room, a kitchen and a bathroom. For them, a building with sides of 5x5 meters or 6x4 is quite enough. On these 24-25 square meters it will be possible to comfortably accommodate all the necessary rooms.
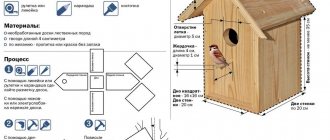
Materials you will need
This material is needed for external wall cladding.
Based on the size of the building, purchase the required amount of material:
- 8 FBS blocks (solid foundation block);
- cement and sand;
- 20 linear meters of beams, section 15×15 centimeters;
- boards for arranging the frame, rafters and floors, with a cross-section of 5×15 centimeters;
- sheets of moisture-resistant plywood (FSF brand), its thickness should be 1-1.5 centimeters and the usual FK brand;
- PVA glue, with mandatory marking “for woodworking”;
- roofing felt or similar rolled waterproofing material;
- moisture-protective composition and antiseptic;
- bitumen shingles for roofing;
- heat insulator, preferably mineral wool;
- fasteners - self-tapping screws, nails.
Tools to prepare
Prepare the following tools:
- drill and screwdriver;
- carpenter's hammer;
- chainsaw, electric jigsaw, wood saw;
- plumb line, angle, tape measure, laser and bubble level;
- tassels;
- container and shovel for mixing the solution.
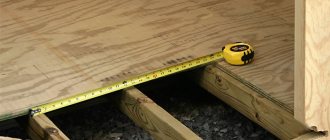
Plywood cutting
Cutting plywood
Everyone understands that plywood is sold in standard sizes, but for work you need its elements in a variety of shapes, and not just rectangular ones. Therefore, a person using this material must know how and with what to give a rectangular standard sheet the desired shape.
The easiest way is to take the necessary measurements at the construction site, visit a carpentry workshop and order the necessary plywood figures. However, this method, naturally, will require additional financial costs, in addition, it does not fully correspond to the task if you build a house with your own hands.
Sizing
A wooden house on a summer cottage can have any size, and you need to focus on the age of the child. However, it is unwise to erect a very small structure - in a couple of years it will become cramped for a grown-up child.
Optimal parameters for a durable hut made from scrap materials: height – 2 m; width – 2.5 m, length – 2 m. Inside such a building you can organize a full-fledged place for games: arrange children’s furniture, place toys.
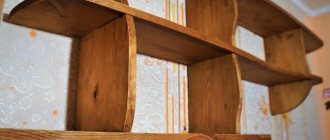
Laying plywood
Laying plywood
Laying plywood on the floor has several nuances. Depending on whether the floor is laid on a wooden or concrete floor, the thickness of the material is determined. When laying plywood on a wooden floor, the defects of which are hidden, it is enough to purchase plywood with a thickness of about 10-12 mm. Minor differences in the level of the boards will be perfectly hidden and will not be noticeable.
When laying plywood on a concrete base, logs are first laid and leveled to zero. In this case, the thickness of the plywood must be at least 15 mm to ensure that the load is maintained and there is no deflection.
Insulation and soundproofing of walls
It is optimal to use mineral wool boards as insulation. The material, cut to size, is glued to the mounting foam from the inside of the room or placed tightly, spaced, between the frame posts. A vapor barrier is laid over the insulation overlapping and secured with staples to the vertical posts. The internal surfaces of the walls are covered with plywood.
Figure 7. Insulation of walls with mineral wool slabs.
The walls of frame houses made of plywood should be protected from atmospheric influences by any facade material: metal or plastic siding, clapboard or block house.
If a house is being built for year-round use, then installing a ventilated façade will make it possible to lay another layer of insulation and vapor barrier, which will significantly increase the thermal characteristics of the building and reduce heating costs during operation.
Jigsaw for plywood
Jigsaw for plywood
In construction, to give plywood the required shape, an electric plane is used, on which a blade with a fine tooth is placed. After cutting with a jigsaw, the edges of the figure can be further processed with sandpaper. At the same time, it is almost impossible to make curved shapes with a jigsaw; for this, a circular plate is used.
Advice! If you don’t have a jigsaw or a circular saw, you’ll have to work the old fashioned way with a hacksaw, but to do this you should sharpen the saw properly and be very careful not to break the cutting line.
How to make a roof
If the roof is planned to be ordinary - gable, the layout of the attic space or attic floor must be done so that there is a partition in the center that will support the roof at the junction of the two halves of the roof. This is the easiest way. There are also more complex ones.
The roof on a dollhouse can be made in different ways can be made in different ways
If you need a roof of a complex shape, we cut out several rafters from plywood that will define the shape. We attach them to the walls and cover them with some flexible material. It can be cardboard, fiberboard. The ends of the rafters are coated with glue (preferably carpentry glue), after which the material is laid. If the bend is too steep, additional fasteners may be needed. Usually thin small nails, like shoe nails, are used.
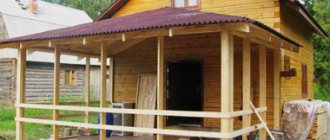
Plywood house
Plywood house
Are you planning to build a house for yourself or your children? Each of us built a hut as a child, and you know that your child will be delighted if he has his own little playhouse. Of course, it is better to use high-quality plywood. When starting construction, you should draw up drawings of the future house.
If construction is taking place for a child, then it is better to build the house in or next to the children’s room so that the child can be under control.
Advice! You should think about what kind of plywood to use for construction and the required number of sheets. If the house is supposed to be built small and light, then the thickness of the plywood should not exceed 10 mm for it to work.
When determining the thickness of the material, it is necessary to take into account the load on the plywood, avoiding its maximum possible bending. If you have sufficient financial resources, you can also purchase a laminated type, which has a more aesthetic appearance and does not require painting.
After preparing the material, we make markings on sheets of plywood, draw windows and a door. When planning the placement of windows, you need to strive for their larger size so that there is light in the house. The height of the doorway must exceed the height.
If the necessary lines are marked, you can proceed to cutting out the blanks.
Advice! Once the pieces are ready, you should use sanding paper to sand the plywood and process the cut edges so that the chips do not hurt your hands. It is better to connect plywood using metal corners and self-tapping screws, since using a timber frame will significantly increase the cost and weight of the object.
Once the walls of the house are assembled, you can move on to installing the roof. When installing this part, it is necessary to maintain a certain angle of inclination, eliminating the possibility of children being on it.
If non-laminated plywood was used during construction, then it is better to paint the house, giving it a cheerful, attractive look.
Step-by-step instruction
The first step is building the foundation
A frame garden house has very little weight, so there is no need to make a massive and expensive foundation. Most often, when building such houses, a strip type of foundation is used. What is required to build a foundation?
- Sand and crushed stone;
- Concrete (preferably ready-made);
- A pipe that will provide ventilation in the floor;
- Rebar rods.
The next step is the construction of the frame itself
Building a frame is a step-by-step process. You need to put a waterproofing layer on top of the base (usually I use roofing felt). Next, you need to make the bottom trim and secure it to the foundation reinforcement. After this, you need to install the racks and secure the horizontal jumpers between them. After this, you will need to install the upper garter (in the same way as the lower one).
After the frame is ready, it is necessary to sheathe the outside with plywood sheets. After this, the entire structure needs to be insulated (you can use a vapor barrier film).
Construction of the roof
For frame houses, lightweight roofing materials are used: flexible tiles and corrugated sheets.
Roof diagram of a frame house.
Rafter beams are attached to the top sheathing, which are leveled and additionally secured with jibs. The distance between the beams should not exceed 1 m. After this, sheathing is done with boards. The pitch between the boards depends on what the roofing material will be. If flexible tiles are used, then the distance between the sheathing boards is small.
After the sheathing is completed, it is necessary to lay a layer of waterproofing. Roofing material is quite suitable for this. It is laid overlapping, carefully fastening the joints and perpendicular to the sheathing. To enhance the waterproofing characteristics, it is possible to install a second layer of roofing material, which is placed perpendicular to the first. After this, the roofing material is attached.