A workbench is an indispensable tool for a garage or workshop. This is not just a table on which additional elements are placed. When properly manufactured according to pre-thought-out drawings, it can become an excellent assistant, allowing you to speed up the execution of various works with wood. Let's look at how to make a workbench with your own hands at minimal cost, taking into account the features of the workshop and the amount of free space in it.
Peculiarities
A folding workbench when folded takes up to 10 times less space than when working.
- Portable - a version whose operating principle is similar to a folding chair or a regular extendable table that is easy to carry. The disadvantage is the almost complete absence of drawers, which noticeably weigh down the structure: instead of them there are one or two shelves without back walls, the workbench itself resembles a rack.
- Universal - a structure that is attached to the wall, but unlike a regular wall-mounted table, this table has all four legs. The scheme is complicated by retractable wheels, allowing you to use the workbench as a cart. This version is reminiscent of a mobile table for preparing hot dogs, popular among fast food sellers in the 90s of the last century: there are shelves with back walls (or full-fledged drawers). It can be folded against the wall, lifted and secured, and rolled to another place. Carrying requires the help of two more people: the weight is significant - tens of kilograms.
- folding wall- mounted workbench is used in a home “office” or utility room – outside the home. It is stylized to match the general design of a home interior, and can be made as a mini-transformer, from the appearance of which guests will not immediately guess that this is a workbench. A profile pipe can be used for the underbench.
General description of the workbench design
This version of the workbench has the simplest design. It is attached to the wall on one side, has two support legs and can be folded (retracted) into a vertical position. Thus, this design is well suited for rooms that have limited space, since free space can be organized by transforming such a workbench.
A homemade workbench consists of the following basic elements:
| Name | Purpose and description |
| Tabletop | Working surface of the table |
| Frame | The supporting structure on which all other elements are based. |
| Support element | It is firmly attached to the wall and is one of the supports of the working surface. |
| Legs | Two support legs, structurally interconnected |
| Retainer | An element that is attached to the wall and serves to secure the folding workbench in the folded position |
All these elements are made of solid wood (pine) and plywood.
Types of workbenches depending on the type of work and available space
Taking into account exactly how the DIY workbench will be used in the garage, you need to select the desired configuration:
- landline or mobile;
- with a fixed, permanent tabletop, or folding;
- with additional shelves/drawers/holders and other storage places or simplified, in the form of a table;
- straight, angular or U-shaped;
- free-standing or mounted near a wall.
Since space is usually not enough, it is better to plan a stationary workbench with your own hands near the wall, and place it in a corner or in the least used place in the garage or workshop.
Important: if the room has windows or a ventilation outlet, a draft is possible - you should not place the workplace in its path, otherwise problems with the back, neck and muscles heated during work are guaranteed.
A mobile folding workbench, made with your own hands from scrap materials, can be kept anywhere, and can be pulled out to a suitable place during use.
Before selecting a specific model and choosing its dimensions, it is advisable to estimate the amount of equipment and tools you already have or are planning to purchase - it is better to make a workplace “for growth” than to suffer in trying to attach additional devices to already crowded shelves.
Do-it-yourself carpentry workbench: how to organize a comfortable workplace
To organize a convenient corner for woodworking, it is not necessary to buy a specialized table. Having basic skills in working with this material, you can make a carpentry workbench with your own hands . The article contains information that will help you easily and quickly cope with this task: optimal dimensions of structures and drawings, useful recommendations and step-by-step technology with a detailed description of all actions, as well as visual photographs. Workbench in the garage: workbench options, how to make it yourself (read more)
With minimal skills, you can make a carpentry workbench with your own hands.
How and from what to make
The most affordable and practical material is wood and its derivatives. Plywood, chipboard, fibreboard, OSB, countertops from already unnecessary tables, etc. will be a completely reasonable choice.
It is important to consider:
- if work is carried out in a damp room, it is necessary to choose a material that is protected from moisture - laminated, impregnated, followed by varnish/paint treatment;
- the working surface should be as flat and smooth as possible. Using boards of different thickness/texture/treatment will not allow you to obtain such a surface, so for the tabletop it is better to use a solid slab of plywood or wood board;
- guides and racks should be made of the same type and size of material, except in cases where the load is distributed unevenly and some of the racks require reinforcement;
- connections of wood materials are made using fasteners (screws, bolts, screws, confirmations) and glue, as well as a tongue-and-groove or tongue-and-groove system. The adhesive type of connection requires waiting for the glue to dry completely; in critical places, it is better to duplicate the gluing with metal fasteners.
It is necessary to assemble a workbench in a wooden garage with your own hands in a fairly dry and well-ventilated room - dust from sawing and sanding materials, fumes from varnish/paint must be removed quickly.
Important: since the load on the tabletop is often very large and uneven - for example, only on one corner - it must be reinforced by a frame or supports located under the main plane.
Main types of workbenches: photos of structures and vices for various purposes
Drawings of tables that can be found on the Internet are presented in a huge variety. To choose the best option for creating a workbench at home, it is better to decide in advance on the type of structure and its configuration. There are several types of tables used for working with wood.
The simplest design to manufacture is a stationary type workbench. To create it you will need a minimum set of tools and a little patience. Such structures are mainly used for processing large-sized wooden workpieces.
Carpentry workbenches differ in size and type of construction.
Folding carpentry workbenches have a more complex structure. These products are quite compact. Their weight does not exceed 30 kg. Such structures are considered mobile and, if desired, they can be easily moved from one place to another. In folding workbenches, the lower support part can be made of metal. This is done in order to increase the stability of the structure. Mobile tables are designed for working with small wooden workpieces.
Carpentry workbenches can also be composite. In this case, all structural elements are fixed using bolted connections. The advantage of such a table is that all its components are interchangeable. On the other hand, the drawings of composite type carpentry workbenches are quite complex, as is the technology for their manufacture. Only an experienced master can cope with this task.
Workbench vices come in universal, special, manual and chair types.
Before you start creating a workbench, you need to choose a suitable vice option. In this case, the specifics of future work must be taken into account.
There are several types of vices for a carpentry workbench:
- Chairs - these devices are used extremely rarely, since they are designed to perform heavy work.
- Universal – designed for working with small workpieces. Bolts are used to secure this fastener to the workbench cover.
- Special - allow you to adjust the position of the workpiece both vertically and horizontally, which greatly simplifies the work of the master.
- Manual - there are instrumental, rotary and non-rotary.
On a note! In non-rotary and rotary manual type vices, the width of the jaws is 8 cm.
Recommendations
For clearer contact, the contact points between the parts are coated with wood glue. Strengthen glued joints using ready-made furniture corners or cut-off corner profiles. Strengthen corner joints where there is no contact with the drawers using triangular spacers.
It is advisable to immediately mount an extension cord with several sockets on the finished workbench - they will be needed to operate some power tools.
A folding workbench is hardly intended for heavy work such as assembling windows and doors. It makes turning operations difficult to produce massive parts weighing dozens of kilograms. For “heavy” work, it is better to assemble a stationary wooden workbench that can withstand a weight of more than one hundred kilograms.
- Regardless of how long the workbench is, it can be foldable (including a transformer). A one-room apartment or a small country house of 20-30 square meters is unlikely to allow you to place a stationary workbench that cannot be folded. Be guided primarily by the square footage of the living space. The same advice applies to an outside utility room or garage.
- Do not use plywood less than 15 mm thick or made from soft wood types for the tabletop. Such a workbench is only suitable for sewing work or activities that do not require the use of brute physical force.
- Do not work on a workbench with strong reagents, especially if there is frequent splashing. For chemically active work, special tables and stands, for example, made of glass, are used.
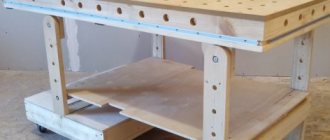
Carpentry workbench frame
Take smooth pine boards without large knots with a cross-section of 50x150 mm. Dry the raw lumber: the lower the moisture content of the boards, the less likely the structure will warp. The carpentry workbench in question is designed for comfortable work by a craftsman with a height of 170–180 cm. To change the height of the structure, make the legs higher or lower.
Drawing of a carpentry workbench (front view).
Workbench drawing (side view).
Table 1 - list of frame parts
Finish dimensions, mm
All elements of the base of the carpentry workbench are paired, so mark two parts of the same length on a 150 mm wide board at once.
Saw all the wooden pieces to length, with the exception of the spacers: it is easier to cut the short ones already planed, and the long ones should be sawed off later in place.
Measure the width of the board, subtract the thickness of your circular saw blade and divide the result in half. Set the calculated size on the measuring scale and make sure that the saw blade is perpendicular. Unfold the boards exactly in the middle.
Board cutting diagram.
Sharpen the parts and sand them with medium-grit sandpaper.
File the bottom spacers and sand the ends. After cleaning the surfaces from dust, apply glue to the small leg and to the end of the leg.
Squeeze the parts together with a clamp, wipe off the squeezed out glue and drill holes with a countersink drill.
Fasten the workpieces with 6.0x70 screws. Prepare the remaining legs of the woodworking bench frame.
Bevel the bottom ends to reduce the likelihood of the wood splitting when the workbench moves.
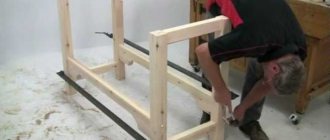
Prepare the joints connecting the legs with the longitudinal legs for gluing. Fasten the parts with screws, setting a right angle.
Screw all four legs into place.
Place the frame halves and longitudinal drawers on the floor, measure the length of the upper spacers.
File the parts and secure them with glue and screws.
Assemble the top frame of the woodworking bench on a flat surface. Fasten the bars with wood glue and 6.0x80 mm screws, drilling guide holes for them.
Assemble the lower frame of the workbench, using clamps and auxiliary boards for convenience.
Replace the top frame and level the entire structure. Connect the frame parts with screws.
Cut out the bottom shelf from sheet material 16 mm thick and secure it to the bars
Assembling a workbench for the garage with your own hands
You can make a garage table with your own hands if you follow the basic recommendations. The whole process can be divided into just a few steps:
- The existing material is being cut. A pipe and a steel angle can be used to form a supporting structure. A garage workbench with a metal frame can withstand significant impact.
- In order for the mechanic’s workbench to have the required dimensions, it is necessary to change the dimensions according to the drawings.
- You can start work by making a power frame. To begin with, a load-bearing element is created, on which another load-bearing element is installed on top, onto which a steel sheet is fixed. You can weld a workbench yourself using a welding preparation.
- The load-bearing element is additionally reinforced with steel pipes. They act as stiffeners.
- The table for metalwork is installed on legs. This structural element is also welded to the base. The recommended length of the elements used is about 900 mm. Power jumpers are welded between the legs. They can significantly increase the rigidity and stability of the mechanism.
- After creating the supporting element, you can begin to create boxes in which tools and parts will be stored. A DIY garage table is made for specific tasks. The number of boxes and their sizes may vary significantly. To create this element, a steel pipe is used. The frame of the boxes is reinforced with a metal channel, which becomes stiffening ribs.
- The next step is to make a supporting frame that is suitable for creating a tabletop. The frame must be very strong, since it will bear a high load. Due to the use of a thick metal pipe, the workbench is durable and reliable.
- After creating the supporting structure, it is further strengthened. To do this, the brackets are welded to the sides. Holes are drilled in the middle of each bracket, which are used to attach the back and other walls.
- Boxes may have plywood walls. Due to this, the workbench becomes lighter. The sides are secured using self-tapping screws. It is recommended to create boxes of various sizes, thereby significantly expanding the functionality of the device. There are various options for the location of drawers on the Internet; the most suitable option is selected depending on your preferences.
- Holes are created on the inside of the structure to fix the guides along which the boxes will move.
- In this case, a board is used to make the table. It is placed on a previously prepared frame, where it is then fixed. Often a metal plate is placed on top of the wood planks to protect the wood from the elements.
- All seams should be thoroughly cleaned. A grinding machine and a file can be used for this. If there are untreated seams, there is a high risk of injury. When processing seams, problems may arise associated with the appearance of cracks and other defects.
- The surface of the wood used must be well sanded. This creates a flat surface that is ideal for placing the steel sheet. Wooden sheets must be fastened securely, otherwise, when a load is applied, the sheet will move or sag.
- Fastening the metal sheet should be done using hidden screws. This is due to the fact that welding work can cause the previously used wood to ignite. The sheet used must be painted on both sides, due to which the service life of the workbench is significantly increased.
- Recently, schemes that allow you to change the height of a certain part of the structure have become very popular. The height of the workbench in the garage is selected taking into account what kind of work will be carried out.
Types of workbenches
Craftsmen divide all workbenches, made independently or purchased ready-made, into several main types. Basically, the division is carried out according to the type of work performed on them, as well as the presence of additional tools.
- Metal workbench. It is used primarily, as the name suggests, for metalworking work on metal. To withstand the load and minimize damage from contact with the workpiece, it is better to make such workbenches with an all-metal high-strength cover. In addition, it is not recommended to use flammable materials for another reason that metalworking often involves the appearance of sparks.
- Wooden carpentry workbench. Used primarily for woodworking. The lid can be made from solid or laminated wood. The main requirement is that it must be perfectly flat, without drops and curvatures, called “helicopters”.
- Universal workbench. Combines the main advantages of the previous two types. It can have two separate tabletops, or can be converted from one type to another using an overlay metal sheet, fixed at the edges and accompanied by additional tools.
For any of the listed varieties, you can expand the functionality by adding a tool to the workbench you have made. This could be a light source with a movable leg, an organizer for tools and materials, measuring instruments built into the surface, and much more.
In addition, to save space, you can assemble a corner workbench. It takes up less space, while the presence of two walls opens up the possibility of arranging tools in a free-access area. A carpentry workbench of this type is most convenient for use in a small workshop where there is not much free space.
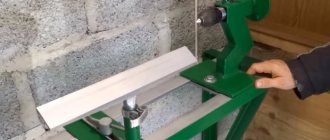
How to make a stand for a drill?
Making a mini-drilling machine with your own hands does not require high qualifications, but it greatly expands the scope of application of an ordinary electric drill. In addition, the machine will be much cheaper than a purchased one, and components can be borrowed from previously used devices.
Making a wooden stand will take very little time and will not require any special materials or tools:
- wooden blocks or boards no thinner than 20 mm;
- furniture guides;
- metal rod with thread for caliper;
- fasteners for wooden parts (screws, glue);
- emery.
Tools:
- hacksaw;
- vice;
- Screwdriver Set;
- electric drill.
Making a stand from metal requires a little more time and materials, so it is necessary to cover it in a little more detail.
The proposed metal stand is more versatile than one made of wood and includes:
- supporting frame;
- guide posts of the drill, to which it is attached and moved vertically;
- vertical tool feed handle;
- additional components for ease of use.
Technology for creating a carpentry workbench with your own hands: drawings, dimensions and procedure
The most convenient option for a private home or garage is a design with a hinged lid. Unlike a folding workbench, its working surface rotates rather than unfolds. This design option has a completely different structure, although it is no less functional and compact.
Drawing of a wooden carpentry workbench with dimensions.
Mobility is achieved due to the presence of wheels installed on the bottom. To prevent arbitrary movement of the structure, it is advisable to use rollers with a locking function. As a last resort, you can install a wedge under the wheels, but this option is not so convenient and practical.
On the right side of the design there are pull-out drawers for convenient storage of small items. If the table will be used by a left-handed master, they should be placed on the other side so that everything you need is at hand. In addition, the workbench is equipped with a special holder. It is made of perforated plywood and mounted on the back of the cabinet. Thus, it becomes possible to make maximum use of the surface of the workbench and organize additional space for storing small tools for carpentry.
On the left or right (for left-handers) there is an open compartment in the design. It is suitable for placing narrow, tall equipment such as a drilling machine. Thanks to the roller mounted on the edge of the tabletop, the process of processing long lumber is greatly simplified, and due to the multi-socket outlet, you can simultaneously connect several tools to the network.
Tool cabinet in the garage
This bedside table will serve both for performing a variety of tasks and for storing tools. It will take up very little space in the garage, and if you try, its pleasing appearance will decorate the room.
- First you need to draw up a plan diagram of such a bedside table. You can choose the proposed option, or based on it you can design your own, taking into account all your personal wishes for the arrangement of the workplace.
- For a novice carpenter, it will be useful to build a bedside table for storing working tools. This will allow you to acquire the necessary experience in carpentry and build the mini-workshop necessary for full-fledged work, which will fit in a small wooden box.
- The proposed tool cabinet in this case is a small floor cabinet. Inside it is equipped with nests for storing various tools, and outside it has a workbench board. It is made from plywood boards or boards 20 mm thick. The bench board must be carefully trimmed and trimmed.
The tool cabinet is equipped with two drawers: one hinged on the door, the other pull-out - the number of drawers and their functionality can be any depending on your needs. The top of the bedside table is equipped with a hinged lid in the form of a drawer. The lid is attached to the frame with hinges. In the working position, it can be folded back and leaned against the wall, or it can be equipped with holders so that it independently remains in a given position. When not in use, the lid will simply lower and close the bedside table.
To make the frame of the bedside table, you need to use either bars or boards with a cross section of 1.5 X 2 cm. The product can be lined with plywood or wood board.
The device for keeping tools in the cabinet is made at your own discretion.
- As you can see in the photo, this garage furniture is either painted or covered with film. You can use a transparent finish, but this will require more painstaking carpentry preparation of the product.
- The interior decoration can be simple; it will be enough just to carefully and repeatedly sand the parts from the inside or paint them with varnish or light-colored paint.
- Materials for assembling a workbench. Total cost of the workbench.
- To assemble a workbench you will not need a lot of materials with a total cost of 3 to 3.5 thousand rubles, depending on the place of purchase. For reference, prices from the Leroy Merlin store in the Moscow region will be indicated.
Lumber
- Planed block 30x40x2000 needles - 1 pc. (68 rub.)
- Planed board 40x96x3000 needles - 5 pcs. (1610 rub.)
- Planed board 20x96x3000 needles - 4 pcs. (620 rub.)
- Layout 14x14x2100 needles - 1 pc. (70 rub.)
Fasteners
- Bolt with nut and two washers M8x100 - 16 pcs. (416 rub.)
- Drywall-wood screws 3.5x45 200 pcs. — 1 box (147 rub.)
- Drywall-wood screws 4.2x90 6 pcs. — 3 packs (42 RUR)
- Furniture dowel 10x50, wood, beige, 30 pcs. — 1 package (47 rub.)
- Reinforced mounting angle 40x40x40x1.5 - 4 pcs. (52 rub.)
- Waterproof PVA glue D3 Tytan 200 g - 1 bottle (151 RUR)
How to calculate the dimensions of a workbench for a garage: recommended dimensions
The dimensions of the structure are selected individually depending on the preferences of the owner, as well as taking into account the expected types of work. The width of typical structures is in the range of 0.7-1.2 m, and the length is from 1.5 to 2 m. Workbenches are single and double. The differences between these designs are the length and number of nightstands with drawers. If the desktop is single, in this case the optimal dimensions of the tabletop will be 0.8 x 0.8 x 1.5 m. In double designs, the length is increased to 2.8 m.
Drawing of a simple carpentry workbench with dimensions for a garage.
The height of the carpentry workbench is selected taking into account the height of the craftsman who will work at it. Typically this figure varies from 85 to 95 cm. It is quite easy to check the correctness of the calculations. If, standing at the table, the master can freely rest his palms on its lid, then the height is chosen correctly. It is very important not to make a mistake with this indicator, since frequent stretching and bending is harmful to a person’s back and can lead to rapid fatigue.
The same applies to metal structures, which can also be used for plumbing work. In any case, the desktop must be stable and very durable. The minimum thickness of the lid is 5 cm. Textolite or linoleum is used as upholstery, which will protect the tabletop from damage. In metalworking workbenches, the wooden surface of the workplace is covered with a steel lid. The minimum thickness of this coating is 5 mm.
Materials and tools
As previously noted, if you wish, you can make a workbench with your own hands. The workbench can be made from a corner or from a profile pipe, it all depends on the specific drawing.
Necessary tools for assembly and processing of materials used:
- Level. In order for the work carried out to be accurate, the device must be positioned horizontally.
- Metal processing is performed with a standard grinder. This tool will also be needed for grinding the surface, for which it is enough to replace the disk.
- The connection of all elements is carried out using a welding machine. The welding seam is characterized by high rigidity and reliability. Today, welding is used extremely often, since many people can purchase a compact welding machine.
- A tape measure or rigid ruler can be used for measurement.
- It is important to observe all dimensions, since its stability and other performance qualities depend on the accuracy of the design.
- Some elements can be connected using a screwdriver. Metal screws are used for connections.
- In some cases, several sheets of plywood are required to create a workbench
- You can change the shape by using an electric jigsaw.
- A drill is also required to work with materials. It allows you to obtain the required holes in metal and wood.
The required materials are as follows:
The main material used is steel angle. The wall thickness should be 4 mm, due to which the structure is highly resistant to mechanical stress.
- Square pipe 60 mm by 40 mm. The thickness of the metal used is 2 mm.
- A corner that measures 40 mm by 40 mm.
- Steel strip with a thickness of 4 mm and the required size to create a tabletop.
- A steel sheet of small thickness, which is required to create the sides of the structure.
- Wooden boards to create a shelving unit.
- Plywood, which is used to create boxes.
- Screws for fixing detachable elements.
- High strength guides for drawers.
- Paint that is used to protect wood and metal.
After finding everything you need, you can begin the actual work. It is worth considering that the materials in question are suitable for creating a structure that is quite impressive in size.
Due to its large dimensions, a vice can be placed on one side of the bench and tools on the other.
About carpentry workbenches
Design and purpose of the workbench
A carpentry workbench is a work table for manual and mechanical processing of wooden products. The design and ergonomics of a classic carpentry workbench allow you to fix parts in various spatial positions and perform basic carpentry operations with maximum convenience: making wooden parts, assembling structures, coating them with finishing compounds. A traditional carpenter's table is designed to work with lumber up to 3-3.5 m long. To process longer workpieces, a carpenter's workbench is used.
A table for carpentry work consists of a bench board (cover) and a bench (supporting frame). A traditional workbench is equipped with front (front) and rear (end) vices, with the help of which the workpieces are fixed in the required spatial positions.
There are holes in the table top and the wooden jaws of the vice. They are designed for installing clamps and stops of various sections and heights.
Having placed the stops in the desired configuration, the part is placed between them and pressed with the screw mechanism of the vice. This way the workpiece is securely fixed in a horizontal position. Based on the thickness of the wooden part, use a stop of appropriate height that will not protrude beyond the edge of the workpiece and interfere with processing.
How to choose the optimal workbench height?
The height of carpentry workbenches varies between 85-95 cm. The optimal table height is selected based on the height of the craftsman. If, standing at the workbench, your palms rest freely on its lid, then the size has been selected correctly. At such a workbench it will be convenient to perform all basic operations, without frequent bending and stretching, which lead to rapid fatigue.
What materials are best to make the structure from?
A carpentry workbench must have sufficient strength and rigidity, since during operation it is subjected to large loads, both static, formed under the weight of massive workpieces, and dynamic, arising in the process of sawing, drilling, impacts, etc. Sufficient strength characteristics are ensured not only by the features of the fastening units, but also the type of materials used.
Coniferous wood is traditionally used to make the base. The table top is made of durable wood: oak, beech, ash, maple, etc. The lumber used to create the bench board must be dry (humidity about 12%) without knots and other defects.
About making a workbench cover
Experience shows that when making a carpentry workbench with your own hands, it is more advisable to purchase a ready-made glued board, which will become a blank for the lid. The effort and time spent on cutting, jointing edges, gluing the shield and leveling it when creating such a massive part will be incomparable with the funds saved.
When performing work that increases the risk of damage to the lid: drilling, chiselling, etc., it is better to cover the working surface of the workbench with a thick plywood sheet or fiberboard cut to the shape of the lid. It is advisable to make this simple flooring immediately together with the workbench.
The final stage of assembling a workbench for carpentry work
When all the elements of the frame have been assembled, you can begin installing the drawers and fittings. First of all, you need to install the guides in the cabinet located on the right. To make work more convenient, it is better to use temporary inserts in the form of wood panels.
At the final stage, the product is polished.
Instead of homemade wooden guides, you can use ready-made factory-made retractable systems. Such fittings (provided they are of high quality) operate silently and trouble-free. These guides can be designed for either full or partial extension. Next, the storage boxes are assembled. For this, screws and adhesive intended for wood are used. The size of the facades is selected taking into account the dimensions of the cabinet.
Note! It is imperative to leave a small gap (about 1-3 mm) between the facades, otherwise the drawers will not slide out well.
As a functional addition, a movable bar can be installed on the spacer, along which one or more guide rollers will move. Their number depends on what work will be carried out in the workshop. So that the roller can move freely up and down, a slot is made in the movable bar for it, and then a wing nut is installed, which will serve as a clamping screw.
A roller is installed in the upper part of the movable bar. To do this, use a U-shaped holder. It must have slots or holes on the sides intended for the roller axis.
Sometimes craftsmen resort to other carpentry tricks, and homemade devices made with their own hands become an excellent addition to a workbench and other equipment:
- compact stands and holders for cutters;
- sliding stops for miter saw;
- magnetic pads on the jaws of clamps (pipe);
- devices for creating precise corner holes with a drill;
- guide bars for circular saw;
- MDF benchtop machines for eccentric sander, etc.
Ready-made carpentry workbench with swivel top and drawers.
Next, you need to install carpentry tools on the workbench with your own hands. When installing electrical equipment on a hinged cover, it is imperative to maintain balance. Do not load only one side or one corner of the workbench. The set screws are buried at least 2/3 of the thickness in the turning part of the tabletop. This allows you to achieve reliable fixation, because electrical carpentry equipment has considerable weight. In the side areas, where the working area remains stationary, this fastener can pass through the entire thickness of the cover.
In its finished form, a homemade workbench with a rotating tabletop and equipment installed on it is very convenient and functional. To protect wood from the negative effects of moisture, it is advisable to coat it with a primer or even paint. All parts are processed before assembling the workbench and must be thoroughly dried. Painting will also improve the appearance of your workshop bench.
Foldable design
It is advisable to use a folding workbench when the amount of work space is limited and mobility of moving the workbench during operation is required. In most cases, a portable carpentry workbench is equipped with a removable table top and a folding frame.
Scheme of fastening clamps and stops for a workbench
The tabletop can be hinged against the wall, and the legs can be folded under it. When using this design, the length of the legs should be calculated in such a way that when folded they do not interfere with each other. That is, their length should be less than half the distance between them.
These types of carpentry workbenches are designed for processing small parts. Therefore, the structural elements of these tables are not made as massive as on stationary ones. For the manufacture of support posts, a beam of 100x40 mm, transverse 60x40, is sufficient.
Any board material (OSB, chipboard, plywood) can be used as a countertop material. If the thickness of the slab material is not enough, the tabletop can be reinforced with a frame made of 30x50 timber (the cross-section of the timber is determined by the planned rigidity of the tabletop).
The folding carpentry workbench is assembled using bolts. In order for the table to be quickly disassembled, it is advisable to use special wing nuts instead of ordinary nuts.
How to make a workbench out of wood with your own hands: installing a cabinet and tabletop
The next step is to install the side tables. In the process of assembling these elements, it is necessary to take into account that the plywood, which is attached to the back of the structure, must be fixed precisely to the frame.
Installation of the workbench tabletop must be done on a finished frame.
It is also worth paying attention to the fact that the outer plane for the left cabinet, used as a support, is longer than its inner part. To make a workbench made by yourself more rigid, this element must be fixed not to the base plate, but fixed to the frame. The cabinets themselves are installed on a base plate. For this, two types of fasteners are used. The lower plane is fixed with screws size M20-M24. For the inner sides, corners should be used.
After the cabinets are installed, you need to accurately determine the middle on their inner sides. This marking is necessary in order to cut U-shaped holes for the turning rod. This must be done so that the center of these holes is located at a distance of 2.2 cm from the bottom plane of the top cover on the cabinet.
Once everything is ready, you can thread the threaded rod through the holes in the four uprights. In this case, its ends should protrude beyond the workbench by about 4-5 cm. They are fixed (without tightening) with locknuts and washers.
Using clamps or screws, you need to install the support strips for the tabletop. They will be placed here temporarily - only so that the position of the tabletop and its horizontal plane can be aligned. Next, three layers of the cover are assembled, which are fixed with screws and adhesive. After this, the bars are removed and the result is checked. The table top should rotate freely.
Then the side surface of the lid (both rotary and stationary) is reinforced with slats. Finally, you need to install the turning handles and locking latches.
Drawing of a wooden workbench with your own hands and materials for work
Based on the design drawing, you need to make all the parts necessary for its assembly. The overall dimensions of the workbench in this case are 175 cm (length) and 76 cm (width). A distinctive feature of this table is its three-layer lid, which has an increased margin of rigidity and strength. The upper and lower levels are made of plywood sheet with a smooth surface. The middle layer of the table top is stacked, it is formed from boards.
Note! It is imperative to leave a gap between the boards in the middle layer of the tabletop. This space is necessary to allow the threaded rod to rotate freely.
A table containing a list of materials needed to create a wooden carpentry workbench:
| Material type | Quantity, pcs. | Dimensions, mm |
| plywood sheet | 1 | 1.2x1.2 (8 mm) |
| 2 | 0.2x2.5 (8 mm) | |
| 3 | 1.2x2.5 (18-20 mm) | |
| 4 | 0.9x2.5 (25 mm) | |
| 3 | 1.2x2.5 (25 mm) | |
| Perforated plywood | 1 | 1.2x1.2 (8 mm) |
| Threaded rod (stud) | 1 | M20 (180-200 mm) |
| Lock-nut | 2 | M20 |
| Washer | 4 | 20 mm |
| Latch with mate | 4 | — |
| Handle for drawers and folding tabletop | 8 | — |
| Furniture wheel with flat support for fixation | 4 | — |
| Self-tapping screws or wood screws | 0.5 kg | M8-M24 |
| Self-tapping screws or wood screws | 0.5 kg | M50 |