When the phrase “wooden box” is mentioned, many people immediately imagine a standard fruit box. Although in fact boxes can be very different and used for all sorts of purposes.
This is a very useful product that can be used in everyday life, not only somewhere in the country, but also just in the house. Let's figure out how to make a wooden box with your own hands, because only a homemade thing can be not only unique and as convenient as possible, but also completely safe.
DIY wooden box
general information
A box is a type of container or an interior item, which is a product that has a cubic or parallelepiped shape. It can be made of various materials, including plastic, cardboard, metal, but is mainly made according to tradition from wood or its derivatives. Depending on the design, the box can have solid walls and bottom or slatted surfaces, and it can also have a lid and be either simple or decorative.
On a note! The category of drawers also includes drawers that complement furniture and make it more functional and convenient to use. Such boxes usually do not have a top lid, but their bottom is equipped with special wheels that ride on small rails fixed inside the cabinet or cabinet in the place where the box itself should be located. This makes it easier to use.
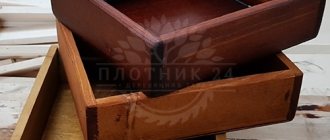
Wooden box
The history of the box itself is unknown. From time immemorial, people have used various containers for storing all kinds of household items, transporting and packaging goods, etc. Historians believe that, most likely, the first boxes appeared during the period when trade relations began to develop and were invented precisely with the aim of simplifying the transportation of goods and products , maintaining it in proper quality until it reaches the point of sale.
Wooden vegetable boxes
Nowadays, a wooden box is still used for transporting and storing goods, but at the same time it is also used in everyday life, and even in gardening. It is actively used for harvesting and growing seedlings. By the way, at one time standards even appeared for boxes for potatoes, storage of apples, etc.
At the same time, the boxes settled firmly in the house. They can be used not only as furniture elements, but also as individual products. For example, there are drawers for storing tools, small parts, sewing accessories, etc.
DIY wooden box
Serious competitors to a regular wooden box are products and containers made of veneer, plastic, and cardboard. But none of them can fully replace simple, but reliable and high-quality boxes, and therefore they continue to be actively produced and made with their own hands.
Let's sum it up
As you can see, there are many different plywood box designs available. Not all of them are presented in this material, however, you can find the drawing you need or get an idea on the Internet. However, many of you are able to make a drawing yourself, simply using the materials presented in the article you are reading now as a guide, while determining your own dimensions for the products.
The box can be assembled without drawings, by eye, however, such aerobatics is a sign of the highest skill in the field of furniture assembly. If you can do it, then go for it, and everything will definitely turn out the way it was intended.
Properties of a wooden box
Why, despite the emergence of cheaper and simpler competitors, does an ordinary wooden box not lose its popularity? It's simple - the answer to this question lies in the unique properties and features of such containers.
Table. Comparison of box characteristics.
| Drawer type | Advantages and disadvantages |
| Veneer | Such a box is made from planks that have virtually no processing. It is quite fragile compared to wood, but costs less. Suitable for storing and transporting fruits and vegetables, as well as other products. Afraid of moisture. |
| Made of plastic | A fairly convenient type of box that is not at all afraid of moisture. Depending on the quality of the plastic, it can be either very durable or quite fragile. But this type of box is still easier to damage than a regular wooden one. It doesn’t cost much, but it’s more expensive than a wooden product. Suitable for storing and transporting not only dry, but also wet products. |
| Made of metal | A species that is quite rare. Metal boxes have not become popular due to their tendency to rust, as well as their heaviness and high price. It is not easy to make a metal box at home without special equipment. |
| Made of wood | The most optimal type of box. It is quite durable, can have different designs, and is suitable for storing all kinds of products. Looks much better than a regular veneer box. When used as a decorative finish, it can be used at home; it is durable if the wood has been treated with protective compounds. |
Wooden box
On a note! Ordinary wooden boxes of simple design are actively used when decorating loft-style rooms. They are an excellent attribute of this design solution.
The production of wooden boxes in production occurs in accordance with GOST 20767-75 . And for them, a wooden board of a certain quality, 1 cm thick, is used. Such boxes are thin-walled, but durable. They are quite light and easy to use.
Tool cabinets, drawers, cabinets
How to choose plywood for making a box
Plywood is made from trees of various species, so the properties of each category of these plates may also differ from each other. That is why it is important to carefully look at the description of the material when purchasing.
Thus, plywood made from linden boasts:
- dense structure;
- flexibility.
Material made from pine will by its nature be durable and resistant to various mechanical damage.
Birch plywood is famous for its smoothness and even surface. If you need to make a product of impeccable beauty to be displayed, then, as a rule, they take it.
Most often, furniture is made of plywood marked “FK”
Not only that when choosing a specific plywood, you have to pay attention to which tree became its “progenitor”, you also need to carefully study the abbreviations, which imply that additives were added to the layer of wood, necessary to improve certain quality characteristics of the product.
Boxes in the house
As a rule, boxes for transporting and storing products are not well processed - they are hardly sanded and, of course, are not varnished. But for use at home, it is recommended to treat them and cover them not only with protective compounds, but also with paints and varnishes. Then the box will look beautiful, and the person using it will not risk getting a splinter in his finger.
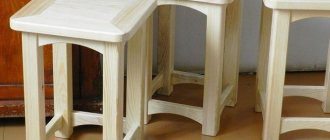
Simple tool box
Typically, the house rarely uses boxes made directly for transporting cargo or storing the same fruit. More often than not, those who need a simple but nice box have to contact carpentry workshops and order a specific product from them according to their size and wishes. So don’t confuse industrial and carpentry boxes.
Boxes in the house, as already mentioned, can be used for various purposes. This includes storing utensils in the kitchen, storing small items in the living room, storing toys, clothes, shoes, cosmetics, household chemicals, etc. The main thing is that this type of container fits organically into the interior and does not cause confusion.
Wooden box for storing various household items
The easiest way, of course, is to get hold of boxes in a store or warehouse, sand them and varnish them to use at home. But you can make such a container yourself, since this is not a difficult task at all, be it a box for decorating a room, storing things, or growing seedlings.
Why exactly a tree?
Wood is the very material that is most often used to create products for the home. The reasons why this happens are simple. First of all, it is important to say that wood is an environmentally friendly material that does not pose a danger to human health . It does not emit an unpleasant odor and does not release any toxic substances into the air, so you do not have to worry about allergies or health problems.
Wood is easy to work with
Wood is also one of those materials that you can easily work with at home. You don’t have to use complex specialized equipment; it’s enough to have a sawing tool, drill and screwdriver or screwdriver on hand. Also, grinding and other processing of the material may require a minimum of cost and effort.
The wood is durable and beautiful and, varnished, can maintain its appearance for many years. Only uncoated material can darken over time and lose its former natural beauty. Fresh wood looks very nice.
Why wood is the best material for making boxes
It is not surprising that wood has been and remains one of the most popular types of materials. Although now in almost any specialized store you can buy its derivatives - plywood, panels, furniture board, etc. But none of these options, in any case, will be better than ordinary natural fresh board.
Making boxes: what do you need?
So, to make absolutely any wooden box (regardless of the purpose of its use), you will need a number of tools and materials. The list is small, but without these things the matter will not move forward. You will need:
- sawing tool for cutting wooden boards and blocks into strips of the required length. This could be a jigsaw or a wood saw;
- a device for sanding wooden surfaces - a grinding machine, sandpaper with a special block, etc.;
- hammer (in case nails will be used);
- screws, nails, possibly metal corners;
- screwdriver (if self-tapping screws will be used as fasteners);
- varnish and brush or paint - to cover the surface of the wood or give it a certain color;
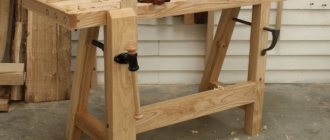
Preparing the necessary tools
On a note! Before applying paint, it is best to pre-prime the wood. This will reduce the amount of paint used and also provide it with a more saturated color.
- pencil, square, ruler, tape measure - tools that will help make the necessary markings.
Important! Before you start creating a box, you must draw its diagram or download a ready-made one from the Internet. This will allow you to make a smooth and neat product that has the necessary parameters.
Wooden box drawing
Harvest storage boxes
They are necessary to optimize space in the cellar or pantry. Placed on the shelves of the rack, such containers will allow you to leave the floor space as free as possible.
How to make a box yourself? It is important to choose a tree wisely. First, it is better to put together a rack from dry edged boards. The optimal width for it will be 0.5-0.6 m. The remaining material will be used to make boxes.
In addition, you will need:
- timber 1.5*1.5 cm;
- slats;
- hammer;
- nails;
- saw;
- carpentry corner.
- Assembling the frame of the future product.
- Sheathing the frame with slats.
Do not forget to leave gaps for ventilation 2-3 cm wide. Professional carpenters advise to sheathe the bottom first, and only then move on to the sides. When cutting and installing slats, you must use a carpenter's corner.
Making a plant box
Step 1. First of all, you need to decide on the dimensions of the box being constructed. It is important to choose the place where it will stand. Based on this, you should sketch out a drawing of the box indicating the dimensional parameters and calculate how much material is required.
First you need to decide on the sizes
Step 2. Next, you need to go to the store and purchase everything you need. First of all, you need to buy the required amount of boards.
Buy boards in the required quantity
Step 3. Now you need to apply the appropriate markings to the board - mark the sides and ends of the box on it. It is better to take measurements with a tape measure, but to get even marks it is better to use a square.
Marking
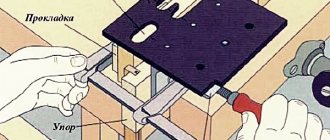
Step 4. Next you need to assemble the box frame and drill holes in its sides. It is better to make several holes on each side.
Assembling the drawer box
Step 5. The boards on the sides of the box need to be connected together using self-tapping screws. You can also use nails, but connections with self-tapping screws are much stronger and of better quality.
Self-tapping screws are used for connection
Step 6. Next, you need to determine the size of the bottom of the box and cut the bottom itself from the board. It needs to be secured by drilling wooden holes and screwing screws along the bottom border of the box around the entire perimeter.
Attaching the drawer bottom
Step 7: It is important to be sure to drill a few drainage holes in the bottom of the plant box. They will ensure the drainage of excess water that will enter the soil during irrigation or rain.
Drainage holes are drilled
Step 8. It is important to sand all surfaces of the drawer so that they are smooth, pleasant to the touch and safe.
Sanding the drawer
Step 9. Finally, the box can be painted, but it is better to coat it with varnish. This will make the box beautiful and additionally protect it from moisture.
Finished product painting
Video - Making a simple box
Drawer
How to make a drawer? Buy:
- wood processing machine;
- roulette;
- construction corner;
- unedged board 2.5*25*130 cm.
You will also need a hammer and nails. And also 4 wheels from a children's toy stroller and attachments to them.
Procedure:
- We convert unedged lumber into edged lumber.
- We cut the board into several pieces - four of 20 cm and 1 of 24 cm.
- We process blanks.
- We cut the remaining boards to a width of 4.5 cm along the grain of the wood.
- We collect the box.
- We attach wheels to the bottom.
We recommend reading:
Do-it-yourself table: what to make it from and a review of the most original ideas on how to simply and effectively build a table (90 photos)- IKEA hallway: review of new products from the latest catalog (design photo)
- DIY ottoman: step-by-step instructions for beginners (photos of finished work)
Here are some assembly guidelines:
- use 1.5*50 mm nails, this will increase the likelihood that the boards will not split during the process of joining them;
- start by nailing the sidewalls of the lower and upper planks to the end cut, and then distribute the rest of the workpieces between them;
- Attach 24 cm long strips from below with nails.
You can put children's toys in such a box.
Slat box
Step 1. First of all, you need to cut the blanks to create a box. You will need bars of the selected length, slats 1 cm thick. The bars need to be cut to length so that their profile is triangular.
Blanks are cut
The process of creating blanks
The block has a triangular cross-section
Step 2. Next you need to take the bars, lay them on top of each other (2 bars on each side) and start making walls. You need to apply wood glue to the flat surface of the block and arrange the slats so that they rest on the flat side surface of the bars. The slats are placed at a certain distance from each other to create gaps.
Applying glue
The slats are parallel
Advice! If you plan to make several boxes of the same size, then it is convenient to use a wooden template to create the walls.
Step 3. Then the slats additionally need to be secured to the corner bars using nails or self-tapping screws. In this way, two side walls of the box are made.
Additional rail fastening
Finished side wall
Step 4. Next, the prepared walls need to be placed in a special template (or simply held correctly) and, using the same principle as in steps 2 and 3, attach the next slats to the sides of the free sides of the bars. Thus, it will be possible to create two other side walls.
The next slats are attached
All side walls are ready
Step 5. Then the bottom is made. You need to lay two slats (with a length equal to the length of the box) parallel to each other, and fix other slats on them, but without gaps, so that the bottom is solid.
Making the bottom of the box
The bottom turns out to be solid
Step 6. All that remains is to secure the bottom to the underside of the box, and it is ready. If necessary, all structural parts can be sanded before assembling the box. It is better to varnish or paint the product after assembly.
The bottom of the box is attached
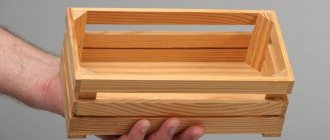
This is what the finished box looks like