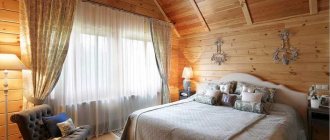
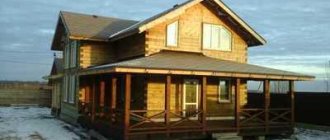
Natural wood is rightfully considered the most environmentally friendly material for building houses.
Timber is a log that has undergone special treatment; the construction of walls from it is a little simpler than from a log house.
The result is a durable, warm, “breathable” house that can last for more than 50 years.
What does it represent?
Untreated wood has several significant disadvantages, which are successfully eliminated in the production of timber.
Elements are manufactured according to technological calculations , using the same measurements.
Thanks to the same length, thickness and width, walls made of this material can be assembled quickly and without additional hassle.
The timber does not shrink and retains its properties over time if you take care of the house. The finished surface is smooth, no additional finishing is required, you can immediately begin facing work.
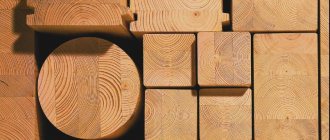
Types of timber for wall construction:
- Non-profiled solid wood .
For this, the logs are given a square shape, where the sides are 100-250 mm, depending on the purpose of the future structure. The elements are dried under natural conditions. Such timber does not have a tight fit; it is used for outbuildings and non-residential buildings. Additional processing of seams and walls until smooth, impregnation against fungus and moisture will be required. This is the most inexpensive and accessible option. - Profiled . Here the logs are processed using high-tech equipment, and finished timber is also produced from solid wood. The connecting side edges are fastened using the tongue-and-groove method. They close securely during construction and do not form cold bridges. The surface of the timber is smooth and does not require additional processing. You can put insulation between the elements and make the house even more reliable. Disadvantages include shrinkage.
- Glued . Each element consists of several boards glued together horizontally. The production process is carried out under pressure, the technological properties of the timber are improved, the material becomes stronger and can withstand heavy loads. Deformation and the appearance of cracks are excluded. The elements are connected by a tongue-and-groove system.
- LVL – veneered . It is created from wood waste, which is combined into a mass, then into boards and then glued like laminated veneer lumber. The result is flexible elements that have high strength and stability. This is the most expensive material presented; it is used for individual components of the building.
All of the listed types of timber are suitable for wall construction. Before making the final choice, you need to understand what goals the home owner is pursuing , whether he is willing to spend time on additional processing, and what the construction budget is.
Read about what a wooden beam is here.
Construction stages
Note. Don’t forget that the longest timber is only 6m long, and if you are planning, for example, a 7x8m house, then you will have to join the rows, which complicates installation.
Types of foundations used for wooden houses
Columnar foundation
Construction method:
- the pillar itself is usually a masonry made of brick or concrete blocks, 40-50 cm high, which mainly depends on the slope of the area;
- For masonry, a hole is made, 20-25 cm deep and 40-50 cm wide, a sand cushion is poured into it, and then concrete mortar is poured. With this pillow you can adjust the height of the pillar - simply by adding or removing a certain amount of concrete mixture;
- the distance between the support points should be no more than 2 m, and they should be at every corner and at every joint.
Pile-rammed foundation
Construction method:
- regarding the location of the support points, the instructions here are the same as in the case of a columnar foundation - a distance of at least 2 m, plus supports at each corner and at each connection;
- to build such a foundation, take metal or asbestos-cement pipes of at least 20 cm in diameter and dig it into the ground 40-50 cm, thus obtaining a casing pipe;
- the pipe is then filled with concrete and reinforced, although this is not a necessary condition for steel elements.
Pile-screw foundation
Construction method:
- if the construction of a log house with your own hands is done on a pile-screw foundation, then the number of screw piles will be exactly the same as the number of cast-in-place piles or pillars;
- such a pile is simply screwed into the ground using a lever to any depth, although you still have to cut off the excess afterwards;
- such a foundation is very convenient for areas with a large slope - the pipe simply compensates for it.
Strip foundations
Construction method:
- strip foundations can be monolithic, that is, poured into a trench or formwork with a reinforcement frame, or prefabricated - assembled from brick, stone or blocks;
- the depth of the tape depends on the condition of the soil and the weight of the superstructure - they can be recessed or shallow;
- recessed foundations are used on heaving soils, and it should be 40-50 cm below the freezing point of the soil;
- such foundations are considered the best for buildings of any type, although this is not always advisable, since you can get by with cheaper versions.
A little about the timber
Timber and rounded logs
The beam has not only a different cross-section and length, but also in the type of profile - it can be profiled (have grooves for longitudinal connections). The percentage of subsidence of an architectural structure will depend on humidity - it can be wet or dried.
This material also differs in the type of production - it is made from solid wood or glued together from lamellas (the price varies greatly). Profiles can be made from different types of wood, where Siberian larch is considered the most valuable, followed by Ural spruce.
All these nuances must be taken into account when designing a house. The fact is that joining into a smooth fugue requires a sealing gasket (jute or linen tape) and dowels for fixation.
In addition, it is very important to provide channels for communications, such as water supply, sewerage, heating, electrification and communications. It is advisable that all “wet” rooms such as a bathroom, toilet, kitchen are nearby - this will make it easier to insert channels.
Construction of the box
Installation of piping on a screw foundation
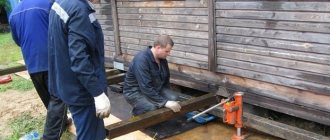
It all starts with the installation of the piping, which is installed on any type of foundation, having previously laid a cut-off waterproofing layer. When we build a house out of timber with our own hands, it is the lower crown that bears the greatest moisture load.
That is why a wedding board made of larch 50 mm thick can be additionally placed under it. Either the board or the lower crown must be impregnated with an antiseptic, which increases its service life by an order of magnitude.
But let's figure out what benefits a wedding board brings? Sooner or later, the bottom will rot and no preparations used to treat wood will help with this. But replacing a board is much easier and cheaper than replacing the entire crown!
Fastening the trim to the foundation with bolts
The frame often serves as a grillage and must be secured to the foundation with bolts recessed by at least 10 mm, but this is not done immediately. First, this contour is joined at the corners (usually this is done “half a tree”), and the joint itself is simply fastened with nails so that it does not move apart. After this, we measure the diagonals - the discrepancy in size should not exceed ±2 mm - after this, you can fix the beam with anchor bolts.
We continue to consider how to build a house with our own hands from timber, and begin to attach the first crown. Under it, as well as under all other crowns, if they have a smooth fugue, a linen or jute ribbon must be placed.
Floor logs are cut into the frame and the upper crown, and they do this right away, without raising the wall higher. Although you can fix them with steel corners with reinforcement, only the self-tapping screw should penetrate the wood at least 40-50 mm.
Joining corners without leaving a trace
The walls are assembled step by step, that is, each row is laid one by one. But for convenience, sometimes boards are simply laid on the joists without fastening, although in some cases the floor is done right away. If dry or glued profiled timber is used, then the tape seal is used only at the joints, and it is not needed between profiled joints.
Dowel connection
In cases where the lumber has natural moisture, when drying, a geometric shift of the profiles relative to each other may occur. Therefore, in order to avoid deformation and make the wall strong, the timber is connected to each other with special wooden nails or pins, as they are commonly called. The pins are driven in a checkerboard pattern either through two rows to the third, or from one to another.
Note. The hole for the dowels is drilled with a single-digit diameter or even a few millimeters larger. If you make it smaller, then when the walls shrink, the timber will hang on them. In addition, the hole should be 15-20 mm deeper than the length of the dowel.
Window and door openings
In those places where there are window and door openings, a shorter beam is placed, but the wall at the opening will be weakened. To avoid loosening and deformation, one or more whole beams are left through the opening, as shown in the photo above. After completing the assembly of the boxes, they are simply cut out.
Floor, ceiling and roof
Floor insulation
When the logs are on point supports (pillars or piles), for insulation they need to be equipped with a subfloor, which will be suspended. Therefore, a cranial beam is attached to the bottom of the beam on both sides, on which the flooring made of boards, OSB, chipboard or plywood will be held, as shown in the figure above. Insulation, cut-off waterproofing is already placed on it and the finished floor is laid.
The ceiling is insulated in a similar way, only here the cranial beam is no longer needed, since the flooring holding the insulation can simply be fixed from below. Most often, the ceiling in such houses is decorated with wooden paneling, but this work is carried out only after the final assembly of the box.
Gable roof rafter system
To get a gable roof, you need to assemble a rafter system, which will consist of timber and boards of different cross-sections. So, first you need to install 100x150 mm ties at the level of the ceiling beams, since the A-shaped rafters will push the walls apart. This will protect two opposite walls from deformation.
Layers are installed on the ceiling, which will take on the vertical load from the rafters and distribute it evenly across the plane. For this, timber 150×150 mm or 200×200 mm is used.
It is best to assemble the rafter legs at the top, so as not to lift them with ropes later, but this is a personal matter for everyone. The Mauerlat will replace the upper crown here, so no special steps should be taken to install it.
A window is left on the gable
The spread of the rafter legs should be wider by 40-50 cm in each direction to create a natural canopy from precipitation. The steepness of the slope depends on your desire, but the greater it is, the higher the attic will be, and the snow itself will slide down the slope in winter.
Wall thickness requirements
The choice of timber thickness for wall construction depends on the minimum temperature and climate that will surround the building:
- for cold regions where the temperature drops to -40 degrees, elements at least 18*18 cm thick are suitable;
- at -30 degrees, the dimensions of the timber should not be less than 15*15 cm;
- for partitions and non-load-bearing walls, elements of 10*10 and 10*15 cm are used.
You can buy timber of the required thickness right away or create it yourself and cut off the excess using a saw. The cut part is called a slab and is used in the construction of roofs, attic floors and other parts of the building.
Marking timber
When assembling walls, it is recommended to draw an assembly diagram indicating the number of the crown, connections and location of openings. On the bars themselves you can indicate their numbers and location. The main characters used are:
- 1 – joints;
- A, C/D, B – longitudinal/transverse walls;
- E – partitions.
Walls can be erected from solid timber and extensions, partitions/transverses - from solid timber. An overlap of 15 cm to the floor is made in the longitudinal wall. To obtain the most accurate and identical dimensions and cutouts, it is best to use templates that will help you quickly carry out the process and transfer the contours to the timber.
All markings on the uneven bars are made using the same template Source pinterest.ru
Noise and sound insulation technology
Wood is not the best material to protect a house from unnecessary sounds from the street. The first thing that owners of houses made of timber do is create reliable sound insulation so as not to hear everything on the second floor that is happening on the first floor.
There are several ways to create reliable sound protection:
- Finishing . Any additional material on the wall creates noise protection. There are special finishes that help increase the benefits of the coating. One of them is natural cork, which supports the concept of environmentally friendly construction. Drywall is considered optimal - an inexpensive, functional and corrosion-resistant material.
- Special soundproofing materials . The main one is high-density mineral wool. It is inserted between the elements for insulation, laid over the wall overlapping, and secured with a construction stapler. To ensure that the wall surface remains straight and the material does not roll off under gravity, a frame made of thin timber is used.
- Roll sound insulation . If there is a task to preserve maximum working space, roll material will be the optimal solution. The thickness of the polymer coating can be only 3 mm, and it will also become an additional waterproofing layer. The vinyl noise block is attached to a frame made of thin timber.
When creating soundproofing walls, you need to follow 2 rules: the material must be attached to the wall tightly, leaving no space for sound penetration and, if necessary, combine materials to create several layers.
Work is usually carried out inside the house . In critical cases, on both sides of the wall.
Pouring the foundation
First, I cleared the area under the house from debris, bushes and other things that were in the way. After this, I began laying out the foundation.
I had to think for a long time about what type of foundation would be suitable specifically for my area. I studied the geological conditions, learned the composition of the soil and the level of groundwater. Specialized reference literature helped me with this. Additionally, I asked my neighbors what foundations their houses were on.
I live in the Ryazan region. Local conditions make it possible to save on the construction of foundations, so most neighbors have houses on light supports made of limestone and concrete. Most often, they even refuse reinforcement - such is the wonderful soil we have. The soil is sandy, therefore, it is not “heaving”. The water runs deep, and wooden houses weigh little. Therefore, there is no need to install buried monolithic supports in my region.
The foundation began by digging a trench. To begin with, I removed the fertile ball. Sand appeared. To make it seal better, I filled it with water. Then he lined the trenches with stone and laid two reinforcing bars. I tied them up in the corners. I think that the tape is best reinforced both at the bottom and at the top. So I did.
The foundation began by digging a trench
To save yourself from unnecessary work, you could order ready-made construction concrete for delivery. However, in my region this turned out to be unrealistic - there are simply no such proposals. And my plot is such that the truck would have to go through the garden, but I don’t need that.
Plus, ready-mixed concrete is expensive, but sand on my site is free. I ordered the stone with delivery - it turned out relatively inexpensively. I made inquiries: in Moscow, even calling an empty truck would be more expensive. It would have been possible to save additional money by collecting the stones myself on the river, but I had no such need.
Stone
I tried mixing concrete by hand. I quickly became convinced of the pointlessness of this event - it turns out to be too long and labor-intensive. I purchased a concrete mixer brand SM-160. It is relatively inexpensive, and will definitely come in handy on the farm.
I started mixing concrete. The process went quickly and fun. The concrete mixer is very easy to use - it can be moved along the dug hole without any difficulty. I used a sheet for pouring concrete, as can be seen in the picture. I placed several supports under the sheet to prevent the material from bending.
How I made the foundation
The seller of the concrete mixer immediately warned me that when using the unit, there is no need to cover the plastic casing where the motor is installed, otherwise it may overheat. After completing the work, I each time cover the concrete mixer with plastic wrap in case of rain.
The concrete mixer helped to quickly prepare the required amount of solution. I laid stones in the concrete. So I filled the foundation strip to the ground level. The above-ground part of the tape was laid out on a thicker mortar using the same stone.
A little short of reaching the top of the foundation, I installed a reinforcing frame. The masonry was done with smaller stones.
The foundation is almost ready. I left it to gain strength. The base does not look very neat and even, but in the future nothing will prevent it from being finished and put in order. For example, the finishing of the above-ground part of the base can be done using plaster - a traditional option for village and country houses. A more modern solution is special decorative panels.
How I made the foundation
I saved a lot while working. For example, I did not make formwork, but used cheap local materials - stones and sand - to construct the foundation. Even taking into account the cost of my concrete mixer, the foundation turned out cheaper than if I had ordered ready-made concrete and assembled the formwork.
Foundation
Alas, you won’t be able to save this much in every region. For example, if I lived somewhere in the Moscow region, I would have to make formwork, install a spatial reinforcing frame, and only then pour in the building mixture.
While the concrete gains strength (and it needs 3-4 weeks for this), I will start preparing consumables.
Prices for timber
timber
Foundation
Find out more detailed nuances of when to remove formwork after pouring concrete from our new article on our portal.
Hydro- and vapor barrier
Steam and waterproofing is carried out for all wooden houses due to the characteristics of the material.
Wood is hygroscopic, quickly absorbs moisture and swells. Waterproofing is laid on top of the insulation before the final finishing layer.
You can prevent unpleasant consequences from moisture penetration with the following materials:
- Single-layer polyethylene film . Suitable for partitions, thin, but inexpensive and easy to install.
- Reinforced polyethylene or propylene film . Double-layer material, durable, but can create a greenhouse effect. Not the best option for residential buildings.
- Vapor barrier membrane . There are several classes for interior and exterior decoration, durable, ventilated, but the price is much more expensive than competitors. There are 2 main types: anti-condensation and foil (they retain heat better).
- Izospan . Strong, durable vapor barrier, but not ventilated.
The vapor and waterproofing is fixed with tape or a construction stapler to the frame holding the insulation.
There are 3 more ways to carry out waterproofing:
- Coating . This is done using bitumen mastic. The timber is cleared of small debris and snags. Afterwards it is treated with a primer and covered with mastic. After complete drying, insulate or apply finishing material.
- Coloring . The most technically simple way. For implementation, special liquid polymer-based compositions are used.
- Impregnation . Suitable for those who want to keep the appearance of the timber as it is, without finishing. As an option, liquid glass is used. The composition fills microcracks in the wood, creating a reliable transparent layer that prevents moisture penetration.
When applying film vapor and waterproofing, it is necessary to create high-quality ventilation in the building. Otherwise, there is a risk of condensation and damage to the finishing material.
Errors in the process
When constructing a wooden house yourself, you can make a number of mistakes that can lead to a reduction in the life of your home.
Possible errors are :
- Poorly thought out layout .
You cannot take the design of a brick or block building as a basis. Different buildings have their own design solutions. The project must be developed specifically for a timber structure. When drawing up a project, it is recommended to consult with a specialist. - Wrong choice of material . It is necessary to choose timber of the optimal cross-section, based on weather conditions and time of residence in the house (for year-round living it is better to choose lumber with a larger cross-section).
- Incorrect connection of beams . If there are no dowels between the crowns, they will sag over time and cracks will appear in the structure.
- Incorrectly arranged harness . If the first crowns are laid unevenly, the structure will quickly deform and cracks will appear, which will lead to a decrease in the service life of the structure.
- Refusal to treat with antiseptics . Without special impregnations, timber will rot faster. Solutions protect wood from rodents, mold and rot. There are impregnations that change the color of wood; they can be used for finishing the exterior of a building.
In order for the house to last as long as possible, construction technology must be strictly followed.
Construction technology
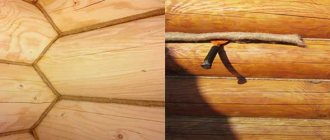
The seams in timber walls are straight and horizontal, unlike in log buildings. There are 2 main ways in which timber is laid out:
- “in the area” – the remainder of the material remains at the edges;
- “in the paw” - without a trace.
Thermal insulation material is laid in the seams . They can be tow, felt or mineral wool. Afterwards, the outer walls are caulked and covered with paint or other finishing material. Internal and external walls are erected simultaneously.
Cladding is carried out only after complete shrinkage of the walls.
Brief instructions for assembling a wall from timber:
- Rolled waterproofing is laid between the first row of the wall and the plinth. A board is placed on top of it and soaked in mastic. A layer of tow is placed on top of it, followed by another layer of waterproofing to prevent possible rotting of the timber due to moisture in the base.
- The bars are laid with bandaging in the corners. Elements of the internal and external walls can have different lengths. The corners of the first row (crown) are connected using the “half-tree” method.
- The corners of the remaining rows are connected by ligating with a root tenon. A groove is made for it, the element is driven tightly inside, secured with a dowel (made of metal or wood) with the current and subsequent crowns.
- The connection between the internal walls and the main walls is made using tenons and dowels. Installation is carried out in a groove created using an electric saw.
- Window and door openings are also created using a saw.
Assembly by connecting to the main tenon is considered one of the most difficult, but it creates a windproof corner. The joints turn out warm and smooth, however, everything has to be cut out by hand, so the process is long and expensive. Pays off in savings on heating costs.
You will find more information about the construction of timber walls here.
Insulation of a house made of profiled timber
Any joint in a timber is a place through which air flows faster than through solid wood. This means it needs insulation. Manufacturers took care to minimize air flow by profiling the timber in different ways. It is the complex profile that allows a house made of profiled timber to achieve heat conservation and minimize the use of thermal insulation material.
The method of insulation depends on the type of beam profile, because some of them do not allow the use of insulation between the beams, and when installing others, the presence of insulation is a prerequisite.
- without interventional insulation . This German profile (“comb”) allows you to make such a tight connection between the beams that insulation is not required. This, however, does not exclude the need to use insulation for caulking the outer part of the wall. In particular, after the final shrinkage of the house;
Assembling a house from timber without inter-crown insulation (comb profile)
- with inter-crown insulation . The Finnish profile provides this opportunity. In this case, the insulation is placed between the ridges of the profiled timber, which provides additional insulation at high installation speed.
Assembling a house from timber with inter-crown insulation (Finnish profile)
For laying between the crowns, predominantly natural materials without synthetic fibers are used, as a rule, jute (jute felt) or flax (eurolinen, jute-flax). These are tape materials that are made from jute and flax in a certain proportion. Strip width 50-259 mm, thickness 5-10 mm.
When choosing a material, you need to make sure that it is not very thick, because... Excess thickness can cause poor adhesion of the beams. The insulation should also not get on the ridge (for the same reason). It is convenient to install jute by rolling it over the surface of the timber. The cost of insulation per roll (20 m.p.) is indicated in the table:
| Density, g/m2 | Thickness, mm. | Width, mm. | Cost, rub/roll. |
| 350 | 5-6 | 100 | 105 |
| 150 | 145 | ||
| 200 | 165 | ||
| 550 | 8-10 | 100 | 145 |
| 150 | 195 | ||
| 200 | 235 |
Linen rope is often used for caulking.
Inter-crown insulation for timber - jute, linen (tape)
Thin jute is convenient for making caulk and insulating openings.
Caulking of timber walls and insulation of openings (windows, doors)
Moss, despite the fact that it is an environmentally friendly raw material for caulking, is not in particular demand in our area.
Less common today is tow. Although this material has currently undergone a number of changes. Tow intended for caulking a wooden house is softened with an emulsion (chemical composition), which makes it softer.
A distinctive feature of natural insulation is its environmental friendliness and the preservation of good ventilation. Among the disadvantages: the complexity of caulking, attractiveness to birds and insects, the integrity of the seam must be constantly checked and corrected, the likelihood of chips appearing on the timber after caulking (marks from a tool). In addition, natural materials are not hygroscopic.
Insulation with synthetic fibers is also available on the market, but their efficiency is lower compared to natural thermal insulation materials.
Another category of insulation is sealants for timber seams. They are used to seal small cracks and between crowns. Joint sealants are not afraid of moisture, are resistant to atmospheric factors, and allow you to obtain an aesthetic thermal insulation joint. They are more expensive than natural materials, but more durable in use.
Sealant for sealing joints in walls made of profiled timber
Good user reviews about such sealants for sealing cracks and seams in timber:
- Perma-Chink . Acrylic sealant with a wide range of colors. Cost 30,500 rub. per bucket 19 liters or 925 rubles. per cartridge 325 ml.
- Remmers Acryl 100 . Acrylic rubber sealant. Price 377 RUR/600 mm. Sold in tubes, compatible with most paint materials.
- Check Mate . Elastic sealant for cracks. Cost 925 rub. per cartridge 325 ml.
- Latex sealant . Excellent adhesion, wide range of colors. Cost 26,000 for 18 liters.
- Accent . Can be applied to a damp surface. Price 3,942 for 15 kg.
- Atacamast . Cost 1,800 for 15 kg. Users note the inconvenient packaging and application of this sealant.
Insulation
Used to protect your home from cold winds:
- Hanging materials: mineral wool, polystyrene foam, polystyrene foam . For installation on the wall, a frame is created, the insulation is attached in layers to brackets or plate-shaped dowels. The wall is covered with finishing materials.
- Polyurethane foam spraying . Installation is carried out using special equipment. The material adheres well to the surface and is environmentally friendly.
Features of insulating walls made of timber:
- work begins after the house has completely settled;
- before starting insulation, it is necessary to repair all cracks, strengthen the seams, and treat the surface against fungus;
- The thermal insulation material must be combined with the wood from which the timber is made.
A correctly carried out insulation procedure allows you to save a decent amount on heating the house during further operation.
The process of insulating timber walls is shown in the video:
More information about insulating walls made of timber is described in our material.
Attic construction
An attic is a residential-type attic space located on the top floor of a house with an attic roof.
After laying all the crowns of the house, the ceilings of the second floor are laid on them.
The gables are sheathed on the outside with clapboard.
Afterwards, the rafter system is installed, the rafters are made from 150 (100) x 40 mm boards, with a pitch of no more than 1 m. The rafters are lathed from a 20 mm board, with a pitch of no more than 400 mm for the installation of the roof.
Roof type
There are two types of attic roofs:
1. gable roof
2. Broken roof (also called a mansard roof)
(attic with a gable roof photo)
(attic with a broken roof photo)
Finishing and insulation of the attic .
All interior finishing work begins after the roofing work is completed. Work is underway to insulate walls and gables using 50-100mm thick insulation, isover (ursa) and their analogues. Vapor barrier of walls, floors and ceilings with isospan (yutafol) film and their analogues is required. The final stage is finishing the walls and ceiling with dry clapboard.
Floors . The insulation is laid and a finished floor made of 28-36 mm boards is installed on top of it
(floor insulation and tongue and groove floor boards)
Installation of wooden stairs
The staircase can be single-flight or double-flight with handrails. Fencing of stairs. Balusters can be made from simple lining, carved from lining, as well as round turned ones.
Rules for forming openings
It is most convenient to create door and window openings on a completely finished wall with insulation and waterproofing. Procedure :
- Using a laser level, mark the future opening, taking into account the size of the door/window + framing that will strengthen the structure.
- Using a regular saw, cut through the top layer, remove all excess down to the timber (insulation, frame).
- Use an electric saw to cut the required opening. To strengthen the inside of the building, they make a frame - decorating the doorway with timber around the perimeter.
Openings in contact with the street require additional insulation. To do this, before installing the frame, a groove is cut inside it around the perimeter, insulation is laid, and only after that the reinforcing material is laid.
Lags
For logs (they are also floor beams), a beam with a section of 100x150 millimeters is used. Since the direction of the load is from top to bottom, the beam cuts into the frame in a vertical position. Step - 0.9 - 1 meter.
The logs are embedded in the first crown.
A mounting block with a cross-section of 30x30 - 40x40 millimeters is placed on the side surfaces of the log along the bottom edge. In the future, a subfloor will be laid on it - the basis for laying insulation.
About cracks and the reasons for their appearance
Cracks in timber are rare, but trouble can appear already in the first year of operation and even during the shrinkage process. There are several main reasons that lead to material damage :
- Huge pressure . Incorrect calculations in the project, thickness or wood that is not able to withstand high pressure lead to the appearance of cracks.
- Poor quality timber . If the material is poorly dried and a wall is built from it, during the natural drying process the outer layer will begin to shrink. Under pressure a defect will appear.
- Incorrect installation . The appearance of cracks is caused by the lack of compensation gaps when forming openings or by improper connection of elements in the wall.
- Premature exploitation . Before heating the house for the first time, at least 12 months must pass so that the walls have time to shrink. Otherwise, the material cannot withstand temperatures and cracks.
You can remove the crack with a mixture of PVA glue and sawdust, use a special sealant or caulk it.
You will learn about cracks and how to combat them in this article.
Openings for doors and windows
The formation of a doorway begins with the 2nd crown, the height to the window is at least 70 cm. The formation of openings can be carried out in two ways. “Rough” opening in preparation for creating the opening. The opening itself is prepared for installation after the timber shrinks. The assembly of the structure is accelerated; beams are installed in the openings to secure the walls.
Openings can be arranged during the construction of walls Source krsk.au.ru
In the second option, they immediately prepare for installation, installing decks that connect the beams and act as slopes. If metal-plastic windows are installed, then decks may not be installed. A vertical groove is made at the ends along the opening into which the rail is inserted. The slats/blocks are made 5-7 cm smaller than the opening so that it does not interfere with shrinkage.
Installation of windows and doors with a “rough” opening is carried out by cutting it to the appropriate dimensions. The joints are sealed using insulation; it must be nailed at an angle. Then the window frame is inserted, fixed to the deck with self-tapping screws, there is a gap on top for shrinkage, it is filled with soft insulation.
When installing a window frame, be sure to leave gaps for shrinkage Source patter.ru
About processing rules
Treatment of timber is done to protect the material from dirt, rot, damage, precipitation and humidity. Several technologies are used for these purposes:
Antiseptic .
The walls are treated with a special compound that prevents the appearance and spread of microorganisms and protects against insects. Non-profiled construction timber can be completely immersed in antiseptic. It is enough to process the glued one only on the outside.- Coloring . It is carried out at the final stages of construction. The paint changes shade and protects from the sun and moisture. In this case, the texture of the wood can be preserved (this type of coating is called glazing) or not (covering coating).
- Complex processing . Combines coloring and antiseptic. It turns out to be more profitable economically.
After the house is ready, the walls are checked according to the following rules:
- Humidity measurement. Optimal limits are 12-15%.
- First sanding. It is carried out to remove excess elements and prepares the surface for rapid penetration of the antiseptic.
- Applying an antiseptic if it will be used separately from the paint.
- Padding. It is carried out to prepare the timber for painting. For external walls, paint with an antiseptic is used, applied in a thin layer.
- Re-sanding. Removes excess particles remaining after priming.
- Painting in several layers, depending on the type of paint.
- Sealing joints using the technology indicated on the packaging of the selected sealant.
Painting a house made of timber is carried out within 3-6 months after construction. The process is recommended to be carried out at an air temperature of at least 15 degrees.
Find out how and with what to treat timber walls from this article.
Calculation of materials and construction costs
Before starting calculations, you will need to clarify the parameters of the future structure , the type and size of the timber that will be used. To calculate the amount of timber per 1 cubic meter. m will need:
- Calculate the perimeter of the building.
- Multiply the perimeter and height of the walls.
- Multiply the resulting product by the thickness of the timber.
Next, we find out how many units of elements are in one cubic meter:
V=H*B*L , where
- H and B thickness and height of timber,
- L is its length.
To determine the number of elements in one beam, divide one by the resulting product.
Ready calculation of the amount of timber per 1 cubic meter. with a length of 6 m.
| Section size + beam length (cm*cm*cm) | Quantity per 1 cubic meter |
| 10*10*600 | 16,7 |
| 10*15*600 | 11,1 |
| 15*15*600 | 7,4 |
| 10*15*600 | 8,3 |
| 15*20*600 | 5,6 |
| 20*20*600 | 4,2 |
The approximate cost of building from laminated veneer lumber without finishing is 6,500 rubles/sq.m. With finishing – 8500 rub./sq.m.
For turnkey construction, a small building up to 100 sq.m costs 500-700 thousand rubles. box without decoration. A finished house with finishing of more than 100 sq.m – 2.5-3.5 million rubles.
Read about calculating the cost of a house made of timber here.
Wooden fittings
This means various anchors, rivets, and metric fasteners. These are specially manufactured products for fastening certain parts of wooden structures.
They also use various mounting profiles made of thick galvanized steel sheet. They already have holes made for nails, screws or bolts - sometimes of different diameters. They greatly facilitate the connection of wooden elements in different configurations and at different angles.
The simplest such element is an ordinary perforated steel plate. Although there are more highly specialized parts that have very complex multifaceted shapes.
When choosing wooden fittings, it is recommended to check its permissible load. If, when designing a wooden structure, the architect foresaw the use of such fasteners and determined what loads arise from given connections, then choosing the most suitable fittings for your home will not be difficult. Otherwise, it is better to consult with experienced specialists and sellers of construction fasteners.
Did you find this article helpful? Please share it on social networks: Don't forget to bookmark the Nedvio website. We talk about construction, renovation, and country real estate in an interesting, useful and understandable way.
Pros and cons of use
The advantages include:
- optimal vapor permeability;
- Absolutely environmentally friendly, harmless to health;
- excellent thermal insulation;
- lightness, minimum load on the foundation;
- durability;
- aesthetics;
- strength;
- availability.
Flaws:
- noticeable shrinkage after completion of construction;
- difficulties when finishing “wet” rooms (bathroom, kitchen);
- the likelihood of resins;
- the need for treatment against the appearance of microorganisms, the possibility of attack by insects and rodents;
- poor fire resistance.
Read more about the pros and cons of houses made of timber here.
Advantages of a house made of profiled timber
Building a house from profiled timber with your own hands
- can be quickly built. A company (team) of three people, having minimal skills in using carpentry and plumbing tools, is able to assemble a box at home within a season;
- The log house is environmentally friendly and has a unique microclimate. In addition, good air flow through the wood will ensure a sufficient level of air exchange;
- timber is an excellent heat insulator and allows you to conserve heat and save on heating;
- no need to immediately invest a lot of money in construction and finishing. These processes can be separated in time;
- a house made of timber has natural beauty, presentability and style.
Stages of building a house made of profiled timber
We will briefly list all the stages of construction, and dwell in detail on the key ones that directly relate to working with timber.
Step-by-step instructions for building a house from profiled timber with your own hands:
| Stage number | Name | Content |
| 1. | Design | – standard project of a house made of profiled timber; – individual project (unique). |
| 2. | Foundation | – determination of the type (tape, pile, slab); – calculation of characteristics; - excavation; – formwork installation; – installation of reinforcement frame; - pouring concrete; – strength gain. |
| 3. | Construction of a box house | – waterproofing; - the first crown. |
| 4. | Subfloor | – fits into the period of wall construction. |
| 5. | Box assembly | – subsequent crowns; – interior partitions; – interfloor ceilings. |
| 6. | Installation of the rafter system | – roof truss system; – insulation of the under-roof space; – laying roofing material. |
| 7. | Installation of individual elements | – installation of columns, supports and other vertical elements; – installation of window and door units; – arrangement of stairs to the second floor (attic, attic). |
| 8. | Interior finishing | – connection of communications; – decoration (cladding) of the room. |
| 9. | External wall treatment | – grinding; – treatment with antiseptic, primer, fire retardant, painting. |
Material prepared for the website www.moydomik.net
Dismantling: how to disassemble?
Dismantling of timber walls is required when the building has served its purpose and it is time to replace it with a new one, as well as when the material is critically damaged. The process is not easy and can become dangerous if done incorrectly. Main methods :
- Manual . Suitable for small buildings, you can save part of the walls for later use.
- Automated . Recommended for large buildings, it helps to carry out work quickly and safely.
- Combined . Suitable for cases where accuracy is needed and some material needs to be preserved.
Before starting work on dismantling the entire building, you will need to obtain permission, draw up a demolition project and coordinate it with the responsible authorities. After dismantling, a demolition report is drawn up and submitted to the authorities.
According to the rules, the roof is dismantled first, then the floor beams and sheathing. Then the timber itself is disassembled.
If the house is located in a place that is difficult for machinery to reach, it is necessary to carry out work with the assistance of specialists and manual equipment. It is dangerous to disassemble the timber yourself, since the structure could have become dilapidated during use and there is a risk of collapse.
Selection of fasteners for building a house. What is important to consider?
For each type of woodworking there is a special fastener. Otherwise, the strength of the structure will be at risk. In addition, the correct placement of nails and screws is important. For these purposes, designers perform calculations according to which the load on a particular element and the ability of wooden boards and beams to withstand possible deformations are determined.
Often, fasteners are selected based on additional criteria, such as appearance. This makes sense when we are talking about work on the exterior, facade of the house, where it is important to hide all joints, protruding “hats” and other irregularities as much as possible.
Nails and screws for building a house should be selected in such a way that the wooden elements match as closely as possible to each other. There should be no gaps between contacting surfaces. It must be borne in mind that sometimes the fasteners may not ensure sufficient contact of the surfaces with each other; in this case, you will have to use several types of nails, screws, screws, etc.
Another recommendation from experts: try to install fasteners into wooden elements evenly over the entire surface. Wood is a fairly “soft” material, so you should be careful not to overdo it when making holes in it. Otherwise, this can cause the wood to become "weak" in one place and may begin to deteriorate over time.
You should also buy construction fasteners from specialized companies, since ordinary sellers on the market most often do not have any information other than dimensions, and will not tell you about all the characteristics, compatibility and methods of using the part.
Next, we will look at the main types of fasteners and the features of working with them.