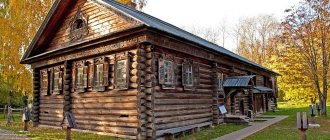
A warm, oxygen-rich wooden house provides an environmentally friendly microclimate and an aesthetically pleasing appearance. Walls made of wood, even after final shrinkage, continue to “breathe”, changing in size. This property of natural material is associated with some difficulties in interior decoration. The best option for a wooden house is to cover the walls with plasterboard. Light weight, simple installation and availability of pressed sheets allow you to level the surfaces of walls and ceilings without the involvement of specialists.
What is needed for finishing
The basic list of materials and tools is the same as when working with drywall in conventional buildings. Of the tools you will need.
- Drill and screwdriver with a set of drills and bits.
- Grinder and metal scissors (for cutting profiles). If a wooden frame is being built, then a hacksaw is quite sufficient.
- A knife for drywall or a regular stationery knife, but with a supply of blades.
- Plastering accessories: spatulas (300 mm and 50 mm wide), nozzle, mixer;
A set of necessary tools and materials
The materials you will need:
- Putty - starting and finishing.
- Serpyanka for joints.
- Primer.
- Drywall.
Types of GK sheets
Drywall is purchased taking into account the room in which it will be installed. The use of moisture-resistant sheets is highly recommended in bathrooms, bathrooms and kitchens. Stove and ventilation pipes are finished with fire-resistant analogues of the material. In other rooms, as cladding, a standard wall sheet is quite suitable.
Required tools and materials
To make a partition in a private house, you need to prepare a tool. Prepare:
- for connecting and fastening structural elements, a drill and a screwdriver;
- check the geometry of the markings of the partition elements: level, plumb line, construction angle;
- drywall saw for cutting;
- hammer, screwdriver;
- metal scissors or a grinder for cutting metal.
Various types of plasterboard partition designs
For puttying drywall: a set of spatulas (small and large), grout mesh. Materials:
- GKL sheets.
- Metallic profile.
- Self-tapping screws, dowels.
- Damper tape.
Putty: (starting, finishing), serpyanka tape, primer.
Tip 2 How to attach drywall to a wall
Quite often people decorate walls with plasterboard. This matter requires special attention. Walls finished with plasterboard look very unusual. Currently, there are several ways to install plasterboard sheets.
Instruction 1 First you need to consider the frame installation of plasterboard sheets. Fastening is done using plasterboard slats. In order to level out large depressions in the wall, you need to attach slats cut from gypsum plasterboard to the wall with glue at a distance of 60 centimeters from each other. If the wall is not load-bearing, then you additionally need to secure the slats with dowels. The slats must be aligned vertically and in one line. Next, you can begin gluing the gypsum board. Seam putty is suitable for this purpose. The layer should be thin. 2 In those places where it is impossible to cover the walls with glue, 12.5 mm thick plasterboard is attached to a frame made of wooden slats. First you need to attach 50x30 mm wooden slats to the base using dowels and screws. They must be aligned vertically and in one line by placing wooden blocks of the required thickness in the right places. To maximize thermal and sound insulation, you need to lay a layer of mineral or glass wool between the slats. After this, you can begin covering the wooden frame with insulation. It needs to be sheathed with gypsum boards. For this purpose, wood screws are most often used, which have a length of 35 millimeters. The screw pitch is 25 millimeters. 3 Sometimes people use the free-standing cladding method. This type of cladding is a standard partition, which is covered with sheets of plasterboard on one side. This design is most often used for leveling foundations, cladding crumbling walls and laying the necessary communications in the wall cavity. The frame is made from UW (guides) and CW (posts) profiles with a width of 50, 75 and 100 mm. The racks have a pitch of 600 millimeters. Wooden beams 60x60 millimeters are also well suited for this purpose. You need to place soundproofing tape under the guides. Plasterboard sheets are secured using metal self-tapping screws, which are 25 millimeters long. You can also use wood screws. To improve thermal insulation and sound insulation, you need to fill the entire cavity with mineral or glass wool. Video on the topic
https://youtube.com/watch?v=7ezJnJp76-s
Is the advice useful? Print How to cover a wooden wall with plasterboard Search Login to the site or Forgot your password? Not registered yet?
Primer, putty of the partition
Before starting to putty the surface, seal the seams between the plaster sheets and the places where the screws are attached. It is more reliable to seal the seams in two stages: first coat them with putty, allow to dry, then glue the serpyanka onto the solution using a small spatula. Lightly putty the places where the screws are attached.
When the composition has set, proceed to treating the entire surface of the drywall. The partition is puttied at least twice, start and finish. After the first layer has dried, it is cleaned with a paint mesh, the drywall is primed, a second is applied, and after the wall is dry, it is sanded. Before each stage of finishing, the walls are opened with a deep penetration primer and given time to dry. Watch the video on how to make a plasterboard partition with your own hands.
Advantages and disadvantages of wooden frames
What advantages does a wooden frame have over its now classic metal profile analogues:
- The first and main advantage is the price of the material. Metal guide and rack profiles will cost more (one element costs about 70 rubles). Wooden beams that are suitable for assembly are sold at a cost of approximately 30-40 rubles, if you look directly at sawmills it is even cheaper.
- The wood is easy to process. Defective bars and slats can be “corrected” with a plane or used as jumpers. It is easy to install; drywall screws can be screwed in even with a screwdriver.
- Environmentally friendly. Although metal profiles are safe for human health, wooden slats are a pure material.
- Shelves and furniture can be attached to the timber frame with racks of appropriate cross-section. The foundation can easily withstand the load without additional mortgages.
But there is no ideal material; timber also has its drawbacks. This is a shorter service life in comparison with metal analogues, flammability, and the possibility of damage by insects and rodents. Mounted wooden frame under sheets of plasterboard However, the main disadvantages of wooden battens include low resistance to moisture and the inability to assemble a non-standard curved frame. However, gypsum plasterboards can be mounted on timber, but following the technology and carefully selecting the material.
Decorative designs from HA
Do-it-yourself home repairs with plasterboard are carried out with the aim of quickly and efficiently decorating wall and ceiling surfaces. Despite this, the material has found wide application in the construction of decorative elements. False fireplaces, flower stands mounted into the wall, and much more are often made from it.
Installation of such elements is carried out only on a metal profile frame. With its help, structures are given strength and reliability. Since profiles can be bent, decorative elements take on various shapes and parameters.
Advantages of designs
The positive side of a plasterboard partition is that, unlike brickwork, it does not need to be plastered. The wall surface is smooth, ready for finishing. Additional advantages of the designs:
- quick installation;
- light weight reduces the load on the foundation;
- stability and reliability of the structure thanks to a durable metal frame;
- The wiring of electrical points is simplified as much as possible, without additional gating of walls;
- high noise insulation;
- gypsum, which is 92% in the slab, is an environmentally friendly material.
When installing structures there is much less dust and debris. The ease of assembly allows you to build them yourself. You just need to adhere to a certain sequence and follow the recommendations of specialists.
Options for partition construction and design
Finishing of plasterboard boards
Before finishing, it is imperative to check all the electrical wiring in the house, because if something is forgotten, then dismantling the wall cannot be avoided. All joints between gypsum boards must be filled with plaster and sealed with sepryanka; this procedure will prevent the appearance of cracks and other unpleasant moments.
You need to putty all surfaces twice - this will allow you to perfectly level the walls and create an even, beautiful color, which will be very useful for subsequent painting or wallpapering, but before that you need to prime the surface.
Sliding frame made of wooden blocks
It is better to make a wooden frame for drywall from dense wood, such as pine or oak. Regardless of the type of tree, the frame elements must be treated with antiseptic solutions to prevent the formation of mold and rot and fire retardants to prevent the wood from burning.
The algorithm for performing the work is as follows:
- The outline of the future frame is drawn on the floor and a projection is made onto the ceiling;
- Next, mark the places where you plan to install sliding guides for drywall. It should be remembered that from the corner to the near post it is necessary to maintain a distance of about 0.6 meters. The edges of the drywall must rest on the bars;
- For additional strength, intermediate slats are installed between the main bars in increments of 0.2 meters;
- Metal corners are used as fastenings for vertical frame elements, on one side of which there is a vertical oval groove. Direct fixation is performed with a screw and washer. The corners are attached at a distance of 0.2-0.3 meters from each other;
- The outer bars are placed first, between which a fishing line or cord is pulled to install intermediate elements;
- The fixation of the bars should not be strong so that the bolts can move along the mounting angle when the house shrinks;
- After installing all the vertical supports, proceed to the installation of horizontal struts; their location can be arbitrary. However, experts recommend installing the jumper so that the corner of the plasterboard sheet rests simultaneously on the vertical and horizontal frame element.
Preparatory work
Before you begin installing drywall on the ceiling or walls of a wooden house, you need to perform certain preliminary work, which includes:
- preparing the base;
- determining the need for materials;
- preparing the necessary tools and equipment.
Preparing the base of wooden surfaces
- trim the most protruding places;
- caulk and caulk cracks between logs, beams or boards;
- treat wooden surfaces with antiseptics to protect against rot and mold;
- Fire retardants are applied - compounds that do not allow wood to sustain combustion and increase the flash point.
Material calculation
To determine the amount of material required, it is determined what the frame will be made of, wooden slats or metal profiles.
Over time, wooden slats can also be subject to various deformations, which will be transmitted to the plasterboard sheets, bending them and causing cracks in the seams. Therefore, to make the frame, it is better to use metal elements with a channel-shaped profile, specially designed for drywall.
When sheathing timber, logs or boards, it is not recommended to install plasterboard sheets without a frame, nailing them to wooden planes. In this case, most of the defects will appear on the panels; they will become curved, wavy, with seams of uneven thickness. Leveling will require applying a thick layer of putty, which will begin to fall off over time due to seasonal deformations of the wooden house.
Next, a plan of the walls and ceiling is drawn in the form of a sweep. Having calculated the working surface area, subtracting all openings - door, window openings, radiator installation locations, etc., and multiplying it by 20...25% (safety factor), we divide the result by the area of one sheet with standard dimensions 2500 x 1200 mm, we obtain the required quantity GKL in pieces.
Tool
- electric drill; - screwdriver; - knife for cutting sheets; - hacksaw for wood; - construction corner; — staff-rule 1.2…1.5 m; — bubble level (for leveling when installing the frame); - plumb line (for wall cladding); - water level (for ceiling cladding); - hammer; - stepladder, scaffolding.
Choosing timber for sheathing
If you decide to assemble a frame for drywall made of wood, then you need to approach the choice of material very carefully. The list is as follows:
The wood must be very well dried. In most cases, you can only buy raw timber at the sawmill, which you will have to dry yourself
The ideal option is considered to be a maximum moisture content of the construction timber of 14%. Each lath and beam must be inspected for defects: uneven and knotty material will create problems during assembly or sheathing. It is important that the lumber is of the same cross-section. For guides and frame posts, you can use the same type of timber 50×50, 40×40, 50×40 mm and others
It is advisable not to use smaller widths, because sheets of plasterboard will be joined and secured with self-tapping screws on the racks.
After purchasing the material, all slats need to be inspected again and treated with protective impregnations or at least painted
This will protect the forest from moisture penetration. It is important to remember that the timber and slats must be stored in a horizontal position, otherwise, over time, vertical storage will result in curved racks
How to build a frame for plasterboard sheathing
In the case of a wooden house, you can go in different ways:
1) If the cladding is carried out in a house that was built several years ago and has settled sufficiently in height, you can mount a fixed frame of slats. To work you will need:
- 75×25 mm slats for guides for gypsum board joints;
- 50×25 slats for sheet guides;
- Self-tapping screws;
- Metal corners for fastening slats;
- Screwdriver;
- Ruler, pencil and stationery knife for marking and cutting gypsum boards.
Horizontal slats are attached along the lower edge and under the ceiling. In this case, the lower one lies on the finished floor, the upper one does not reach the ceiling 1-2 cm. The placement of vertical guides begins from the corner. The distance between the main slats along the central axes should be equal to the width of the sheet. Internal slats are set in increments of 400 mm, i.e. 2 auxiliary slats for 1 sheet with a width of 1205 mm.
The slats are fastened to the wall using self-tapping screws or nails. The installation of each guide must be accompanied by checking verticality with a level or plumb line. The main and auxiliary elements can be attached to the horizontal floor and ceiling rails either with metal corners or with self-tapping screws, directing them to the support point at an angle of 45°.
It is important to check not only the strict verticality of the guides, but also the evenness of the plane to which the drywall will be attached. For control, it is optimal to use a long, flat rod or a construction rule.
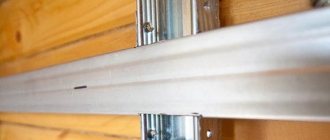
2) The movable frame is suitable for installation in a newly built house, in which the rigid frame given above is deformed when the structure shrinks. You will need the same set of tools, only as a moving element you need to purchase “crab” attachments and PAZ 2 strips. The plank is attached to the wall motionlessly; a crab pre-installed on it with a rail can move along it within 6 cm when it shrinks. They tell you more about installation masters in the video. The work algorithm also applies to wooden frames.
3) Another interesting way to install a movable frame without complex devices. Fastening is carried out not to the wall, but to the ceiling. To do this, nylon plugs are inserted into the places marked on it. They will protect metal and wood from negative effects on each other. Holes are drilled in the ceiling beam at the attachment point, into which a long bolt and washer are threaded. It turns out that the upper part of the frame is not firmly fixed, but suspended. Thus, we leave the structure the opportunity to maintain its integrity and not change its position when the main wall shrinks and the ceiling lowers.
The guide rails are screwed into the ceiling and floor beams and to the walls along their length.
Subtleties of making wooden sheathing
When assembling sheathing for drywall made of wood, you need to select lumber with the appropriate cross-section. If you do not plan to insulate the walls with plasterboard, then a batten with sides of 40x40 millimeters is suitable. When laying insulation, the width of the frame should allow this to be done, that is, use timber 50-100 mm wide and 40-50 mm thick. Plastic dowels and screws with a suitable length are used for fastening
Fasteners are purchased based on the thickness of the lumber, so that at least 30-40 mm of dowels fit into the wall. Diagram with the dimensions of wooden beams for sheathing It is important to take into account the material of the walls. Gas or foam concrete blocks are very fragile, and a standard plastic dowel will not provide reliable fixation; it will simply fall out or have significant play
The same applies to anchors. For fragile walls, a metal dowel with teeth, the so-called “crocodile”, is used. The technology for assembling the sheathing can be in the form of two designs: with fastening the slats directly to the wall (if it is flat without significant differences) and with installation on guide bars laid on the floor and ceiling. Example of installing lathing on a wall. In the second option, the diagram is similar to assembling a frame from a profile on a wall. The guides are mounted, the frame posts are attached to them using mounting angles, and then the cross rails are added. This embodiment is applicable when the walls in the house have very large unevenness and need to be leveled with plasterboard.
It is important that the holes for the dowels are drilled in advance, otherwise it will not be possible to drive in the dowel; the same applies when screwing in self-tapping screws “directly”, they can simply split the board. Sheathing installation diagram Example of attaching wooden sheathing under plasterboard If the walls are smooth, the sheathing is assembled as follows:
Lathing installation diagram
An example of attaching a wooden sheathing under plasterboard. If the walls are smooth, the sheathing is assembled as follows:
- mark the surface for the vertical posts of the frame;
- The slats are installed along the lines and holes are drilled directly through them in the wall to the diameter of the dowel. The pitch of the attachment points is maintained within 500-600 millimeters;
- drive in dowels and screw in self-tapping screws.
At this stage, the sheathing is complete; it is worth protecting it from the negative effects of moisture and temperature changes.
Option for attaching wooden sheathing to the ceiling Plasterboard sheathing must be done with gaps. Between the sheets they should strike within 2-3 mm, from the floor 5-10 mm and 10-30 mm from the ceiling. These gaps will be closed in the future with decorative and finishing elements and will compensate for possible movements of the frame.
https://youtube.com/watch?v=RRqxtLjLxpc
Installation process
The determining stage for the entire partition is the correct marking. It is better to check the correctness of the drawn lines several times. The best option is to do it using a laser level, but if you don’t have one, then use a large level, a construction angle and a plumb line.
The process of marking a room for installing a partition
Subsequence:
- Marking begins from the floor, drawing a perpendicular line. From it they set the horizon on the ceiling and transfer it to the walls, check the correctness using a plumb line, level, and construction angle.
- According to the markings, attach the guide profile first to the floor, then to the ceiling and walls, and check with a level. Dowels (6 x 40 mm (45 mm)) are used as fasteners. A damper tape is placed under the tape, which neutralizes metal vibration.
- After this, the installation of the rack profile begins. In the case where there is a door in the partition, the first racks are placed, between which a box with a canvas will be inserted. It is recommended to reinforce these profiles with timber, inserting it inside the profile. The size between the posts is 7-8 cm larger than the width of the door. It is better to decide in advance on the model and frame of the door group; the thickness of the door frame varies depending on the model and material. The pillars are connected by a lintel reinforced with timber, also making an indentation from the height of the door by 7-8 cm.
Next, in increments of 60 cm, insert the rack profile into the guides. They are fastened together with a special tool - a cutter, if there is one, or with metal screws (3.5 mm-4 mm diameter, 9.5 mm-11 mm length). It must be taken into account that the rack profile should be one centimeter less than the height of the room, taking into account possible shrinkage of the building. - Next, screw the jumpers between the posts. To do this, cut the profile into pieces 8 cm larger than the distance between the posts. The edges are cut at an angle of 45⁰ and folded inward or outward. Insert between the pillars using metal fasteners. The minimum distance of the last direct suspension from the ceiling is 30 cm.
The two sides of the frame are mounted in this sequence. After installing it, electrical wiring is made inside under the drywall in a corrugated sleeve. Soundproofing material is laid. The last stage is covering the gypsum board frame. They start from the doorway, try to install the sheets so that they are attached to three racks (with self-tapping screws for 25 mm plasterboard). Experts recommend sheathing the partition with sheets in such a way that the seams on opposite walls do not match.
The process of covering the partition frame
In this case, there is less chance of cracks forming.
Disadvantages of wooden sheathing
Wood is one of the oldest materials used in construction. But, nevertheless, it has many shortcomings that previously builders simply had to put up with.
Diagram of the installation of wooden lathing on the wall under plasterboard
It was the development of the production of finishing products that led to the replacement of wood with metal parts. This happened for a number of reasons:
- Wood reacts very sensitively to changes in the surrounding air. When there is a high level of moisture, the slats or beams begin to absorb it and swell, which leads to an increase in volume. The temperature difference from lower to higher leads to drying out. As a result, the wooden product changes its shape, it “twists”, bends or warps. And such fluctuations are one of the features of our far from ideal climate. One can only imagine what will happen to the finish without proper care and treatment of such elements. An example of attaching wood lathing to a wall
- The second negative point is the reaction of wood to stagnant air without ventilation. The timber under the plasterboard sheathing will simply begin to quickly deteriorate, that is, rot. And if you also add a layer of insulation, which contributes to the lack of ventilation, the frame will become unusable very quickly. Diagram of the installation of timber sheathing for plasterboard
- And also the tree will react significantly to turning the heating on and off in the house. For example, in winter the room is heated, the air is drier, and as a result, moisture evaporates from wooden parts. When the heating is turned off, the humidity rises and the products will begin to replenish the lack of moisture. Simply put, the tree will begin to “pull” dampness from the sheathing, insulation and walls of the house.
- Another disadvantage of wooden material for assembling sheathing for drywall will be its poor quality of drying. Most sawmills sell lumber not fully dried, or even raw. Over time, in the absence of conditions for drying, the slats become deformed. Leveling the wall in this way will become very difficult, if not impossible.
But, all these problems are completely solvable, especially considering the fairly low cost of the material.
The process of laying insulation under plasterboard sheathing
Modern technologies, especially various impregnations and waterproofing, in combination with modern equipment, make it possible to use lumber to assemble sheathing for drywall.
How to make a wooden base for gypsum plasterboard sheathing?
Specifics of interior decoration of houses made of timber
Wood is one of the first building materials used by mankind. It has not lost its relevance today. And the use of modern processing and construction technology allows you to quickly build a house that meets all quality requirements. However, interior decoration has its own nuances, without which all the advantages of the building will simply turn into disadvantages:
- Firstly, it is worth remembering that it is worth starting interior work in a wooden house after at least 6 months. During this time, the house will “settle down”, and movements of load-bearing walls and ceilings will not spoil the interior decoration.
Decorating a fireplace with plasterboard in a timber house - Secondly, despite the naturalness of wood finishing, in any case additional finishing of the external surfaces of the premises will be required: bathroom, toilet and kitchen. The walls of these rooms will be subject to higher humidity, which will lead to deterioration of the material.
- And thirdly, it is difficult to lay communications in the walls and ceilings of a wooden house.
What are the advantages of finishing a house made of timber with plasterboard, taking into account these construction nuances?
Partition on a wooden frame
Plasterboard dividing walls in a wooden house are often made of timber. This is justified from the point of view that the materials must match each other in structure and thermal conductivity. It is worth taking into account the fact that poorly dried timber can ruin the entire structure, it can “lead”
The second point that is worth paying attention to is that insect pests can grow in the tree.
Construction of a wooden frame partition made of plasterboard
Before installing the partition frame in a wooden house made of timber, the wood must be impregnated with antiseptic compounds. The calculation of materials is carried out similarly in the same sequence. The length of the timber strips ranges from 2 to 4 m. The principle of the structure is the same as that made from a metal profile.
Scheme of a wooden frame
Additionally you will need:
- metal perforated corners that will attach the racks to each other;
- wood screws 35 mm;
- timber for guide supports 40 x 60 mm or 50 x 80 mm;
- for racks 30 x 50 mm.
Sequencing:
- The markings are carried out in the same sequence as for the frame for the profile. Check it using a level or plumb line.
- Guide beam 40 mm x 60 mm (50 mm x 80 mm), attached first to the floor, then to the ceiling, walls. Guide strips to the floor and ceiling. Use dowels 40 mm-45 mm long. First, you need to drill a hole in dry wood with a drill, the diameter is slightly smaller than the fastener.
- Install wooden posts; timber 30 mm x 50 mm is suitable. They are attached to the guide posts using metal corners and 30 mm-40 mm wood screws. The step between them is the same as for metal profiles (60 cm). It is only necessary to take into account that the last racks must be installed from the wall at a distance of at least 10 cm. A small gap in height of 8 mm-10 mm (from the ceiling) is left between the guide beam and the racks. Then, using metal corners and wood screws, attach transverse hangers between the posts.
- The wooden frame is ready, then plasterboard sheets are attached to the timber, the joints are sealed with sickle tape, and putty is applied. The process follows the same scheme as for partitions based on profiles.
A selection of photos of the design of plasterboard partitions in the house
Interior partitions made of plasterboard
It is quite difficult to divide a large room into comfortable zones without using expensive materials and without resorting to the help of specialists.
But you can make partitions from plasterboard, which are easy to build, the material is inexpensive, and you can start handling it as a complete beginner. Partitions will help create distinct zones in a house or apartment; they can be created if you want to separate space, but at the same time spend little time and money on it. What is this article about?
Fastening drywall to timber
The sheathing is carried out as when using a metal frame. But there are some nuances that should compensate for some of the disadvantages of such a material as wood. Scheme for attaching various materials to a wooden sheathing First, sheets of plasterboard are attached to a wooden frame with gaps from load-bearing walls within 5 mm. This distance from the floors should be up to 30 mm, and the ceiling should also be 5 mm. Scheme for installing drywall on a wooden frame Secondly, installing drywall at the joints is not done end-to-end, but with a gap of 3–5 mm
These precautions are taken in case of possible movements of the wooden base. Self-tapping screws are screwed in in increments of 250–300 mm, joining adjacent sheets on the frame posts. The caps are slightly recessed, but without damaging the cardboard layer
After covering, finishing is carried out using conventional technology with putty and reinforcement of joints.
Soundproofing protection
Separating elements should provide sufficient sound insulation of individual rooms so that each family member and guest can retire, do something that requires concentration, and relax. The problem is solved by constructing thickened massive partitions from porous materials that better absorb sound waves, especially low frequencies. But shell rock, gypsum blocks, and aerated concrete are not always suitable.
The characteristics of sound protection are improved by organizing a multilayer structure of the enclosing wall. Layers of hard materials reflect, while layers of soft materials absorb sound. The effectiveness of sound insulation increases with increasing rigidity, weight, and the number of layers of the frame cladding (with a provided air gap between them). Typically, in wooden buildings, sound insulation is achieved with a soft layer (usually slabs of basalt stone wool, less often - expanded polystyrene, other sound-absorbing materials) between the cladding of the frame system.
Stone wool is both heat protection and sound insulation
How to choose the right materials
When selecting materials for finishing a house made of timber with plasterboard, several fair questions arise:
- Is it possible to attach drywall directly to wooden walls inside the house?
- If you use a frame, can it be assembled from wood or should you prefer a metal profile?
- What type of drywall should I use: wall, moisture-resistant or fire-resistant to improve fire safety?
The answers to these questions will determine the further choice of material, as well as the techniques for finishing a house with plasterboard.
Frame or frameless methods
The frameless method of mounting plasterboard sheets to the wall surface is simpler and faster, but requires compliance with many factors.
GKL can be mounted directly on walls if the planes do not have significant differences. Perfectly straight walls in a wooden house are very rare, even in a new building. After all, wood dries out and shrinks along with movement.
And in this case, laying communications becomes much more difficult. For example, you will have to directly drill the supporting structures for the wiring.
Scheme for frameless installation of drywall
The frame, on the contrary, makes it possible to level out any differences and unevenness of the walls to the ideal value, and laying utility lines under the plasterboard sheets will not be difficult at all. In addition, if suspended ceilings are planned, structures on a solid foundation can withstand the load much better.
Metal or wood
In timber houses, both wooden slats and metal profiles can be used as frame material. Moreover, in the first option, it is permissible to build a simpler structure by attaching the beams under the gypsum board directly to the walls (again, taking into account differences). But the quality of lumber must be at a high level. Only wood that is well dried and treated with protective compounds is used. The cross-section of the racks of such a frame must be exactly 50×25, the same criterion for the crossbars, but the guide bars are no less than 75×25!
Mounted wooden frame under plasterboard in a timber house
The process of attaching wooden frame posts
Metal profile types are also suitable for use in wood construction. With their help, you can build a solid foundation that is resistant to influences such as humidity and temperature changes.
An example of fastening a metal frame in a house made of timberMetal frame on the ceiling
To do this, you need ready-made guide elements UD profiles and rack CDs. In terms of cost, metal “parts” of the frame will be cheaper in comparison with high-quality wooden slats. The video shows how to install a metal frame on timber walls.
Which drywall to choose
The type of drywall for finishing a wooden house is selected depending on the purpose of the room. In the bathroom, toilet and kitchen there must be a moisture-resistant sheet; in living rooms, a wall option is quite suitable, and a fire-resistant one is used for finishing structures that may be exposed to temperature influences. In addition to the above-mentioned features of material selection, in a house made of timber, it is necessary to use a vapor barrier.
General information
First of all, I note that there are two ways to install drywall:
| Installation method | Peculiarities |
| Frame | In this case, a frame of metal profiles is assembled on the walls or ceiling. As a result, the usable space in the room is reduced, but the frame allows you to provide a flat surface for the walls. In addition, in the space between the base and the casing, you can hide communications or even lay insulation. |
| Frameless | Such installation allows you to save space in the room; in addition, it is carried out much faster, since there is no need to assemble the frame. The only thing is that in this case the base must be smooth and of high quality. |
Below we will consider the installation features of each of these methods.
How to sheathe a wooden house with finishing material
Before you begin covering the interior walls with plasterboard, you need to prepare the necessary tools and additional building materials. For this process you will need:
- The basis for assembling the frame with your own hands. You can choose a wooden base or a metal profile as it. Whatever base is chosen, the assembled frame must be strong and reliable.
- Construction drill.
- Special cutting tools for trimming finishing material.
- Screwdriver for fasteners.
- Paint brush for painting.
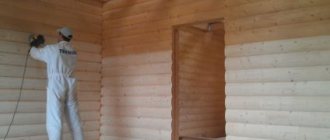
Initially, it is recommended to treat all wooden walls that will later be covered with plasterboard. This stage is quite simple, and anyone can do it with their own hands. It is best to choose a special impregnation for wood, and repeat the manipulation after the first layer has dried. Impregnation will prevent mold or mildew from appearing. You can apply the special composition to the surface using a construction brush or roller.
Next, a base of metal or wood is assembled. Most often, a metal profile is used as it, which is most convenient to assemble and is much more practical to use. The base of the frame must be attached to the surface of the wall, so these parts must be level and consistent in size. To check, you must use a construction or laser level.
The self-assembled frame must be firmly and stably attached using special screws to three planes:
- to the floor;
- to Wall;
- to the ceiling.
In this case, care should be taken to ensure that the finished and secured frame can easily support the weight of the finishing material, as well as additional decorative elements that can be applied to the drywall.
The next process involves cutting the material and joining it to the frame. After the base is covered with plasterboard, you need to use putty intended for interior work. You need to carefully putty the walls with your own hands, alternating the process of priming the entire surface. It is on high-quality putty and primer that the evenness of the walls will depend, on which any type of decorative finishing can be applied in the future.
To cover the walls of a wooden house with plasterboard with your own hands, you do not need to have specific construction skills, and you won’t have to spend a lot of effort for this event. The most important thing is to adhere to the process technology, and if necessary, you can familiarize yourself with the photo and see the recommendations of specialists in the video.
https://youtube.com/watch?v=-yZN1quNY0A
And a few more nuances
Since the ceiling will go down when the log house shrinks, we cover the wooden house with plasterboard a little differently than usual. Namely:
- First we cover the ceiling. By the way, the frame for it also cannot be rigidly attached to the walls; it is better to use flexible hangers and rods.
Diagram of a “floating” suspended ceiling frame
- When covering the walls, we do not bring the cladding to the ceiling by a few centimeters (depending on the degree of possible shrinkage) and leave a gap of 1 cm from the floor. These gaps can be closed with skirting boards and ceiling cornices of the appropriate width, securing them to horizontal surfaces.
- You also need to leave a thin gap of 1-2 mm between the sheets. It will be hidden with putty during subsequent finishing, and in the event of uneven movement of different sections of the walls, it will not allow cracks to appear on the drywall.
GKL installation diagram
Tip 1 How to cover a wooden wall with plasterboard
Author KakSimply! The use of plasterboard when decorating a room allows you to level the walls, making it easier to carry out further repairs, improve sound insulation, mask communications and save heat. An additional advantage of this material is that anyone, including those far from construction professions, can attach it to walls; you just need to acquire the appropriate tools and know the basic principles of working with drywall.
You will need
- - drywall;
- - wooden slats;
- - dowels and screws;
- - drill;
- - hacksaw;
- - screwdriver;
- - putty;
- - putty knife.
how to cover walls with plasterboard
Why drywall
Drywall has many applications, but it is most often used to create partitions, so we will tell you about the process of constructing plasterboard partitions, which can be made of any shape and size, it all depends on your imagination. Also, if you need to create a partition in which you can install a door and create sound insulation and insulation, then plasterboard is also perfect for this. It is very easy to use, you just need to purchase profiles for constructing the frame, some tools, and you can start creating the partition.
Interior partitions made of plasterboard are erected in the place where you need to divide the room into zones. Perhaps it will be a study, a studio, a playroom for children, or just a beautiful partition that can advantageously emphasize the interior design and highlight the room with original decor. If you are interested in plasterboard products and want to build some structures in your home, we recommend reading articles about these products on our website.
If you have started a renovation and are planning to completely decorate the room, then using drywall will be the best option in order to save your budget as much as possible without compromising the quality of the repair. By the way, you can arrange lighting and insulation in the partitions, if, of course, you need it. We just want to point out that drywall is a very versatile material that can be used in a wide variety of fields and areas of construction and repair work.
It has no restrictions on its use, so almost anyone can start working with it to create the necessary structure with their own hands, the main thing is to follow the instructions below and, if everything is done correctly, you will get a high-quality and beautiful partition.
Advantages of lining a wooden house from the inside with plasterboard
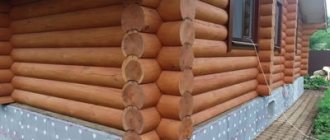
The timber structure is distinguished by relief walls. At the same time, owners often want to give their home a more modern look. Using drywall in a wooden house to level surfaces is preferable to other materials for a number of objective reasons:
- natural composition of dry gypsum plaster;
- high vapor permeability of the material;
- light weight and ease of cutting facing slabs;
- low cost and simple installation on a frame base;
- additional thermal insulation;
- communication wiring hidden behind the casing;
- ideally flat surface for finishing materials.
View of a room covered with plasterboard. It is noteworthy that these works were carried out without the involvement of hired professional builders
Various types of drywall: standard, fire-resistant and moisture-resistant
The advantages of this choice include covering the wooden ceiling with the same plasterboard slabs.
The universal material allows for bold design solutions - multi-level surfaces of any configuration, zoned built-in lighting, overhead air distribution from the air conditioning system.
In a word - almost everything your heart desires.
The purpose of partitions in a log house
The erected wooden frame shrinks completely in 1-1.5 years, and the installation of self-supporting internal elements - partitions - begins.
Wooden houses of frame, panel type almost do not shrink. Once assembly is completed, the interior space can be formed without delay.
The main functional purpose of partitions is to divide the living space enclosed by external walls into rooms. The purpose, location, and area are determined by the planning project for each level of the building. Other functions, in addition to the enclosing one, are the creation of the necessary supporting surface for the installation of furnishings, furniture, and household appliances; obtaining a heat and sound insulating barrier between adjacent rooms; assistance in zoning and decorating the space of a separate room.
The absence of strict requirements for enclosing structures that do not take the load from the roof or upper floors makes it possible to reduce the thickness and use less durable materials. The construction can be completed without the help of professional builders. Easy to dismantle (without compromising the strength characteristics of the building) and move to another convenient location.
With the help of lightweight structures, attic, sanitary and hygienic premises are laid out, areas are separated for dressing rooms, laundries, and illumination is provided in the depths of the building (using light-transmitting materials).
Independent frame made of metal profile
A sliding frame for drywall in a wooden house can be made with your own hands:
- A level is struck on the floor and ceiling, a guide profile is installed on the floor;
- Using a level and a tape measure, mark the places where the vertical posts will be located; the distance between them is chosen independently (60 or 40 cm);
- The height of the wall is measured, depending on which the height of the vertical posts is determined. To ensure that these elements do not rest against the ceiling, their length should be 10 cm less than the distance from the floor to the ceiling. In this case, the racks will not be damaged when the house shrinks;
- Next, the stand, cut to size, is applied to the mark on the wall and several attachment points are drawn. In this case, you need to ensure that the fasteners do not get into the joint of the logs or into an existing crack. They also mark the wall and profile with one number. In the future, this will allow you to install the vertical elements in their place, since the grooves may be at different levels;
- Now, using a grinder, cuts are made along the axis of the profile in those places where the attachment points are marked. The length of the finished groove should be about 10 cm, and its width should be slightly greater than the thickness of the screw. The edges of the slot are cleaned until completely smooth. The groove should be located strictly along the axis of the profile, and its main part should be located under the intended attachment point;
- All other vertical racks are prepared according to a similar scheme, while marking the wall and the profile located in this place is mandatory;
- To give strength to the frame elements, special stops made of bars or long self-tapping screws are nailed a little above the mounting points on the wall. The outer plane of the stop should be at the level of the future frame;
- Now you can screw the racks to the wall; for this you can use self-tapping screws with fairly wide washers. This will allow the fastener to rest tightly against the profile. The stand is placed with its back against the wall and the fasteners are screwed into the upper part of the slot, stepping back slightly from the edge. In this case, there is no need to tighten the fasteners too much; the washer should turn with little effort. The distance left below will allow the screw to move with the wall during the shrinkage process, and a small indentation at the top will allow the wood to expand due to moisture;
- To attach plasterboard sheets to the frame, take a U-shaped profile and combine it with an installed vertical stand, with the back facing outward. The profiles are connected to each other with a cutter through the side edges;
- At the end, cross members made of metal profiles are installed to make the structure more rigid.
Surface marking
You need to decide on the shape of the partition, for this you can look for interesting ideas on the Internet, if something interests you, you can sketch out a similar shape on paper, add your decisions and preferences, and then start making markings. Also, think and decide whether you need to insulate the partition, because it allows it, but this is an additional expense. If insulation is needed, for example, in a private house, it will be very useful, since maintaining heat in it is much more difficult than in an apartment, then create a frame and, in general, the entire structure wider so that insulation can be placed in it.
If your work is related to sounds, perhaps you are a musician or a sound engineer, then it is better to use soundproof plasterboard to create a partition, which can effectively muffle most sounds that will no longer disturb both you and your neighbors. Also, it is possible to install spot lighting in the partition, which will create a unique atmosphere at night. In addition, such lighting will help you easily navigate around the apartment without turning on the main light, thanks to which you can save a little on electricity.
The selected form must be transferred to the wall and floor, that is, its projection must be made onto the surface on which it will be installed. The very first thing that needs to be applied is the contours of the product, which will indicate the installation location of the guide profile, which will significantly facilitate all further work. The profile that will be located inside must be marked on the wall in the same way. Be careful here, the location of the guide profile is marked both on the wall and on the floor and ceiling, since it will be directly attached to them. The rack profile is attached to the guide, and not to the surfaces, so its location can only be marked on the wall to make it easier during assembly.
If you are planning to create interior partitions from plasterboard using insulation, then remember that you will need to make much more frame to make room for the insulation itself. This means that when marking, it will be necessary to take into account the location of the insulation. Also, we note that it will be difficult to illuminate a thin partition, so light partitions serve more of a decorative role. Already in wider plasterboard partitions you can create niches, lighting, and insulation, so decide what you need more.
Frame structure
The number of frame elements is calculated taking into account the fact that the distance between its vertical and horizontal parts must exceed 400 mm, and also that the perimeters of door, window and other openings must be framed by frame elements. Let’s calculate how many linear meters of elements are required to assemble the frame.
If, nevertheless, a decision is made to make a wooden frame from slats, it should be taken into account that along the perimeter plasterboard sheets are attached to slats with a cross-section of 80 x 25 mm (two adjacent sheets are fixed on one such slat), and intermediate ones are used with a cross-section of 40 x 25 mm .
COVERING SIDING PANELS FOR EXTERNAL WALLS OF A HOUSE ON THE LAKE SHORE
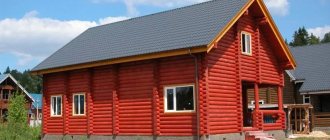
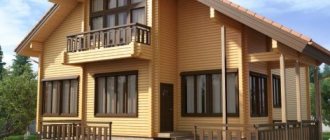
If you want a warm feeling from your exterior, cladding the facade with clapboard will give you this! Look at these photos of houses covered with wooden clapboards and you will see this. Fortunately, modern protective materials allow you not to think for a long time about restoring the facade of a wooden house.
Don’t be afraid to apply new technologies to old, proven materials and you will get ultra-modern wooden house facades that will delight you every day!
The one-story wooden house is located on Orcas Island, one of the archipelagos of San Juan Island off the coast of Washington, USA. The house is equipped with retractable panels that protect it from very windy storms, the prevailing ocean currents that come ashore in winter. Located on the coast of an island, the house uses both retractable wood panels and the surrounding forest for winter protection. Lining is widely used on the facade and interior of the house as a finishing material. But look how ultra-modern the cladding looks!
On the south side of the house there is a rocky shore overlooking the Pacific Ocean. The architects, answering the question of how to cover the facade of the house, used natural colors of cedar cladding on the facade to harmoniously combine this wooden house with the surrounding landscape. The lining material for the exterior cladding of the house is local.
The surrounding forest helps protect the house from weather conditions, which are severe quite often.
Stone collected from the site was used to level the area for the house. The space occupied by the house was compensated by the green roof on it.
The site is on an island with pristine shorelines and marine life, so carefully engineered stormwater flows were designed to replicate pre-construction conditions.
Wooden wall panels are installed on tracks, which allows them to close tightly or open widely depending on weather conditions.
When the weather is good and the panels are open - behind them is a wall of large panoramic windows, which can also be closed or opened wide for easy access to the outdoors.
This double sliding panel system is used on both the front and rear façade of this modern timber home.
When both sets of slides are open, you can easily walk through the house from the front yard to the back deck without opening the door.
The home's wide open spaces are ideal for allowing ocean views to travel unimpeded throughout the home and yard.
When the glass panels are closed and the wall panels remain open, cold parties remain comfortable.
The home's outdoor deck also boasts a large size, allowing you to enjoy outdoor dining.
This stunning outdoor dining table was crafted from two planks of naturally weathered building material.
The roof overhang and deck siding is Western Red Cedar.
Around the back of the house, the alcove is also lined with red cedar clapboard, and the open deck is left uncovered to weather conditions.
The back deck slopes down to the portion of the landscaping that was leveled for the home's foundation.
Inside the home, wood floors, clapboard ceilings and walls act as a frame for impressive views.
Even the view from the front of the house is magnificent and constantly showcases the local animal life.
When the wall panels are closed, the view to both sides of the house is still not completely blocked, and natural daylight can illuminate the interior areas.
On cold days, when the house is closed, a wood fireplace is used for heating. The design with open square shelving on both sides is the main focus when covering the wall panels. Even the wooden paneling of the ceiling of this wonderful interior does not create the impression of a grandmother’s dacha. As a nod to the color of the ocean and sky, several parts of the interior feature rich blue hues.
The indoor dining table is made from a slab of Fir wood, but unlike the outdoor dining table, it has not been treated for outdoor use. The kitchen overlooks the side façade and deck. It has four small storage rooms on the side walls. The overhangs on the other side of the house are longer and contain a master bedroom overlooking the side garden and ocean, as well as a guest suite overlooking the side garden and a master bathroom overlooking the front yard. Unlike the social area, there is no clapboard paneling in the bedrooms, bathroom and toilets.
Frameless method
It is not at all necessary to install the frame: you can attach the drywall directly to the wall surface using a special adhesive. The advantage of this method is that it increases the usable area of the room.
Disadvantages of the frameless method:
- Suitable only for smooth walls, otherwise it will be difficult to install the sheets.
- There is no way to lay wires or hide communications.
- It is unacceptable to use an adhesive composition - it is not among the environmentally friendly materials.
- It is impossible to apply insulation.
If profiled laminated veneer lumber was used to build a house, all of the listed disadvantages will not be observed (except for additional insulation) - this is a rare case when the walls will be almost perfectly smooth, so you can attach drywall directly to their surface.
Beautiful examples
- Audacity and avant-garde. Walls finished with OSB without further coating create a bright interior with an interesting heterogeneous pattern. Extraordinary aesthetics are accompanied by cost savings. The fashion for such finishing is gaining momentum.
- Natural wall. Finishing the interior walls with timber-like boards allows you to create a monolithic interior with excellent aesthetics. Decorative beams are tinted in a dark contrasting color and highlight the light colors of the finish. The ceiling is covered with clapboard and painted in a light color or covered with matte varnish.
The interior decoration of a frame house is shown in the following video.