[contents]
Advantages of a frame veranda
A frame veranda can be erected in the shortest possible time and has the following advantages:
- creation of additional multifunctional space;
- strengthening the walls of a frame or timber house;
- improving sound insulation of main rooms;
- maintaining heat in the house;
- ergonomic appearance.
The veranda can be used as an entrance hall, living room, summer kitchen, or greenhouse. It can be divided into several zones, for example, for relaxation and storage of garden tools, etc.
What needs to be decided before construction begins
The veranda is a simple structure, but its construction should be treated with utmost care. Firstly, you need to obtain permission for its construction, and when construction is completed, you will need to re-register the house (the rule is due to the fact that the area of the house increases). Secondly, no matter what kind of veranda you have in mind, its construction should be based on the following recommendations:
- For construction, choose the facade where the entrance door to the house is located. This is practical and convenient, especially if you plan to glaze and insulate the structure; the extension also becomes a vestibule, preserving the microclimate of the living space.
- Regardless of what material is chosen for construction, the design must match the architecture of the house and fit into the surrounding space.
- It is necessary to set the size of the veranda at the dacha in order to understand how much material will be required for construction. Structures with a length equal to the length of the facade to which it is planned to be attached look proportional. Comfortable width starts from 2.5 m. The summer veranda can be made smaller.
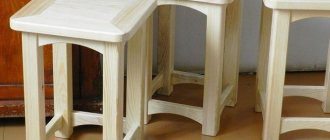
Corner wooden structure with two entrances Source we build with our own hands.rf
- The format of the building is immediately determined: will it be open (summer) or closed. In the latter case - will it be heated, what kind of glazing will it be (except for the standard one, possibly continuous, “French” glazing).
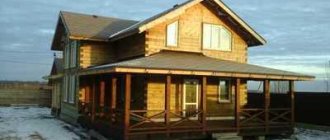
- Depending on the location relative to the walls of the home, the structure can be front, end, or corner. The veranda built around the perimeter of the house has an original appearance. It can be divided into open and closed areas, and there is enough space in it for a hallway, a pantry, and a summer kitchen, not to mention a spacious recreation area.
What types of frame verandas are there?
The appearance and purpose of a frame veranda make it possible to implement the most innovative design solutions. In shape they can be either classic rectangular, square, or radial, L- and U-shaped, polygonal, etc. Like verandas made of other materials, frame structures can be:
- open, in which the roof is supported by support beams, and one or more walls are missing;
- closed, which is a space completely enclosed by walls or glazing.
Sergey Yurievich
Construction of houses, extensions, terraces and verandas.
Ask a Question
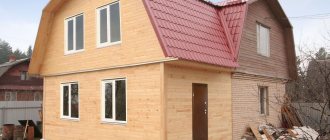
Verandas are also distinguished by the material from which they are built. The best option is a frame veranda made of timber. This structure is perfect not only for a log house, but also for a cottage made of brick, foam blocks, or silicate.
In terms of environmental friendliness and ease of construction, a wooden frame veranda has no equal. The only condition is that the wood used for construction must be treated with effective fire and bioprotection.
Features of the terrace and its difference from other small architectural forms (SAF)
This name refers to a platform located directly on the ground or raised above it. A distinction should be made between a terrace as a flat piece of land (for example, in terrace farming) and a terrace as a building structure. The first has a limiter that prevents the soil from “sliding” down the slope and ensures ease of planting.
The second is located on supports or a prepared site, has a floor, sometimes a fence and a roof.
Open (without roof) veranda adjacent to the house
Covered pool terrace (canopy not attached to the house)
Very often a terrace is confused with a veranda. In fact, a veranda is one of the types of terraces, necessarily covered and adjacent to the house. Sometimes the presence of permanent or removable glazing is considered a mandatory accessory of a veranda.
Types of terraces are conventionally divided according to the following criteria:
- the presence of a roof (canopy). The entire surface of the site can be covered, or only part of it. There may be a complete absence of a roof or the organization of temporary shelters - umbrellas, portable canopies;
- the presence of a fence. It can be purely symbolic - a border, a decorative lattice, green spaces, sculptures, and so on. It is possible to install strong and reliable railings, solid or lattice. Such fences are considered a prerequisite when the site faces a steep slope, seashore, mountain ledge/hills. If there is a roof, the fencing is often part of the supporting structure of the canopy;
- number of levels. The simplest building options are single-level, the most complex can include dozens of levels with platforms of different sizes and shapes;
- form. The simplest ones are logically considered to be square and rectangular terraces, curved or in the form of a broken contour are much more difficult to build;
- location. The site may be adjacent to a house or other building (for example, a swimming pool), surround the structure on all sides or partially, or be located separately from all buildings of the estate.
When planning a terrace at your dacha and planning to build it yourself, it is better to choose the simplest option: a rectangular, single-level structure with railings and a light canopy.
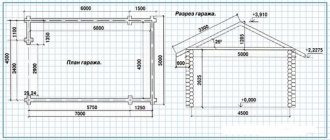
Foundation for a frame veranda
When constructing a foundation for a veranda, it is not recommended to connect it to the foundation of the house. Buildings have different weights, and the loads from the house will be transferred to the extension, which will lead to its shrinkage.
The strip foundation is carried out using standard technology: markings are made and a trench is dug. The formwork is installed, inside which the reinforcing frame is laid. Then the structure is filled with concrete mixture. After the concrete has hardened, you can begin building the frame.
The strip foundation can be made of prefabricated FBS slabs. In this case, there is no need to wait until the concrete hardens and you can immediately build the extension.
A columnar foundation for a frame veranda involves digging in foundation pillars, which can be either ready-made or poured directly on the site. The lower crown is mounted on the installed supports.
How to attach a veranda to a house: main stages of work, similarities and differences
Regardless of what type of veranda is planned to be built, most of the work follows the same pattern.
- Site preparation. The area planned for development is cleared, all debris is removed, the condition of the foundation, the walls of the house and the blind area (if there is one) in this place is checked. If there are communications in this area, it is necessary to mark their location so as not to damage it during the construction process. It is better to remove the top layer of soil and uproot the plants. To prevent the roots from damaging the building in the future, it is advisable to treat the soil with special compounds.
- Marking. First of all, the corners of the building are marked, then the perimeter is outlined along the cord. For columnar and pile foundations, marks are placed for future supports in accordance with the project; for strip foundations, the width of the strip is marked.
- A pit/pits are being dug. This applies only to buried foundations; screw piles are screwed into the ground without first digging out the holes.
- A sand and gravel cushion is installed. This type of preparation is also carried out for screw-pile foundations, but the embankment is carried out around already installed piles. The distance from the axis of the pile to the outer edge of the cushion is at least 0.5 m. If the soil on the site includes loose sand, the cushion can be partially replaced or supplemented with a layer of hot-filled bitumen.
- The foundation is being completed. For columnar supports, columns are made of brick, blocks or monolithic concrete, strip bases are poured into formwork or mounted from blocks. The upper part of strip or column supports must be protected with horizontal waterproofing, the underground part is treated with roll or coating waterproofing. The strip foundation or pillars are “connected” to the foundation of the main building with mortgages at the reinforcement stage.
- A grillage is being installed. This stage is required for columnar and pile foundations.
- Racks are mounted or columns are laid out/cast. It is mandatory to connect these elements to the foundation with mortgages or other fasteners. The racks or columns adjacent to the wall are connected to the main wall. For light structures made of metal or wood, the connection can be omitted.
- The upper and lower trim are assembled. The lower one is only for light frame structures. For permanent verandas made of blocks, bricks or monoliths, the top frame is replaced with a mauerlat, on which the rafters will subsequently rest.
- The roof frame is assembled. More details about the connection of rafters or trusses with the upper frame (mauerlat) can be found in the article.
- The roof is laid with the selected material. For any design, waterproofing the seam between the roof and the wall of the house is mandatory. It is also advisable to arrange water drainage and a so-called “rain apron”.
- The base and flooring are being installed. The most popular is laying decking boards, decking or tongue and groove boards over wooden joists.
- The veranda fencing is being installed. It can be light or substantial, in the form of masonry or a monolith, complemented by glazing, mosquito nets, sun protection elements, and so on.
- Finishing is in progress.
Taking into account the difference in materials and qualifications of builders, the duration of work can range from 2 days to several weeks.
Below is a video on how to install a veranda made of wood with your own hands:
Construction of the veranda frame
The frame veranda is built from treated timber with a cross-section of 10x10 or 15x15 cm. For the lower trim, a beam of a larger cross-section can be used, which is laid in two rows and connected using the “direct lock” method. Logs are mounted on the frame - the basis of the veranda floor.
Frame structures are installed vertically on the lower frame and are united by the top frame. Additionally, at a height of 1-1.5 m from the bottom point, a number of horizontal beams are installed that connect the frame, giving it strength and stability. The height of the veranda depends on the height of the ceilings in the house. When installing the frame, it is important to position it so that the roof is sloped. The correct installation of frame supports should be checked at the building level.
The cutting of supports is usually carried out using the “direct lock in 1/2 wood” method. Making high-quality connections of horizontal and vertical elements to create a strong and safe structure is a responsible task that only a qualified specialist can do. The joints are reinforced with bolts, angles, screws and other fasteners provided for by the project. To prevent deformation and shifting of the frame, it is attached to the foundation elements using anchors or clamps.
To connect the frame veranda to the house, exhaust floor beams or parts of the rafter system are used. After assembling the frame, the walls are filled, hydro- and thermal insulation is carried out, and the finishing is applied.
Attaching the joist to the harness
They can be mounted on top of the harness, or at the same level with its top edge. You need to decide exactly how you will do this at the very beginning of the work: this will determine at what level it will be necessary to attach the support beam to the wall of the house (the height of the joists is taken into account or not). Methods for attaching floor joists are shown in the photo below.
How to attach floor joists to the frame
Frame veranda roof
The role of the Mauerlat in a frame veranda is performed by the upper frame, on which layered or hanging rafters are installed. The roof of the veranda can be single- or double-sloped. When installing a pitched roof, it is necessary to make such a slope that will allow precipitation not to accumulate on the roof surface.
The same material is used as roofing as for the roof of the house. Also, the roof of the veranda can be covered with lightweight and durable polycarbonate. The roof is attached to a pre-installed sheathing. Elements of a drainage system should be installed on the roof of the veranda. They must be connected to the house's drain for effective water drainage.
Decorative finishing of the veranda
The optimal option for making the walls of a frame veranda: the bottom is covered with OSB boards or other wood materials, and the top is glazed.
When installing high panoramic windows, a lot of sunlight will fall on the veranda. This option will allow you to equip a greenhouse or winter garden.
The frame veranda should be in harmony with the appearance of the house. Decorating the veranda depends only on the owner’s imagination! Wooden carved posts and railings coated with varnish or paint will be an excellent exclusive decoration. You can order carved balusters or make them yourself. There are a lot of options for decorating a veranda, so it is recommended to consider different styles and trends and choose what you like best.
You can also use different materials to finish the floor of a frame veranda. The most ergonomic solution is a terrace board. High-end laminate can be used from inexpensive materials.
Final stage
To finish the walls, use lining or facade boards. If a warm veranda is being built, a layer of thermal insulation is laid under the cladding, which is protected with a waterproofing film. They also line the interior space, not forgetting about waterproofing.
To line the ceiling, use a board or lining. At the last stage (if a closed veranda is being built), the front door is hung, window blocks are inserted, and lighting is provided.
There are no special requirements for the stairs to the veranda. A competent solution would be a common frame of the veranda and stairs; this way the design will be more reliable and costs will be reduced. When designing a staircase, the following points are taken into account:
- The angle of inclination should be comfortable for safe use.
- For the lower base, supports buried in the ground or a small foundation are built.
- The design is completed with railings.
- The external staircase is made wide enough. It is beautiful and practical: the wide passage is convenient for bringing furniture and household appliances into the house. Flowerpots and containers with flowers placed along the edge of the steps will become an effective addition to the veranda.
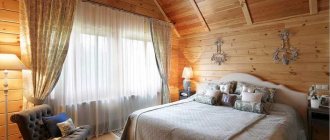
Natural wood is the best interior solution Source on-off.com
Heated frame veranda
You can turn your veranda into a full-fledged room that can be used all year round with proper heating arrangements. As a rule, the heating system of the house does not allow placing additional radiators on the veranda. In this case, you can install a small wood or solid fuel stove, if the space allows.
Also, a heated veranda requires high-quality insulation of the walls, roof and floor. Mineral wool is used as insulation, meeting all environmental and fire safety requirements. It is better to use triple-glazed windows for such a veranda to prevent heat loss.
The cost of arranging a heated veranda is much higher than a regular one, but you will get a full-fledged room that can be used as a hall, dining room or recreation room.
You can ask your question to our author:
Floor
The assembly of the floor begins with installing the logs on the supporting base, for which grooves are marked and cut out in the timber. The logs are installed in these recesses and fixed using mounting angles. It is convenient to use a protected terrace board for finishing the floor. It is laid on the logs and secured with wood screws.
If it is necessary to build a veranda at the dacha with a heated floor, the design is complicated as follows:
- Lay the subfloor using an unedged board.
- The timber is attached to the rough base in steps of half a meter (you can take a section of 50x50 mm).
- Insulation, for example, mineral wool, is placed between the beams. If a slab heat insulator (for example, penoplex) is selected, the gaps between it and the beams are filled with polyurethane foam.
- After laying the insulation, there should be a gap of 1 cm, which will serve as natural ventilation. The top of the insulation is covered with a water-repellent film.
- Lay the finished floor. If a solid or glued floorboard is chosen for it, it is additionally coated with two layers of varnish.
Finish floor for an open structure Source rabotai-sam.ru