In order for a house on a columnar foundation to look aesthetically pleasing, and also to prevent debris and moisture from getting into the basement, at the last stage of construction it is necessary to close the gaps between the pillars from the outside with a fence.
There are several options for decorating this space. In the article we will look at how to close a columnar foundation with your own hands, as well as types of decor and closing technology.
Base finishing
A variety of materials are used to finish the base. The main requirement is that they be strong enough to withstand being in water.
Optimally, the foundation cladding is carried out with a special one or covered with a profile metal sheet. The siding imitates the classic stone materials used for the base - rubble stone, brick, flagstone, etc.
Corrugated sheeting in soft colors for the base will also look quite beautiful. Their main advantage is that they can be easily washed from dust and dirt, and your base will always have a presentable appearance. Siding can be metal or plastic. It is better to use special siding for the base; siding for walls will not work here.
Before starting work, it is necessary to install the sheathing. It is made from wooden blocks with a cross-section of 50x50, which must be treated with a composition against rotting and fungus, or special plastic guides. Since the bars will be in a humid environment with poor air circulation, it is imperative to treat them with special compounds!
The bars are attached to the piles or monolithic base of the house using self-tapping screws. The fastening spacing depends on the type of siding panels. Typically, large-sheet siding is used with a spacing of fastening bars of 30 cm; the same rule is also suitable for corrugated sheeting. Then a metal corner is fixed at the bottom. The corner should be higher than the blind area, so it can be done in advance and the inner perimeter can be aligned with the corner.
After this, siding or corrugated sheeting is attached to the bars, cutting it along the lower corner, and maintaining a straight line on top. The corrugated sheets are fastened with the sheets overlapping into two waves. The corners are sealed, the windows are decorated with slopes. At the end of the work, a drip lining is installed in the upper part to prevent water from getting under the siding.
Hanging pick-ups
They are cheaper and easier to implement . For this method, you can make a frame from a wooden beam or use a metal profile. It is recommended to treat the frame with a special substance that resists flame and protects against fungi and other harmful organisms.
But first, prepare a blind area that will drain water flowing down the facade of the house from the foundation. Then attach the frame to the bottom wall of the house and to the supports.
Either siding or slate sheets are mounted on the frame. Don't forget to leave a few centimeters of free space between the panels of material and the blind area. When exposed to moisture, the soil rises and can damage the protective panels.
The main advantages of pile-screw foundations
This method of creating a foundation is chosen when it is not possible to create a regular strip foundation using a cement-sand mixture. In addition, there are a number of other positive nuances:
- The root system of all plantings around is preserved.
- There is no need to set up a huge construction site.
- Suitable option for marshy soils.
- Work is carried out at any time of the year, including winter.
- The pile is reused.
- Small and medium-sized elements can be installed without the help of special devices.
- Allows you to place the house in close proximity to other residential buildings.
This option for arranging the foundation is also suitable for small country cottages. The work is completed quickly and there is no need to wait until the solution is completely dry, and this greatly reduces construction time.
How is the base of a pile foundation constructed?
In order to construct a plinth for a pile foundation, you must do the following:
- Make a sheathing. To do this, use wooden blocks or a metal profile.
- Insulate. This stage can be skipped, but if you plan to use the space as a full-fledged basement floor, then it is impossible to do without thermal insulation.
- Install finishing on the screw foundation of the house.
- Seal corners and seams.
- If necessary, clean the structure and additionally treat it with special compounds.
Plaster
Suitable for concrete surfaces, block structures and other prefabricated elements. The work can be done independently, but if you need to create a certain structure, it is better to practice beforehand. If you don’t know how to cover the strip foundation of a house from the outside cheaply and beautifully, then this solution will be optimal, as it has many advantages:
- Availability. The price of plaster compositions is low; they can be bought at any hardware store.
- Easy to apply. To work, you will need a container for preparing the mixture, a trowel and a small rule for leveling the surface. All features of the process are indicated on the packaging.
- Short terms of work. Finishing the foundation of an average-sized home can be completed in a day.
- Possibility of painting the surface in a suitable color.
There are also disadvantages that are worth considering:
- You need to purchase special plaster; regular façade plaster will begin to crack in a couple of years.
- The surface must be dry and clean, so work cannot be carried out during wet periods.
- If the foundation has significant unevenness, the consumption of plaster increases greatly.
If necessary, you can first fix the thermal insulation material; extruded polystyrene foam is best suited. And a reinforcing mesh must be laid on top of the sheets.
Base finishing options
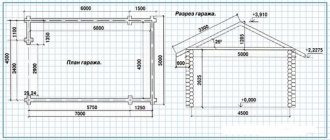
Pile-screw foundation with a high grillage
Pile-screw base with strapping
- A pile-screw foundation with a high grillage is usually installed on unstable and moisture-saturated soils. The average length of the pile is 2.5 m, so the depth in any case will be about 2 m - in such cases, even the seasonal mobility of dispersed heaving soil is not a problem - such a depth is quite enough for immobility.
- Also, such foundations, using screw piles, are installed on slopes where the differences in the plane at different points of the base area are too large. Perhaps, in such situations, covering the base of a house on screw piles is most relevant, and here it is more convenient to use light finishing materials, for example, base siding.
Finishing work
We close the pile-screw base. Finishing principle
So, our task is to close the base for screw piles with our own hands, and for this we can use many materials. However, the essence of arranging such finishing of the basement of a house with your own hands is very similar to one another, since the principle still does not change.
The brick will be covered with ceramic tiles or simple plaster
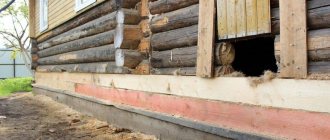
One of the options is when the base on screw piles is sealed using a low grillage. That is, when installing such a foundation, a trench up to 30 cm deep is dug along its perimeter and a tape is poured, where the upper part protrudes 10-20 cm above the ground level. This way you get a pedestal for laying bricks, which, in turn, will serve as a base for tiles or plaster.
Here you get, as it were, two foundations in one - a screw and a strip, but this combination will not only make it possible to easily close the piles, but also increase the strength of the foundation. In addition, concrete is poured with a light reinforcement frame - as a result, the tape will not crack and will also serve as part of the decoration of the lower part of the house.
Finishing with stone panels
Another option you see in the photo above is to install sheathing on piles under some sheet material. In this case, these are stone panels, but you can just as easily install composite or siding on them. Here you see two wooden profiles, but there may be more of them - everything will depend on the height of the base and the size of the finishing material itself.
The sheathing here does not have to be installed from wood - more often it is made from metal, and for this they can use a 20x40 mm metal profile or even a CD, which is used for installing drywall.
Fixation can be done directly on the piles, but this is convenient for timber and metal, where the first is screwed and the second is welded. For CDs, it is best to weld ears (metal plates) onto the piles, onto which the brackets can be fixed.
A corner 120×120 mm serves as a base for a brickThere is another way to close the void under the building, and its price will be much less than installing a strip foundation. A corner of 120×120 mm is welded to the piles, which will serve as the basis for the facing brick, where the width of the bed is exactly 120 mm. The corner is welded strictly level and if the area is inclined, then in the upper part it is better to go deeper into the ground so that there is no void left.
Facing brick laying
Before laying decorative bricks, the corner should be primed to reduce the possibility of rusting to a minimum. The construction of the plinth is carried out as usual masonry with a spoon ligation and a seam of at least 5 mm.
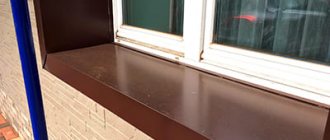
After you have raised the entire perimeter, you need to put ebbs on top, which can be decorative, that is, from a brick set, or make them yourself and galvanized sheet, but the first option will look much better.
Insulation of a screw base with extruded polystyrene foam
You may also need to insulate the foundation base and for this you can use extruded polystyrene foam. A trench 20-30 cm deep and wide is dug along the perimeter of the building using a shovel bayonet and sheathing is mounted on the piles. Then you attach sheets of insulation on top of which you can lay tiles or cover them with slate sheets, as shown in the photo.
Siding
Siding is a modern material and is very popular, due to its many advantages. A special base type is used for work, the durability of which is in many ways superior to the façade version.
You can cover the foundation as follows:
- The frame is pre-installed. For this, the most affordable installation option is used.
- The first method resembles the process of creating piles with a grillage. The peculiarity is that the tape is poured into a small depression level with the ground. A cohesive structure is created that will serve as support for the masonry.
- The second method is used when the piles are made of pipes. Corners are welded to the base at a short distance from the ground; for reliability, the place under them is compacted and a support is created. Rolled metal is welded on top, the thickness of which depends on the load.
There are 2 common cladding methods:
- installation of a suspended plinth;
- construction of brick foundation walls.
The first method is much simpler - you just need to install decorative panels on a wooden or metal sheathing attached to the stilts or walls of the house. In the second case, you will have to make a small concrete base. What both methods have in common is that even an inexperienced person can handle the job.
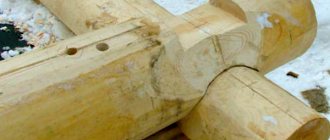
Closing with timber
One of the most effective methods of closing is tying the base with a special beam. However, this type of work is the most technically complex.
The closing process involves a wooden board placed between the post and the base itself. The board is secured and wrapped with roofing felt.
When working, the following conditions must be observed:
- The process must begin from the corners of the building
- The structure must be connected with special metal brackets
- After completing the strapping, you need to check the strength of the work
Finishing the base with thermal panels
Recently, so-called thermal panels have appeared on the finishing materials market. This is a decorative finishing material consisting of two layers - an internal insulating layer and an external facade layer.
The inner layer of insulation can be represented by the following materials:
- Styrofoam;
- expanded polystyrene;
- pressed shavings;
- polyurethane foam;
- mineral wool.
The most commonly used exterior finishing material is:
- clinker tiles;
- fake diamond;
- PVC;
- plastic and other polymers;
- crushed marble.
Obviously, such material has aroused interest among buyers, because it has many obvious advantages.
Advantages and disadvantages of thermal panels
- Heat and sound insulation. Two layers of dense material perfectly dampen extraneous sounds, and the presence of dense insulation reliably protects the base from the negative influence of the environment.
- Durability. These panels can last 30 or 50 years! Not much time has passed since the invention to see this firsthand, but practice shows that after 10-15 years of use, the panels did not collapse, deform, or fade in the sun.
- Resistant to extreme atmospheres. In conditions of extremely low temperatures, where the bases of houses are necessarily insulated before covering, facade thermal panels are especially popular. This finishing material can withstand temperatures of -80°C. Moreover, the panels can withstand at least 50 freezing and defrosting cycles.
- Low environmental friendliness. Manufacturers call their products environmentally friendly, but the presence of PVC or polymers in the composition casts doubt on this.
- Thermos effect. The obvious disadvantage of this material is the fact that it does not allow air to pass into the room. This means that without additional ventilation of the room, a thermos effect can be created inside the house. Of course, by covering only the base with panels, you don’t have to worry about this problem. But if you decide to cover the entire house with this material, take care of air circulation.
Installation features
It is very convenient to install such finishing on a plinth, because each panel has grooves and ridges at the ends, thanks to which the elements are assembled into a single monolithic structure.
It is only important to understand that the presence of insulation on the panels themselves implies their installation on a pre-leveled wall. As for attaching elements to the wall, for this, given their low weight, an adhesive composition is used
And if necessary, for greater reliability, the panels can be fixed with nails or self-tapping screws.
Clinker tiles
An excellent solution for walls and foundations, as clinker is durable. In addition, this finish looks attractive and goes equally well with different facades. The main advantages are as follows:
- A huge selection of options, differing in color and texture. You can find almost any shade.
- Long service life. The resource is at least 20 years.
- Low maintenance, the surface does not require the application of protective compounds, although moisture protective agents will not hurt.
Clinker tiles also have some disadvantages:
- High price. This is one of the most expensive solutions.
- Difficulty in installation. The small size of the tiles complicates the process.
Important!
In order for the work to go quickly, you need to level the base as best as possible.
Basement siding
The most popular and frequently used option for cladding the basement of a house on a pile foundation is siding. The material has many advantages, including:
- Low cost of both the material itself and the components needed during installation work.
- Installation of basement siding does not require special skills, which allows you to carry out the installation yourself.
- Durability. Plastic does not rot and is also resistant to negative environmental influences.
- Variety of designs. It can imitate the texture of natural materials, which allows it to organically fit into the overall design of the house and the surrounding area.
- Easy to care for. Siding is easy to clean, which can be done even with the use of strong detergents.
It has virtually no drawbacks, which makes it the most popular and frequently used.
Why close?
Buildings with a columnar foundation do not have a full basement. The gaps between the supports remain open .
To prevent debris from being blown into the space between them by the wind and water not to flow in, and to make them look more aesthetically pleasing, a fence is used.
Its main task is to protect the base from moisture , which is why preference is given to basement siding or brickwork. Sheet materials are used, less often lumber.
The choice of a fence and how to decorate it largely depends on the overall budget. However, whatever the materials, it is necessary to perform waterproofing and not forget about ventilation.
How to sheathe it yourself?
You can improve the external decorative characteristics of the foundation areas located above the ground and additionally create protection from adverse influences with your own hands. To do this, you must adhere to installation technology.
After completing the basic calculations, purchasing tools and facing material, you can proceed directly to covering the base. At this stage, all work is carried out in a given sequence, that is, step by step.
Waterproofing
Before installing the sheathing on the foundation, its base must be protected from water. Waterproofing is applied to all exposed concrete surfaces. Usually, the coating type of treatment is optimal for this, and a little less often - the plaster type of treatment.
Special attention should be paid to the junction of the blind area and the plinth - in this place, waterproofing is carried out with hydroglass insulation, a special film or membranes. They are laid on top of the insulating board on the purlins, and then run through the cladding
These simple measures will effectively protect concrete from destruction due to exposure to precipitation and underground moisture.
Frame installation
Next, you need to mark the surface to be sheathed and calculate the location of the main load-bearing elements of the sheathing. It should be taken into account that the step between the guides should be 50–60 cm. In addition, door and window openings, as well as corner parts of the base, will require separate brackets - they are mounted at a distance of up to 1 m from the corner part. Holes should be drilled according to the marks given; it is advisable to use a hammer drill for this. The length of the hole should exceed the size of the dowel by 1–1.5 cm. However, it must be borne in mind that if the base is made of brick, it is not recommended to drill the masonry seams.
The holes are thoroughly cleaned of dirt and construction dust, and then the brackets are attached. For uneven foundations, the optimal solution would be brackets with movable parts; they can be moved if necessary and fixed at the desired level. To begin with, fix the brackets along the edges of the basement area. Subsequently, they are connected to each other with a construction cord and form a certain level for installing intermediate brackets.
Thermal insulation
The foundation is insulated using basalt or glass wool; as an option, you can use extruded polystyrene foam. They start working from the bottom, moving up. First, slots are formed in the insulation to accommodate the brackets, then the slabs are placed on the brackets and secured with disc-shaped teeth, their number on each slab should be five or more.
Fastening corrugated sheets
The corrugated sheet is fixed directly using rivets and self-tapping screws. For each square meter you will need approximately 7 pieces. The sheets are installed vertically, starting from one of the corners. The sheets are laid overlapping one or two waves - this will ensure maximum strength and sealing of the structure. The sheet is fastened with self-tapping screws from the outside, in the deflection of the corrugation. The sheathing in the areas of the joints of the panels is covered with specialized corners
Please note that the fasteners should not be tightened too tightly, otherwise dents will appear on its surface.
During installation work, remember to arrange the ventilation system. The holes in the panels must be prepared in advance; in order to close them, you need to buy special gratings - they are sold in any construction supermarket. They will not only improve the external characteristics, but at the same time prevent the penetration of dirt and dust behind the skin. The product is fixed using mastic, and the gap between the ventilation grille and the canvas is sealed with silicone sealant.
At the end of the work, you should decorate the corners using a decorative finishing strip. If during installation of the corrugated sheet the surface of the material is damaged, then all chips and scratches must be covered with an anti-corrosion compound and then painted in the same tone as the surrounding canvas. The foundation of a private house, finished with profiled sheets, provides reliable and at the same time budgetary protection of the structure from destruction.
In the next video you will see the lining of the foundation plinth with corrugated sheets.
Which material to choose
Only after considering all possible options for installing a columnar foundation, and assessing all the pros and cons for each of them, will it be possible to settle on the most optimal type of basement partition. When choosing an option, it is imperative to take into account compliance with climatic and operating conditions, as well as other requirements imposed on it, such as: ease of installation, practicality and aesthetics.
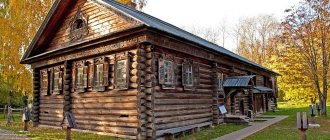
Despite the fact that installing a columnar foundation from cobblestones is the most labor-intensive and expensive option, its main and significant advantages are: reliability, strength and durability. Therefore, when building a wooden house, this option for the basement structure is most often chosen.
Conclusion
Comfortable and cozy accommodation, as well as a long service life, depend on the correct and high-quality execution of work on the arrangement of the basement of the building.
How to cover a pile foundation from the outside: materials, photos, videos
› Foundation work ›
One of the final stages of construction is the finishing of the basement area. Always in houses where there is a pile foundation, there is space left, because of which the entire building takes on an unfinished appearance.
Therefore, it is important to understand whether it is worth finishing, what materials are best to use for this purpose, and also to thoroughly study the correct technique for performing finishing work. In this article we will look at how you can cover a pile foundation from the outside, the advantages of each type of material, as well as how to perform the work
In this article we will look at how you can cover a pile foundation from the outside, the advantages of each type of material, as well as how to perform the work.
What are the advantages of finishing work?
In addition to the fact that manipulations allow you to create a finished, aesthetic appearance for the entire building, it is also worth noting some other advantages of the finishing:
- you can increase the thermal insulation of the entire house several times, which means that in winter the room will always be warm;
- prevents precipitation from accumulating under the building;
- eliminates the possibility of medium-sized and large-sized animals getting under the floor of the house.
Of course, these factors play an important role, which is why many owners of private houses and penthouses prefer to carry out work of this kind.
Let's consider the materials that are relevant to use for finishing the foundation.
Brick
If desired, the cladding of the house can be done from more serious materials that will last for a long time - brick is considered to be such a material. In addition, it has an aesthetic appearance and is durable. But it is worth noting that in this case the work will have to be completed longer, and it will be more labor-intensive.
To close a pile foundation, you must first arrange the foundation for the masonry. Just as in the case of siding, it will be necessary to provide a special layer that will prevent soil heaving.
One of the most suitable options for mounting bases is a monolithic tape. Experts recommend using it in cases where construction is planned on soil that is easily deformed.
Let's consider the advantages of decorating the foundation of a house with bricks:
- serves as an excellent thermal insulation material (considered the most reliable of all available);
- does not require any additional finishing;
- can always be repaired if necessary;
- durable.
But brick also has disadvantages as a finishing material. It is quite heavy and expensive; it is difficult to install it yourself (you will need the help of specialists).
Plastic panels
You can also use this material to finish the foundation of a house; in this case, the installation technology will be exactly the same as in the case of siding. If you decide to design a foundation using these particular materials, then you will be able to appreciate the following advantages:
- pleasant appearance of the building;
- you can choose any color or texture of the panels;
- providing additional rigidity to the house;
- the material does not rot;
- resistant to both chemical and mechanical influences;
- has an affordable price.
However, when choosing plastic panels, it is worth remembering that in any case, natural stone or brick will look much better.
Profiled flooring
If you are thinking about how to cover a pile foundation, without resorting to the help of specialists, then it is worth mentioning corrugated sheeting. Its installation is easy; the frame is mounted in the same way as for installing siding.
Corrugated sheeting is durable and easy to use both in terms of operation and installation. A significant advantage is also the fact that a large number of color solutions are provided.
If you have never encountered foundation finishing work, it’s not worth the risk. It is best to immediately seek help from experienced specialists who will do all the work quickly and efficiently.
How to cover the pile foundation from the outside? Link to main publication
Fake diamond
An excellent solution for a foundation that is not afraid of changes in temperature and humidity. There are a lot of options, so choosing the right one for any facade will not be difficult. The advantages are:
- Long service life of tens of years. In terms of strength, artificial stone is almost as strong as natural stone.
- Attractive appearance, such a base looks respectable.
- Possibility of self-installation. The stone is glued in the same way as ceramic tiles, everything is quite simple.
Among the disadvantages it is worth highlighting the following:
- The high price of the material, it is an order of magnitude more expensive than everything that was discussed earlier.
- Demanding requirements for the base: it must be level.
In general, this option is suitable for those who value reliability. It is enough to carry out the work once - and you can forget about finishing the foundation for at least 10 years.
Concreting and waterproofing
In order to carry out concreting, it is necessary to purchase: reinforcing mesh, steel wire or rods, asbestos-cement slabs or boards treated with an antiseptic, formwork material and a cement-sand mixture.
It is necessary to build formwork around it, install reinforcement, and then pour it using concrete mortar.
It is imperative to insulate the basement covering from moisture. Waterproofing is laid between the base and the plinth.
If brick or stone was used to create the base surface, a layer of roofing material should be placed between the rows of masonry or bitumen should be poured. In the case of concreting, insulation is made in two layers.
For insulation, it is better to use foam sheets. They must be laid inside the structure. The insulation must exceed the height of the ceiling.
To attach the foam, you can use special glue. After laying the insulation, you should begin the final finishing. This can be done using:
- Decorative facing stone;
- Porcelain tiles;
- Clinker tiles;
- Basement siding;
- Mosaic plaster.
How to close the foundation from the outside, simulating brickwork - watch the video:
If you have already built a house and have not finished finishing the foundation, you should quickly begin to solve this problem. The house will become much warmer, it will take on a more beautiful appearance. You will feel comfort not only being inside the room, but also contemplating it from the outside.
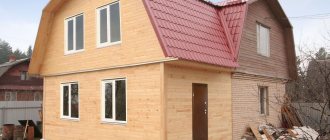
Hello! On the website, we got a lot of ideas for decorating and building a residential building, and today we decided to repay our favorite site by presenting to the readers our version of the answer to the question: “how to cover the pile foundation of a frame house from the outside?”
When starting a construction project, we, like many other people who decided to build a house with their own hands with the minimum possible amount of money spent, chose the most budget-friendly foundation option that allows us to quickly “get down to business” - a foundation on screw piles. And once we’ve built it, we’ll think about what we’ll use to cover it with.
Time passed unnoticed. A year has flown by, the frame house is standing and blown by all the winds, siding has been ordered to finish the house, but as it turned out, another 50-60 thousand rubles need to be spent on the basement siding. according to the most conservative estimates. At that time, we did not have such funds, but after installing the fence we had sheets of corrugated sheets that were exactly the color of our metal tiles. We decided to use these sheets to cover the pile foundation from the outside.
Device
What does the structure consist of? The construction of a columnar foundation includes the following important elements:
- Pillars. They are made of pipes, wood, brick, reinforced concrete. It is recommended to use asbestos pipes or reinforced concrete, since these materials are more resistant to external influences and have high strength indicators.
- Formwork. It is made of boards that are planed on one side (attached to the concrete part). Wood of any species is used for formwork. Their thickness is 25–40 mm, and their width reaches 120–150 mm. If you use large boards, gaps may form during installation. It is not recommended to use metal to create formwork, since this metal is heavy and adheres more strongly to concrete.
- Fittings. To reinforce the pillars, rods with a diameter of 10–12 mm are used. After every 25 cm, clamps are attached to prevent the reinforcement from moving to the side. The rods are placed vertically and brought out on top of the foundation to weld the reinforcement of a solid grillage.
- Grillage (prefabricated reinforced concrete or monolithic). A monolithic grillage is able to provide the required rigidity, as well as high reliability of the structure. Prefabricated jumpers are connected to each other by tying mounting loops of twisted wire. You can also use welding with cutting reinforcement. Formwork is installed on the lintels, as well as a reinforcement cage, after which the concrete mixture is poured.
- Pickup. In order to insulate the space created during construction under the floors and protect it from the accumulation of debris, a fence is provided. With its help, the wall running between the pillars is fenced. The fence is made from different materials, but brick or stone is often used for such purposes. The creation of this structure involves the presence of a concrete screed, which acts as a base. It is not buried and is laid on a bed of sand. To create a concrete screed, you need a reinforcement cage, as well as formwork. The pick-up is placed on the screed, holes are made in it to provide the possibility of supplying communications.
- Waterproofing system. To protect the structure from moisture, the upper part of the pillars and fences is covered with bitumen. Then roofing material is wrapped.
Types and features of basement siding
Manufacturers offer the buyer several types of finishing materials. Siding differs in raw materials:
- Vinyl - made from PVC. Therefore, the panels are light and easy to work with.
- Metal base siding - galvanized steel is chosen for production. They are also treated with protective compounds, both on the front and back sides. The weight is greater than the previous version, but the strength is much greater.
Base material is distinguished for finishing and texture:
- Brick panels - completely imitate brickwork. From a distance it is almost impossible to distinguish from the original. Everything is achieved due to the fact that for the manufacture of panels they use impressions of ordinary bricks along with chips and cracks.
- Stone cladding. There are several options for panels for the base of a pile foundation. The choice will have to be made from imitations of rubble, burnt, rock stone and alpine granite. Each of these materials has excellent characteristics and is perfect for finishing the base.
Let's figure out why basement siding is so popular for finishing. Everything is connected with several advantages that this material has:
- Availability. The price is affordable, so almost everyone can afford to buy it.
- Mechanical stability. If you decorate a pile-screw foundation with basement siding, then it will not be afraid of even the strongest blows.
- Biological inertia. Insects, mold, fungi and rodents do not damage the material.
- UV resistance. The panels retain their original color for many years. Only the shade changes, but this will happen evenly and unnoticed by the owner.
- Duration of operation. Some manufacturers indicate a period of 45–50 years.
- Easy to install.
- Versatility. Installed on any foundation.
But this material has several disadvantages. Firstly, these are linear changes with temperature. Secondly, flammability. This only applies to vinyl siding.
Porcelain tiles
Durable finishing material that is suitable for foundations and provides their reliable protection. Available in different colors and item sizes may vary. The advantages are as follows:
- The cladding looks respectable and fits well with most facades.
- Installation does not cause any particular difficulties and is no different from tiling surfaces with ceramic tiles.
- The service life is long, with proper installation it can last for decades.
As for the disadvantages, they are:
- The price of the products is high; they are an order of magnitude more expensive than most types of finishes for the base.
- It is very important to lay the elements perfectly evenly, otherwise the appearance will not be the best.
Porcelain stoneware is suitable not only for foundations, but also for formwork, as it is not afraid of water. The main thing is to prepare the base and lay the elements at a slight slope.
Insulation options
The plinth cladding can be of several types. The decision which one to use is made based on aesthetic considerations, financial capabilities, and the qualifications of the workers who will perform the finishing.
Insulation of the base can be done in two ways:
- on a separate tape structure;
- along the sheathing, which is attached to the piles.
Tape design
The first option is more complicated and also has a number of limitations. A shallow-type tape structure can be made of concrete or brick. Most often, it rests on the ground or its own small monolithic foundation (read more about the construction of a shallow strip foundation). But when building on heaving soils, it is strongly not recommended to use this option. Especially if we are talking about a brick base. In this case, the ground rises (swells) in winter. Moreover, the process occurs unevenly. Having dug out the snow from the plinth structure, at some point you will see inclined cracks, which indicate damage from frost heaving.
A strip base on which, if necessary, you can even attach insulation
This phenomenon can be prevented by eliminating one of the heaving factors:
- low temperature;
- moisture.
It is impossible to fulfill the first condition when manufacturing a non-buried tape. The soil under the cladding of the basement of the house will still freeze and deform. Moisture removal may also be ineffective.
It is reasonable to use strip lining only on those soils that are not prone to heaving. Such bases include coarse soils, medium or coarse sand. This option is also suitable for regions with warm climates, where negative temperatures are rare.
The insulation is attached to the brick according to the standard scheme. Penoplex is best suited
The insulation is fixed to a concrete or brick wall, similar to the type of thermal insulation of the external enclosing elements of the building. It can be performed both without an additional frame and with its use. The method depends on the type of finish chosen.
Profiled sheet
It is made of galvanized steel with a polymer or paint coating. The base made of corrugated board lasts a long time, but at the same time it looks simple and unpretentious. It has many advantages:
- You can choose not a plain option, but a profiled sheet that imitates stone, wood or other material; it looks much better.
- It is not difficult to attach the sheets with your own hands; the process is very similar to installing siding; it also uses lathing.
- The weight of the finish is light and, if necessary, it can be easily dismantled.
As for the disadvantages of corrugated sheets, the most significant of them are the following:
- Low sound and heat insulation characteristics. It is advisable to use mineral wool or polystyrene foam under the metal.
- When the protective layer is damaged, the steel begins to rust.
Important!
It is better to cut profiled sheets with a jigsaw. If you do this with a grinder, the metal overheats and begins to rust at the ends.