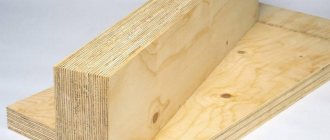
Floors in private low-rise buildings are most often made of wood along beams, using fire monitors, beams, metal channels or reinforced concrete supports. This is the most affordable method that allows you to do without lifting equipment and complete the work in a shorter time than when installing monolithic slabs. Certain difficulties and questions can be caused by such an installation stage as attaching floor beams to the wall, especially if the roof truss system will rest on them. There are several ways to solve this problem.
Beam and rafter system Source kroi.ru
Methods of fastening to walls
All installation components are always described in the design documentation for the house, including fastening the rafters to the floor beams, and the beams themselves to the walls. But not everything is built according to the project, especially when it comes to outbuildings - a garage, a guest house, a bathhouse. In these cases, you have to choose the optimal installation method yourself.
This takes into account the location and functions of the floor, the design of the walls of the building. For example, if this is a ceiling between residential floors or the first floor and the attic, then the fastening should not be rigid, otherwise any movement on the upper tier will be transmitted to the lower one due to vibration. The beam is fixed so that it retains the possibility of longitudinal play.
However, this does not apply to frame buildings, in which the beam itself is an important element of the supporting frame and is rigidly attached.
Top frame of a frame building Source googleusercontent.com
In total, there are several types of beam fastening: support, tie-in, cut-in, suspended.
Support mount
This method is used most often. It is the simplest, but at the same time reliable, since the beam rests on the wall and rests completely on it. On wooden and frame walls, the beam is secured using special steel angles, cap screws, dowels or studs. Niches are created in walls made of bricks or building blocks during the masonry process.
- Fastening with corners.
Using perforated steel corners, floor beams are attached to the mauerlat installed on stone walls, to walls made of logs or timber, as well as to the upper longitudinal beam of the frame. It is laid on top and secured with corners on the sides if it is a fire monitor mounted on an edge. The beam can be secured both from the side and from below.
Fastening a timber beam to a mauerlat Source asm.ru
When installing the floors onto the frame, the beams are shifted so that they do not lie on the support posts. This is only permissible if there is a design that implies such an arrangement of beams and load calculations.
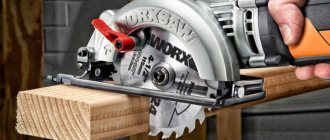
- Fastening with bolts and studs.
This type of fastener can only be used to secure a timber beam or an I-beam. After marking and laying out in place, a through hole is drilled in the beam, going into the upper part of the wall. If hidden fastening is necessary, a recess of larger diameter is made under the bolt head or nut. The screw fastener is inserted into the hole and tightened with a ratchet wrench. In metal I-beams, holes are drilled on both sides of the supporting plane.
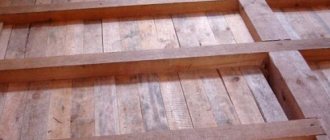
After installing and fixing the beams, you can continue the construction of the walls of the second floor, cutting grooves in the logs of the first row according to the markings to the height of the beam. Or by laying this row with pieces of logs, the length of which is equal to the step between the beams. If you extend them beyond the outer walls in the upper floor, it is possible to attach the rafters to the beams, which will simultaneously serve as the lower tie-downs of the trusses.
Option for installing rafters on floor beams Source r-domik.ru
- Mounting on block and brick walls.
When laying walls made of solid bricks and concrete blocks, the row on which the ceilings will be installed is run with special care, checking the level. Then markings are made and wooden beams are laid, having previously treated their ends with a preservative fungicidal impregnation and wrapped in two layers of roofing material. Such protection is necessary at the junction of materials with different heat capacities, so that the wood does not get wet or rot at the point of condensation.
Additional fastening of the beam to the wall is not required; it is securely fixed with wall blocks, which are laid out in the spaces between them, and the upper rows.
If the walls made of aerated concrete and other cellular blocks are of insufficient strength, then a reinforced concrete strip (reinforced belt) is poured under the beams along the entire perimeter or 3 rows of solid bricks are laid out with reinforcement at the top and bottom.
Waterproofing of a wooden beam when installed on “cold” walls is mandatory Source akson-quick.ru
See also: Catalog of companies that specialize in roofing work
Preliminary preparation
To prepare the foundation you will need the following tools and materials:
- roulette;
- bayonet and picking shovels;
- rammer;
- crushed stone, gravel and sand;
- water.
Before you begin installing the supporting pillars, you need to remove the soil from the underground to a depth of about half a meter. The resulting pit is filled with crushed stone, sand or gravel. The backfill is filled with water several times and carefully compacted with special compactors; its level should be 15-20 centimeters higher than the outer soil level.
Preparing the base of the pillars
For the construction of retaining pillars, it is preferable to use red brick or wild stone. Less commonly, concrete support posts are installed. It is not recommended to use sand-lime brick or aerated concrete blocks. The best form of construction would be a truncated pyramid, the base of which should be wide enough.
The cross-section of the pillars depends on their planned height. The higher they are, the larger the cross section should be. For the best stability with a support height of up to 25 centimeters, the pillars are erected with one and a half bricks; at higher heights, the installation is done with two bricks. The dimensions of concrete support pillars must be no less than 40 by 40 centimeters and no more than 50 by 50 cm.
Scheme of laying brick supports
Important! The maximum height of the supports should not exceed 50 centimeters, as their stability is significantly reduced.
Video description
For more information on how to attach beams and make floors in aerated concrete walls, watch this video:
Inset
This connection method is applied only to wooden structures when it is necessary that the end of the beam does not extend beyond the outer walls and is reliably protected from weather conditions. Such as rain, snow, sun rays, causing rotting and drying out of wood.
This type of connection is called a "dovetail" or "frying pan". At the ends of the beam, a tenon is cut out in the form of a symmetrical trapezoid, shaped like a dovetail, and the same groove is made in the upper crown of the wall or the transverse connecting beam.
Insert into a frying pan Source arunda.sk
A simpler way to fasten wooden beams is to insert a half-pan, which is a truncated “dovetail” with one straight and one beveled edge. The nest is made a little larger and the spike is secured in it by driving a wedge. This option is less durable and reliable, but is quite suitable for covering under an attic or lightly loaded attic.
Cutting
A cut-in differs from a cut-in in that the beam rests on the entire thickness of the wall and ends outward. Due to the larger support area, it can withstand more severe loads and is used when covering long spans. Cutting is carried out in different ways:
- half a tree;
- in the paw;
- half-paw;
- in the region
Round timber beams embedded in the wall Source akak7.ru
With this connection, it is also possible to install rafters on floor beams if their ends protrude sufficiently beyond the boundaries of the walls.
How to get to the warehouse and where to buy materials?
You can buy a variety of components and materials for building a wooden house made of timber or a house made of logs of various designs at our sales office in Moscow and the Moscow region - Balashikha. Our office contacts and directions are here...
Here you will be helped to make a choice and will be provided with technical advice on the professional assembly of wooden structures based on logs or timber frames.
You can see the fasteners we sell for log houses of wooden houses here.
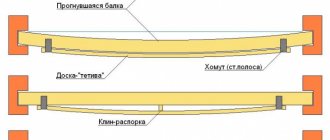
Fastening to columns
Columns are installed over long spans to relieve the load on the beams and prevent them from sagging. They are attached to columns using a supporting or hanging method. But often the support area is insufficient for laying and joining two beams, and it needs to be increased.
- Bolts of sufficient cross-section are screwed onto the wooden pole with wood grouse on the sides.
- A support platform made of thick sheet steel is welded onto the metal one on top.
Column made of profile pipe with a support platform Source jackwharperconstruction.com
How to close the adjusting mechanism?
If you leave this shrinkage device open, the appearance of the structure will suffer, and the illusion of its integrity and solidity will disappear. To decorate the gap between the column and the horizontal element, casings are made to match the color of the wood, which are placed on the column. While adjusting the mechanism, they are moved back or removed depending on the design.
Screw jacks are made from high-strength carbon or alloy steel. The devices are supplied assembled with reinforced washers and nuts of high strength class. Thick steel support and response platforms provide extraordinary rigidity and strength of the structure. All elements of this mechanism are galvanized. The thickness of the coating must be at least 50 microns, which guarantees long-term protection against corrosion.
Useful tips Updated: 11/19/2020 11:02:37
Connecting beams to rafters
Attaching rafters to the floor beams of a gable roof can be done in two ways:
- first install and secure the beams on the walls, and then fix the rafters on them;
- install ready-made rafter trusses on the walls, in which the bottom tie will serve as a beam for the future floor.
When assembling a rafter system on the roof, a tie-in is usually used, and trusses on the ground are assembled on metal corners and plates. Such trusses can be installed and fastened to already mounted beams, connecting the lower tie-rods along their entire length to them.
Hanging rafters (without laying their upper part on a ridge beam installed on supports) are not allowed to be attached to beams resting on brick or block masonry. They create point bursting forces that can destroy the masonry. This option is only suitable for floors supported by chopped wooden walls or mauerlat.
Differences between hanging and layered rafters Source krrot.net
How to attach the rafters to the beams is chosen based on your own capabilities and abilities, taking into account the required degree of reliability of the fastening and the volume of the roof. One of the most reliable methods is insertion, when grooves are cut at the ends of the beams and rafters are inserted into them. The shape of the grooves can be different; the cut of the supporting part of the rafters must correspond to them. Additionally, the parts are fastened with bolts or self-tapping screws.
Methods for connecting beams and rafters Source kryshikrovli.ru
A simpler method is to cut the lower end of the rafter leg at such an angle that it fits onto the beam, and then fix it with planks or use perforated steel fasteners for beams and rafters.