Handicraft lovers often have problems with storage space for materials. If you love and know how to work with your hands, it is illogical to buy various organizers, pencil cases and boxes, because you can make them yourself. We have already told you how to weave a basket from newspaper tubes, and in this master class we suggest trying to make a basket from strips of veneer. The basket is square, so by making several pieces, they can be easily arranged on a table or in a closet.
Veneer baskets are perfect for storing materials and tools, as well as other small items that are abundant in any home. When weaving baskets, the sizes can be varied, selecting them to suit your needs. The same technology can be used when working with birch bark and even colored cardboard.
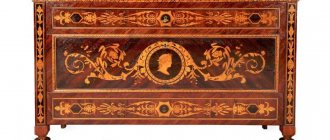
Fabulous beauty by human hands: the principle of marquetry
These intricacies are amazing. As if such mosaic beauty was made not by people at all, but by gods! The marquetry technique is not easy, but it is quite accessible to anyone who has a creative imagination. In fact, everyone who creates a multilayer applique from wood, beads, feathers, petals, sawdust, and sparkles is introduced to the study of the basics of inlay. Products decorated with mosaics will be a great gift for any of the holidays,, or.
The technique for making marquetry is as follows:
: Thin figured plates from various types of wood are glued onto a wooden or some other surface that serves as a base. These fragments differ in shade and structure. Thanks to this effect, an original ornament is obtained. In addition to wood, mother-of-pearl, thin ivory plates, various stones, ceramics, and small metal pieces are actively used for the marquetry technique.
Examples of marquetry in the photo that are stunning in their detail:
Basic Marquetry Making Process
The starting material for making marquetry is veneer. Today, peeled and planed veneers with a thickness of 0.6 and 0.8 mm are most often used.
However, in the past, technology did not allow this method of producing wood mosaic fragments, so pieces of veneer cut to a thickness of 3 to 8 mm were used.
To achieve the final effect, veneers of different types of wood are used, due to which they differ in color. Color changes can also be achieved by etching.
The making of marquetry is preceded by careful design, assembly of the model and, possibly, the production of cardboard templates for easy transfer to the veneer layers. The decisive step is to cut out the individual parts into the desired shape.
Various carving techniques are used for this:
- Knife cutting - sharp carving knives of various shapes are used to make marquetry. You can also use a classic knife or scalpel. When cutting, do not press too hard on the cutting tool, as the veneer may break. To break the fibers, finer and more repeated cutting is recommended;
- Hand sawing - Power saws can also be used to cut veneer. A favorite is the so-called lumberjack - a saw with fine teeth in the shape of an egg. A high-quality clean cut can also be achieved using a plywood saw, thanks to which you can cut even small curved decorations;
- Electric Butchering - Nowadays, marquetry production also uses power tools. An example is electrical decoupling, which can be used to cut quickly, accurately and evenly;
- Laser cutting - Professional modern marquetry companies use laser for cutting. Thanks to this, individual veneer pieces are cut with maximum precision and ensure a perfect result.
Where do masterpieces come from?
Marquetry as a decorative technique for making household items and souvenirs originated in the Ancient East
. At first it served to highlight individual details of figurines (for example, eyes); wood inlay was also used in architecture to decorate buildings.
Later, in Ancient Rome and Greece
When products were made from a single-color material, they were decorated with wooden or stone details using the marquetry technique.
In the 9th-13th centuries, the beginnings of marquetry made themselves felt in the majestic architecture of Italy
. The masters of the Renaissance invented and created the richest patterns from jewelry and marble, and actively decorated church utensils.
In the 2nd half of the 16th century, the prerequisites already appeared for the separation of this applied art into a separate channel.
The technique of making marquetry is very popular. The exquisite furniture features the famous Florentine mosaic. In addition to the wooden background, it is based on plates of multi-colored precious and semi-precious stones.
Types of marquetry
The materials that make up the pattern are cut/glued directly into the base itself, which can be any furniture, plywood, blank for a picture, multi-layer plywood. There are two types of inlay:
- intarsia - decorating a wooden base with wood. In this case, the elements that make up the mosaic are cut into the thickness of the base;
- Marquetry - the use of veneer using various materials.
When creating a marquetry mosaic, do not be embarrassed if there are defects in the wood - this will only help you achieve a unique image.
Please know that this is a painstaking and lengthy process. Marquetry inlay loves care and absolute precision. Armed with patience, desire, equipment and looking at the photos presented on our website, you can not only understand the marquetry style, but also create a real masterpiece:
- a shining picture;
- decorate furniture;
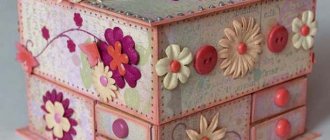
- gift box;
- or even a family coat of arms.
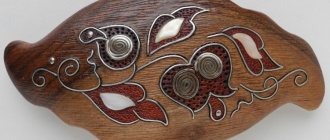
Many marquetry masters begin by making small wood paintings and panels. This material is pliable, pleasant to the touch, all parts are easily glued to the base. Wooden marquetry paintings are natural, environmentally friendly and durable masterpieces.
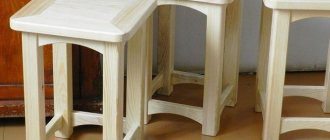
And if you want to furnish your apartment with exclusive furniture, in particular, decorate a children’s bed, using marquetry technology, the following tips will be useful to you:
- choose a bed made of natural wood;
- the headboard and footboard of the bed must have sufficient area for hand carving;
- Decorate a children's bedside table in the same style - then you will get a whole set.
Stylish marquetry furniture made from durable wood with your own hands is a long and labor-intensive process. But it will be highly valued by your relatives and will faithfully serve for more than one generation.
Wood mosaics, in which multi-colored intricacies of different wood species are visible, are widely used in the manufacture of souvenirs and gifts. A DIY gift box looks very cute, and you can also decorate it with a wooden mosaic. To make it:
- use clean wood;
- draw an original sketch;
- In addition to carving, decorate the box with stones.
It all depends on the taste of the person for whom the elite gift is intended. For the marquetry technique, it is important that all decorative elements are hard, durable and of high quality.
The family coat of arms, created using the marquetry technique, will become not only an original decoration of the house, but also a family heirloom. This is very delicate work, but the result is worth the effort!
Watch examples of interior design in the YouTube video:
Do-it-yourself wood intarsia: master classes and practical tips
To work marquetry you will need a minimum of materials and tools that everyone can find. In order to make the work easier, we will glue the veneer “cold” - that is, with a homemade press (the “hot” method is not for beginners). You will need these tools:
- A wallpaper cutting knife with a set of sharp blades is a special tool for DIY marquetry.
- Two sheets of chipboard, which are one and a half to two centimeters larger in size than your work, are needed for do-it-yourself marquetry.
- Painting tape.
- Buttons.
- Tracing paper is also necessary for creating marquetry with your own hands.
- Pencil and carbon paper.
Materials that will be used to make marquetry:
A useful video for beginners will help you understand the principle in more detail. To learn how to make a simple marquetry painting, watch this video for beginners from YouTube. The master will clearly and clearly tell you how to make an original star using veneers made of mahogany, ash and birch. This material will be an excellent start to the great art of creating marvelous ornaments:
You can also visit YouTube regularly and keep practicing, as learning marquetry is a multi-step process. The master makes wonderful paintings in this video:
Masterpieces created using the marquetry technique decorate many areas of our lives. These are furniture, paintings, boxes, jewelry and souvenirs. Sergey Rashchupkin talks great about the features of the technology:
Today, young marquetry masters willingly comprehend the subtleties of this art, inspired by the works of their predecessors. Join us too! Rate and share the article with your friends!
Decorate the lid of a box or furniture with a wicker pattern, giving it a unique and elegant look. Like many other carpentry methods, this one seems overly complicated only at first glance. However, once you understand the basic working principles shown in our article step by step, you will see that it is very easy to do.
squares of maple veneer to create the braided pattern.
, painted black, and light cherry rectangles.
The main secret of constructing a pattern is the ratio of the sizes of squares and rectangles. The rectangles should be twice as wide and four times as long as the squares. Using the 1:2:4 ratio, you can build a braided pattern of any size.
In the example shown here, the 20mm x 40mm rectangles correspond to 10mm squares. A 5mm wide black stripe and a 25mm wide walnut border surround the woven pattern. After gluing, the edges of the set are cut flush with the edges of the lid with dimensions of 216x280 mm.
Cutting veneer strips
This pattern requires 63 squares and 62 rectangles, but it doesn't hurt to have a few extra pieces. To cut out the parts, you will need a sharp knife, a metal ruler and a working polish. The workboard can be made from a piece of plywood or laminated particleboard, adding a wooden strip to which the edge of the veneer is pressed. First, make a 10mm template from scraps that are at least 12mm thick.
Press a piece of black veneer against the stop rail and, using a template, position the ruler parallel to the stop with a 10 mm offset (photo A). Cut several strips with a total length of at least 60 cm to make squares (photo B). Then cut two more strips 300mm long and set aside. Join the edges of the previously cut strips, fasten the strips with tape and cut into squares (photo C).
To make a template for the light rectangles, tape the two black strips that you have set aside, butting their edges together.
Cut several 20mm light strips with a total length of at least 2400mm. As before, join the edges of these strips, secure with tape, cut one end at a right angle and press this end against the stop rail. Tape two 20mm strips together and use them as a template to set a ruler to cut the strips into rectangles.
Why veneer furniture or doors?
By veneering, an ordinary table or cabinet made of pine can “turn” into oak, and its appearance will not be inferior to furniture made entirely of oak. The price of the finished product will be an order of magnitude lower than when purchasing solid wood items. This is why gluing veneer is so popular among craftsmen.
Veneered MDF table
Important! Veneering offers many other benefits. With its help, you can make completely new, beautiful products from old discarded furniture that serve as interior decoration.
Stripped doors can also be restored, as can a peeling window sill. The design possibilities with veneer are very wide: the furniture will fit perfectly into any style - from classic to modern.
Advantages of veneer:
- does not dry out;
- not affected by moisture or temperature changes;
- does not deform;
- has a long service life.
Chest of drawers Valencia oak veneer
Rapid firing will change the color of the veneer
Using hot sand, make the ends of the rectangles darker, as if going into the shadows, to create the illusion of interlacing stripes.
Set the heat control of the electric stove to the middle position and place a small cast-iron frying pan 2/3 filled with fine sand on the stove. Practice with veneer scraps and determine the optimal time to soak light-colored rectangles in sand until the desired color is achieved. Darken both ends of each rectangle (Photo D).
Assemble the pattern
To keep the pattern flyers in place so you can continue assembling, place a sheet of so-called contact paper, sticky side up, with a piece of cardboard underneath (photo E). Mark two perpendicular lines on the contact paper, intersecting in the center of the sheet. These lines will help neatly
arrange the fly so that the finished pattern is rectangular. Place squares and rectangles face down (photos F and G).
If some parts move or do not stick well to the sticky layer of contact paper, temporarily secure them with clear tape. Having assembled the pattern completely, trim its edges (photo H, I, J).
Add a beautiful border
Cut 5mm strips from the black veneer and 25mm strips from the walnut veneer in the same way as before. Attach these strips to the edges of the pattern (photo K), overlapping at the corners. Cut the overlaps diagonally from the inner corner to the outer corner (photo L). After making mitered joints at all four corners, turn the set over and apply strips of masking tape to the border. Remove the transparent film from the front surface.
Quick tip! Apply clear tape diagonally to all corners on both sides to prevent cracks when cutting the veneer.
Apply gummed tape
Before gluing the finished set to the base, the masking tape must be removed. To do this, first moisten the strips of gummed tape and cover the entire front side of the set with them (photo M). When the wet paper tape dries, it tightens the veneer and the set may warp. Do not panic! It will become flat again after gluing to the base. When the tape is dry, carefully peel away the masking tape, tearing it off at a 45° angle to the direction of the grain. Pull the tape along the surface of the set to avoid accidentally tearing off one of the parts.
Quick tip! If, when removing the tape, one of the veneer pieces falls out of the set, insert it into place and secure it with a drop of glue, rubbing it into the seams with your finger
Lightly moisten the gummed tape using a wet sponge and apply it to the front of the set. When dry, this tape will tighten the joints of the veneer parts more tightly.
Procedure for veneering furniture or doors
The work of veneering furniture is not very difficult. The base is leveled, sanded, defects are covered with wood putty, and then sanded again. Make sure all surfaces are clean and dry before applying the adhesive.
A layer of glue is applied to the veneer strips, allowed to dry a little and pressed firmly to the base. Tap the material with a special hammer or roller to level the position. Afterwards, fix the edges and joints of the veneer with masking tape, clamp the product with a press or iron it through paper along the wood fibers.
After the glue has dried, remove the tape, remove excess glue, cut and sand the edges with sandpaper or a sander. To extend the life of furniture, a protective coating of varnish and oil is applied. If the technology is strictly followed, home furnishings veneered will look amazing and will add a touch of grace and elegance to the interior.
Stick the set onto the base
To glue the set to the base, you can use a vacuum press, a plywood press, or simply clamp the work with clamps between two thick plates cut from 19mm plywood or MDF board. I usually use traditional bone glue as it allows you to transfer the kit even after the glue has dried by simply heating it with an iron, but you can use any wood glue. Cut a base from a durable and stable material, such as MDF or plywood, to the size of the set. Then cut a piece of veneer the same size to glue onto the back of the base. Choose a veneer that will look good on the inside of the box. It is glued to the underside of the base to prevent the finished panel from warping.
Apply glue evenly to the base and glue the veneer sheet. Then turn the base over, apply glue and carefully stick on the braided pattern set (photo N). The adhesive should only be applied to the base and not to the veneer. Place the panel in the press and squeeze tightly (photo O). Leave the panel under pressure for several hours, then remove and wait another day to allow the glue to dry completely.
Methods for gluing veneer
Veneering can be done using different methods. Here are the main ones:
- Contact cold. For this purpose, contact adhesive is used, which has a short holding and setting time. The technique is only suitable for small parts.
- Cold followed by pressing. After applying the glue, the surfaces are joined, leveled and fixed with a clamp.
- Hot. As they are gluing, they go over the veneer with an iron, and the glue melts from the high temperature.
Hot veneer gluing
Glue selection
Typically, for the contact method, any quick-setting adhesives such as “Momenta” are used. PVA is suitable for joining smooth parts, but it is only used in conjunction with an iron.
Advice! Titebond glue and epoxy based products are ideal for cold pressing techniques.
Wood glue Titebond II