Wooden architecture has developed over the centuries in many countries. Today, for the construction of warm and durable houses, various types of logs and logs are used, which have successfully proven themselves in the northern regions of Russia, Canada and Norway.
Timber and rounded logs are widely used as building materials - strict geometric dimensions simplify and speed up the assembly of the log house, since a template can be used to mark the connecting grooves. Construction from chopped debarked logs is noticeably more difficult, since each connection is adjusted individually.
When it comes to houses made of wood for the private sector, we mainly mean either frame structures or ready-made turnkey log (timber) buildings. Is it possible to build log houses on your own, the way our ancestors did? The answer is unequivocal - yes, cutting a log house is within the capabilities of any skilled owner . You will learn about all its nuances from this article.
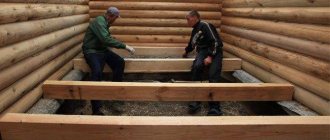
The construction of any building is a complex of various activities, including both preparation for construction and the phased implementation of individual technological operations. We will not consider them all, starting from the “zero” cycle, since the subject of conversation is precisely the felling of a log house. But one remark will not be superfluous. It concerns the most expensive part of the structure, the foundation, the costs of which can reach ⅓ of the estimate.
Which type should I choose? Considering the relative lightness of buildings made of wood, it is advisable to limit ourselves to a shallow-depth tape or a pile-grillage foundation. For any log house it is quite enough, if the presence of a technological (basement) floor is not an indispensable condition. Although in this case there is a good solution - to “raise” the house by installing a higher base.
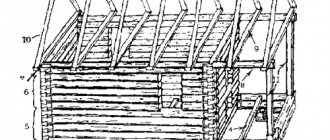
The general order of work is unchanged: installation of the foundation - lower crown - laying wood samples in rows (from bottom to top) with simultaneous arrangement of openings for doors and windows. Next is the ceiling and rafter system. But what does “cutting a log house” mean? This is the connection of all blanks into a single structure with a preliminary selection of material at the designated “points”. The construction of the walls of a building is impossible without reliable fixation of all elements, therefore, when working with wood, cuts (cuts) are made in certain places of the log (timber).
But there is a difference in how the samples are fastened together. There are several ways to cut log houses. Each of the methods has both advantages and individual disadvantages, so we will give a general overview of the ones most used when doing DIY work, since there are quite a lot of them. And which one to choose is entirely at the discretion of the master.
Preparing regular logs for laying
Before cutting down a log house with your own hands, you need to perform two important operations: form a groove along the entire length and a corner connection without additional fasteners. Not only the strength characteristics depend on the quality of their execution, but also the most important property of the structure – the ability to retain heat inside for a long time.
The geometry of the longitudinal recess of the arc profile largely determines the thermal conductivity characteristics of the room. The width of the inter-crown groove has a double meaning. On the one hand, an unreasonable increase in the parameter reduces the useful height of the log, on the other hand, additional widening of the groove has a positive effect on maintaining the internal temperature.
Given this state of affairs, the logical resolution to the contradiction is the following: use a wider ditch when constructing structures in the northern regions.
The profile of the crown groove comes in several interpretations:
- lunar;
- tongue and groove;
- lunar with additional undercut.
Russian lunar profile is considered technologically advanced : the geometry of the excavation accurately repeats the ridge of the response log. This type of log cutting is described in detail in numerous videos due to its wide popularity.
To make a groove you need to have :
- line (a tool similar in functionality to a compass);
- pencil;
- axe;
- adze;
- chisel;
- hammer.
A medium power chainsaw with a good chain will intensify the initial stage of the ditch gouging process. The groove must be made in the lower part of the log to prevent the formation of additional pockets of moisture collection.
The technological process of forming a longitudinal recess includes the following operations:
- put the log of the future crown on top of the existing layer, center and fix it;
- mark a horizontal line on the top workpiece with a length equal to the width of the groove (at least 12 cm);
- adjust the line and draw a corresponding arc line on the surface of the lower one at the end of the upper log;
- draw a groove line along the entire length;
- use the nose of the chainsaw bar to make longitudinal cuts 1.5-2 cm less than the calculated depth of the excavation;
- make a longitudinal cut to the same depth;
- cut out one half of the groove, then the other.
It should be noted that in search of a solution to how to cut down a log house with your own hands faster and easier , experimenting with the shape of the longitudinal groove is not recommended.
The common belief that a triangular shape is no worse than a semicircular shape is erroneous. When connecting, the angular profile not only reduces the contact area, but also provokes the formation of cracks in the log.
Foundation for a log house
The main tasks of any house foundation are as follows:
- holding the base and structure of the house in one, solid plane and, as a result, maintaining the integrity of its walls
- preventing the house from sinking into the ground under its own weight
- preventing the house from freezing from below the ground during the cold season
In addition to the above-mentioned requirements for the foundation of any house, some more requirements should be added to the foundation of a log house:
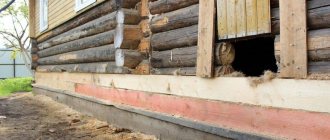
- Height and moisture protection . The height of the foundation of the log house should be higher than for a stone house . The optimal foundation height for a wooden house above ground level is 50-60 cm or higher. Such a rise is necessary to maximally prevent contact of wooden walls with moisture emanating from the ground.
- Ventilated base. If you are planning a wooden base for a log house, then it should be well ventilated from below. This measure will increase the longevity of the floor. For this purpose, the optimal foundation for a log house will be one of the varieties of pile, columnar foundation, as well as a strip foundation with ventilation.
log house on a pile foundation
- No heavy foundation needed. The weight of wooden houses is much lighter than stone ones and therefore a log house does not require a deep, massive and heavy foundation. For a small log house up to 80 square meters, budget foundation options are well suited: pile and columnar.
Read more about the types and properties of pile foundations
Read more about the properties of a columnar foundation
log house on a columnar foundation
strip foundation
Stage 6
Types of cutting corners of a log house and informative videos on their implementation
A characteristic feature of the construction of a wooden structure using the technology under consideration is the natural fastening of the logs to each other only through structural measures without the use of additional fasteners . ways to correctly implement a corner connection :
- "in the paw";
- “in a state of rage”;
- "into the bowl";
- "in a big way."
The first joining method is the basis of the so-called waste-free technology.
The next three provide additional projections beyond the plane of the walls. The often demonstrated corner cutting of a log house in the video is the last one on the list.
The advantages of joining logs “in a clap” are:
- lower location of the bowl, preventing the accumulation of moisture inside the ligament;
- a closed corner structure, which is formed by the ends of the logs protruding beyond the plane of the wall;
- high strength and reliability.
Before you cut down a corner frame with your own hands , you need to acquire a standard carpentry kit, which was also used when forming a longitudinal groove.
A chainsaw is also welcome here. The bowl is marked as follows:
- lay the log of the future crown and fix it with staples;
- the legs of the line are moved apart by half the diameter of the lower log;
- a line is placed on the cross-laid wooden blanks and the contour of the bowl is drawn, constantly maintaining the contact of the legs with the logs and their verticality;
- Transverse and longitudinal cuts are made according to the intended geometry, the bowl is chopped and its surfaces are cleaned.
Upon completion, the log is placed in the bowls and the gaps are checked. defective if the actual depth of the bowl is greater than the design one . The way out is to wedge or lay a thicker seal.
Final Tips
Having mastered the craft of a carpenter, you will save significantly on construction. Start learning the basics by making a log gazebo for the garden. Then, build a small bathhouse on your site. The experience gained will allow you to master the construction of a house. A technologically precisely manufactured log house will be warm and will give the building durability and reliability and provide exceptional environmental friendliness, especially if you use cedar lining for internal cladding.
On other pages of our website you can see a lot of interesting things about log houses and log baths.
Assembly
Watching the video of cutting down one crown of a log house “into a bowl” , you should note the sequence of processing the log: first you need to form the geometry of the “bowl”, and then start cutting out the longitudinal groove. Sometimes the issue is solved differently: simultaneously with marking the bowl, mark the location of the longitudinal groove from the end of the log to the corner joint and combine the operations.
When starting the practical implementation of the planned solutions, you need to clearly know the sequence of assembling the crowns together :
- an inter-crown sealant (tow, linen wool, moss, etc.) should be spread over the already formed layer;
- It is customary to connect several crowns together with dowels (wooden spikes) at intervals of 1.5 - 2 meters;
- the orientation of the wood fibers should be as follows: less dense (southern) fibers “look” inward, northern fibers “look” outward.
After cutting the log house yourself, experts recommend erecting a temporary roof and allowing time for the structure to shrink (1.5-2 years) . Afterwards, you can coat the ends of the logs with a protective compound.
Having developed the skills of cutting the geometry of a corner joint and a longitudinal groove, you can begin to construct a wooden structure. When developing a construction method, you should use the preferred options for the location of technological surfaces: it is advisable to base the bowl and longitudinal groove in the lower part of the wooden workpiece. When assembling, do not forget to place sealing material between the rims and fasten the layers together with dowels.
Stage 7. Doors and window openings
We specifically started talking about openings after construction was completed, since there are two options for their arrangement.
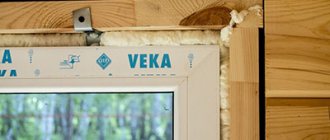
Installation of a casing for installing windows and doors in a log house
- In the first case, holes are created after the completion of construction work. At the same time, in the crowns located in the places of future openings, first leave small gaps (the dimensions of the latter depend on the size of the mounted products). Once you've finished laying the logs, simply cut the openings with a chainsaw.
- In the second case, leave openings during the construction process. This is very labor-intensive and expensive, since you will use bars with notches at the ends and special grooves.
How to install a window in a log house
Window installation
Bath windows
Doors for a bathhouse made of logs
Therefore, we advise you to give preference to the first option.
Log selection
It is best to harvest timber for the bathhouse in winter, from late November to early March, when there is no sap flow. Summer wood, compared to winter wood, dries out much more, so after shrinkage there will be more cracks and cracks in the log house. In addition, it darkens faster and is more susceptible to fungi and mold.
You need to choose a tree that is not affected by rot, fungus and insects, preferably with a minimum number of knots. The trunks should be smooth and not runny, that is, the difference between the diameters of the butt and crown should be no more than 50-70 mm. The most suitable type of wood for a bathhouse is pine, although the lower crown, which is most susceptible to dampness, can be made from larch.
Bath size
The size of the bathhouse can be arbitrary - at your own request, depending on what is planned to be placed in it. A standard bathhouse includes a sink (washing room), a steam room and a dressing room (in the modern version, a relaxation room). For a steam room, three to four square meters are enough, for a sink a little more, about five to six. The dressing room, if without sophistication, can perform its functions with a size of 5-6 sq.m. In other words, the average size of a rather modest bathhouse will be 4x5 meters, or 3x6. With a standard log size of 6.1 m, the second option will be much more economical.
Advantages of chopping into a bowl
- Good stability of the log house. Such a log house is not subject to shifts of logs relative to each other, as happens when cutting into a right angle or dovetail.
- Warm corner. Due to the thickness of the joint of the logs in the corner (into a whole log), heat loss is minimized. This is especially true when cutting a bowl with a tenon, if only the tenon is made correctly, without unnecessary gaps.
- Attractive appearance. A well-processed log house looks much more impressive than cutting it into a right angle or khrya.
- Does not require additional cladding, both outside and inside. The warm corner allows you to leave the frame as is, so it only needs to be sanded and painted.
- Convenient joining of logs. Unlike other types of cutting, the bowl allows you to join logs in any cut. In a place where there are no additional walls, simply cover the joint with a short piece of log.
Carpenter's trait
What to choose? The answer can only be given by the logs themselves, since horizontal grooves on logs with steep slopes can cut off up to half the thickness of the log.
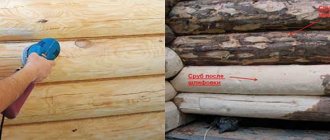
After drawing, the log is freed from temporary fastening with staples and turned over with the scratches facing up. To make it easier to see, the scratches are outlined with a pencil. With strong blows, plunging the heel of the ax blade into the depth of the groove, cross-shaped notches are made along the entire length of the log. The middle of the ax blade should touch the drawn lines. Then a groove is made with the toe of the ax blade: cutting it between the notches and picking out the wood. The work can be speeded up if you use electric or chainsaws. In this case, notches are not made on the log, but many cross cuts and one long cut are made along the log with the end of the chainsaw. You should try not to cut to the full depth of the groove, but leave 0.5–1 cm for manual finishing of the groove. This will extend the life of the log structure.
The final cleaning of the groove is done with an adze, tilting the log in a direction convenient for cutting. An adze is an ax whose cutting plane is directed not along the handle, like a regular axe, but across it, like a pickaxe, but with a rounded cutting edge. There are two types of adze: large and small. The carpenter works with a large adze while standing, delivering strong blows along the log with both hands. With this tool you can immediately select a groove without using a regular ax. A small adze is used with one hand while sitting on a log. This tool is used to “finish” the groove after a larger adze or ax.
Next, the correctness of the groove is checked: the log is “placed on the firebrand.” The hump of a solid log is coated with colored pigment (previously this was done with coal or ash, hence the name) and a log with a groove is placed on it. They remove the grooved log and watch how the colored pigment has stained the groove. A clean place means that the groove did not touch the smeared hump; a dirty place, on the contrary, shows that there is excess wood here that did not allow the log to “sit” - it needs to be removed. So gradually, the groove is refined until it is completely erased. This means that the groove is completely in contact with the hump of another log.
There is another way to check the correctness of the groove selection - with a wooden “woman”. They take a piece of log (with an impressive name - “baba”) up to one meter long and tap it on the connected logs. Then the log with the groove is removed and they look where there are jammed places, indicating excess wood in the groove. “Baba” must be made of soft wood, otherwise it will crush the front surface of the log being tapped.