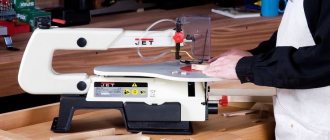
Every person who has used a circular saw at least once knows how difficult it is to make an even cut. To somehow simplify this task, some use a special guide. This design will help you make perfectly straight cuts. Create a guide for a circular saw with your own hands.
A circular saw is often used in the household for cutting wood.
Guide bar - what is it?
Before you create such a design yourself, you need to familiarize yourself with its main features.
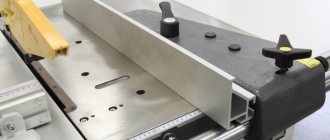
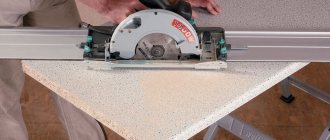
A guide bar is a special rail that is responsible for sliding the saw forward and backward. At the same time, it limits the movement of the tool and therefore it cannot be directed to the left or right.
This device is used not only to ensure an even cut. It also helps reduce the number of chips in places where the saw came into contact with the wood being cut.
Additional Information! Sometimes guides are included with circular saws from Bosch and Interskol.
Guide rail functions
There are several main functions that these structures perform:
- increased accuracy when sawing large materials;
- improved quality when creating a curved cut;
- simplifying the creation of parts in accordance with a certain standard;
- the ability to manufacture several parts using one template;
- increasing safety when using circular saws.
Also, with the help of guides, it will be possible to make cuttings with high accuracy.
Do-it-yourself design production
After preparing a sketch of the structure (with dimensions) and purchasing the required materials, you can begin work. You should start by making a frame for the table top. It can be made from a profile pipe. Having a welding machine and a grinder on the farm, this is not at all difficult to do.
- The required pipe sections are cut.
- The sides are welded.
- Four sections connecting the sidewalls are welded.
- All welding and sawing areas are processed with a grinding wheel.
- Adjustment screws are attached to the ends of the legs, allowing you to install the table on a not very flat surface.
Metal frame under the tabletop
The structure must be painted to give it an aesthetic appearance and protect it from corrosive processes. It remains to make holes in the frame for mounting the tabletop.
The table can also be made from timber or boards with a section of 10 x 5 cm. To assemble the frame you will need metal corners, dowels and screws.
Design example
Important! When using wood blanks, one should not forget about the mandatory treatment of them from exposure to moisture and temperature. For this purpose, special formulations are produced.
You can also use old furniture, such as an office table, as a base for a circular saw. It is only necessary that its base be strong. In most cases, the standard dimensions of such structures are quite suitable for cutting wood. But it is recommended to install a new countertop itself. An alternative is to glue two sheets of plywood 1.2 cm thick. This thickness will be quite enough to install a saw weighing about 5 kg.
You can glue 2 sheets of plywood
After making the base, you can proceed to the most important stage - preparing the surface and installing the saw.
Table. What may be needed to carry out the work.
| Tool, device | Photo |
| Jigsaw | |
| Screwdriver | |
| Drill | |
| Sander | |
| Milling unit | |
| Roulette | |
| Square |
Step 1. You need to drill mounting holes in the platform of the purchased unit (if the holes were not provided for in the design). It should be remembered that after such modification, the manufacturer’s official warranty for the purchased tool will be lost.
MDF (board made from tiny wood chips)
Step 2. The tabletop is cut out according to the required dimensions. It can be made from 1.8 - 2 cm thick plywood, MDF, old furniture or sheet metal, but this option is rarely used. In this case, chipboard is not recommended, since these boards are not very durable. Plastic should also not be used as a countertop.
Important! The thickness of the cut directly depends on the thickness of the table. The larger this size, the shallower the depth the disc can cut through the workpiece, since the working surface of the disc is reduced.
It is advisable to mill the edges of the tabletop (no one has canceled the aesthetic appearance even for working devices), after which you should go over the workpiece with a grinding machine.
Step 3. A slot for the saw blade is made in the tabletop.
Step 4. Markings for hardware are applied. The saw is attached to the bottom of the tabletop. The fastener caps should not protrude beyond its plane.
The saw is fixed to the bottom of the table top
Many people do not drill the platform when installing the saw on the tabletop, but secure it with clamping blocks and self-tapping screws.
Step 5. The tabletop is turned over into the working position and secured to the frame. For fixation, it is recommended to use not only self-tapping screws, but also metal corners, which provide the required structural strength.
Fastening the table top
Many craftsmen do not limit themselves to simply installing factory tools under the table. To gain a few millimeters in the thickness of the cut, they completely remove the saw guard, sole, and saw blade tilt adjustment device (if it is not useful in the future). After this, a homemade platform is produced, on which the saw is attached.
Step 5: The tool's power management is displayed. For this you will need: a plug for the socket, a plug for turning on the saw, a standard light switch, a piece of cable, clamps for clamping the power button on the saw, self-tapping screws and minimal electrical installation skills.
Power management disabled
A socket is attached to the inside of the table; a cable for the switch is output from it, which is installed where it is convenient. The device is powered from the nearest power source in the room. The saw power button is fixed with clamps in a recessed position. The integrated saw start control allows you to quickly and easily control the operation of the tool.
Step 6. To work on the table, you need to make stops and a carriage.
Circular table guide carriage
A carriage for sawing small workpieces or cross-cutting lumber can be made from a plywood base and two wooden walls. It will move along two guides, which are made of sections of metal pipe with a cross-section of 2 x 1 cm and installed in grooves made using a router. The parts placed inside the carriage are very convenient and safe to saw.
Finished carriage
Guides for working with workpieces can be made of boards, plywood or metal.
Metal guides
They must be able to adjust their position depending on the width of the workpieces being cut. The stops can be not only longitudinal, but also transverse, and also help to make cuts at an angle.
Example of a stop
If you don’t want to make the guides yourself, you can install a ready-made device.
You can supply a ready-made device.
To cut workpieces, you cannot do without a marking ruler. To mount it in the tabletop, a shallow groove is selected using a router. It can be done with a chisel and a knife, but using a milling machine it is much faster, more accurate and easier. All areas where work was carried out are carefully sanded to eliminate the risk of splinters. Installation holes are drilled. The ruler is secured with self-tapping screws.
The ruler is attached with self-tapping screws
You can provide various devices to facilitate the operation of the tool: a bag under the table top to collect chips, a dust extractor for sawdust flying over the table, a mechanism for lifting the table top for servicing the tool. In small spaces, a folding tabletop is convenient.
Operating a circular saw is a traumatic operation, so you should push the workpiece toward the disk not with your hands, but with a pusher specially made from a block. The most common injuries that an operator can receive when working with a circular saw are injuries to the fingers and eyes when knots or chips bounce off. When working, be sure to wear safety glasses.
Sawing table made from a hand-held circular saw
A well-made frame, a securely fastened saw and prepared work equipment allow you to cut material quickly and safely.
Video - Do-it-yourself circular table from a hand-held circular saw
Advantages of a homemade guide bar
The guide allows you to make straight cuts.
Many people think that homemade splints have no advantages. However, in fact they have a number of advantages:
- ease of use;
- repeated use;
- durability;
- versatility.
Homemade designs also have their drawbacks. The main disadvantage is that they are not easy to make. Therefore, to avoid problems, you need to figure out in advance how to make guides for a circular saw with your own hands.
What should a saw table be like?
When setting up a stationary area for processing materials, several nuances must be taken into account.
- The structure must be stable and rigid.
- The material from which the table is made must be strong and durable.
- It is important that the table surface is perfectly flat.
- Grounding must be provided.
Circular saw table design - The table must be equipped with devices that ensure the safety of the operator.
- The saw start button should be located within easy reach.
- A place should be provided for collecting sawdust, which should be easily accessible.
- The work area around the table should not be cluttered, as this increases the risk of injury.
Taking into account the above, you can be confident in the reliability of the installed structure and the good quality of the workpieces being processed, regardless of the amount of work.
Table for circular saw - photo
The main components of the table: frame and smooth surface for placing workpieces.
The material from which structures are made varies depending on the purpose, installation location and frequency of use. For domestic needs, you can make a structure from boards and plywood and install it, for example, in a garage. Working with large volumes of materials implies increased requirements for the strength and reliability of the structure. The best solution in this case would be a frame made of a metal profile. To reduce vibrations and provide greater stability, many even concrete the legs into the floor.
Some tips for setting up a table:
- the saw blade must be positioned strictly perpendicular to the table surface;
The saw blade must be positioned strictly perpendicular to
- the standard and optimal size of the tabletop is 1.2 x 1.2 m, but it can vary depending on individual requirements (if the tabletop is long, additional support legs may be needed);
- the height of the table depends on the height of the master, usually it varies between 0.8...1.2 m;
- it is more convenient for the operator if the table is installed on legs rather than on solid sheets, for example, plywood;
- the width of the slot into which the disk attached to the bottom is inserted should not exceed the thickness of the disk by more than 2 mm, otherwise the tool may quickly fail due to clogging with chips;
DIY circular table from a hand-held circular saw
- the circular saw should be placed in the center of the table so that there is no strong shift in the center of gravity;
- It is recommended to place the saw control buttons on the table top or the top of the table leg.
Important! In many models of saws, holes for attaching the sole to the table are already provided by the manufacturers.
Example of a reinforced workbench for a circular saw
Required materials and tools
Before you begin manufacturing the structure, you need to familiarize yourself with the list of necessary tools and materials:
- wooden blanks: boards, plywood, laminate;
- wooden bars with a thickness of 10 cm;
- self-tapping screws, screws, bolts or nuts;
- drill with drills;
- screwdrivers or screwdriver.
Additional Information! The above tools must be prepared in advance so that they are at hand while creating the guide.
Detailed instructions for manufacturing
To make a circular tire yourself, you need to familiarize yourself with the basic rules for its manufacture in advance.
From plywood
Plywood is often used to create a tire.
The plywood structure is made in several sequential steps:
- Disconnect the circular saw from the power source.
- Measure the distance from the saw blade to the groove located on the support platform.
- Cut the plywood strip so that its width is a millimeter less than the distance obtained in the previous step.
- Fasten the strip to a wide piece of plywood.
- Attach the second strip parallel to the base of the instrument.
Important! Before you make a guide yourself, you need to create a drawing with accurate calculations.
Aluminum profile tire
Some people want to make a more durable and high-quality structure. For this they use an aluminum profile. The only serious difference between such products and plywood is that a U-shaped aluminum profile is installed in the guide gap. With its help, it is possible to significantly increase the rigidity of the entire structure. Thanks to this, the cutting accuracy also increases.
When creating aluminum busbars, thick plywood is often used as restraints. However, it is better to install several fluoroplastic plates instead. This material is more efficient because it has a low coefficient of friction.
Other varieties
The construction rule is often used as a guide.
You can make a guide bar for a circular saw with your own hands from a miter box rail. Most often, this device is used for cross-sectioning materials. It consists of two corners that are connected in parallel to each other. Their ends must be attached to an iron or plywood base.
If the rail miter box will be used in a circular saw, it must be attached using metal pins or bolts. The structure must be installed higher so that it does not come into contact with the work surface.
Additional Information! Some people use a ruler from the building code as a guide bar. However, this design is not very convenient, since it must be configured before each use.
Step-by-step instruction
A durable, comfortable table for a manual circular saw will work if you stick to the action plan.
Its points are as follows:
- Determine the dimensions of the tabletop and supporting frame;
- Prepare drawings of parts indicating dimensions, material, quantity; you can use the examples, adjusting the shapes and sizes to suit your needs;
- Calculate the required amount of materials and fasteners; determine where scrap materials can be used and what needs to be purchased;
- The frame parts are connected sequentially, the top plate is prepared, and it is attached to the frame;
- At the bottom, through the prepared holes, a circular saw is attached, protection and guide stops are installed;
- The assembled apparatus is tested and modified if necessary.
Additional guide bar functions
Using a guide bar, it is extremely difficult to damage the material being cut.
Such designs have a number of additional functions that you should familiarize yourself with before using a homemade guide bar for a hand-held circular saw:
- protects the sawn material from damage;
- allows you to adjust the exact length of the cut;
- significantly speeds up the process of sawing wood;
- securely fixes the wood to the work surface.
Additional Information! Both branded guides and homemade designs can boast of the above additional functions.
Types of circulars
According to the method of performing the work, circular saws are divided into two types:
- Stationary;
- Hand tools.
Each type has its own characteristics, advantages, and disadvantages. The main difference between a stationary machine and a hand tool is the object of movement. On a stationary machine, the sawn material is moved along the saw blade; the hand tool is moved along the stationary workpieces.
A circular saw is chosen depending on the type and amount of work performed. To make a shelf for books, a stool, or a flower stand, all you need is a hand saw.
For mass production and sawing of long, dimensional workpieces, a stationary installation is used. Many experienced craftsmen have both types of circular saws at their disposal.
How to adjust correctly
Before you start working, you need to properly adjust the structure. You will have to independently choose the optimal location and point for further fixation.
It is necessary to position the device so that its edge lies flat against the cut line and without distortion. After this, you need to adjust the placement of the saw blade. It must be torn off from the casing and aligned perpendicularly to the cutting line.
When the disk and guides are adjusted, the structure is fixed with clamps. This is done to minimize vibrations that may occur while the saw is running.
Important! To cut wood at an angle of 45 degrees, you will need to adjust the saw blade or adjust the angle on the bar itself. This must be done very carefully to avoid mistakes when adjusting the tilt.
Features of a manual circular saw
The tool is based on an electric motor with a saw blade mounted on a shaft. Models from different manufacturers have approximately the same design.
The products are equipped with many additional accessories:
- Start button with rotation speed controller;
- Protective casing;
- Retractable parallel stop;
- Regulators for cutting depth and tilt angle;
- Sawdust ejection pipe.
The saw blade rotates towards the base plate, towards itself. The main rule when working with a manual circular saw: first start the engine so that the disk begins to rotate, then carefully bring it closer to the surface to be treated.
The tool is convenient when performing the following work:
- Sawing boards, plywood, particle boards;
- Cutting timber, cutting slats;
- Recesses for groove tenons;
- Edge processing, chamfering;
- Cutting waste lumber for fuel.
The power of the device is selected based on needs. For short-term work in domestic conditions, processing workpieces up to 4.5 cm thick, a power of up to 1.2 kW is sufficient. Semi-professional tools have a power of 1.8 kW and cut workpieces up to 6.5 cm thick.
Professional equipment with a power of 2.2 kW can withstand long-term loads and leaves a cut of up to 8.5 cm. Woodworking enterprises use saws with a power of up to 5.5 kW; their weight reaches 100 kg.
Useful tips
Blank templates make the work much easier.
There are several useful recommendations that will help beginners use a circular saw with a guide:
- It is necessary to use special blank templates. With their help you can quickly make identical parts.
- Before starting work, you need to adjust and configure everything in advance. Only with a properly configured tool will it be possible to cut wood efficiently.
- Do not work at the circular saw for too long. The tool must be turned off periodically to prevent it from overheating.
- The tire must be securely attached. It must not slide on the work surface. Bolts or screws can be used as fastenings.
- If, during sawing, the circular saw begins to sharply slow down, it must be turned off. This often happens when a tool works continuously for a long time and begins to overheat.
Important! If you need to cut an even cut, you must use a guide. Without it, it is quite difficult to do this.
A circular saw is an indispensable tool that allows you to quickly cut wood products. People who want to do quality work should use special guides. Such designs can be purchased or made independently.
