June 5, 2022 Stroyekspert Home page » Foundation » Blind area and finishing
Drains for the plinth
Protecting the foundation of a house from precipitation can significantly extend its service life. For the underground part, blind areas are widely used. For above-ground installations, drains or drains for the foundation base are considered the best option. We will tell you what they are, how to make them and install them with your own hands in this review.
Features of installation of ebb tides for a wooden house
Taking into account the peculiarity of the natural material of wood, it is necessary to eliminate the existing one-sided widespread concept of the principle of how to attach ebbs to the base of a wooden house, which has two main goals:
- The low tide protects the crown of the house from moisture.
- The base will be protected from severe wetness.
The most vulnerable and painful place in the house is considered to be the first crown of a row of logs or boards, which should be located on the basement of the building. This design has a second name - a frame crown. This part of the building is most susceptible to the influence of dampness and wetting, since water accumulates to a greater extent here. This is a unique design of a wooden house, where the strip foundation will be laid wider than the size of the wall.
In any case, during the construction of the building, the upper part of our foundation will have a waterproofing component, in the form of a board, having a width of 20 cm, and a minimum thickness of 4-5 mm. The boards are treated with an antiseptic, which increases the boards’ resistance to moisture.
Before correctly installing ebb sills on the foundation of a wooden house, it is necessary to perform preparatory work for the base, which consists of the following operations:
- The entire level of part of the base must be leveled with a concrete screed.
- We lay it with roofing felt, and always in 2 layers.
- We lay a technological lining along the entire finished perimeter for the foundation.
- We use a block with a beveled surface in the structural part.
Next, when attaching lumber intended for drainage, on the second technological crown we make a production groove on the outside where the board will be attached. The second edge of the board will rest on a pre-prepared beveled block, which is attached to the basement of the log house.
Author:
Nikita
Publication date:
22/12/2017
Deciding on the sizes
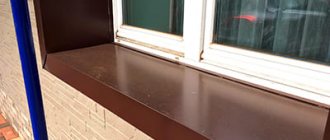
Metal castings can be sold in long strips - up to 6 meters long; you can find companies that will cut them into pieces of the length you need. The second option is good, since you don’t have to think about where to put the leftovers. The length of the window sill is determined by the width of the opening. The ebb board is usually made wider by 2-4 cm on each side. When preparing, the excess is cut off, leaving protrusions on both sides of the window opening. But you can cut it exactly to the width of the opening. It depends on the exterior wall finish and your desire/taste. In any case, if you order planks of a certain length, and do not cut them yourself, add a few centimeters - this way you can correct it if they are cut crooked.
The dimensions of the window tide are determined by the window opening
The depth of the tide on the window should be such that its edge protrudes a few centimeters. You don't need a protrusion that is too large - it can get in the way, but 4-5 cm is quite normal. In this case, the flowing water will not fall on the wall or under the foundation. With such a protrusion, moisture pours onto the blind area around the house, then goes into the storm drain.
Metal window sills have a larger range of sizes
When choosing a plastic casting, you may encounter difficulties. The narrowest ebb is 15 cm, and then the increase occurs in a certain step. Typically this step is 50 mm. So there may well be a situation - either too little or too much. You need to make a decision based on the situation - how critical is the ingress of water close to the foundation, how often do people walk along the windows. After evaluating these factors, you can choose a wider or narrower one.
Materials for casting and installation diagrams
Due to the fact that the minimum width of monolithic foundations is often greater than the thickness of the wall materials used in wooden house construction, the base of the house protrudes outward. To protect its upper edge from getting wet and destroyed, ebbs made of different materials are used:
- steel – galvanized, coated with polymers or laminated;
- polymers – plastic additional elements.
Concrete, clinker, copper and aluminum castings for wooden cottages are rarely used, since they sharply increase the construction budget. They are more difficult to adjust at the junctions with the crowns of the log house, and the cut deviation and installation time increase.
The main installation schemes for ebb tides are:
- concrete, clinker - making an inclined plane with a mortar on the upper surface of the plinth, laying the elements on a cement-sand mortar or a special mortar with moisture-proof properties;
- copper, vinyl, steel, aluminum – fixing the top shelf to the wall, ventilation façade frame, adjusting internal and external corners, fastening elements together with rebates, screws or overlapping rivets
Important! Manufacturers produce corner elements for vinyl moldings. From companies that sell steel castings, they can be ordered according to the developer’s dimensions. Concrete and clinker products are cut locally using an angle grinder with diamond equipment.
The ebb shape looks like this:
The width of the average working shelf varies between 50 – 400 mm. Products made from sheet materials can be ordered in a specific or standard size. When choosing vinyl additional elements, the possibilities are somewhat reduced - you will have to choose from the manufacturer’s ready-made range.
Making an external view corner
When making the ebb from plastic, the cutting of the corner elements is simplified. To do this, the lower and upper parts must be cut out, an additional type of element must be built on the area being placed, and then all connections must be treated with silicone material or sealant.
When using metal elements, the work is done differently.
- First, the shelf of the upper and middle view is cut, in one section up to 90 degrees in angle, and in the other an overlap of about 2 centimeters is made.
- Then the corner parts are connected; to do this, the bar is bent at the cut area, and the overlap must be brought inward. The corner element is fastened using self-tapping screws or rivets.
The most reliable connection is considered to be a seam fastening; for this, 2 centimeters are left on both sides of the corner. To fasten the seam connection, you must use a special tool and also have experience with such work.
You can also connect the corner, leaving a small gap; it is subsequently closed on top with a strip, which is secured along the seam using self-tapping screws.
It is necessary to protect the foundation from water ingress on all sides of the house, taking into account the porch and other decorative elements.
Installation instructions for drip tides
Tides are designed to provide protection from adverse weather conditions. Low tides allow water and snow to flow down to the ground and not accumulate on the window ledge or foundation. Flashings significantly extend the service life of facades. The main material for their production is aluminum and galvanized sheets.
Low tides are divided into
•Window sills
•Ebbings for the foundation
•Shields for fences
Master sheet bender
manufactures castings of any complexity and configuration. Product manufacturing time is from 10 minutes.
To calculate the price for manufacturing ebb tides, contact our manager, or use the price list
What are they, are they needed?
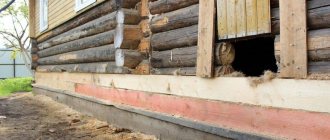
The ebb for the foundation plinth is a strip that resembles a shelf . The ebb is installed along the entire perimeter of the protruding part of the base with a 5-10 degree slope in the direction opposite to the wall. Installing such a strip allows liquid to drain from the surface of the foundation.
The ebb for the base is made from waterproof materials, either independently or to order in specialized stores.
Installing this structural solution allows you to extend the service life of the foundation and avoid its destruction under the influence of moisture and low temperatures.
Neglecting to install the drip lining for the base leads to rapid destruction of the base and a decrease in the load-bearing characteristics of the foundation. Subsequently, this becomes the reason for the formation of cracks on the surface of the walls of the house, requiring urgent reconstruction of the entire monolith. A particularly neglected foundation can lead to the destruction of an entire building.
Video: ebb tides on the foundation
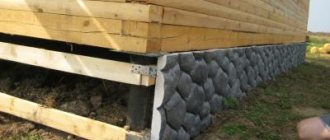
The drip for the base is a protective strip with a drip that protects the junction of the wall and the foundation from moisture.
Flashings for the foundation plinth can easily be made from galvanized roofing steel or flat painted sheets of metal tiles with your own hands; you can purchase them ready-made on the construction market.
How to install drip sills for a plinth with your own hands
Due to the active development of individual construction, thousands of houses made of wood and brick are built and repaired every year. In this case, special attention is paid to the construction of the foundation and plinth, which are the basis of the entire structure.
They must securely hold the building on the ground and prevent moisture from entering its walls.
Installing the basement drip yourself
Tool
Considering that the installation of ebb tides on the foundation will be done with your own hands, you should know what will be useful to you during the installation process:
- Measuring tool – long tape measure, ruler and pencil;
- Wood hacksaw;
- Miter boxes - used for precise cuts of boards at different angles (only for cutting corners in drain boards);
- Square;
- Drill, drills and screws;
- Metal scissors or grinder with cutting disc;
- Riveter and set of aluminum rivets.
A bit of materials science
In addition to the drain board, metal and plastic flashings are used in wooden houses.
Metal products for water drainage are steel, aluminum and copper. Of the steel ones, the most in demand are galvanized castings and those coated with a polymer film. Their performance characteristics are higher, and they also have different colors.
Plastic products are good for everyone and there are even special elements for corner joints. They are inferior to metal ones in terms of strength, but win in price.
Installation of ebb tides
There is no single standard for the design of ebb and flow elements on the foundation, so ebb and flow can be installed using various methods. However, it is recommended to first protect the wall joints and the joints of the corners of the log house from moisture, then mount the planks on straight sections of the house’s base.
Decoration of corners
In houses made of SIP panels, built using frame, panel or half-timbered technology according to budget projects, only external corners are usually present. In log houses, internal corners are added when the corners are cut into a bowl or claw. In the latter case, a separate tape can be poured for these elements; the corners can lie close to the base or hang over it.
Therefore, the width and slope of the base of the house, the convenience of placing the plank, cutting waste, and the productivity of work to protect the foundation change.
Outside corner
If PVC base moldings are used, the technology for cutting the planks for making corners is greatly simplified.
Installation diagram for vinyl drip panels.
It is enough to cut out the lower and upper parts, install the additional element at the place of use, and treat the seams with sealant and silicone.
It is more difficult to work with metal bases, so other technologies are used:
- cutting out the upper part of the plank - the upper and middle flanges are cut, on one side along the marking of a 90 degree angle, on the other with an overlap of 1 - 2 cm;
- joining a corner element - the strip is bent at the place of the cut, the allowance is moved inwards, the metal is fastened with screws or rivets along the corner.
A seam connection is considered more reliable; in this case, 1 cm is left on both sides of the corner, 2 cm on the other side, respectively. The complexity of seam joints lies in the need for a home craftsman to have some skills in tin work and to use a special tool.
Instead, you can join the corner with a small gap, close it with a wide strip on top, attaching it to opposite sides along the seam with rivets or self-tapping screws.
External corners at the junction of the internal walls of a log house with a claw cut can be designed in the following way.
Important! The foundation of the house must be protected by ebbs along the entire perimeter, including the porch, decorative elements of the facades (bay windows, pilasters).
Internal corner
When independently fastening the ebb of a house's base in the internal corners, the technology is much simpler. In this case, it is fashionable to run one plank under the other, slightly bending the wide shelf, covering the cracks with sealant.
Important! If the basement part of the foundation is poured at a single horizontal level, and the crowns of the adjacent walls of the log house are shifted vertically by half a tree, the ebbs can be placed at different angles or at different levels.
Straight sections
After decorating and protecting the external and internal junctions of the walls, the sills are attached to straight sections. The maximum rigidity of the casting strips is ensured by fastening them with special brackets:
The technology for installing house basement flashings on a wooden building is as follows:
- horizontal marking - the line is usually made with a special painting tool (painted thread) before installing the corner elements;
- fastening of drip strips - brackets are screwed onto the wall or uprights of the frame of the ventilated facade, the lower stiffening ribs of the drip panels are put on them, then the counter shelf is fixed to the sheathing or crowns of the building with self-tapping screws.
After which, the stiffeners should be additionally bent around the brackets using pliers. There is a technology for installing flashings on a foundation without clamps:
- along the line marked at the initial stage, angle grinder cuts are created in the crowns of the frame with wood-cutting equipment or a hand-held circular saw, while a slope parallel to the middle flange of the ebb is required;
- wooden blocks are laid out on the upper edge of the plinth, the upper side of which is cut at the required angle, they are secured with dowels into the plinth;
- planks without a curved upper shelf are inserted into the cut, pre-filled with acrylic or silicone sealant, and attached in the middle with self-tapping screws to the support bars.
This is the most aesthetic design option for log houses that do not have facade cladding. A cut with a depth of 2–3 cm additionally relieves internal stress in logs and beams, preventing cracking when the timber dries out.
In practice, a method similar to the first option is often used, but without installing brackets. In this case, the ebbs are held in place exclusively by dowels or self-tapping screws installed in the top shelf. The support on the outer edge of the base occurs solely due to the own weight of the sheet steel and polymer material.
Important! The rigidity of the casting belt structure along the perimeter of the log house is achieved by the presence of stiffening ribs at the external and internal corners. Unlike window sills, the structure cannot be lifted by the wind.
Thus, ebbs above the protruding base of the house foundation, made in the same plane as the facades, can be installed independently in several ways. It is most reliable to use special brackets; the most aesthetic option is to insert the plank into the cuts of the log house crowns. The simplest technology is to fix the sills to the walls or sheathing of the ventilation façade with self-tapping screws without brackets.
Advice! If you need builders to build a foundation, there is a very convenient service for selecting specialists from PROFI.RU. Just fill out the order details, the experts will respond and you can choose who to collaborate with. Each specialist in the system has a rating, reviews and examples of work, which will help with the choice. Looks like a mini tender. Placing an application is FREE and does not oblige you to anything. Works in almost all cities of Russia.
If you are a master, follow this link, register in the system and be able to accept orders.
Methods for connecting ebb tides to each other
There are several ways to fasten ebbs together:
- Overlap;
- Folded method (falsetto - lock);
- Plank.
1. For an overlapping connection, it is necessary to lay the strips one on top of the other by at least 3 cm. For additional rigidity, you can fasten them with rivets; you need to coat the joints with a hermetic compound.
2. When installing the ebb in a rebated manner, water resistance can be guaranteed without the use of additional means. It is more difficult, but also more economical.
3. Joining with a plank is a more expensive method due to the use of additional decorative strips, but it is also more aesthetically pleasing and durable at the same time. It does not require the hassle of using a falsetto lock, while freely allowing the ebb material to expand and contract in accordance with climatic conditions.
Proceed with installation
Since there are fewer and fewer supporters of installing a drain board, an alternative is to install drip panels from other materials.
Installing metal and plastic ebbs on the foundation base of a wooden house is practically no different. You can begin installing the drip linings after erecting the walls, removing the scaffolding and finishing the base, but it is better to do this at the final stage. Moreover, such an operation can be done with your own hands.
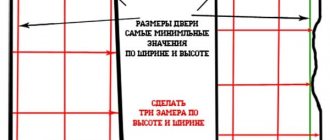
- The first thing you need to start with is to measure the perimeter of the house in order to know the length of the ebbs that you need to purchase or make yourself. To the resulting figure you need to add 10% of the length for trimming corners and overlap when joining.
- Now you need to decide on the width of the ebb. Considering that the fastening is carried out at an angle (about 15 degrees), you need to apply a ruler from the wall to the edge of the plinth. Mark the application point with a marker. The width is calculated taking into account 2-3 cm of overhang.
- If the ebb shelf width is up to 7 cm, it can be mounted without a backing. If the width is greater, then the ebb should rest on some kind of base (for rigidity). This is done by installing a lath along the edge of the base or longitudinal bars, applying cement mortar or polyurethane foam.
- Along the height of the marked point, a line is drawn along the entire perimeter using an even strip (rule) or beaten with a cord.
- Installation is carried out first from one corner of the building, then the second, then a straight section, then the third corner, etc.
- The connection at the corner is made from two ebbs, cut at 45 degrees, and the edge of the second ebb is cut with an allowance of 1.5 cm for fastening with rivets. Straight sections are overlapped with a margin of 3 cm.
- Sealant is applied to the upper shelf of the ebb, and the ebb is screwed to the wall with self-tapping screws, preferably roofing screws with a rubber gasket.
- If you choose the option of making ebbs with your own hands, then the upper shelf does not bend, and the ebb is inserted into a groove cut into the wall using a hand-held circular saw. Fastening is carried out to a rail mounted on the plinth.
The groove made must be treated with an antiseptic.
Watch the low tide installation video:
Having protected the outer part of the foundation from moisture, it is nevertheless necessary to periodically inspect the lower part of the wall, the base and the fastening of ebbs for timely detection of leaks or other violations of the integrity of the structure.
Step-by-step installation process for drip tides
- Having decided on the material for the ebb, you can begin measuring and calculating its quantity. To do this, measure the entire perimeter of the house and add 10% to the resulting figure, this is necessary in order to take into account the cost of material for the design of corner and longitudinal connections;
- Whatever material you choose, the width of the ebb should be sufficient to prevent water falling at an angle from the wind from hitting the lower crown of the wooden house. The width should completely cover the protrusion of the foundation and be no less than 10-15 cm.
Important to consider! The edge of the low tide should not extend more than 5 cm from the extreme point of the foundation protrusion.
- If the ebb is made of galvanized metal, aluminum or plastic, care should be taken to place a lining underneath it, otherwise with a slight impact it can suffer significant mechanical damage. But if the ebb protrudes more than 10 cm, then even under the copper or wooden ebb a lining must be made. The most widely used cement base under low tide. To do this, using a trowel, a tubercle is made on the foundation from a solution of cement and sand, which is slightly lower than the fastening line; it provides a minimum slope;
- Using the rule, a horizontal line is drawn along the entire perimeter of the house; it will coordinate the fastening of the ebb at the required level;
- Installation of ebbs begins from the corners of the house, they are sawed at an angle of 450, and one of the corners is made 1.5-2 cm longer, this will be the place for fastening with rivets.
- The corners are fixed to each other using aluminum rivets; for this, holes are drilled in the galvanization, at least two per corner and fastened with a rivet gun.
- The ebb tides are attached to the wall of the house with self-tapping screws; it is recommended to use at least three per meter;
- Once all the corners are equipped, you can proceed to fixing the ebb tides in straight sections.
What foundation did you choose?
- Tape 48%, 519 votes
519 votes 48%519 votes – 48% of all votes
- Slab 27%, 289 votes
289 votes 27%
289 votes – 27% of all votes
- Pile 15%, 159 votes
159 votes 15%
159 votes – 15% of all votes
- Column 6%, 67 votes
67 votes 6%
67 votes – 6% of all votes
- Undecided 3%, 37 votes
37 votes 3%
37 votes – 3% of all votes
Total votes: 1071
11.02.2020
×
You or from your IP have already voted.