A circular hand saw is a convenient and functional tool for cutting wood blanks. With its help you can cut sheets of plywood, saw boards, trim timber, baseboards, trim, etc.
d. But when there is a large volume of work, for example, when building a house, it is more convenient to use a stationary version of the device. How to make a circular saw with your own hands from a hand tool?
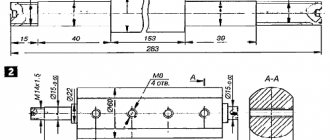
Diagram of a homemade circular saw.
Construction and materials for a stationary saw
A homemade DIY circular saw can be made by securing a hand tool to a stable base. In the simplest version, the device is installed on wooden trestles or on a table mounted from plywood and boards. The tool is secured to the bottom of the plywood sheet, and a cut is made in the tabletop for the toothed disk.
The design parameters of the machine depend on the size of the material being processed. In accordance with it, the power of the hand tool is selected (800-1200 W or more). To perform a clean cut, it is better to install a model with a rotation speed of 3000-4000 rpm.
To manufacture the machine, you will need wood materials, fasteners and tools:
Tools for making a homemade circular saw.
- plywood with a thickness of 20 mm; board for stiffeners and legs (50×100 mm); sandpaper, wood glue and varnish; bolts, screws, clamps; tape measure, pencil, ruler; jigsaw, drill, screwdriver.
The height of the table is selected according to the height of the master and is usually about 1 m; the length of the tabletop depends on the size of the materials that are planned to be processed.
Advantages
When a tool (and even more so a machine) is produced independently, its design, as a rule, takes into account as much as possible the needs and tasks that are supposed to be solved with its help:
- so that the molded parts do not have burrs and creases when cutting, it is necessary that the circular saw has an adjustable speed of movement relative to the plane being cut (so that the burrs are removed by the cutting edges of the saw teeth);
- Suppose you need to make not the usual transverse trimming of molded products, but at a certain angle. In this case, it is necessary that the workpiece be fixed to avoid play during cutting;
It is extremely difficult to find a cross-cutting machine for sale that has the function of not only rotating the worktable, but also the option of pressing the workpiece. And if you manage to find such a tool, it will not be cheap.
- and, of course, the price. A cross-cutting machine can be assembled literally from scrap materials, moreover, from parts that cannot be used anywhere else. Cost-effectiveness – why not a decisive advantage?
Making a countertop
The working surface is cut out of plywood using a jigsaw according to the accepted dimensions. The workpiece is processed with sandpaper or a sander. The edges of the table top are milled.
On the bottom side of the sheet, markings are made for attaching a hand saw. A sector is outlined for the hole for the disk.
If you plan to cut workpieces at different angles, the slot should have a trapezoidal contour with a downward expansion. The groove is cut with a hand-held circular saw; holes ø10 mm are first drilled at the ends of the intended sector. Holes must also be made in the tool frame and tabletop for bolt-on mounting.
Next, the stiffening frame is marked for the horizontal surface of the table. The edges along the perimeter should deviate from the edge of the tabletop by 5-10 cm. The boards cut to size are applied end-to-end to the markings on the bottom surface of the sheet, and their contours are outlined with a pencil.
Tabletop diagram for a circular saw.
A center line is drawn in the middle of the marked outline of the frame.
It marks places for screws for attaching the ribs. Through holes are drilled for fasteners with a chamfer on top to recess the caps. Self-tapping screws should be screwed in every 10-20 cm, from the corners of the frame - at a distance of 5 cm.
The boards are placed on wood glue along the intended perimeter and clamped with clamps.
After the glue has dried, without removing the clamping devices, screw in the self-tapping screws and screw the heads into the countersunk hole. In the corners, 2 self-tapping screws are screwed into the end of the frame. Then you need to attach stable legs to the finished tabletop.
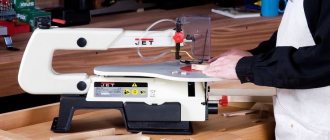
Miniature Dremel saw
What you need to prepare for work:
Figure 1. It is better to print templates on cardboard or thick Whatman paper.
- Dremel. A tool model 4000-5/36H or any other will do. Together with it, the kit usually includes 5 devices and 36 different accessories. The kit costs about $100.
- Board 2.5x20x120 cm.
- Board 2.5x5x120 cm.
- Plexiglas 20x25 cm, thickness 2 mm – 2 pieces.
- Clamp for fastening a pipe with a diameter of 2 cm – 4 pieces.
- 1/4″ bolts – 2 pieces.
- Wing nuts 1/4″ – 4 pieces.
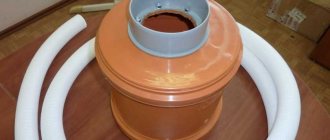
- Insulation for pipes with a diameter of 2 cm - 1.8 m.
- Screws 6x25 mm – 20 pieces.
- Screws 4x16 mm – 12 pieces.
- Drills with a diameter from 2 to 6 mm.
- Screwdriver.
- Knife.
- Wood glue.
Work order:
- From a board 2.5x20x120 cm you need to cut 2 pieces 25 cm long and 2 pieces 10 cm long.
- From a board 2.5x5x120 cm, 4 pieces of 14 cm in length are sawn off.
- Using a template pre-cut from thick paper or cardboard, markings are made on a 2.5x20x25 cm board (Fig. 1). The template is cut according to a specific Dremel model.
- The board is sawn and drilled along the marking lines. The edges of the cutouts are machined so that the tool fits into the cutouts.
- All parts are fastened to each other with screws.
- The Dremel is inserted into place and secured with clamps. If necessary, some modification of the grooves and recesses is carried out.
- The covering on the working surface is made of plexiglass.
Assembling a table for a circular saw
The boards prepared for the legs are cut to length at a slight angle, tapering downward.
The upper ends are also beveled so that the structure stands with a slight expansion. The legs are attached to the tabletop frame with bolts through drilled holes. For better connection strength, you can include square bars glued into the inner corners of the frame into the screed.
It remains to install the working mechanism in the circular saw. The hand-held circular saw is mounted to the machine tabletop from below. The disk is inserted into the cut-out slot, the device is secured with screws, the heads of which must be flush with the top of the plywood sheet.
As a protective layer for the material and to improve the sliding of workpieces, the tabletop and other wooden parts of the machine are coated with several layers of varnish. Markings can be applied to the surface of the tabletop to trim the ends of the baseboards or trim, which are prepared for miter jointing.
Assembly diagram for a table for a circular saw.
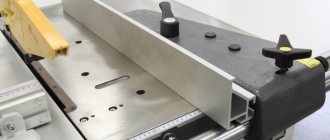
In another embodiment, the working plane of the machine is made of two metal plates.
They are attached to the frame with bolts leaving a gap for the disc. The holes for the bolts are countersunk from above to deepen the heads. The bar for controlling the size of the material being cut can be attached with clamps.
A more convenient stop for the part to be cut is made of a steel angle with shelves of 60 and 80 mm. Its length should be greater than the length of the table.
The ends of the narrow shelf are cut off, and the wide one is bent onto the tabletop. Holes are drilled in the ears and threads are cut for the clamping bolts. The guide strip from the corner is installed according to the workpiece template and fixed with bolts to the end of the tabletop.
If you constantly use the machine, it is better to make the table from steel corners by welding.
The power button can be mounted on the tabletop frame or mounted on the workshop wall using an extended cable to connect the machine. The power key on the saw body can be bypassed or simply secured with a clamp. Access to the machine shutdown device must be safe.
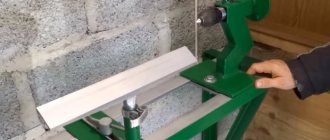
To cut small parts, you can make a mini-machine without a work table.
An old drill can serve as an electric drive for the sawing mechanism. A special shaft for insertion into the drill chuck will have to be ordered from a turner. The toothed disk and 2 bearings must fit firmly onto it.
The frame for installing the shaft is made of two parallel sections of hardwood boards with holes for pressing bearings. The working surface can be made of hardboard or plexiglass. The drill and frame of the device are attached to a board 30-40 mm thick.
The tool, mounted with the handle up, must be securely fastened with a clamp to the base in the cylindrical part of the body near the chuck. The board that serves as the base of the mini-circular is pulled to a regular table with clamps. The body of the inverted drill and the base plate should be at the same level.
The guide bar for a mini-circular saw can be made from a 50x50 mm block.
At one end of it, a stop cut from a board is rigidly fixed. It should be adjacent to the end of the work surface. A threaded pin is attached to the other end of the guide bar.
A second thrust element (bar) is put on it through a hole drilled in it. The stops are tightened by tightening the wing nut on the stud. The guide stop is installed at the required distance from the disk and secured like a clamp.
A homemade mini circular saw allows you to saw off parts of fairly small thickness.
At your discretion, you can improve a homemade circular saw in a simple design by installing additional elements and using other materials. The functionality of the machine can be improved by equipping it with a carriage for feeding material, changing the fastening of the working mechanism, and installing other additional devices for controlling the saw.
A circular hand saw is a convenient and functional tool for cutting wood blanks. With its help you can cut sheets of plywood, saw boards, trim timber, baseboards, trim, etc.
d. But when there is a large volume of work, for example, when building a house, it is more convenient to use a stationary version of the device. How to make a circular saw with your own hands from a hand tool?
Diagram of a homemade circular saw.
Options for making a woodworking machine
Today, there are a large number of ways to make a stationary circular saw. Angle grinders, hand drills, screwdrivers, and many other tools are used as drives for them.
The most common drive options are:
- drive from a hand-held circular saw;
- machine with a motor from a washing machine.
How to make a stationary sawing machine - step by step guide
When manufacturing, you will need a small amount of material and hand tools, which, as a rule, are in everyday use of every owner. This includes:
- wooden blocks;
- OSB or plywood sheet;
- fastening hardware;
- drill with a set of drills;
- hand-held circular saw.
A sheet of plywood or OSB with a thickness of at least 20 mm and dimensions of 1100 x 880 mm will be used as a desktop. To make a stationary machine for cutting wood, you must perform the following steps:
- Place the hand-held circular saw in the intended installation location and trace the outline. After this, make a recess of about 12 mm.
- Drill holes along the contour of the recess for the M8 mounting bolts and use them to fix the hand-held circular saw on the back base of the table.
- Install a socket next to the saw and connect the saw to it, make a groove in which the saw blade will be located.
- Make a frame for the perimeter of the table and legs of the required length from a wooden block. Install a folding box at the place where the saw is attached, constructing it from thin plywood. Install a power button at the end of the table, having previously connected it to a socket.
- Make a hole in one of the corners of the box to connect a vacuum cleaner. To fix the hose, you can use a plastic fitting with a diameter of 50 mm.
- The box is fixed to the table using metal corners and screws.
- Then, across the table it is necessary to cut 2 longitudinal grooves to install a 150x100x10 mm channel. Since the work table will be covered with 4 mm thick PVC sheets, the depth of the grooves under the channel should be 6 mm.
- After this, you can begin making pushers. Hardwood slats are used as guides. The pusher frame can be made of laminated chipboard with a thickness of 16 mm.
After watching the video, you can familiarize yourself with detailed step-by-step instructions for making a stationary circular saw from a hand-held circular saw.
Homemade cutting machine driven by a washing machine
Another common option is to use an asynchronous motor from a washing machine as a saw blade drive. For domestic use, a low-power electric motor is suitable, for example the engine from an old Malyutka washing machine or any modern automatic machine.
Sawing machine from a drill at home
You can also make a good circular saw using a hand drill. The costs for materials are minimal, and almost everyone in the house has a drill. You will find more details about all the nuances and a step-by-step algorithm for making it yourself in our article on how to make a circular saw from a drill.
Construction and materials for a stationary saw
A homemade DIY circular saw can be made by securing a hand tool to a stable base. In the simplest version, the device is installed on wooden trestles or on a table mounted from plywood and boards. The tool is secured to the bottom of the plywood sheet, and a cut is made in the tabletop for the toothed disk.
The design parameters of the machine depend on the size of the material being processed. In accordance with it, the power of the hand tool is selected (800-1200 W or more). To perform a clean cut, it is better to install a model with a rotation speed of 3000-4000 rpm.
To manufacture the machine, you will need wood materials, fasteners and tools:
Tools for making a homemade circular saw.
- plywood with a thickness of 20 mm; board for stiffeners and legs (50×100 mm); sandpaper, wood glue and varnish; bolts, screws, clamps; tape measure, pencil, ruler; jigsaw, drill, screwdriver.
The height of the table is selected according to the height of the master and is usually about 1 m; the length of the tabletop depends on the size of the materials that are planned to be processed.
About safety precautions
Woodworking machines are equipment that creates increased danger. There is no place in a popular article to present the contents of volumes of technical specifications and technical specifications on them, and the home master is responsible for himself. Therefore, we will briefly show “from the opposite”: what a circular machine should not be like in order for work on it to be possible without injury or injury. An example of a “work” that violates all the essential rules for a more or less safe design of sawing and jointing machines is shown in Fig. (the electrical part is a separate topic).
An example of an incorrect and dangerous design of a circular sawing and jointing machine
Explanations for it:
- A – saw blade without protective cover. This is a common disease of almost all homemade circulars. Like, keep your fingers away from the saw, use the workpiece pusher, and everything is OK. So, for your information, now on the Internet you can easily come across a saw blade made using powder metallurgy methods. Having stumbled upon a carnation, it very readily shatters into small sharp fragments.
- B – the protrusion of the disk is clearly more than 1/3 of the diameter. “Snacks” of the workpiece twitching in the hands, shaggy stepwise cuts are inevitable. Injuries at work are more than likely.
- B – the power transmission is also not covered with a casing.
- G, D – table made of dissimilar low-quality materials. Transverse distortion of the workpiece and “bogging down” of the saw with all sorts of bad consequences are also quite likely.
Making a countertop
The working surface is cut out of plywood using a jigsaw according to the accepted dimensions. The workpiece is processed with sandpaper or a sander. The edges of the table top are milled.
On the bottom side of the sheet, markings are made for attaching a hand saw. A sector is outlined for the hole for the disk.
If you plan to cut workpieces at different angles, the slot should have a trapezoidal contour with a downward expansion. The groove is cut with a hand-held circular saw; holes ø10 mm are first drilled at the ends of the intended sector. Holes must also be made in the tool frame and tabletop for bolt-on mounting.
Next, the stiffening frame is marked for the horizontal surface of the table. The edges along the perimeter should deviate from the edge of the tabletop by 5-10 cm. The boards cut to size are applied end-to-end to the markings on the bottom surface of the sheet, and their contours are outlined with a pencil.
Tabletop diagram for a circular saw.
A center line is drawn in the middle of the marked outline of the frame.
It marks places for screws for attaching the ribs. Through holes are drilled for fasteners with a chamfer on top to recess the caps. Self-tapping screws should be screwed in every 10-20 cm, from the corners of the frame - at a distance of 5 cm.
The boards are placed on wood glue along the intended perimeter and clamped with clamps.
After the glue has dried, without removing the clamping devices, screw in the self-tapping screws and screw the heads into the countersunk hole. In the corners, 2 self-tapping screws are screwed into the end of the frame. Then you need to attach stable legs to the finished tabletop.
Now the guides
There is no point in specifically describing the limit bar. The design is clear from the photographs. To prevent the bar from moving after adjustment, two side screws are used. The front guide (slider) has a rather complex design. This is due to the fact that it has been redone and refined many times. If I did it again, I would do it differently. In addition to the usual requirements - rotation at an arbitrary angle with position fixation, easy movement, there were also special requirements. I wanted it to be non-removable, and at the same time not to interfere when there is no need for it. As a result, it is made reclining. The slider itself moves along a guide and with the help of a bearing along the surface of the table. The bearing was not chosen immediately. From the beginning there were experiments with plates from wood to fluoroplastic. But all this created scratches on the aluminum table. If you make a table out of steel, then there will be no such problem. Thus, the slider moves along the guide. It can be folded back by rotating around this guide. To do this, pull the spring-loaded handle. She pulls back the plastic cracker preventing the slider from reclining spontaneously. Clamps were made as additional bells and whistles. They will, of course, not be secured with clamps. But, so far, we haven’t gotten around to fastening it. So that the circular saw could be stored in a closet without any damage to it, a plywood casing was made. In this case, it can be safely removed.
Assembling a table for a circular saw
The boards prepared for the legs are cut to length at a slight angle, tapering downward.
The upper ends are also beveled so that the structure stands with a slight expansion. The legs are attached to the tabletop frame with bolts through drilled holes. For better connection strength, you can include square bars glued into the inner corners of the frame into the screed.
It remains to install the working mechanism in the circular saw. The hand-held circular saw is mounted to the machine tabletop from below. The disk is inserted into the cut-out slot, the device is secured with screws, the heads of which must be flush with the top of the plywood sheet.
As a protective layer for the material and to improve the sliding of workpieces, the tabletop and other wooden parts of the machine are coated with several layers of varnish. Markings can be applied to the surface of the tabletop to trim the ends of the baseboards or trim, which are prepared for miter jointing.
Assembly diagram for a table for a circular saw.
In another embodiment, the working plane of the machine is made of two metal plates.
They are attached to the frame with bolts leaving a gap for the disc. The holes for the bolts are countersunk from above to deepen the heads. The bar for controlling the size of the material being cut can be attached with clamps.
A more convenient stop for the part to be cut is made of a steel angle with shelves of 60 and 80 mm. Its length should be greater than the length of the table.
The ends of the narrow shelf are cut off, and the wide one is bent onto the tabletop. Holes are drilled in the ears and threads are cut for the clamping bolts. The guide strip from the corner is installed according to the workpiece template and fixed with bolts to the end of the tabletop.
If you constantly use the machine, it is better to make the table from steel corners by welding.
The power button can be mounted on the tabletop frame or mounted on the workshop wall using an extended cable to connect the machine. The power key on the saw body can be bypassed or simply secured with a clamp. Access to the machine shutdown device must be safe.
Machine with pendulum engine suspension
Those who can boast of the ability to work with metal can be advised to make a circular saw with a pendulum engine suspension. The main feature of the device is that the motor, shaft and cutting disc are installed in one common frame. On one side it is hinged to the frame, the second is held in place by a screw with the ability to adjust the height. By changing the length of the screw, you can adjust the height of the disk exiting the tabletop.
This system allows you to adjust the cutting height, as well as use discs of different diameters. If, instead of an adjusting screw, you use a probe placed on the tabletop, you can get a simple copying machine. The feeler gauge will allow you to adjust the cutting depth according to a certain pattern. This fairly simple modification will turn a simple circular saw into a real woodworking machine. With this device you can not only cut the board into the necessary pieces, but also make precise cuts and make various selections.
DIY mini circular saw
To cut small parts, you can make a mini-machine without a work table.
An old drill can serve as an electric drive for the sawing mechanism. A special shaft for insertion into the drill chuck will have to be ordered from a turner. The toothed disk and 2 bearings must fit firmly onto it.
The frame for installing the shaft is made of two parallel sections of hardwood boards with holes for pressing bearings. The working surface can be made of hardboard or plexiglass. The drill and frame of the device are attached to a board 30-40 mm thick.
The tool, mounted with the handle up, must be securely fastened with a clamp to the base in the cylindrical part of the body near the chuck. The board that serves as the base of the mini-circular is pulled to a regular table with clamps. The body of the inverted drill and the base plate should be at the same level.
The guide bar for a mini-circular saw can be made from a 50x50 mm block.
At one end of it, a stop cut from a board is rigidly fixed. It should be adjacent to the end of the work surface. A threaded pin is attached to the other end of the guide bar.
A second thrust element (bar) is put on it through a hole drilled in it. The stops are tightened by tightening the wing nut on the stud. The guide stop is installed at the required distance from the disk and secured like a clamp.
A homemade mini circular saw allows you to saw off parts of fairly small thickness.
At your discretion, you can improve a homemade circular saw in a simple design by installing additional elements and using other materials. The functionality of the machine can be improved by equipping it with a carriage for feeding material, changing the fastening of the working mechanism, and installing other additional devices for controlling the saw.
The presence in the household of the necessary minimum tools for simple work fully justifies the need to have a small box with the simplest tools in everyday use.
But when the need arises to carry out simple repairs or realize a long-standing dream of a small hobby, then the need arises to purchase or independently manufacture a simple but very necessary carpentry tool - a stationary circular saw.
The practical use of this kind of tools varies from one craftsman to another, but one thing everyone agrees on is that such a machine is simply necessary in a household tool park.
In practical terms, a stationary circular saw is needed:
- for longitudinal dissection of wood; for trimming the edges of unedged boards to obtain smooth sides; for obtaining planks, slats, boards of the same size; for removing part of a board (quarter) to create a tight connection of boards in a panel. In purely economic terms, a circular saw is simply necessary for cutting firewood from wood processing waste.
At the same time, if you approach the issue of machine equipment creatively and put in a little more effort, the result can be a machine with a whole set of universal functions:
- sawing; grinding; planing; drilling; tool sharpening.
Original devices
The list of homemade products can be continued endlessly, but we’d rather talk in more detail about some homemade machines that can be made from any model of drill.
Drill
A drill made from a drill is not a fantasy, but a real and fairly universal machine, assembled independently. The main thing is that you need to order from Chinese engineers (if you couldn’t find it in your city) a flexible shaft from a standard medical unit. As a result, a drill appears in your arsenal, which can be used for engraving work or drill holes using special burs in small parts or structures that cannot be reached with a standard drill.
Lathe
A woodworking or lathe for home can easily be made using a drill. The tool must be secured with special clamps quite firmly, and a specially designed holder with several sharp pins must be inserted into the chuck to keep the workpiece from turning. The center of the rear holder (headstock) and the clamp at the front of a homemade lathe should be located on the same axis. Precision is necessary to prevent runout as the workpiece rotates. After installing the part, the tailstock is firmly fixed with a special clamp.
The third element of the machine is a tool rest in the form of a wooden block on which a chisel or other tool for processing the workpiece will rest.
A lathe for processing wooden workpieces will work properly if the drill has a built-in electronic speed controller. Using the trial method, you establish the optimal rotation mode for effective wood processing. Using such a woodworking device, you can make unique products for household needs: for example, a rolling pin or pestle with a mortar, a candlestick or a prefabricated candelabra.
Winch
An original winch based on an old but powerful drill will become an indispensable assistant in the household, especially for those users who live in their own home and have a personal plot. A simple situation: you decided to install a larger container in your summer shower, but raising it to such a height alone is problematic. Using a winch, this can be done in a few minutes. You just need to first calculate the weight of the container and the spindle speed.
According to garage craftsmen, a homemade winch can easily lift the engine from a passenger car. Watch the video if you don't take my word for it:
Experts advise using a homemade device, setting the drill at the lowest speed. This design can move objects with different masses, because craftsmen even make winches based on an ordinary car starter.
How can you make a circular?
As with reinventing the wheel, there is no definite answer; each individual case has its own path of search and discovery.
But, basically, when asked how to make a circular saw, craftsmen make attempts in several directions:
- improvement of existing hand tools, adapting them as main parts - an electric motor and a circular saw; improvement of an industrially manufactured tool for the specific application; assembly of a machine from individual elements - shaft, motor, bed; independent production of all parts of the structure, well, except for the electric motor .
Design features of a circular machine
Circulars of any fixed type consist of main parts.
Table for connecting mechanisms. An assembly combined with higher power engines is preferable to a table made entirely of metal. The surface of the table must be made level with your own hands, for a higher quality product at the end. The engine in most cases is used from what is in stock. Electric motors designed for long-term operation from the network will be preferable to commutator drives. The shaft is the most critical component of the circular. Finished products are used most often; in other cases, the assembly is made on a lathe
It is important to calculate the mounting holes and eliminate runout.
When making a machine with your own hands, you should pay special attention to safety. The main surface of the saw blade should be covered with a protective cover
The moving parts of the drive and motors must be covered. The emergency stop button is built into the electric drive circuit and has a convenient location.
Manual circular design
The simplest and relatively inexpensive way to make a stationary machine for cutting wood using a circular saw is to convert a manual mounting circular saw into a stationary one. The essence of the modification is to create a standard model of a stationary bed and work table for an industrially manufactured sample.
This modification will allow you to attach the saw upwards with the tool frame, secure it to the work table, and thus use it as a small circular saw. The guide for cutting planks is made from a steel angle 25x25 mm, it is attached to the work table.
The frame itself is welded from 25x25 mm corners, taking into account that the largest standard size of a circular saw is 230 mm, then such a frame is sufficient to create a lightweight, portable but stationary saw, the main use of which is small work that does not require long-term electric motor voltage.
This use case is implemented in some models of domestic and foreign manufacturers of power tools, in which any hard surface is used as the base of the machine, and the mounting saw itself is attached to the base using clamps.
Design requirements
The duration and safety of working with homemade equipment depends on the types of loads, operating modes and strength of the unit. Knowledge of the features of woodworking devices will make it possible to produce a mechanism that is reliable, but simple and durable.
High disk speeds. Without this condition, high-quality cutting of wood is impossible, but for the master it is more important to guarantee the safety of a homemade circular saw, so the protective devices that are usually equipped with purchased models are a role model
If the future author believes that it is quite possible to do without some of them, then this opinion is erroneous, since one careless movement often leads to injury. Strength of absolutely all components. Not only the ability to withstand large static loads is important, since the table may begin to vibrate due to multidirectional dynamic influences
They are not dangerous for the master, but they affect the quality of the cut: marks from the teeth remain on the surface of the lumber, and difficulties arise in maintaining linear dimensions. Fire safety is the main requirement when working with wood, so compliance with the rules when installing all electrical appliances is a must.
Tabletop small circular
This option involves making the machine body from wood or an iron angle or profile pipe, taking into account the fact that the placement of the tool will be in a desktop version.
Since the base will be small, the use of such a tool opens up new possibilities. Such a woodworking machine allows you to carry out work in any convenient place. The principle of creating such a machine is similar to how a hand-held circular saw is created - a body, a top plate, a device for fixing a mounting saw or an angle grinder, in the case of using an angle grinder as an engine, are made for the base. Separately, To maintain maximum safety, you need to provide a button to turn the power supply on and off for the tool, and a mechanism for locking the power buttons on the saw or grinder itself. For ease of operation, it is recommended to make the guide bar with guides for fixing the stop into the base body, thereby increasing the reliability of fastening. For clamping here, it is recommended to use bolts with wing nuts, thus further creating ease of operation.
What discs should you use for circular saws?
The productivity and quality of work largely depends on the correctly selected disk for a hand-made circular saw made from an angle grinder, a hand saw, or one assembled from separate mechanisms. It should be remembered that there are differences between discs for wood and metal. Even if thin, soft aluminum will be sawed, the appropriate blade must be installed. Metal cutting wheels have finer teeth. There are universal disc options that are suitable for working with both wood and metal.
There are also differences between the discs intended for longitudinal and transverse sawing of wood. Longitudinal sawing is carried out with a cutting attachment with sparse large teeth. But cross-cutting will be of better quality if discs with fine, frequent teeth are used.
As for the material and method of manufacturing disks, they can be monolithic or carbide. Monolithic ones are made from a single piece of high-carbon steel. Such bits are inexpensive, but have a significant drawback: they quickly become dull and require sharpening and re-wiring.
Circular discs can be made for wood or metal.
Carbide discs are made of tool steel with cobalt and tungsten brazing. They are more wear-resistant, but the price of such products is much higher.
The outer diameter of the disks for a homemade circular saw is limited by the dimensions of the protective casing. The standard disc thickness is 3.2 mm. There are thinner and thicker saw wheels. Thin ones are used when working with wood of valuable tree species to make a clean cut. For rougher work, thick discs are recommended.
Making the stop and preparing the necessary holes
For a stationary saw intended for longer operating hours, the presence of a reliable stop for fixing the thickness of standard opening boards is an important and necessary condition.
The emphasis itself is made of metal or using a metal base and individual wooden parts.
The most acceptable option is to create a stop from a 100x100 mm corner, with metal plates of at least 5 mm thick welded to it with slots along the length. The length of the stop must be no less than the length of the working plate of the circular saw. The length of the plates must correspond to the width of the working surface of the stove.
Holes are drilled in the body through the work plate:
- on the edge through the machine frame; in the middle of the work plate.
The holes should form a regular rectangle with the vertices in the center of the holes.
The holes are necessary so that on the inside of the machine in these places, on strips reinforced with a strip of metal 5-6 mm thick, nuts are welded to fix the clamping bolts of the stop.
When making a stop and drilling holes, you need to take into account that the stop must be parallel to the plane of the saw.
How to make a permanent stationary circular?
Now let's move on to the simplest part. This possession does not develop in one day, but collecting it is not so easy, and it also requires a large number of elements and parts. With such a stationary workbench, you can cut everything easily: both thin and thick timber. In principle, if you are not a master of wood design, then the tabletop option will be enough for you. If robots are moving frequently and with high intensity, you may want to think about assembling a stationary saw.
Regardless of whether a tabletop or stationary circular saw is made, the table is covered with a thin ball of steel or galvanized steel, which is necessary to increase the value. In addition, without a special coating, after about an hour a small hole will appear in the center of the table, and you will no longer be able to make a deep, straight cut. Let's take a look at how to develop and select the main nodes and what is special about the installation.
Making the adjustment rod handle
Adjustment of the cutting depth or the height of the saw exit above the working plate is adjusted on the frame in two ways:
- creating a lifting mechanism for the working plate; creating an adjusting mechanism for raising and lowering the axis of the circular saw and the motor with a belt drive.
The plate lifting mechanism can be constructed by fixing the metal plate to the machine frame using long bolts. Lifting will be carried out by tightening the locking and fixing nuts on each bolt.
The second type of lifting mechanism can be represented as:
- guides along which the carriage with the shaft and motor moves; an adjusting rod with fixing nuts; handles with an applied adjustment scale.
The adjustment rod itself can be replaced with a standard metal threaded stud. This option is even more profitable than inventing new methods.
The adjustment handle can be made by welding a metal plate to the end of the stud. At a distance of 4-5 mm from the center of the plate, aligned with the center of the stud, holes are drilled for self-tapping screws.
For ease of operation, a rod is welded to the end of the plate in such a way that the entire structure can be rotated using it.
As a scale, you can use a round washer made of multilayer plywood or plastic - it is put on a pin and fixed, on the one hand, with self-tapping screws, on the other hand, it is pressed with a nut.
Having assembled the entire lifting mechanism, a scale corresponding to a certain lifting height of the working plate is applied experimentally to the plywood.
Pros and cons of a homemade sawing machine
Advantages
The ability to make a unique machine of the required power and size to suit your needs.
The cost of assembly can be minimal if all or part of the original components are available.
In any case, homemade frames, as a rule, are durable and massive in comparison with modern flimsy Chinese machines from stores.
A powerful homemade circular saw is capable of performing rough and heavy work that only industrial equipment can do, and which household machines cannot withstand. Industrial circulars cost tens and even hundreds of thousands of rubles. The homemade option is many times cheaper.
Flaws
Modern factory-made stationary circulars for the home, despite their fragility and relatively high price, have a number of advantages. As a rule, they are all equipped with various degrees of adjustment or some of them.
- planing depth;
- tilting the disk at an angle;
- speed adjustment;
- gear transmission with a significant increase in saw blade speed;
- well-thought-out protection systems.
Performing all these options entirely on homemade machines is difficult, difficult and expensive. Therefore, for small precision carpentry work and furniture production, factory machines with a full range of functions are better suited. The homemade version is well suited for rough work with large-sized wood and primary processing.
Making a benchtop tool
For comfortable work with machines, it is necessary to provide, in addition to the elements already mentioned, other tools and devices necessary for normal operation:
- on the working plate, for convenience, it is recommended to apply a centimeter jackal, “0” of which corresponds to the side of the saw blade; to protect against accidental chips and splinters, it is recommended to install a protective screen made of transparent plastic above the disk; to facilitate cutting, when additional force is needed to press the board, it is recommended to consider installation of a pressure roller or wooden pressure plates; to facilitate the work and prevent the board from falling back, it is necessary to install thrust plates.
boat motor
The saw set is removed from the chain saw engine and the drive sprocket is removed. The clutch is remade by grinding out a smaller cup and replacing the tension spring, which makes it possible to reduce the mass of the unit and reduce the adhesion force. The motor shaft and gearbox are connected through a coupling.
For installation use a channel:
- in the top shelf the necessary holes are made for mounting the engine with the gearbox;
- The lower shelf is equipped with a hole, a tube is welded into it coaxially with the output shaft of the gearbox.
A shaft is passed through the tube, which transmits rotation to the propeller, and is connected to the output shaft of the gearbox. A fastening and rotating unit is attached to it, which is used to install the motor on the transom of the boat, raising and lowering the propeller into the water.
A gearbox is installed at the lower end of the tube, which receives rotation from the vertical shaft and transmits it to the horizontal one. A propeller is installed on the latter, which will move the boat.
Required tools and materials
To correctly and reliably connect parts and create a rigid structure capable of withstanding heavy loads, you will need:
- tools: grinder with cutting wheels; welding machine; hammer; drill with a set of drills; marking tools - tape measure, meter, square, scriber, core; consumables - electrodes, metal brushes; clamps, vice materials: metal corners or profile pipe; metal sheet for the work plate; bolts, washers, nuts, studs; metal strip; hardwood boards;