Articles
All photos from the article
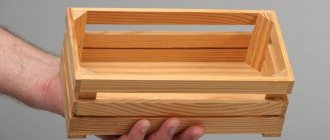
After renovating an apartment, a lot of scraps of various materials remain, such as wood, sheet fragments, metal corners, pipes, etc. From almost any material you can make a useful homemade product that will be beautiful and functional.
Today we are interested in a photo frame, and not a prefabricated one made from scraps of wooden baguette, but a monolithic one made from sheet material. Our instructions will tell you how to make a photo frame from plywood with your own hands.
Classic frame.
Frames for photos and paintings from standard lining
The cost of one 40x50 linden frame is 38-42 rubles (depending on the cost of packaging the lining). Pine will cost half the price, but there will be a lot of unpresentable knots. It took one pack of lining to produce 20 frames. One board makes 2 frames, and a standard pack contains 10 boards 2 meters long. Dimensions 40x50 - “internal” correspond to the size of the painting. The external dimensions of the frame are larger, so the trimmings were minimal, solely due to cutting the corners. Cut the boards in cross section as follows:
The actual production of the frames took about 2 hours of work: Trimming the blanks.
Gluing the frames with standard PVA wood glue (fixing the corners with a stapler on the reverse side). Two days - drying, then another hour was spent tinting the frames with a glazing compound for wood, and that's all... The frames turned out quite good, they look a little brutal, but for oil work, as an option, they are quite suitable... Summer discounts up to 50% - Electronics for homemade products in a Chinese store.
Frame for 2 photos
If you need to place 2 photos side by side, you can make a corresponding photo frame. The technology is no different from single assembly; it is enough to take into account the dimensions and make two compartments instead of one. For example, size A4 fits 2 A5 photos 15*20 cm.
Starting work on a frame with two photographs, make a drawing
You can do the same thing when you need to make a photo frame for 3 photos. The shape can be any, and the dimensions depend on the size of the photographs. For example, in A4 you can place 1 A5 photo and 2 A6 photos - 10-15 cm.
The basis of a photo frame for three photos
Wooden half frame
DIY wooden frames
Another option for making a photo frame using wood. Such a product can fit into more modern designs, and its manufacture does not require special skills. It is enough to follow all the rules and recommendations.
Tools and materials
To create a half frame, prepare the following:
- photo in the size you choose;
- two light wooden strips;
- a piece of fabric;
- natural rope;
- special eye screws large enough to pull the rope through;
- some polymer clay;
- stapler;
- universal glue;
- scissors;
- pencil and knife.
Glue gun
Making a wooden half frame
Instructions
Step 1. Set the recommended temperature to preheat the oven to make polymer clay. Then, using a knife, cut the clay into two even pieces. Roll them in your palms to form smooth balls. Use a pencil to make a hole. The diameter of the hole should be slightly larger than the thickness of the rope. Place the finished clay on a baking sheet and bake for a few minutes until the material hardens.
A hole is made in the ball
Step 2: While the clay is baking, use a cloth to rub the varnish or stain into the wood, giving it a deeper tint. Don't forget to add old sheets of paper to avoid damaging your home surface. Leave the wood until completely dry.
The wood is given a deeper shade
Step 3. Take one of the wooden strips and, measuring about 3 cm from both ends, make marks with a pencil.
A wooden strip is marked
Step 4: Screw both eye screws into these points until they are tight.
The eye screws are tightened
Step 5: Place the top of the photo or painting face down on the top strip of wood (with screws). This will be the back of the picture. Carefully align the paper so that it is centered and straight. Then secure the canvas with a stapler and glue.
The paper is neatly aligned
Step 6: Place both clay balls onto the rope and thread the end of the rope through one of the eye screws. Tie a tight knot and then do the same on the other side. Remove any excess rope and use all-purpose glue to secure the edges. This will protect the clay balls from wearing out and the knot from coming undone.
The edges of the nodes are fixed with universal glue
Step 7: Now all that's left is to hang your new wall art in a place of honor.
The finished frame is hung on the wall
Photo half frame
Another photo of the craft
Photo frame sizes
The first frames appeared long before the advent of photographs and the ability to take photographs. They were used to frame pictures. The artists chose the sizes of the canvases to their taste, and the owner himself ordered a frame for the finished painting. In those days, painting a picture was not a cheap pleasure, and the design led to additional considerable costs.
With the advent of cameras, manufacturers of photographic products came to the conclusion that standardized frame and photograph parameters significantly reduce the cost of production. This made photography more accessible. The sizes of photo frames were also standardized according to the size of the printed photos.
Most Commonly Used Photo Frame Sizes
Standard sizes of photo frames now mainly depend on the sizes of photo cards printed in a photo salon or studio.
What are the sizes of photo frames:
- B7 is a well-known size for small photos - 9x13 cm. This size is more suitable for photos in an album, although small photos can be used in multi-frames or modular ones, depending on the designer’s idea.
- A6 is also one of the most used standards for photos - 10 cm by 15 cm. This is ¼ sheet of the classic A4 paper format.
- B6 – photo size 13x18 cm, the largest of the common variants of classic photography. This format is large enough to place a photo of this size on the wall; from a distance you can already see the details.
- A5 - the size of the photo and photo frame, respectively, appeared largely thanks to the same standard A4 sheet, since A5 is half of it and is equal to 21 by 15 centimeters. It is convenient to print this format yourself on a printer at home or at work. Photo frames of this size are most often found.
- A4 - as in the previous case, we are actually talking about two slightly different standards - 20x30 cm and 21x30 cm. This format is widely used because not only in a photo salon you can print photos in this format. At home, many people print out certificates, thanks, and diplomas, which are then placed on the walls of apartments and offices.
Popular photo sizes of standard A
All of the above are standard frame sizes that are widely used for photo cards that match the parameters.
Custom sizes
Selecting the size of the photo frames discussed above will not be difficult; they are often used and therefore in demand. You can find them in any large office department or in a photo salon. Things are a little more complicated if the dimensions of the required frame differ from the standard, or are shaped like an oval or circle. Or you need a large photo frame. They either have to be ordered online or made individually.
For photos of standard large sizes, frames of sizes A3, A2 or A1 are used, depending on the size of the photo, poster or painting. These parameters correspond to standard sheet sizes of paper and cardboard. So: A3 is 30x40 cm, A2 is 40x60 cm, A1 is 60x80 cm.
In addition to the A and B paper standards, there is a relatively rare group of SRAs. These sizes are a cross between standards A and B. For example, SRA0 is a size of 90x120 cm, and SRA3 is 30 by 45 cm.
Custom SRA size
Unpopular sizes C and B
Rectangular shapes of photographs and photo frames are considered familiar and common. But the square frame is already considered non-standard, and finding it is more problematic. A frame with this shape looks unusual and original, and placing it in the interior is a little more difficult than a rectangular one.
Square photo frames look more unusual than rectangular ones
Round and oval frames are mainly used for portraits. They are reminiscent of the photographic traditions of the past. The very absence of angles in the photograph evokes in viewers associations with something vintage.
DIY photo frame
How to make wooden furniture with your own hands?
Preparing your desktop
First of all, you need to prepare your table on which you will work. There should be no unnecessary things on it and every tool should be at hand. Not everyone has their own desktop and has probably already thought about creating one. Making a table is not difficult, but choosing a place for it in the house is difficult. The ideal option is an insulated balcony, on which you can do crafts at any time. I have already written about preparing the table in a separate article and tried to describe in as much detail as possible the entire process of creating it. If you don’t know how to prepare your workplace, then read the following Article. After you have completed the process of creating a table, try to start choosing your future craft.
Carrying out work from plywood
Just as simple furniture is made in detail and then assembled into one piece of furniture, do-it-yourself plywood crafts should be done separately.
To do this, first of all, prepare special drawings of plywood crafts, on which you will specify the dimensions of all parts and their fastenings.
Take a ready-made plywood sheet and attach a paper part template to it.
Trace the part with a pencil and plan out the outline with a jigsaw.
After this, each part must be cleaned with sandpaper or a grinding machine and only then the piece of furniture must be assembled.
When you are done with the entire set, open it with varnish.
Below are different options and photos of plywood crafts. Choose the one you like.
Making a template and blank from plywood for a future photo frame.
Wooden mailbox: how to make it yourself
☛ Use a jigsaw to cut the plywood in half along the line so that we get two pieces measuring 175x220 mm.
☛ Coat both halves with PVA glue and connect them. ☛ We tighten them with clamps for stronger and better gluing.
☛ Leave it to dry for at least 3 hours at room temperature 20⁰C.☛ We make a template out of cardboard while the blank for the future frame dries.☛ We draw the lips using stationery (school) patterns.
Please note that those who can draw beautifully by hand do not need to use patterns.
☛ Using scissors, cut first along the inner lines and then along the outer lines.
Advice. In order to make the template absolutely symmetrical, you just need to fold it in half along the axis and, already bent, cut the rest with scissors.
☛ We transfer the template onto the glued plywood and outline the contours with a pencil.
How to make your own photo frame
- first you need to select the picture you like and transfer it to the working window of the program;
- then you should select the scaling section, taking into account the dimensions of the existing sheet of plywood;
- the finished drawing is divided into fragments, each of which is printed in turn;
- The preparation of the template is completed by gluing all the fragments into one sheet, after which the contour is carefully cut;
- Next, the template is applied to a sheet of plywood and outlined with a simple pencil.
Stripping plywood
We clean our plywood with sandpaper. As you already know, “Medium-grained” and “Fine-grained” sandpaper is used for cleaning plywood when sawing. You've probably seen sandpaper in hardware stores, and that's what we'll need. In your work you will need “Coarse-grained”, “Medium-grained” and “Fine-grained” sandpaper. Each of them has its own property, but a completely different coating, by which it is classified. “Coarse-grained” sandpaper is used for processing rough plywood, i.e. which has many defects, chips, and cracks. “Medium-grained” sandpaper is used for processing plywood after “Coarse” sandpaper and has a slight coating. “Fine-grained” or otherwise “Nulevka”. This sandpaper serves as the final process for stripping plywood. It gives the plywood smoothness, and therefore the plywood will be pleasant to the touch. Sand the prepared plywood in stages, starting with medium-grain sandpaper and ending with fine sandpaper. Sanding should be done along the layers, not across. A well-polished surface should be flat, completely smooth, glossy in the light and silky to the touch. How best to prepare plywood for sawing and which sandpaper is best to choose Read here. After stripping, check the plywood for burrs and small irregularities. If there are no visible defects, then you can proceed to the process of translating the drawing.
We choose quality material
The main material is plywood. The choice is always difficult. Each of us has probably encountered such a problem as delamination of plywood from the end part and asked the question, what causes this delamination? Well, of course, this is mainly due to low-quality plywood. If this is not the first time you have picked up a jigsaw, then you can select plywood from the remnants of a previous craft. If you are new to sawing and you don’t have plywood, then buy it at a hardware store. Choosing material for sawing is always difficult. You should always choose plywood carefully, often look at the defects of the wood (knots, cracks) and draw conclusions. The difficulty in choosing plywood lies in the fact that no matter how you guess at its defects and shelf life. For example, you bought plywood, cleaned it, translated the drawing and suddenly it began to delaminate. Of course, this has happened to almost everyone and it’s oh so unpleasant
So it is better to pay attention when choosing and choose good plywood. I wrote a special Article that describes step by step all the principles of choosing plywood
Decorating a photo frame
- from cardboard,
- from colored paper,
- from corrugated paper using the quilling technique,
- from scrap materials - from plastic bottles, from tubes glued together from old newspapers, etc.,
- from natural materials - stones, cones, shells, etc.
How to treat the surface → Room decoration → How to choose the right paint → Surface treatment technologies → Leveling and finishing the walls → Selecting and applying a primer → Removal from the surface → Stretch ceilings and technologies → Reviews and testimonials
Sawing parts
There are many rules for cutting, but you need to stick to the most common ones. First of all, you need to cut out the internal parts, only then according to the external pattern. There is no need to rush when cutting. The main thing is to always keep the jigsaw straight at a 90-degree angle when cutting. Cut out the parts along the lines you accurately marked. The movements of the jigsaw should always be smooth up and down. Also, do not forget to monitor your posture. Try to avoid bevels and unevenness. If you go off the line while cutting, don't worry. Such bevels and irregularities can be removed using flat files or “coarse-grained” sandpaper.
Pallet picture frame
If you don’t know what to give to a friend or loved one, then a frame made from a pallet is a great gift. To make it, you don’t need any special tools or skills, so anyone can make such a picture frame. You just need to follow the step-by-step instructions below.
Step 1. Find a whole pallet or small parts of it. Select four small boards to form the frame and make sure they are all long enough.
The boards must be long enough
Step 2. Decide on the photo size. Take measurements and use them to control the wood you cut.
You need to decide on the size of the frame in advance.
Step 3: Cut the wood pieces to size. Using your measurements, cut the pieces of wood to the width and length you need for the frame.
Elements of the future frame
Step 4: Sand the surfaces of the wood pieces using a plane (or have someone do it for you). This must be done with each of the blanks.
Workpieces need to be processed
Step 5: Form a square frame on a flat surface. Glue the four pieces together at the junctions. Use clamps to tightly connect the parts. Aim for a very neat and tight fit at every corner. Clamps (such as clamps) will help create the necessary pressure. Leave until the glue is completely dry before removing the clamps.
Glued frame
Step 6: Apply varnish to the surface of the frame. If you want to decorate it, then after varnishing the product can be painted in different colors.
Frame after applying varnish
Step 7: Glue a thick piece of cardboard to the back of the frame, leaving the top part unglued. The picture or photograph will need to be inserted into the frame through the top. Glue some string to the back and hang the finished frame on the wall. Instead of a loop, you can make a cardboard leg that is attached to the back of the product.
Corrugated cardboard is glued to the back
Step 8. Insert the photo and hang the frame on the wall in a suitable place. Everything is done, all that remains is to enjoy the result of the work done.
Finished photo frame
Manufacturing technology
Wood made of plywood is considered the most popular decorative item in a modern interior.
Before you make such a craft with your own hands, you need to decide on its size, shape and purpose. Many people prefer to make a large family tree; the process of making it can begin after preparing all the photographs of relatives.
To make such an interesting decorative item, you need to follow some steps step by step.
- First, drawings and sketches are prepared, according to which templates for all elements and the trunk of the future tree should be cut out. Then frames for family photographs are measured, and boxes from boards are prepared. The frames must include holes for subsequent fastening. Photo frames and boxes should be primed.
- The next step is to attach the hooks and loops. It is recommended to lay thick fabric at the bottom of the box, giving preference to natural materials.
- Putty should be applied to the prepared plywood trunk, which will allow it to acquire a natural texture. Once the putty surface has dried, you can safely proceed to sanding and painting, using dark brown paint.
- The process of making a family tree is completed by cutting out leaves from paper and gluing them to the trunk. To give the foliage more volume, they are folded in half. After this, photographs of relatives are placed in chronological order.
A wish tree made of plywood also looks no less interesting in room design. It can often be found in the homes of newlyweds. Each invitee can write their congratulations or wishes to the lovers and hang them on the tree.
Carved wood also looks gorgeous in the interior, but its production is expensive compared to plywood crafts.
Which is better: heated floors or radiators?
Warm floorBatteries
To make a wish tree, you need to cut out a trunk, crown and branches from sheets of plywood. All parts are carefully sanded, primed, painted and attached to the wall.
Making a DIY photo frame is not particularly difficult. You can decorate paper with anything, but the decor should not be too heavy. Let it be inscriptions, stamps, glued buttons, paper flowers. When decorating it in a modern style, you can paint the frame with chaotic abstract elements using a regular marker.
You can make a variety of photo frames with your own hands from cardboard. This will be a stronger and more durable option, unlike paper.
We will look at a standard method that anyone can do. It is better to take very thick cardboard, in this case the frame will last much longer. Accordingly, you need scissors that can easily cut through such cardboard, Moment glue or hot glue with a hot glue gun.
In addition, you need a loop for hanging or an additional piece of cardboard for the leg.
Plywood tree (16 photos): how to cut a family tree for the wall? Layouts, templates and do-it-yourself drawings of large carved trees
For beginning craftsmen who plan to make such a craft for the first time, experts recommend choosing simple models. They will be much easier to cut and assemble.
Expert opinion
Strebizh Viktor Fedorovich, leading construction foreman
Hardwood plywood is durable, but expensive and is only suitable for making crafts that are planned to be placed indoors. If you want to clarify something, please contact me!
Cleaning Parts
You should always clean the parts of a future craft carefully. At the very beginning of the work, you already sanded the plywood with sandpaper. Now you have to do a small part of stripping the plywood. Using medium-grain sandpaper, sand the edges of the parts and the back of the plywood. “Fine-grained” sandpaper is considered the final stage of cleaning parts. It is better to clean the front part of the parts with fine sandpaper. When processing plywood, take your time. You can also use a rounded file, which is convenient for cleaning the inside of the holes. Try to ensure that the parts come out without burrs or irregularities.
Translation of the drawing
For me, drawing translation has always been the main process in my work. I will tell you a couple of rules, as well as tips for high-quality translation of a drawing. Many people transfer the drawing onto plywood not only using a pencil and copying, but also using “Black Tape”, glue the drawing to the plywood, then wash off the drawing with water and the markings of the drawing remain on the plywood. In general, there are many ways, but I will tell you about the most common method. To transfer the drawing onto prepared plywood, you must use a copy, a ruler, a sharp pencil and a non-writing pen. Fasten the drawing in plywood using buttons or simply hold it with your left hand. Check if the drawing fits the dimensions. Arrange the clock drawing so that you can use a sheet of plywood as economically as possible. Translate the drawing using a non-writing pen and ruler. There is no need to rush, because your future craft depends on the drawing.
Drilling holes in the parts
As you have already noticed, the parts contain parts of the grooves that need to be cut out from the inside. To cut out such parts, you need to drill holes in them using a hand drill or, as in the old fashioned way, make holes with an awl. By the way, the diameter of the hole must be at least 1 mm, otherwise you can damage the elements of the drawing, which, alas, are sometimes difficult to restore. To avoid damaging your work table when drilling holes, you must place a board under the workpiece so as not to damage the work table. It is always difficult to drill holes alone, so ask a friend to help you in your task.
Making an original photo frame.
☛ Drill a hole with a ø8-10 mm drill inside the frame so that you can insert a jigsaw file.
style=”display:inline-block;width:336px;height:280px” data-ad-client=”ca-pub-3518738935631683″ data-ad-slot=”6877683473″>
☛ We cut out the inner part.
Please note that we cut the plywood along the inner line with such a saw pass that the drawn line remains visible.
This is done so that if there is any unevenness, it can be trimmed using a router with a thin cylindrical cutter.
Although ideal evenness is not necessary in theory, since our photo frame will be in the shape of lips.
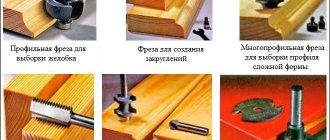
☛ We make a fold for inserting photos with a depth of 4-5 mm. To do this we need a wide cylindrical cutter.
☛ We round the front side of the frame using a shaped cutter. ☛ We cut with a jigsaw along the outer line as well as inside, the line should remain for subsequent adjustment, but not with a router, but with a grinding machine.
☛ We round the outer edge with a figured cutter.
Important! When performing all processing work, do not forget about safety precautions. ☛ We are finalizing our almost finished product using sandpaper
☛ We are finalizing our almost finished product using sandpaper.
Other creation ideas
In addition to plywood, you can use other materials to create a wooden photo frame. The simplest and most interesting option is to use popsicle sticks. With their help, you can make a frame and glue a photo on it.
No less simple and interesting is the use of a wooden plank to create a half-frame. Having secured the photograph to the base by the upper part, holes are made in it for a cord, on which the half-frame with the photo is hung on the wall. For a more complete mounting of the photo, it is worth attaching the same wooden plank at the bottom of the photo.
Another easy-to-use material is pallet wood, which can be cut into desired pieces, sanded and joined.
Each option has its own characteristics, so it’s worth trying your hand at creating photo frames from different materials, using various decorative elements. With each new work, the level of skill will tirelessly grow, and the products will delight with originality and beauty.
To learn how to make a photo frame out of wood with your own hands, see the following video.
Types of photo frames
There are many options for photo frames. When creating them, materials can be used from the simplest to exclusively professional ones, requiring pre-order in specialized salons or online stores. The resulting hand-made little thing no longer falls into the category of ordinary photo frames.
Wooden undecorated photo frame
Multi-frame - for a collage of several photos
Photo frames may vary in material, installation method and type of execution. According to the type of placement, frames are divided into: wall-mounted, table-top or universal. By execution type:
- single;
- multi-frames - frames on several photos.
According to the type of attachment to the surface, in addition to the classic one - hanging on a nail, photo frames can be magnetic, which allows you to place it, for example, on a refrigerator or on another metal surface.
With singles everything is quite clear. Multi-frames are frame collages, which are arranged depending on the number of frames included in the module, and on the taste preferences of the author.
Modular symmetrical multi-frame
A multi-frame has a single base on which several photos are placed, each in its own smaller frame. Multiframes can be:
- symmetrical;
- asymmetrical;
- with internal frames of the same or different sizes, etc.
A multi-frame can also be one large frame, for example, size A2 or A3, the photos inside of which are attached with decorative clothespins or bright stationery nails.
One example of an original multi-frame for photos is a panel designed in the form of contrasting puzzles, and each puzzle contains a photo. So, what materials can you use to create modern photo frames if you want to create and decorate yourself?
The main element in any photo frame is what the photo will be attached to. First of all, a foundation is required and the following can serve as it:
- cardboard;
- wood (processed and unprocessed, dry branches, etc.);
- plastic (for example, old CDs);
- glass or mirror;
- any other hard material that is at hand and matches the design idea.
Photo frame from CD discs
The most common and affordable materials as the basis for a future photo frame, of course, are thick cardboard, paper and wood.
Types of decorative frames by type of material for their design and decoration
The huge amount of decorative materials that currently exist provides craftsmen and craftswomen, as well as those who just want to start creating with their own hands, unlimited freedom of choice. When it comes to creating modern photo frames, the most commonly used materials when decorating are:
- colored paper;
- cardboard;
- felt;
- foamiran (“plastic suede”);
- decorative tape;
- fabrics and finishing materials (including jeans, lace, buttons, buckles, etc.);
- pebbles;
- shells;
- dried flowers;
- artificial flowers;
- cereals and dough.
Various interesting small-sized products made of wood, plastic, metal, glass and stones are also actively used by home craftsmen for decoration and finishing.
And this is not a complete list of materials that can be used to decorate an original handmade photo frame. You can even use colored tape and pencils!
Frames made from colored pencils can be used not only for photographs, but also for children's drawings
Preparing tools
As the main material, you can use various wooden products, for example, plywood or parts of pallets. You can easily make frames or other products from them. After choosing the design of the future frame, you need to prepare working tools.
Preparing tools
Prices for clamps
Clamps
Table. Tools for making a wooden frame.
Item name, photo Description
Wooden elements
Various wooden options will work, such as popsicle sticks, unnecessary slats, or part of a pallet. Alternatively, you can buy ready-made wooden baguettes and make an elaborate frame out of them.
Fasteners
You can use wood glue or special finishing nails to join individual pieces of wood together.
If the structure is very large and reliable fixation is needed, then these types of fastening can be combined.
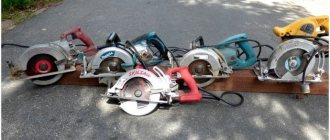
Saw and miter box
Using these tools, you can cut pieces of wood at a certain angle, which is very important when creating a frame structure. The resulting joints are of the highest quality, which has a positive effect on the appearance and reliability of the frame.
Clamp
If you plan to seriously engage in the manufacture of frames in the future, then a clamp will allow you to obtain ideal quality products
It is needed to press the parts of the structure while gluing them, thereby maintaining the ideal geometry of the wooden craft.
Master class: birch bark photo frame
The procedure for making a wooden frame
- Estimate the dimensions of the frame and select transverse and longitudinal wooden planks. You can cut a wooden strip into four elements. All parts of the future frame should be as smooth as possible, so if necessary, they can be planed and then treated with sanding paper.
- Saw off the ends of the wooden planks at an angle of 45 degrees. To ensure that the corners are even and the product comes out neat, it is better to use a special device - a miter box with suitable connectors.
- The ends of the planks are greased with PVA glue and pressed tightly at an angle of 90 degrees. To fix the corners, the frame should be tied tightly with twine, making sure that the corners do not move. Can be used to secure the corners of half staples from a stapler. They are cut into two L-shaped halves. Next, these corners are inserted into the middle of the cuts at the ends of the wooden slats, and then the two sides of the frame are connected.
- The PVA glue hardens for 15-20 minutes, and after that the frame is again treated with sandpaper and coated with paint or varnish. You can use stain or potassium permanganate, which also gives wooden products a beautiful brown tint.
- The reverse side of the frame is cut out of thick cardboard or a piece of fiberboard. If the design is not intended to be collapsible, then you can glue the back side to the frame with glue, and for a collapsible frame, use special metal clips.
DIY frame - features of manufacturing and application in interior design
Instructions for making from a wooden frame
Now we glue the parts. Apply PVA glue to the ends with a brush, then assemble the frame and tighten it around the perimeter with a rope, pulling it from the middle to the corner on four sides using wooden blocks. It is advisable to lightly press all four slats to the plane of the table so that they do not move while the glue dries. The structure must dry for at least a day.
Then reinforce the corners. Glue a wooden or plywood corner on the back side, which is best embedded flush with the plane of the frame, retreating 15-20 mm from the outer edge of the baguette. Trace the scarf with a pencil, use a hammer and chisel to make a groove and place the part in it using PVA glue.
After the glue has dried, the frame must be given a finished look, that is, the final finishing must be done. Trim along the outer perimeter with a plane, sand down any existing unevenness on the outside. After this, coat with varnish, stain or paint, depending on the desired decorative effect.
Making your own photo frames from cardboard: how to create it easily and simply
Photo frames can be either thematic or classic, it all depends on your capabilities and imagination.
Expert opinion
Strebizh Viktor Fedorovich, leading construction foreman
If for some reason it is impossible to print now, just take a photo, trace it along the outline, and leave stripes 1.5 and 1 cm wide on the sides. If you want to clarify something, please contact me!
Rest
When sawing, we often get tired. Fingers and eyes, which are always tense, often get tired. When working, of course, everyone gets tired. In order to reduce the load, you need to do a couple of exercises. It is necessary to observe a work and rest schedule. You can see Exercises for rest. Do the exercises several times during work.
Cleaning Parts
You should always clean the parts of a future craft carefully. At the very beginning of the work, you already sanded the plywood with sandpaper. Now you have to do a small part of stripping the plywood. Using medium-grain sandpaper, sand the edges of the parts and the back of the plywood. “Fine-grained” sandpaper is considered the final stage of cleaning parts. It is better to clean the front part of the parts with fine sandpaper. When processing plywood, take your time. You can also use a rounded file, which is convenient for cleaning the inside of the holes. Try to ensure that the parts come out without burrs or irregularities.