Pros and cons of wooden floors
To install the ceiling yourself, you need to prepare. The floor in the house must rest on a strong and rigid structure. Before starting work, you will have to study the requirements for the elements, the features of their calculation and the types of sections.
The following advantages of wooden flooring can be highlighted:
- attractive appearance, the ability to make a wooden floor without additional measures;
- light weight, reduced load on walls and foundations, savings on construction;
- possibility of carrying out repairs during operation;
- speed of installation, execution of work without additional machines and mechanisms.
Wooden beams do not weigh down the structure and are quickly installed
But it is also worth highlighting the disadvantages:
- flammability of wood, the need for special impregnation with fire retardants;
- lower strength compared to reinforced concrete or metal elements;
- shrinkage and deformation due to changes in temperature and humidity;
- susceptibility to rot, mildew and mold at high humidity, it is necessary to treat with antiseptics at the construction stage and periodically during the service life.
How to use timber floor beams
When building any private house, you always have to make various types of floors. These can be interfloor or attic structures, but in any case, their installation must be approached responsibly and the most suitable materials must be chosen for this.
We can say that these structures are as integral an element of any home as the walls, foundation or roof.
In the photo there are beam ceilings.
Requirements for wooden floors
Wooden floor beams must meet the following requirements:
- correspondence of section dimensions to load, span and pitch, this requires calculation of beams;
- good strength and rigidity;
- Fire safety;
- no serious wood defects or damage.
For work it is necessary to prepare high-quality material
There are also certain requirements for the material from which the beams are made. It is recommended to choose coniferous wood. It contains a lot of resin, so it is better resistant to various microorganisms . The best material is considered to be those trees that have grown in harsh conditions. Their trunk density is higher. For this reason, it is worth purchasing pine or spruce that grew in the northern regions of the country.
You also need to pay attention to the preparation time. The best period is considered to be at the end of winter. At this time, the tree is in a dormant state, there is less juice in it, and therefore the moisture content of the material will be less.
How to calculate permissible load
Competent and accurate calculation of the load on wooden floor beams guarantees the reliability of the structure and allows you to select a material that most accurately meets the specified parameters.
To calculate the permissible load on a beam, you will need the following parameters:
- material (type of wood);
- the length of the wooden beam (or the distance between the walls);
- pitch - the distance between the beams themselves;
- load on the structure.
The latter consists of two quantities - a constant load (the weight of the beams themselves + insulating materials) and a temporary load (the weight of furniture, people and everything that will be in the room).
The permissible load on a wooden floor beam is the most important indicator in the construction of low-rise buildings. If you doubt your ability to perform an accurate calculation, we recommend delegating this task to professionals.
What types of wooden floors are there?
Wooden floor beams are used for almost all levels of the house. The beam frame must be provided for the following types of construction:
- basement or basement floor (first floor floor);
- interfloor covering;
- attic floor.
The thickness of the supporting beam for the attic is from 10 to 20 cm
The normalized payload, which is taken into account in the calculation of wooden floor beams, depends on the type. There will also be a difference in the thickness of the insulation and its necessity.
Between 5 and 15 cm of mineral wool, polystyrene foam or extruded polystyrene foam is usually laid between the beams above the basement. In interfloor structures, it will be enough to provide a couple of centimeters for sound insulation. A cold attic requires the most material. Here the thickness can be from 10 to 20 cm. The exact values depend on the climatic region of construction.
Sometimes they prefer to make the basement floor not from wood, but from metal and reinforced concrete. In this case, an I-beam or channel is used as load-bearing beams, and concrete is poured into formwork made of corrugated sheets. This option will be more reliable if there is a risk of flooding. It will also better resist moisture from the basement.
What timber is used for the ceiling?
- All you need is well-dried wood - a humidity level of no more than 20%. When drying, the wood changes in volume, sometimes even warping, which will lead to deformation of the ceiling.
- The type of wood, if we are talking about a wooden structure, must match the type of the rest of the wood. The degree of shrinkage and response to temperature changes differs markedly between different materials.
- The bars must be carefully treated on all sides, not forgetting the ends, with antiseptics, since wood is usually susceptible to rotting and is a tasty morsel for insects.
- It is also recommended to treat the material with fire retardants - the compositions increase fire resistance.
When constructing a beam system, a number of other requirements are met that affect the choice of material - its dimensions and manufacturing method. Thus, above rooms with high humidity, the beam system is additionally waterproofed. And if beams separate floors with different temperature conditions - for example, a residential floor and an unheated attic, then the thermal insulation must be strengthened and meet the same requirements as the thermal insulation of walls. In this case, the insulation constitutes a noticeable additional load, and the timber will have to be selected in larger sizes.
What types of beams are there?
There are several criteria by which wooden floor beams are classified: by size, material, type of section. The length of the floor beams depends on the distance between the walls. To this value you need to add a margin for support on both sides . Optimally, you need to provide 200-250 mm.
Based on material, elements are divided into the following types:
- from solid timber or boards;
- from laminated veneer lumber.
Bent beams are made from laminated veneer lumber
The latter are significantly more expensive. But such material is suitable for covering large spans. A regular beam can work at distances of 4-6 m, while a laminated beam copes well with distances of 6-9 m. Glued laminated timber practically does not shrink, is fireproof and resistant to moisture. It is possible to produce not only linear elements, but also bent ones. A significant disadvantage of such a material will be the presence of non-natural components (glue).
The cross-section of beams can be of the following types:
The latter has widened elements at the top and bottom. In the middle of the section it is reduced to the maximum possible size. This option allows you to rationally use wood and reduce its consumption. But making such an element is not easy. For this reason, I-beams are not often used in construction.
The most commonly used timber is rectangular in shape.
The best option would be a rectangle. In this case, the long side is located vertically, and the short side is horizontal . This is due to the fact that increasing height has a better effect on strength than increasing width. Installing a beam from a board flat is practically useless.
The most unfavorable of the presented ones can be considered a square section. It is least adjusted to the diagram of forces in the element.
You can also use logs for roofing. But this option did not gain popularity. The section from the board is much more profitable and easier to install, therefore it is used much more often.
Metal beams: traditional reliability
When a developer has the opportunity and request for more ambitious and large-scale construction, he uses metal floor beams of various sections: a corner with different flange sizes, a channel, a T-beam, an I-beam. If we exclude the possibility of metal corrosion, then in terms of strength there is no substitute for such beams. But the use of metal in individual housing construction is limited by a number of other indicators:
- it is difficult to work with metal at heights;
- special mechanisms for installation are required;
- welding, cutting metal and protecting it from corrosion are additional costs;
- high cost of material;
- metal beams must be insulated from the attic side.
Metal beams also have positive aspects:
- they don't burn;
- more durable;
- metal spans can be made longer and the distance between the floor beams can be greater;
- The types of metal beams are very diverse and allow you to create structures of almost any complexity.
In any case, it is better to entrust the calculation of a metal beam to professionals.
This might be interesting!
In the article at the following link, read about a flat roof in a private house.
Calculations
Calculation of the cross-section will allow you to have no doubt about the strength and rigidity of the structure. In this case, the maximum length that is allowed for any section is determined. To perform the calculation, you need the following data:
- the length of the wooden floor beam (more precisely, the distance between the load-bearing walls);
- the distance between the beams (their pitch);
- load on the structure.
The load consists of two values: permanent and temporary. The permanent includes the mass of the beams themselves (preliminary for now), insulation, ceiling lining, rough and finished floor. The temporary load is the mass of people and furniture. According to regulatory documents for residential premises, it is taken to be 150 kg/m2. For the attic you can take less, but it is recommended to use the same one. This will not only provide a certain margin of safety, but will also make it possible in the future to convert your attic into an attic without reconstructing the load-bearing elements.
The beam frame should be calculated using the following formulas:
In these formulas, q is the load per square meter. m of flooring, which includes the mass of structures and 150 kg of useful value. In this case, these values must be multiplied by the distance between the beams. This is due to the fact that the calculations require a load per linear meter, and initially the value was calculated per square meter. l2 is the distance between the load-bearing walls on which the purlin rests, taken in a square.
Knowing Wrequirement, you can select the section of the floor. W = b*h2/6. Knowing W, you can easily create an equation with one unknown. Here it is enough just to set one geometric characteristic b (section width) or h (its height).
Most often, the wooden beam already has a known width. It is more convenient to make it from a board 50 or 100 mm wide. You can also consider the option with a composite section. It is made from several boards 50 mm thick.
By calculation in this case, the required height of the element is found. But there are cases when you need to fit into a certain ceiling pie so as not to reduce the height of the premises. In this case, the height of the section is added to the equation as a known quantity, and the width is found. But the lower the height, the more uneconomical the floor frame will be.
To tighten two or three boards together, it is convenient to use metal pins. In this case, when tightening the nuts, be sure to use wider washers. They prevent the metal from pressing into the softer wood. It is imperative to provide insulation between wood and steel fasteners. For this, you can use a material such as TECHNOELAST brand EPP.
Wooden blocks must be waterproofed before installation
Before using wooden elements, they are treated with an antiseptic composition. This is necessary to prevent mold and rot. It is also recommended to treat with fire retardants, which will increase fire safety. When resting the purlins on a wall made of brick or concrete, their ends are wrapped with technoelast, linocrom, waterproofing or roofing felt.
When constructing private country buildings, many builders use floor beams. The products evenly distribute the forces from the structures above, increasing the rigidity and strength of the entire house. When designing a residential building, it is necessary to calculate the wooden floor beams, select the optimal cross-section and distance between the beams.
Load-bearing beam 6 meters
Question:
I am adding a terrace, length 6.8 m, width 4.0 m. Near the wall of the house, the span was 6.0 m. Along the edges, reinforced columns of 0.4 * 0.4 m were made of brick. A support beam is needed for a span of 6.0 m. A beam of 200*150mm can support it. or take three 200*50 boards? But how to grow together?
Vladimir Aleksadrovich, Krasnodar.
Answer:
Hello, Vladimir Alexandrovich from Krasnodar!
As I understand it, the truss system of the attached terrace will rest on a beam 6 meters long.
With such a span length, it is usually recommended that in addition to the two outer supports, even from reinforced columns with a cross-section of 0.4 * 0.4 meters, an additional support point should be made in the middle of the span. It does not have to be the same column; fastening the beam simply with an anchor to the wall of the main house is often sufficient. Which immediately increases the load-bearing capacity of the support beam. Otherwise, you risk seeing a deflection in the middle of the span, measured from 3 to 5 centimeters (depending on the weight of the terrace roof).
According to the reference data I have, the cross-section of the specified beam should be larger than the 200 * 150 millimeters you planned.
Therefore, in my opinion, you can take a section of 200 * 150 millimeters (installation only on the edge!), but with the obligatory reliable fastening of the beam to the wall of the house in the middle using an anchor with a diameter of about 20 millimeters.
In such cases, preference is given not to a solid beam, but to one made up of three edged boards with a cross-section of 200 * 50 millimeters.
To do this, take three boards without visible defects, fold them in such a way that the two outer boards have a butt part at one end, and the middle board with the opposite arrangement, that is, its apical part would be at the end parts of these two boards.
A professional can determine where the top is and where the butt is based on the location of the annual rings.
If an amateur builds it, then it is more difficult. And the simplest thing is to lower the boards entirely into the water; the butt part will be more submerged than the top part.
However, in our modern life such subtleties are usually omitted, although the strength suffers from this.
And the joining of boards is done either with 200 mm nails, which are used to pierce the boards through and bend the ends of the nails, or using pins with nuts (and washers so that the nuts do not fall into the thickness of the wood when they are tightened). The fastener pitch is about a meter. Nails in three pieces, every 50 millimeters along the width of the boards. Hairpins one at a time. With alternating their location from the center line by 50 millimeters in one direction, on the next mount in the other direction. Holes are pre-drilled for the studs. The diameter of both holes and studs is approximately 10 - 12 millimeters.
Of course, all this is approximate and based on personal practice. You have the right to do things differently.
Good luck!
Construction in Moscow and Moscow region
We work with a guarantee! Wide range of construction services. Foundation, walls, ceilings, roofing, turnkey! +7 (905) 797-20-34
luxurykomfort.ru
Other questions on the topic of gender:
- Logs thickness - table of sections of wooden logs
- The cost of replacing floors in a bathhouse - Estimate
- Which floor is cheaper for a stone country house
- Sealing cracks in edged board floors
- Reconstruction of the floor with insulation
- Wooden floor in a log house 7 by 7
- Insulation of floors with foam chips
- Laying larch floorboards on beams
- Leveling wooden floors
- Fastening ceiling joists in a log house
- Ceiling with exposed beams
- How to update your garage floor
- Drying ceiling beams for a log house
- Wood beam ceiling repair
- Insulation of a wooden floor in a house without a basement
- Fastening the floor joists
- Waterproofing between floor boards
- Natural materials for floor insulation
- Replacing the floor in a brick country house
- Insulation of a wooden floor in a wooden house
- How to repair a hole in a concrete floor
- Rotten floors in a new frame house
- Replacing a ceiling beam without dismantling the roof
- How to fill floors in a steam room and sauna sink
- What beams for a 7 meter span ceiling?
- Replacing floors in an adobe house
- Floors rotted along the ground in a country house
- Ceilings in a timber house are sagging
- Pouring a concrete floor in a wooden house
- Floor made of wooden sleepers on sand
- Options for flooring on the ground
- Tiles and laminate for log floors
- Ceramic tile floors in a log house
- Replacing floor joists with floor supports
- The floors between the first and second floors have rotted
- How to fix the logs of a log house ceiling
- Floor on concrete base
- Calculation of the number of floorboards for two rooms
- Screed on wooden floors
- Rotting of laminated timber in a seasonal log house
- Film for floor insulation
- Cottage, humidity, floors, cellar.
- Replacing and insulating wooden floors
- The floor beams of a country house sank
- Insulation of interfloor wooden floors
- What kind of film is needed to lay a floor on the ground?
- Increase the ceilings in the extension to the house from sleepers
- Pillar for attic floor beams
- Wooden floors in the garage
- Exposed beam ceiling
- Leveling floors in a log house
- Insulation of the attic floor
- Replacing an old wooden floor in a kitchen
- Interfloor ceiling in a log house
- Extension to a one-story panel house
- How to fill the underground
- Why have apartments always had wooden floors?
- Insulation of wooden interfloor ceilings
- Coating a concrete floor in a bathhouse with bitumen mastic
- Strengthening ceiling joists for the attic floor
- Floor beams for the ceiling in a garage 7 by 7 m
- Workers to replace the floor in the country house
- Harmful substances from furniture
- Sagging of the floor between the first and second floors
- Replacing joists and floors under a partition with a door
- Covering an aerated block house with a channel
- Support under the log and shrinkage of the log house
- Make a hatch in the floor to access the subfloor
- Finishing an old concrete floor on a balcony
- Replacing rotten ceiling beams
- Floor screed device
- Insulation of old floors on the balcony without removal
- Floor pie on the ground
- Replacing support posts for joists
- Overlap between the steam room and the residential floor
- Waterproofing the floor in a wooden house on the ground
- Fighting mice in insulated wooden floors
- Ceiling mats in the garage
- House with a mezzanine for children's rooms
- How to insulate wooden floors in a gas block house
- Replacing a rotten floor in a Finnish house
- Calculation of floor beams
- New floor over old wood
- How to insulate floors in a bathhouse
- Round log beam floors
- Concrete floors in a log house
- Floors without insulation in a black bathhouse
- Cost of replacing a wooden floor in a brick house
- Replacing the ceiling with increasing its height
- Leveling a sagging beam without support
- How to fix sagging wood floors
- Warm water floors in a log house
- Floor pie in the bathroom of a log house
- Replacing wood floors in a 1906 house
- Wooden floors in a house made of SIP panels
- The floor in the frame on stilts sags
- Strengthening a wooden floor
- Leveling the deflection of wooden floors
- Wooden floors are swollen
- How to change beams built into block walls
- Cladding the ceiling of an adobe house with euro clapboard
- Changing the floor in a slag-filled house
- Floor on the ground in an old wooden house
- Tiled floors in a wooden bathhouse
- Insulation of a wooden floor
- Plywood floors with joists
- How to level a subfloor under laminate
- How to strengthen a cut wooden floor beam
- Coating floor joists with bitumen primer
- How to restore old beams
- Porcelain tiles on wooden floors
- Replacing joists and subfloors in a timber house
- Ceiling beam sagged
- Repair of sagging floors in a wooden house
- Lower the floor in an old log house
- Laminate flooring in an old country house
- Compatibility of polystyrene foam and wood in construction
- Rebuilding floors in a brick house due to creaking
- Timber logs 150 x 4 meters span
- How to straighten a sagging ceiling in a house
- Replacing rotten floor joists in a log house
- Replacing floors on the ground in a bathhouse
- Waterproofing the subfloor of a house
- Beam ceiling
- The ceiling in the bathhouse turned black
- Floors made of 12 mm plywood in two layers
- New floors on old ones
- Aligning beams in a timber house
- Strengthening interfloor wooden floors
- Wooden ceiling-floor pie
- How to raise a joist without opening the floor
- Option for arranging the floor in a log house from OCB
- Is it possible to replace beams
- Interfloor wooden floors
- How to cut a block diagonally with a circular saw
- Glassine in the house floor pie
- The floors are dry - what to do?
- Repairing the ceiling of an old wooden house
- How and with what to paint OSB
- Attaching the joists to the foundation
- Waterproofing the floor on the ground
- Floating floor on the ground
- Floor pie on floor beams
- Strengthening the ceiling joist
- New ceiling without touching the old one
- Insulating the floor in a village house
- How to strengthen floor joists 150x50 span 6 meters
- Installation of floors in an extension to the house
- Wooden floors on the ground
- Cement screed on the ground
- Cold floors in the house
- Is it possible to install logs after assembling the log house?
- Section and pitch of beams for a span of 5 meters
- Re-cover the floors in a cinder-cast building
- Fastening floor joists in a log house
- Attic floor in an old cinder block house
- Channel or I-beam for floor beam
- The smell of varnish from the floor - how to get rid of it
- Floor on rotten crowns
- The floors in the country house were torn out
- How to decorate a wooden ceiling above a gas stove
- Replacing a rotten floor - price of work and material
- Floating wooden floor in the country house
- Metal I-beam as a ceiling beam
- FC plywood floors on the open terrace
- What's the best way to install wood floors on a concrete slab?
- Laminated plywood for subfloor
- The floors are rotten, what should I do?
- How to change the subfloor without dismantling the finishing floor
- Floor ventilation in a log house on a slab
- A mushroom is eating our house
- Installation of logs to log walls
- Country house made of blocks and wood
- Beam 8 meters what section
- Replacing the subfloor and flooring in a log house
- Insulation of floors with polyurethane foam in a timber house on stilts
- Ceiling joist thickness
- The floor is rotting and moldy
- DSP subfloor and insulation
- Planks for attic floors 5 m
- Replacing a beam under a brick wall
- Reconstruction of an old floor in an old house
- Exposed beam ceiling
- What to support the floor beams on
- Sandwich panel floors
- Log beams
- How to remove part of a floor beam
- Insulating the floor from the subfloor
- Cold floors in a warm brick house
- Floor installation in an old brick house
- Insulation of the floor of the 1st floor in a log house
- Soundproofing the floor of the 2nd floor in a wooden house
- I-beam wooden floor beam
- Insulating the floor in a house on stilts
- Selection of log section for a span of 5 m
- Repairing the ceiling of an old house
- Laminate flooring on the second floor in a log house
- Floor insulation in an old wooden house
- Wooden floors are worn away by a worm
- Ceiling in a wooden house
- Distance from ground to floor
- Protecting floor joists from moisture
- Wooden floor on laminate
- Strengthening wood floors
- How to lay floors in winter in a cold house
- How to replace a rotten floor
- Floor insulation
- How to strengthen floor joists
- Second floor floor beams
- Floor insulation with foam plastic
- Laying floorboards
- Channels as interfloor slabs
- Interfloor ceiling in a silicate brick house
- Chicken coop floor
- How to strengthen the ceiling of a garage basement
- Load-bearing beam 6 meters
- Moldy subfloor
- Raise floors over old floors
- Mastic for covering subfloors and joists
- How to lay plywood on floor joists
- Creaking floors in the apartment
- Floors and drainage in the bathhouse
- The logs and subfloor of the country house have rotted
- Logs 9 meters
- How to cover the first floor of a log house of 8 meters
- Rotting subfloor
- Which ceiling joists to choose
- How to put ceiling beams in a bathhouse
- Transferring beams in a log house in height
- Strengthening old wooden beams
- Covering the first floor of a house without a basement
- Insulation of wooden floors with moss
- About lumber for floors and roofs
- Strengthening or replacing ceiling joists
- Floors on the ground
- Bathroom floor tiles
- Laminate flooring in the country house
- Subfloor and roofing felt
- Replacing the support beam
- Finishing floor on old floor with insulation
- Tiled floor in a wooden house
- How to insulate the underground
- Laying parquet boards in an apartment
- What to put on the veranda floor boards
- Updating an old subfloor
- Fastening the floor joists
- Subfloor repair
- Waterproofing plank floors
- Floor beams - reinforcement
- Thickness of plywood on joists
- How to remove creaking wooden floors
- Strengthening the interfloor ceiling
- Laminated plywood for wood floor repair
- Leveling floors during house shrinkage
- Insulation of wooden floors
- Installation of floor slabs
- Attaching beams to a vertical concrete wall
- How to join three skirting boards in a corner
- Floor joist supports
- Floor beams for a span of 7 m
- Floor installation in a timber house
- How to make a floor in an extension from foam block
- Which timber to choose for a beam floor
- Repair of bath floors
- Second floor terrace floor
- Round timber floors
- How to strengthen wooden floors
- How to change a rotten beam
- Replacing floor beams in an adobe house
- Support to strengthen the beam
- Ceiling joists
- Concrete floor under laminate
- Maximum distance between floor beams
- The middle of the wooden house sank
- Repairing floors in an adobe house
- Heated floors in a wooden house
- Raise the floor in an old house above ground level
- Replacing floor joists in an old house
- Attic floor repair
- Floors - asbestos-cement pipes for pillars under logs
- Attaching joists to slabs
- Strengthening logs in a log house 7 meters long
- Bathroom floor installation
- Insulation of floors using Izospan B film
- Floor ventilation below ground level
- The floors in the timber house are rotting
- Insulation of floors on a concrete screed under linoleum
- How to make garage floors
- Types of flooring for the home
- What thickness of the floor board should be 28, 36, 40...
- Fastening floor joists in a panel house
- Concrete floor in a wooden house
- Repair of wooden floor on the balcony
- Installation of logs in a timber house
- Concrete floor screed over Sip floor
- Strengthening and insulating the floor from blocks
- How to level floor joists
- Strengthening wooden floor beams
- Should a concrete floor be connected to the house?
- Insulation of regularly flooded floors
- Insulating the floor of a house on sleepers
- How to secure floor joists over a round log
- Replacing rotten floors
- Glassine in the underground of a timber house
- The film is blowing up over the subfloor
- Questions about floors in the garage 2nd floor
- Arrangement of the subfloor in a rounded log house
- Monolithic floors on the ground
- What is the best way to cover the walls and floor of a garden house?
- How to level a concrete floor in a panel house
- How to level the floor in the kitchen
- Floor in bathhouse sink
- What to rest the floor joists on in a log house
- How to strengthen interfloor joists in a brick house
- Economical interfloor ceilings
- Insulation of concrete floors
- What is better to put under linoleum
- Subfloor repair
- Floor installation using gas silicate
- Replacing floors in a country house
- Floors made of moisture-resistant slabs
- How to lay linoleum on an old floor in an apartment
- Leveling floors in an old house
- Treatment of genital lags
- Choosing floorboards for your home
- Thermal vapor barrier in the floor pie
- Raise sagging floors without dismantling
- Thermal and sound insulation of the floor in a panel house
- The floor in the hallway of a private house is rotting
- Rotten floor in a wooden house
- How to change the floor under a fireplace
- Concrete floor in garage
- How to wax a floorboard
- How to make a wood floor in a garage
- Repair of concrete floor on the balcony
- Replacing subfloors
- Moisture-resistant laminate for wooden floors
- How to cheaply re-floor an apartment
- Bathroom sink floors
- Arrangement of rough floors
- Sagging joists and floors
- How to change a rotten floor
- How to lay the floor on a loggia correctly
- Wooden floor construction in more detail
- Subfloors made of larch on the 2nd floor
- Second floor subfloor
- How to hide air conditioner pipes in a tile floor
- Replacing a rotten floor
- Floor repair in a panel house
- Lay floors on the attic loggia
- The new wood floor has started to rot.
- Repairing a wooden floor in a country house
- How to insulate a wooden floor
- Again about floor insulation
- Larch loggia floors
- Foundation and floors of adobe house
- Floor in a finished (transportable) bathhouse
- How to arrange the floor on an open balcony
- Underfloor insulation
- Connecting the ends of the floor boards
- Concrete floor in garage
- How to level a subfloor
- How to lay a new floor on an old one
- How to lay a subfloor
- How to raise floors in your home
- How to lay floors beautifully
- Ventilation in the underground
- How to level log beams for flooring
- The subfloor beams began to rot
- Laying the floor with a board without a tenon
- Floors in a country house
- Floor on the loggia balcony
- Floors - leveling log joists
- Asbestos cement pipes to lighten concrete floors
- Insulation of underground space
- Preparing the base for laminate flooring
Construction in Moscow and Moscow region
We work with a guarantee! Wide range of construction services. Foundation, walls, ceilings, roofing, turnkey! +7 (905) 797-20-34
luxurykomfort.ru
Construction in Moscow and Moscow region
We work with a guarantee! Wide range of construction services. Foundation, walls, ceilings, roofing, turnkey! +7 (905) 797-20-34
luxurykomfort.ru
Construction in Moscow and Moscow region
We work with a guarantee! Wide range of construction services. Foundation, walls, ceilings, roofing, turnkey! +7 (905) 797-20-34
luxurykomfort.ru
Floors
All questions to Semenych about construction
Semenych (author of materials)
Our site is regularly updated with interesting and unique materials and articles on the topics of lumber, building materials and works, the author's opinion and knowledge of a real coven with more than 15 years of experience are provided. There is a section - funny stories of shabashniks. If you would like to receive information about this, subscribe to our website's newsletter. We guarantee that your address will not be shared with third parties.
Apartment renovation in Moscow and Moscow region
We work with a guarantee!
Wide range of repair work. Professional craftsmen.
+7 (905) 797-20-34
luxurycomfort.ru
| Country house | Bath |
| For the dacha | Tool |
| Materials | Tales |
| Foundation | Log houses |
| Roofs | Insulation |
| Walls | Siding |
| Floors | Cellars |
| Attics | Doors windows |
| Stairs | Extensions |
| Wells | Toilets |
| Balconies | Loggias |
| Condensate | Flooding |
| Fences | Kennels |
| Sidewalk | Birdhouse |
| Adobe | Carts |
| Garages | Barn |
| Greenhouses | Bath |
| Swing | Brazier |
| Shower | Horizontal bar |
Types and types of wooden floors
According to their purpose, wooden floor beams are divided into the following types:
You should familiarize yourself with each of the subspecies in more detail.
Basement
The structure must have high strength indicators and withstand significant forces, because the beams will serve as the basis for the floor. If the design of a residential building includes a basement or a garage for a car, then the wooden blocks are replaced with metal supporting structures. This is due to the rapid destruction of wood from exposure to high humidity. An alternative option is to reduce the distance between the floor beams and treat the wooden elements with an antiseptic.
Attic
The ceiling is installed independently or is a continuation of the roof rafter system. The first option has the best technical characteristics. It is more rational to arrange an independent ceiling; such a design improves the sound insulation performance of the entire house and is considered repairable.
Interfloor
The design of floor beams in a frame house has its own characteristics. One side of the wooden beam is used as support elements for fastening the ceiling, the second (upper part) is used as a joist for installing the floor covering. The space between the interfloor beams is filled with mineral wool or other heat-insulating material; a vapor barrier membrane is mandatory. Plasterboard sheets are fixed at the bottom of the pie, and a plank wooden floor is laid on top.
Strengthening wooden floors - ways to strengthen the ceilings and beams of the second floor
The main element of attic and interfloor floors in many private houses is a wooden beam.
The service life of wood floors is limited due to the properties of the wood, especially if it has been poorly processed or has been subjected to stress and moisture. As a result of such factors, the beam ceases to cope with the function assigned to it (sagging, deflection, curvature is possible) and reinforcement of the wooden floor beams will be required.
In addition to damage and loss of load-bearing capacity of floor and ceiling beams (joists, purlins), strengthening may be dictated by an increase in the load on the floor.
Advantages and disadvantages
The wooden blocks that are used for flooring have their strengths and weaknesses.
The main advantages of beams made from boards are:
- minimal weight of structural elements, which reduces the load on the load-bearing walls and foundation of the building;
- beautiful appearance;
- the possibility of installing a plank floor without additional preparation;
- high speed of installation work without the help of lifting mechanisms;
- It is possible to repair the ceiling during the operation of a residential building.
The disadvantages of wooden structural elements include:
- the need to impregnate wood with antiseptics and fire retardants; such solutions prevent rotting and combustion of the material;
- lower strength indicators compared to metal or reinforced concrete products;
- deformation and shrinkage of the structure as a result of sudden temperature changes or under the influence of high humidity.
Note! The installation of a wooden floor is possible on enclosing structures made of aerated concrete, brick or on walls made of any other material.
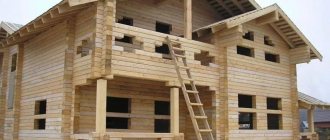
Features of floors
The photo shows the installation of floors.
Based on the experience of professional and independent developers, we can say with confidence that it is the wooden structures of interfloor slabs that are the most popular and often manufactured in the construction of private houses. (see also the article Cottages made of timber, advantages and disadvantages of the material)
This is due to several factors, of which the main ones can be identified:
- ease of installation (2 people are enough to manufacture them, and there is no need for specialized equipment, such as in the manufacture of reinforced concrete structures);
- low cost compared to all other types of structures;
- sufficient strength, reliability and durability;
- ease of repair and dismantling.
For more information about timber floors, watch the video in this article.
Using boards and solid timber
In the case of using solid wooden beams or boards for flooring, the span length is chosen within 4–6 m, which is half the maximum distance when using building structures made of laminated veneer lumber. Parts made from bonded boards are often manufactured directly on the construction site.
The strength of the structure is superior to solid beams. The main advantage of the products is the possibility of constructing a composite part from several boards. Builders can independently regulate the thickness of the beam by fastening the required number of elements. The boards are connected to each other using threaded elements. Rubber or plastic washers are installed under the bolts and nuts. The elements prevent the effects of corrosion on metal embedded parts and protect the wood from cutting into the nut when tightening.
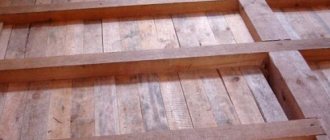
Installation of interfloor and ceiling slabs on wooden logs
The photo shows interfloor ceilings.
Interfloor ceilings in a house made of timber begin to be installed by laying the logs. To do this, prepared timber is placed on the walls, which is pre-wrapped with roofing felt. This will protect the wood from moisture penetration and, as a result, from rotting.
The outer beams should be laid no closer than 5 cm from the wall, and the distance between adjacent crossbars should not exceed the previously calculated values, which in our case are equal to 60 cm.
An important condition is that the logs must be laid over the entire thickness of the walls, having maximum support and stability. The gaps between the joists on the wall are filled with bricks or building blocks, after which a subfloor made of 150x25 mm edged boards is laid on top.
Ceilings made of timber are almost completely identical to interfloor ones, with the only difference being that the thickness of the beams may be smaller, and the step between them may be several centimeters larger.
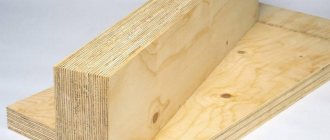
Prefabricated timber
The photo shows prefabricated timber.
Quite often there is a situation when there is no lumber on sale, in particular, timber of the required size. In this case, there are several ways in which it is quite possible to solve this problem. The first method is to use prefabricated beams in the construction. You can easily do it yourself using a screwdriver or drill. (see also the article Joining timber along the length - connection options)
Let's say you need logs measuring 150x250 mm, but there are no such sizes on sale, but boards with dimensions 50x250 mm are always in abundance at any lumber base. In order to get a beam of the desired size, it is enough to buy 3 such boards and fasten them together.
It is better to use wood screws rather than nails as fasteners, since over time the wood dries out and the nails do not hold the boards together so firmly.
As the instructions for making prefabricated joists yourself advise, if you use them for basement or basement floors, then before tightening them with self-tapping screws, you should treat each board with an antiseptic.
This will prevent the appearance of wood pests and will significantly increase the service life of the entire floor. If you use prefabricated timber for interfloor slabs, then no pre-processing of the boards is required.
The admissibility of using this type of lag is obvious and is not questioned. This material is as environmentally friendly as regular timber, since no adhesives are used during assembly.
Attention! The load-bearing capacity of prefabricated timber is even higher than that of solid lumber, and the cost is slightly lower. From all of the above, it becomes clear that in some cases the use of prefabricated elements is even preferable to solid ones.
Glued laminated timber
Photo – laminated timber.
This type of lumber is an acceptable alternative if the required solid logs cannot be found, or their price is high enough for you, and it is not possible to make a prefabricated structure yourself.
Glulam beams are made from several boards of different lengths, fastened together using a two-component structural adhesive, which is used in the manufacture of wooden load-bearing building structures. (see also the article What are the advantages of laminated cedar beams)
Floor beams in a wooden house made of laminated veneer lumber are characterized by good strength and resistance to loads, but they also have some disadvantages.
- Due to the fact that adhesives are used in their production, such material can no longer be called environmentally friendly.
- In their production, a fairly large percentage of low-quality lumber is used. Significant shrinkage is possible after several years of use, which means that a laminated timber floor may “sag” over time.
- And the main disadvantage of glued beams is their limited service life, which is determined by the manufacturer at 20 years.
To calculate the volume of lumber, you can use the calculator:
Glued laminated timber
To increase the strength or size of solid beams, they are fastened together manually during installation of the floors. For the same purposes, laminated veneer lumber manufactured at enterprises is used. It consists of several bars connected to each other. The thickness of an individual element is regulated by the number of products glued together. Glued laminated timber is produced at the factory by pressing, its length reaches 12 m.
Finished products retain the characteristics of solid lumber and can be nailed without loss of strength or cut into pieces of the required size. The only drawback of such structures is their high cost. It is necessary to carefully calculate everything before installing the first floor ceiling on wooden beams.
Note! Glued laminated timber is often used in construction for the installation of arched ceilings.
Floor installation
In order for a building to last for a long time, beam floors must meet a high level of strength. Have good sound and heat insulation, as well as good ventilation.
When installing wooden beams, the lighthouse installation method is most often used. First, the outer beams are installed, and then the intermediate ones. To avoid mistakes during work, use a level. In case of height differences, the beams can be leveled by placing cuttings soaked in bitumen primer under the end ends.
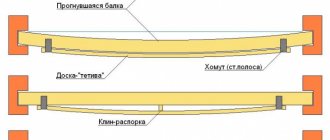
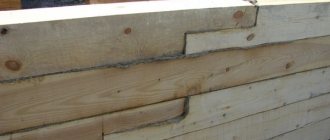
Before installation, the beams are spliced or cut to the required size. Splicing of timber beams along their length is usually carried out using the “key groove” method. To do this, the ends of the beams are cut down to 12 thicknesses and one end is buried in the thickness of the other. Then the joints are fixed.
Splicing two beams
The distance between wooden beams should not be less than 60 cm and exceed 1 meter. In a structure made of logs or laminated veneer lumber, the step is taken longer than in plank floors. When installing an attic floor, the distance between the chimney and the beams must be at least 40 centimeters.
Self-production of glued elements
There are several options for making laminated veneer lumber yourself:
- combination of three elements into one structure;
- gluing two parts in the shape of a Z symbol;
- connection of lamellas using special elements, metal inserts.
The first method is considered the most practical; it is much simpler than the other two. At the initial stage of work, boards for timber are selected and laid on the central element so that the annual rings of the wood face in opposite directions. Marks are made on the surface of the boards with a black marker or a simple pencil, which will indicate the sequence of their laying.
The central element is cleaned on both sides with sandpaper, which will create a rough surface and improve glue adhesion. Side boards are processed only at the point of contact with the main beam. At the next stage of work, the surfaces are degreased with a solvent, an antiseptic and fire retardants are applied. These liquids and protective compositions are applied alternately: first the solvent, then other impregnations after the base composition has dried. Not only the sides of the lumber are processed, but also the ends.
Now you need to apply a thin layer of glue (1-2 mm) to the cleaned and pre-treated surfaces. The top and bottom boards are laid on the central beam so that they are in the same plane. To fasten the elements, clamps are used, which are installed on the beam every 40–50 cm. The curing time of the glue is indicated by the manufacturer (usually does not exceed 2 days).
How to fix the situation
To reinforce floor beams, you can go in two ways:
1. increasing load-bearing capacity; 2. load reduction.
The first option is the most common, since reducing the load means converting the premises for another purpose, which is difficult and not always possible. To take advantage of the second, you need to consider several options for strengthening the beam.
These methods include:
1. Increasing the section. It is important to note that it makes sense to do the overlays at the top or bottom. Additional width will not have the same effect. This can be explained by the formulas by which beams are calculated. For extensions, wooden boards are used, which are fixed to beams.
2. Installation of intermediate supports. Most often, reinforcement with racks is not considered here, since they will rest on the underlying floor. You can use struts, but only if they fit harmoniously into the interior.
3. Metal clips. The metal is attached on both sides. For minor damage, strip steel can be used. For serious deformations, it is better to choose a channel. It is important to provide waterproofing between metal and wood without fail.
4. Attaching carbon fiber overlays. This type of composite material is not a common solution, but it is worth considering. Fastening is carried out using glue, the elements are light enough to do the work yourself.
Strengthening should be performed only after choosing among the proposed options the most optimal for each case separately.
Reinforcement with wooden or metal prostheses
Reinforcing beam ends with wooden prosthetics
Reinforcement with metal prostheses
Reinforcement with carbon fiber (carbon fiber)
Layout of carbon fiber sheets
Calculation procedure
A preliminary calculation helps determine the pitch of wooden floor beams, their sizes and quantity. Before carrying out such operations you must:
- carry out measurements of the span between the load-bearing walls of a residential building;
- calculate the load that the ceiling will experience after installation;
- carry out calculations of the section and pitch of beams using special tables.
The length of the base beams for the roof consists of the span size and the required margin of 10–15 cm for a reliable ceiling when supported on the wall. Span length is the distance between the internal parts of opposite walls in a residential building or any other building. The most popular option in private construction is considered to be a distance from 2.5 to 4 m. For spans greater than 6 m, wooden trusses are used to install the floor.
Important! The load on a wooden beam includes forces from the structures above, the internal filling of the floor, as well as temporary elements (people, household appliances and furniture).
Accurate calculations can only be performed by a construction organization specializing in this. For independent calculations, use the following values:
- the total standard load per square meter of flooring when using insulation (mineral wool) is 130 kg/m2;
- when using thick boards and heavy thermal insulation material, the standard load increases to 150 kg/m2, the total, taking into account the safety factor of 1.3 - up to 245 kg/m2;
- in the attic room, the ceiling is subject to temporary loads from the installation of furniture or the movement of people - the total load will be 350 kg/m2;
- the total load for interfloor spans is at least 400 kg/m2.
All specified values are considered the base value for further calculations.
see also
Comments 41
Well, there’s Vladirom’s calculator, enter the span and pitch of the beams vladirom.narod.ru/stoves/beamcalc.html
I have a studio hall-kitchen size 5.80 * 9.60 laid I-beam 200 equal-flange 2 pieces of 6 meters between them, 3.15 meters each, 150 * 150 timber and 50-KA board. During the construction of the 2nd floor, 14 sibit pallets were installed, the deflection in the middle was 4 mm.
This is specifically so as not to write the same thing. I posted a cheat sheet a year ago: vk.com/expertm_nsk?w=page-118571856_52625662
When bent, a beam tends to twist into a spiral. To minimize subsidence when walking, you can make diagonal supports from 50x50 timber across the beams themselves or install crossbars from sections of these beams. The ceiling will be stiffer and sag less. The beams themselves are at least 100x200 mm, pitch 600. PS. I couldn't find a drawing with cross braces.
150x200 should be enough. It is better, as written below, to assemble with boards. The main thing is not to spare nails. The width between the beams is standard 600mm.
Now they are blocking me with timber 100x150 every 80
100*200 through a swing of 90-100 cm laying is sufficient with a margin if the length is no more than 6 meters
room length 5.3 width 6.4
so, it seems that it is accepted that the length is greater than the width)) for you it’s the other way around. Beams, if your width is normal, are 100*200. I have these at a length of 5.6 m and everyone says that with a margin, only So that the distance between them is no more than a meter, I laid them 90 cm apart.
Assemble a “butterfly” beam - three 50x200 boards per edge, with wooden spacers between them, tighten them with pins along the spacers, the beam spacing is 600mm. Other things being equal, the “butterfly” is stronger than a whole beam of the same section, because spatial rigidity appears in it
what is a butterfly beam
Assemble a “butterfly” beam - three 50x200 boards per edge, with wooden spacers between them, tighten them with pins along the spacers, the beam spacing is 600mm. Other things being equal, the “butterfly” is stronger than a whole beam of the same section, because spatial rigidity appears in it
Assemble a “butterfly” beam - three 50x200 boards per edge, with wooden spacers between them, tighten them with pins along the spacers, the beam spacing is 600mm. Other things being equal, the “butterfly” is stronger than a whole beam of the same section, because spatial rigidity appears in it
so the ceiling height will be 660cm
So I thought I’d throw two beams one hundred and fifty on top of each other and sew them together. since the height of my gas block is three hundred mm
I made 50 by 150 boards and the floor rests on them and I’m making a second floor. They jump a little when you jump on them. but my step is 1100-1200, initially I didn’t think that there would be a second floor.
By the way, the strength of strength material will help you - the deflection of a beam under a uniformly distributed load is considered... The moment of inertia of a rectangular section is also... It is more difficult to find reliable information about the modulus of longitudinal elasticity of wood, but you are unlikely to be mistaken by an order of magnitude...
By the way, I remembered another valuable tip - wooden beams should be made with the so-called bending, so that under the influence of a constant load the beam will bend and take a rectilinear shape...
Builders are unlikely to bother with stretching the beam... (it’s more convenient to bend it and fix it in this state...),
Do you think the author of the article understood you?
Concrete slabs are better))) In general, the neighbor laid thicker timber, otherwise it would sag.
Or you can fasten 2 200*50 boards together and use them as timber, it’s stronger))
10x20 will be good, the distance between the beams often depends on the flooring, often it is OSB, so they select it so that the beam fits at the junction of the slabs. But it’s not worth more than 60, the flooring will sag even when walking, and will creak. There are options for floors with double beams, thicker for the floor of the 2nd floor and thinner between them for the ceiling of the first.
It’s better to put a gun carriage
With a span of 5 m, I laid 400x100 (2 x 200x100, fastened together) with a step of 700 mm (between lags of 600 mm - the size of the foam block). During the construction process, pallets with 500 kg foam blocks, 4 pieces each, were placed on a pair of such logs. There was a deflection in the center
2 x 200 in height? How did you fasten it?
Yes, 2x200 in height. Studs all the way through. 5 pieces each. But you should do it like this, just screw the boards at an angle of 90 degrees to each other.
I built two houses. The first one was for myself at the age of 23. The green one didn’t know much. I put 1009120)*200. The result is, in principle, normal, but when children play and jump, it’s not very comfortable. The second time I ordered 100 (120) at 250. In the end, they brought 150 to 250 for the same price. Very heavy, but the difference is noticeable in the noise and shaking of the chandelier))). The larger the rib, the less deflection, vibration, etc.
Article rating:
Save to:
Which timber to use to cover 5 meters Link to main publication
Definition of section and pitch
After selecting the loads and determining the length of the beams, they begin to calculate the step of their laying for the installation of the formwork of the future floor, and also determine the size of their cross-section.
All work is carried out according to the following rules:
- the ratio of the width and height of the load-bearing elements of the floor is at the level of 1:1.4 (the width of the beam ranges from 4–20 cm, and the height of the products depends on the thickness of the heat-insulating material, and is in the range of 10–30 cm);
- the installation step of the beams is affected by the calculated loads and dimensions of insulation, plywood or any other material for filing;
- between adjacent beams leave a free space of 30 to 120 cm.
To accurately determine the cross-section of a wooden floor beam, there are special tables. When carrying out calculations, it is necessary to pay attention to the maximum deflection value; for attic floor beams no more than 1/200; for interfloor elements - 1/350.
Floor beams are the main load-bearing elements of the entire wooden floor. The reliability of the wooden floor depends on the correct choice and selection of the size and number of beams. The main dimensions of wooden floor beams are their length and cross-section. You need to determine the length of the beam based on the width of the span that you will need to cover. The cross-sectional dimensions of the floor beam depend on the span length, the distance between the installed beams (installation step) and the expected load that will act on the floor beams. The article will tell you how you can independently calculate the number and sizes of beams.
Increasing the cross-sectional area of a beam
One of the most popular ways to strengthen floor beams is to increase their cross-section by installing additional wooden overlays. This method is mainly used in cases where the material of the beams becomes loose due to natural aging or as a result of the activity of wood-boring beetles.
An increase in the cross-sectional area is achieved by installing wood overlays with a thickness of at least 50 mm on the weakened or damaged area. Some experts argue that it only makes sense to increase the section along the horizontal sides, that is, at the top and bottom of the beam, and increasing the thickness of the product along the width does not give a useful effect.
Before installing the overlays, as in the case of other work on strengthening beams, weakened areas should be treated with antifungal agents. After antifungal treatment, it is necessary to reduce the level of deflection to a minimum using jacks. It is more efficient to directly install the linings along the entire length of the beam. Attachment is carried out using bolts or studs through and through.
Not only wood, but also metal can be used as a reinforcing element. In this case, channels or metal strips are used. The latter are less reliable than the channel and can only be used to strengthen small areas of damaged beams.
Reinforcing the span of a beam with the help of metal overlays is carried out according to the same algorithm as in the case of wooden overlays, but it has some peculiarities. In particular, before installation, metal linings are treated with an anti-corrosion compound. In addition, a waterproofing layer should be installed between the metal and wooden parts.
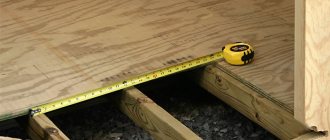
Determining the required number and sizes of floor beams.
The dimensions and number of wooden beams for the floor structure will be determined based on several components. First you need to measure the width of the span that will be covered. Then we determine the method of attaching the floor beams to the walls of the building, that is, how far the beams will go into the walls. After this, you need to calculate the loads that will act on the floor beams when the construction project is put into operation. And the final stage: using tables and special calculator programs, the required section and pitch of the floor beams are selected.
Which beam to choose for flooring: dimensions and installation process
In private construction, the interfloor ceiling is usually erected from wooden beams. Firstly, the material is quite accessible, and secondly, it is lightweight, so you can handle the construction of the ceiling on your own and without the use of special equipment. Well, thirdly, wood is an excellent heat insulator.
Choosing timber for floors
What will we talk about:
Calculation of the length of floor beams.
The dimensions of the span that needs to be covered and the size of the embedding of the floor beams into the walls determine the length of the beams. The length is measured with a tape measure. The depth of embedding the beam into the wall in each case must be determined individually, based on the material from which the walls are made. In brick or concrete walls, floor beams are installed in grooves about 100 mm deep if the floor beam is made of boards and to a depth of 150 mm if the beam is made of timber. Special notches are cut into wooden walls, the depth of which should be at least 70 mm. In the case of fastening floor beams to wooden walls using special metal fasteners, which are used as corners, brackets, clamps, the length of the beams is the same as the distance between the walls. In some cases, roof rafters are mounted on wooden floor beams, and then it is necessary to extend the beams beyond the wall by 30-50 cm in order to form the light of the future roof.
Floor beams, depending on what material or wood they are made of, can span different sizes of spans. It must be taken into account that the optimal span length is 2.5–4 m. For a length of up to 6 m, a floor beam made of edged boards or timber can be used. From 6 to 12 m it is already necessary to use floor beams made of laminated veneer lumber, which can be rectangular or I-beam. In the case of using conventional floor beams, it is necessary to support them on intermediate supports, which are walls or columns. Instead of beams, if the span is more than 6 m, wooden trusses can be used.
Installation of beams
Initially, all necessary calculations are made. When the dimensions, cross-section and pitch of laying the beams are known, installation work can begin. It should be said here that the moisture content of the material is of great importance.
It is advisable that the board is dried to 10 - 12%. Timbers whose humidity exceeds 20% cannot be used in construction, otherwise they will twist strongly along the longitudinal axis.
Most often, special cuts or niches are made in the walls so that the ends of the beams rest on the wall to a depth of 100 - 150 mm. If the walls are brick, concrete or block, then the ends are treated with bitumen mastic or roofing felt to prevent rotting from absorbed moisture.
The width of niches in stone walls is selected so that the board is concreted with a 50-100 mm layer of cement-sand mixture. Fastening is also practiced using steel baskets, plates, brackets and other similar parts.
In this case, the brackets themselves are attached to the walls with anchor bolts or dowels, and the beams are inserted into the landing cup and secured with self-tapping screws.
In frame houses, when calculating the pitch of laying wooden beams, they try to take into account the location of the wall racks of the partitions; this principle makes it possible to create a more reliable and durable frame.
Fastening floor beams in a log house with steel brackets.
Important! Wooden floors conduct sound vibrations well, so it is advisable, regardless of temperature conditions, to lay mineral wool between the beams and use sound-absorbing pads.
Calculation of the load acting on the floor.
The self-weight load of all floor elements, including floor beams, linings, inter-beam filling and the weight of the operational load, which includes the weight of furniture, other objects and devices located in the room, and the weight of people make up the total load acting along the floor beams on the floor itself. It is quite difficult to calculate this load; it is performed by specialists and represents cumbersome calculations performed by specialists in the process of designing a floor structure. However, using the simplified version below, you can perform these calculations yourself.
Wooden floor for the attic , if things or other materials are not stored in the attic, and the insulation is made of lightweight materials, the constant load consists only of its own weight and is usually 50 kg/m2.
According to SNiP 2.01.07-85, the operational load in this case will be 90 kg/m2, including 70 kg/m2 - the standard value for this type of attic 1.3 - safety factor.
Adding 50 kg/m2 and 90 kg/m2 we get the total design load for the above attic floor, which will be 140 kg/m2, and after rounding 150 kg/m2.
If the attic is planned to be used for storing things, for other purposes, when a large load will be applied to the floor, or heavy insulation and heavier filler and lining were used during manufacture, the standard load value will increase to 150 kg/m2, and, accordingly, the total rounded the load on the attic floor should be taken as 250 kg/m2 (50+150x1.3 = 245 kg/m2). When the attic space is used for human habitation as an attic, the total design load, taking into account the weight of floors, partitions, furniture, doors, increases to 300-350 kg/m2. However, in this case, it is also necessary to take into account the weight of the interfloor wooden floors installed during the construction of the attic, and the temporary load during operation consists of a large number of furniture and people, the total load should be taken as 350 - 400 kg/cm2.
Load Definition
The size of the beam for the floor between floors is determined by the load that the structure must withstand. It’s one thing to have an uninhabited attic, which acts as an air gap between the roof and the home, and quite another thing to have an attic, where the total weight of furniture, people, household appliances and insulation can reach significant values.
The total load is the sum of the mass of all objects and the weight of the structure itself.
For a non-residential attic, the calculation will be approximately as follows:
- if the room is not used as a warehouse, and a lightweight heat insulator was used - mineral or basalt wool, expanded polystyrene, then the dead load is taken as 50 kg / sq. m;
- according to SNiP, the standard load during operation of a non-residential attic space is 70 * 1.3 = 90 kg/sq. m, taking into account the safety factor;
- accordingly, the total load is calculated as 50+90=130 kg/sq.m. m. In practice, the value is immediately increased to 150 to ensure a safety margin.
If old things are folded and stored in the attic, including furniture, if heavy insulation is used, and also when the ceiling is covered with heavy finishing material, the operating load is increased to 150.
- Accordingly: 50+150*1.3=245 kg/sq. m.
It is also recommended to make interfloor ceilings in a house from timber in cases where the second floor is a residential attic. However, when making calculations, it is necessary to take into account the weight of furniture, the floor on the second floor, partitions, if any, and the total weight of permanent residents.
- Typically, the total load is 300–150 kg/h. m.
If the second floor consists of residential, heated, actively used premises, then the total load will be at least 400 kg/sq. m. Determination of the cross-section of timber, both glued and solid, is carried out based on the obtained values.
Determination of the section and pitch of wooden floor beams.
Above we discussed how to determine the required length and calculate the total load. After this, you need to determine the required cross-section of the floor beams and the laying step, which are interconnected. The rectangular section of a wooden floor beam is best if the height to width ratio is 1.4:1. The width of the floor beam in this case can be in the range from 40 to 200 mm, and the height from 100 to 300 mm. The height of the beams is chosen to be the same as the thickness of the insulation. If logs are used as floor beams, their diameter should be in the range from 110 to 300 mm.
The pitch of the wooden floor directly depends on what type and section of the floor beam material is used and can be from 300 to 1200 mm, most often the pitch of the wooden floor is selected in the range from 600 to 1000 mm. When choosing the distance between floor beams, you can also proceed from the size of the insulation slabs that will be laid in the space between the beams, or the ceiling sheets. In frame buildings, you should strive to ensure that the laying pitch corresponds to the pitch of the frame posts. Then the greatest reliability of the structure will be ensured due to its rigidity.
Using reference tables, you can accurately calculate the dimensions of wooden floor beams or check the already selected dimensions. When making calculations, it must be taken into account that the relative deflection of attic floors should not exceed 1/200, and that of interfloor floors – 1/350.
Beams for interfloor slabs: purpose, types, calculation of parameters and installation of beams
Overlapping with timber on an I-beam as an intermediate connection.
Floor beams are used as load-bearing beams that transfer the load from all objects in the room, including the own weight of the floor, to the walls of the structure. These beams serve as support for the floor joists and as the basis for the ceiling finishing.
Thus, we see that we have before us a structural element, the proper use of which requires the correct calculation of such parameters as:
- cross-section of timber for flooring. It is important to select the width and height of the section, as well as their ratio;
- step of arrangement of load-bearing elements over the area to be covered;
- moisture content of lumber. This is also a very important parameter on which the success of the entire event may depend;
- the type of wood used to make beams. Most often it is pine;
- lumber quality. It is important to ensure that there are no cracks, a large number of knots and other defects;
- the presence, extent and composition of wood treatment with protective complexes, including antiseptics, fungicides, fire retardants and insecticides.
the length of the beam in relation to its cross section. There is a maximum length for timber floors, and usually it does not exceed 6 meters, since wooden material cannot reliably cope with large spans;
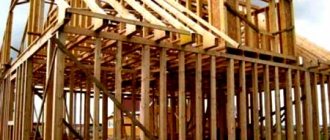
The photo shows the ceiling of the first floor.
For the construction of interfloor structures, massive four-edge material made from northern pine is usually used. The most popular sections are 100x100 mm, 150x100 mm, 150x150 mm, 200x150 mm, 200x200 mm.
It is believed that the greatest load-bearing capacity is possessed by parts whose height exceeds the width by 7:5, and the length exceeds the height by approximately 24 times.
Important! The purpose of timber for interfloor ceilings is to accept, distribute and transmit loads from the weight of people, objects and its own weight to the load-bearing walls of a house or apartment.
Types of permissible load on structures
The design of any ceiling includes three parts:
- The upper one - with flooring, screeds and insulation (when there is another living space on the floor above).
- The lower one - with ceiling decoration and hanging elements (when housing is also located on the floor below).
- Structural – a load-bearing base on which all the elements of a given part of the structure are mounted (which is the floor slab).
The floor and ceiling with decoration and furniture and interior items located on them, including suspended ceilings, decorative partitions, additional plumbing, children's swings, sports equipment, etc., which are possible in the apartment, provide a constant static load on the floor slab.
Temporary (dynamic) load is understood as that which occurs when people and pets move along the floor structure. At the same time, the calculations even take into account, for example, that all members of the family who will live in a given room may turn out to be obese people, and they will choose as a pet not some light hamster, but large lynx or deer, moving rapidly, almost constantly on the move.
The location of point and distributed loads is taken into account separately. An example of a point one is a suspended punching bag weighing 220 kg, a distributed one is a suspended ceiling system, in the frame of which hangers for the panel are located at a certain distance from each other, attached to the floor slab.
There are nuances in the calculations of point and distributed loads - it is necessary to take into account the functional purpose of the room. Thus, when installing a bathtub with a volume of 520 liters, which, when filled with water, will create a distributed load (due to the area it occupies), the point load from its legs is also calculated separately.
Thus, loads can be permanent - when the entire service life is affected by overlying structures, engineering equipment, communications, etc., and temporary - in three positions:
- Moving living objects indoors, adding new household items and rearranging them.
- Seasonal and weather factors - precipitation (accumulation of rainwater and snow on the roof, eaves and balconies), strong wind.
- Anticipated emergency situations, for example, a collision of a heavy vehicle with a part of a structure or a tower crane falling onto the wall if another construction site is being built nearby, and other similar cases.
In accordance with the coefficients specified in the construction documentation, a standard 6 m hollow core slab (for example, PK 60-15-8), without taking into account its own weight, can withstand the following loads:
- Spot: 1040 kg/m2.
- Distributed: 960 kg/m2.
- Constant: 880 kg/m2.
- Temporary: 1040 kg/m2.
- Limits:
- Minimum: 400 kg/m2.
- Maximum: 1040 kg/m2.
Installation work
The main stage is, of course, the installation of beams. It implies competent preparation at the stage of construction of the first floor.
First, the wood should be pre-treated with a fire-retardant compound, as well as an anti-rotting liquid (this must be done with the entire crossbar). This must be done immediately after purchase. If the material will lie for some time before laying, it needs to be rearranged: a row of beams, then 3-4 bars across, then the next row. This will allow the board to ventilate and dry out. This will prevent mold from appearing.
The part of the beam embedded in the wall should also be coated:
- Bitumen or primer.
- Ruberoid, roofing felt or glassine.
- Liquid waterproofing agent consisting of bitumen.
- Linocrom.
This is done due to the fact that wood, when in contact with concrete and blocks, can absorb moisture and begin to rot over time .
Reference
For aerated concrete, an operating humidity content of 3-5% is considered normal. No matter how dry the blocks may seem, direct contact of wood with this material is unacceptable.
The beam must be embedded into the load-bearing wall at least 12 cm. The ends are cut at an angle of 70 degrees in order to ensure the removal of moisture.
Attention!
There is no need to cut off the end of the beam with waterproofing material. Otherwise, access to moisture evaporation will be blocked. It is required to leave a small air gap between the end of the beam and the wall.
Beams are laid on a reinforced surface (to enhance the strength of the structure). Instead of an armored belt, some manufacturers in small houses allow a 6x60 mm metal strip to be supported on aerated concrete with a lining.
The beams are fastened to the reinforced belt in houses made of gas silicate using anchor bolts.
To insulate the street side, insulation can be placed in front of the beam. As a rule, the outer ends of the beams are insulated from the outside with expanded polystyrene.
Filling the voids between the laid beams is done with gas blocks. Gaps of 2–3 cm are left between the gas silicate and the timber. They are tightly packed with mineral wool, thus preventing the formation of condensation and dampening of the beams.
Do not forget to think about the placement of the stairs to the second floor , since the opening must be provided immediately:
Well, that's all, the floors are ready. Now you can begin the subsequent finishing.
What does the concept mean?
The load on a concrete hollow-core floor slab is the main operational parameter that determines the load-bearing capacity of the product and reflects how many kg of weight a square meter can withstand. m of surface. Reflects the totality of all types of loads that the slab can withstand while performing its functions.
The permissible load on a hollow-core floor slab is one of the main parameters for choosing this product when designing a building. The strength of the structure and the duration of its operation until the need for major repairs arises depend on the accuracy of the calculation.
Tools and materials for work
Before performing the main work of cutting out locks, it is necessary to take into account and prepare all the necessary tools so that they are at hand at the right time.
What you need for work:
ruler and square;- marker;
- axe;
- chisel;
- chainsaw;
- electric drill;
- stationery knife;
- chisel;
- bolts, nuts, a key for them;
- antiseptics and fire retardants.
You may also need a sander or sandpaper to smooth the cut surfaces.