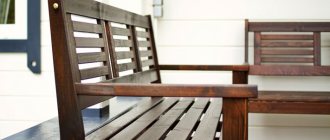
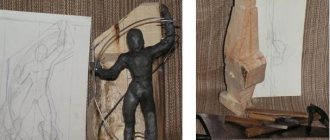
Glued laminated timber has found widespread use in the construction of economy-class housing and luxury houses. In addition to house construction, small batches of material are used to implement original projects for the creation of architectural miniatures, interior decoration and furniture manufacturing. For these purposes, rare wood is best suited; blanks of non-standard sizes and original profiles may be required. You can make a unique profiled beam with your own hands for the implementation of individual author’s projects in your own workshop or on rented equipment.
Before organizing your own production, you need to decide whether independent production will be justified. The motivation for making such a decision is often the desire to realize one’s own creative potential in the following areas of business activity:
- Production of exclusive furniture;
- Providing services in interior design of homes;
- Author's design of reception halls, restaurant interiors and art exhibitions;
- Business in the field of architectural miniatures.
A dream to finish the facade of a house or arrange a veranda according to your own design can motivate you to make your own laminated laminated timber.
Depending on the needs for material and available woodworking equipment, there are several ways to independently produce profiled timber. The implementation of such a project includes the main stages:
- Defining goals, quantity of products and estimating the project budget;
- Selection of material and organization of drying;
- Production of lamellas;
- Gluing;
- Profile recess.
Material selection
Making timber with your own hands is a difficult, but completely doable task. To make laminated veneer lumber, you can use any lumber made from various types of wood. The most economical is the edged softwood board, which is close in size to the size of the lamellas. Making timber from ready-made boards will eliminate the need for sawing wood.
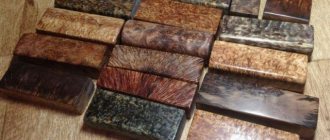
To make profiled timber with your own hands, you can use deciduous and rare wood species with an attractive texture. A more economical solution could be a combined beam with a front part made of valuable wood. It is better to select the material yourself; for this you need to: select lumber according to the nomenclature and standard sizes, carry out inspection and defect detection of the product. It is better to purchase dry wood, but at this stage the moisture content of the wood does not play a special role; in any case, it will need to be brought to condition.
Do-it-yourself profiled timber at home
The range of lumber on the market is increasing every year and the types of products for building a wooden house are becoming more and more advanced.
What to do with ordinary non-profiled timber, which is being replaced by its fellow profiled and glued beams. After all, using the “budget option” of edged timber is cheaper. Craftsmen solve this problem in their own way. There are several ways to make do-it-yourself profiled timber from ordinary timber. This way you can save money and get better quality building material. Are you saying this is impossible? We will answer - you can make profiled timber with your own hands, all you need is some free time and a little patience. And of course, the ability to use tools!
Why is it better to make profiled timber with your own hands?
Why complicate things? Isn't it easier to buy ready-made profiled timber and build from it? Yes, it's undoubtedly easier. But there are many reasons why making profiled timber with your own hands is so important:
- By making profiled timber with your own hands, you can save from 3 to 5 thousand rubles per cubic meter of material. Of course, more time will be spent.
- The profile can be made in such a geometric shape that it will not be blown through. Moreover, you are doing this for yourself, which means that the profile will be made with high quality.
- Walls made of such material will not require additional finishing, since the insulation will not be visible.
- The crowns can be made more accurately and the connecting ones will fit tightly to each other.
What types of profiles are best to make?
When choosing a profile, it is best to calculate your strengths and skills. Making a profile on a beam with your own hands seems like a simple matter. It takes a lot of time and perseverance to carry out this task efficiently.
When choosing a profile, it is best to focus on the simplest designs. To implement them, you don’t need to use many types of tools and you don’t need to do a lot of calculations.
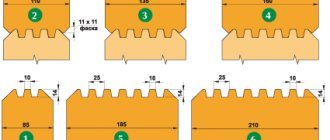
There is GOST 9330-76 “Basic connections of parts made of wood and wood materials.” This document will help you decide and calculate everything correctly. Basically, when profiling with your own hands, you make the following types of profile:
- Profiling through a block.
- Profiling through triangles.
You need to understand that before making a profile, you need to calculate its depth, height and width. It is different for each section of timber, and GOST will help with this. In any case, when building a house from such timber, insulation with a thickness of at least 5 cm is laid between it.
How to make a profile yourself?
There are several ways to make a profile on a beam with your own hands.
Using a cutter
[ads1]The easiest way is to take a hand router.
It should be powerful from one and a half kilowatts. Special attachments are purchased for it. If the profile is simple, then the radius of the cutter used will be 4-5 cm. If it is complex, then it is done by several types of cutters. With this tool, if you wish, you can even make a D-shaped side of a profiled beam with your own hands.
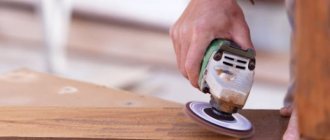
But here you also need an additional grinding machine and an electric planer.
It all depends on what kind of manufacturing precision you want to achieve in the end. The very concept of “profiling” implies precision and surface cleanliness. The advantages of this option:
- If the workpiece is of good quality, then the router will cope 100% and the result will be as accurate as possible. But you definitely need to monitor the accuracy of the router.
- If the milling attachment is sharp, then you can do without further grinding.
But this option has its drawbacks:
- A milling machine is an expensive tool (5-10 thousand rubles).
- It is not always possible to purchase the necessary attachment; it may simply not exist for the type of milling machine that you have.
Best suited for cutting straight grooves.
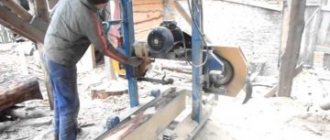
Using a Circular Saw
The second way to make a connection with your own hands is to use available tools. For example, using a hand-held circular saw. Such a tool costs 2-5 thousand rubles, depending on the manufacturer. The main thing is that it can be cut at a back angle and make a cut with a depth of at least 65 mm.
The advantages of this option:
- Ability to control the accuracy of the cutting depth.
- Easy cutting of a straight and smooth groove.
Disadvantages of working with a circular saw:
- The cutting depth may not be sufficient.
- It is impossible to clean the groove with this tool.
- Each time you need to readjust the cutting depth.
- Low operating speed.
Best used for cutting a triangular groove.
Another way to cut a groove with a circular saw can be seen in the video:
In both cases, this is a long and painstaking work that requires precision and preliminary measurements.
Of course, you can combine these tools with each other. For example, if you need to make a rounded quarter, cut it with a saw first. And then round with a router. Don’t rush to throw away the sawing waste; it will be useful for connecting the beams together.
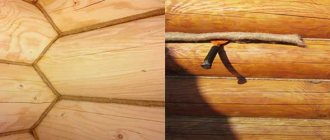
Corner beam connection
You can also make the corner connection of the timber yourself. Most often it is made in two types:
- One way or two way simple connection.
- Connection in a warm corner.
Any connection is made in accordance with GOST 30974 - 2002. You need to choose the type of cutting of bowls based on your own skills and knowledge.
The tools you will need are: a chainsaw or a milling machine with a special device, a pencil, marking templates, a tape measure, an ax and a hammer drill. Using a hammer drill, holes are drilled for the dowels.
One-way or two-way connection
With a one-sided connection, a bowl is cut out on the beam on one side; with a double-sided connection, the bowl is cut out on both sides.
At the end of the beam you need to measure a distance equal in depth to half the section and a width equal to the width of the beam. Cutting out such a connection is not difficult. Then the beams are stacked on top of each other. This connection is also often called “cold”. This design requires insulation and a layer of insulation of at least 5 cm.
Complex connection in a “warm corner”
Connecting to a “warm corner” is difficult to accomplish. This requires special skills and precision. Although a warm corner retains heat better and makes it possible to make the corners more even.
There are several types of timber connections in a “warm corner” that you can do yourself: a keyed connection, a connection with a main tenon.
Make templates according to which you will mark the timber. It is easy to make from wooden slats. Attach the template and make three cuts with a chainsaw to the specified depth. Then the excess is chopped off along the cut with an ax.
The finished groove is cleaned. The cuts must be made large, half the cross-section of the original material. This compensates for them when the house shrinks.
Tow is placed tightly between the joints; after installation, it will be difficult to caulk the “warm corner”.
The crowns should be connected to each other using wooden or metal dowels. Remember, we talked about leftovers that will come in handy. This is what wooden dowels are made from. When the timber shrinks, the iron pins will be visible and this will ruin the entire aesthetic appearance of the structure.
Wooden dowels are made with a diameter of 20-30 mm. On one side they are slightly sharpened. If you make them in advance, then by the time of construction they will dry out. You can also make square dowels; it’s easier to make them yourself.
In this case, its diagonal should exceed the diameter of the drill used later by 4-6 mm. The length of the dowel should be equal to 1.5 times the thickness of the timber. The holes are drilled, taking into account this size, but adding another 2 cm. They should not be drilled near the corner joints, since when hammering in the dowels there may be chips.
Such holes should be located at a distance of 250 mm from the end and in increments of 1.5 m.
Making a warm corner with your own hands right away is difficult. This requires skills and experience in working with timber. But if you have time, you can practice on old material or a thick board.
Making a profiled beam with your own hands and assembling it correctly into corner joints is quite painstaking and time-consuming. If you have the time and patience, doing this work yourself will save you money. But if you do not have sufficient skills, then it is better to spare your time and energy by purchasing ready-made profiled timber with already cut bowls.
Log house made of profiled timber for shrinkage without finishing with your own hands: Step-by-step instructions +
Log house made of profiled timber: shrinkage, do-it-yourself assembly. A house built from profiled timber is more than a roof over your head. This is a place of endless comfort, which has attractive appearance and excellent characteristics.
How to dry lumber
The best results are obtained by chamber drying of wood, but you can set up a place for drying in a garage or on a country plot; wet lumber is often stored under sheds or in outbuildings. The natural drying process can take several months. If this process is organized indoors, you can use a heater and fan. In any case, the room must be ventilated. When the stack is located under a canopy, the wood must be protected from direct sunlight.
In the drying stack, the edged boards are laid in horizontal rows; the rows are separated in height by spacers of the same size. Dry wood blocks with a section size of 40x40 mm can be used as a gasket. The bars are laid perpendicular to the main layer every 500-600 mm. To prevent deformation processes, it is recommended to lay oppression from available material on the top row of the stack.
During the drying process, the moisture content of the material is periodically checked; when the moisture content reaches 10-12%, the lumber can be used to make lamellas. Humidity control is carried out with a moisture meter; there are no special requirements for accuracy of measurements; an inexpensive device can be used for these purposes.
Final recommendations
Do not forget that the final stage of the arrangement will be the installation of windows and fixing of doors. Windows are cut out of plexiglass in accordance with the window opening. They are fixed with glazing beads and small nails. For greater strength and reliability, the edges should be treated with sealant. The picture will be complemented by beautiful platbands, which will add more comfort.
There is no need for a massive door in a playhouse. In most models it is completely absent, but for a greater sense of usefulness it is worth providing for them. Only 1 layer of plywood is suitable for it, which is reinforced with transverse dies. Fixed on door hinges and painted.
Any children's building will not be difficult for a person who knows how to use a hammer. It is enough to choose the right scheme or draw it up yourself, and then strictly follow the specified parameters and data. Don’t limit your imagination, and also involve your baby, who will tell you what and how will be more convenient for him in his own playhouse.
Preparation of lamellas and preparation for gluing
From the edged board, brought to the required condition, you can begin to make lamellas for gluing. To equip the workplace, you need a planer and a circular saw. It is advisable to abandon the operation of merging lamellas using the “tenon-to-tenon” technology. The tenoning machines on the market are expensive, the equipment is highly specialized, and it is impractical to purchase it for personal use. Without special equipment, the easiest way to produce two- or three-layer laminated veneer lumber.
The procedure for making lamellas:
- Obtaining blanks of a given shape using a planing machine;
- Trimming with a circular saw with an allowance of 50 mm;
- Defecation and sorting into facial and internal parts;
- Assembly “dry”, marking according to the order of location in the finished product.
To prevent displacement of the lamellas, a keyed or dowel connection is used. The nest for the key is hollowed out in the center of the workpiece; the key can be made from a discarded board. The dowel is made from hard wood and inserted into specially drilled holes.
Experienced professionals recommend:
- Lay layers with a clearer pattern of annual rings on the front side;
- For two adjacent lamellas, the wood fibers should be oriented in different directions;
- Treat the surfaces to be bonded with coarse sandpaper to roughen them, remove dust, and degrease the surface with a solvent.
Bonding and crimping
For gluing, use any available wood glue; for timber intended for indoor use, it is better to choose environmentally friendly glue. The operation is performed at room temperature, in a ventilated area. Glue consumption is up to 10 liters per cubic meter of finished timber.
The lamellas are laid in a previously determined order, the glue is applied with a brush or roller, the thickness of the adhesive layer is up to 2 mm. The assembled structure is fastened with screw carpentry clamps located at intervals of 400-450 mm. It is recommended to place gaskets made of multilayer plywood measuring 12x12 mm under the clamp stops.
The time for complete curing of the glue is determined according to the passport data of the composition. After the gluing process is completed, glue deposits are removed on a planing machine, “steps” are eliminated, and the timber is given the specified dimensions. For finishing, use sandpaper or a sander.
Profiling and final trimming
Profiling timber with your own hands is the most important operation. When making timber with your own hands, the profile can be given any shape. To cut the profile, it is advisable to use an economy-class milling machine or assemble a machine for profiling timber yourself. This is easy to do using a hand router, a carpenter's workbench and a simple slipway. The power of the milling cutter must be at least 2 kW. This solution is suitable for the production of small batches of profiled timber. A variety of attachments allows you to cut profiles of the most complex shapes, including cone-shaped ones.
When made individually, the grooves can be cut with a circular saw. Such a simple machine for making profiled timber can be assembled on a workbench using a rigid guide for moving the saw. After cutting, the grooves are sharpened using carpentry tools.
The final carpentry operation is finishing trimming, the product is given a given length, and the end is processed with sandpaper.
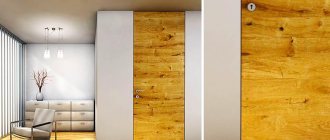
The finished profiled laminated veneer lumber is decorated with stain, wood oil, artificially aged, and imitates the relief left by the bark beetle. The timber intended for external finishing is impregnated with moisture-repellent and antiseptic impregnations.
Types of insulated laminated veneer lumber
The advantage of this material is that it combines the features of wood and artificial materials . Its texture, good thermal insulation and durability are equal or even superior to the properties of other building materials.
Insulated timber comes in several types, differing in material and design. A popular insulation material is ecowool. This is a cheap material that retains heat well. But its main disadvantage is that it can easily be damaged by rodents. Also, laying ecowool requires a special tool, which increases construction time.
A more convenient and popular insulation is polyurethane foam; it is easily installed in glued building materials.