Designing your home
Before assembling a house from timber, you need to choose the right project. Log houses are assembled according to standard or individual designs; they can differ in architectural complexity or have simple shapes. If you plan to assemble a ready-made factory log house, we recommend choosing a standard project, which has advantages:
- The log house has already been tested in operation, and the manufacturer has eliminated the main shortcomings.
- The manufacturing material is used as economically as possible, so the price of the finished box is cheaper.
- It’s easier to choose finishing materials and roofing, since you can see several finished houses with your own eyes and chat with the owners.
When choosing an individual design, timber is also the most suitable material. It has the correct shape and can be adjusted to any size. Therefore, with the advent of this lumber, it became possible to assemble wooden boxes of the most complex and unusual shapes.
By choosing timber of the required cross-section, any project can easily be adjusted to any region with different average temperatures and climates. For a garden or country house, material with a small cross-section is suitable: 100x50 mm, 100x100 mm. For permanent residence, timber with a section of 150x150, 150x200, 200x100 mm is taken. The simplest option is a square section - 150x150 mm. The square shape allows you to quickly assemble the walls without selecting the technical and external sides. But provided that the beam is simple. In this case, a section of 150x150 mm must be additionally caulked and insulated.
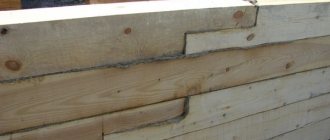
One of the economical options is profiled material. The tenon and groove on the technical sides of the beam are firmly connected during installation and create a reliable barrier to the wind. The walls are insulated using tape insulation directly during assembly. And if the front and back sides are additionally sanded, then after assembling the box you only need to go over the walls with paint and varnish material and the house is ready to move in.
A separate group is the log house made of laminated lumber. This beam consists of lamellas that are connected to each other under the influence of a press and glue. But scientists are still arguing about the environmental friendliness of laminated lumber. The positives stand out: high strength of the walls and increased thermal insulation properties. So, for the construction of a residential building from glued material, a section of 100x100 mm is suitable; at winter temperatures down to -15 degrees, additional wall insulation will not be needed.
When choosing a project, it is worth considering what type of timber the walls will be assembled from. Since further finishing work depends on this, which means additional material investments.
Replacing rotten crowns of a house on a strip foundation
Replacing crowns for a structure on a strip base is a more labor-intensive procedure. The jacks are placed in niches cut inside the rotten crowns. In order for the device to “walk” freely inside this niche, you will also have to dismantle a fragment of the floor and destroy a small part of the foundation.
And after replacing the logs in the log house, it will be necessary to restore the foundation and return the floor covering to its place.
An alternative option is to combine jacks with levers. The lever can be a hard rock log. It is placed in the niche in the same way and installed so that the outer side of the lever is on top of the jack.
The advantage of this method is that the damage to the foundation is less significant, but a large or two-story house cannot be raised in this way.
What to do if the house is on a pile foundation
The difference between strip and pile foundations is only in the method of installing jacks. Everything else happens using the same technology. In the case of a pile foundation, it is most convenient to install jacks in pre-dug holes:
- dimensions – 100x70 cm;
- depth – 50 cm (the bottom must be made as flat as possible, and then compacted with the thickest and strongest board possible);
- distance from the wall – 50 cm;
- The long side of the pit should be located along the wall.
Using jacks installed in this way, you can lift the lower crowns, which are replaced in a wooden house, and work with them “in weight”.
For what reasons can logs rot prematurely?
Operational wear and increased load on the lower part of the structure are the main reasons that lead to damage to wood. However, there are factors due to which the tree rots earlier than planned:
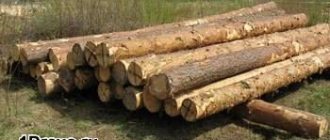
- In order to save money or due to an oversight of the owner, logs of inappropriate quality were purchased for construction: high humidity, which did not undergo antiseptic and hygroscopic treatment.
- Low quality waterproofing material that protects the log house from environmental aggression.
- Violation of storage rules during construction of the building. Even properly dried logs stored in damp or dirty conditions during construction lose the necessary properties.
- Incorrectly installed ventilation system in utility rooms with high humidity (kitchen, bathroom). Impaired air circulation leads to the appearance of rotten areas and further rotting of the tree.
- Failure to follow the rules for caring for external wooden elements. Contact of logs with the ground in the event of shrinkage of the backfill leads to freezing and further thawing, as a result of which the process of rotting begins.
Logs can rot prematurely due to the fault of the developer. An oversight, incorrect construction technology, and banal “hackwork” lead to the need for early replacement of logs.
How to install a spring unit Force
To install the Spring Assembly, you will need a drill, a drill bit and a special attachment for the head of the “Strength” spring assembly. It is necessary to drill a hole in the upper crown, the length of which reaches the middle of the beam. Then insert the spring assembly into it and tighten it so that the spring is completely compressed, only in this case the necessary load will be provided. The spring assembly must be installed at a distance of 1.5 or 2 meters from each other, and their location must be staggered.
When building wooden houses or other structures, it is necessary to use fasteners to create a strong fixation of the walls. To do this, you can use dowels or “Force” spring units. The first fastener option is more affordable, the second will cost more. Or you can use an alternative method, using both fastening options at once: fix the lower rims of the frame with dowels, and fasten the upper ones with spring bolts. Such a house will more easily withstand the shrinkage process and will serve its owners in excellent condition for many ten years.
Fastening the crowns of a log house using dowels
Dowels are the most common fastening element. It is more economical and convenient to use. There are several types of dowels: metal and wood. The former are not recommended for use in wooden housing construction. Metal and wood are two different materials; wood has a wet structure and the metal in it is subject to corrosion. In turn, a rusty fastener can provoke rapid destruction of the wooden material. Metal dowels have a corrugated shape, one might even say ribbed, and during the shrinkage of the house, the surface of the beam will be damaged due to the unevenness of the fastening element.
It is recommended to use wooden dowels to secure the timber. They are not inferior in strength to metal ones, because... Hardwood is used for their manufacture. Birch dowels are the most popular; they are affordable and have excellent strength characteristics. The length of wooden dowels may vary. But it is recommended to purchase long dowels; they can be cut at the construction site into the required size elements, based on existing logs or beams.
Dowels are used to prevent deformation of the timber and provide stability to the wooden walls of the house. Birch dowels are environmentally friendly, just like the log house itself. They are not afraid of temperature changes and have the same degree of humidity as the walls of a house. Provide natural shrinkage to a wooden house. They are durable, the dowels, beams and logs are compatible and together can last a long time.
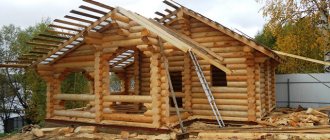
Rules for assembling a log house
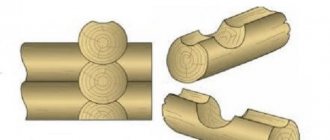
- Laying logs in crowns. There are two ways of laying - butt to top and butt to butt (top to top). But if it is necessary to make horizontal alignment in a row, this rule can be changed.
- To obtain the required rigidity in the log structure, they are fixed in vertical planes using dowels - wooden parts machined in the form of a round or square rod. Dowels pass two or three logs at once into drilled holes; such fastening is done in each crown. Holes are drilled using wood drills with a length of 450 mm and a diameter of 25 mm. The distance between the holes is selected from 80 to 150 cm. There should be at least 100 mm from the edges of the openings and bowls. The pins are driven into the holes with a hammer, into a “tightness”. The use of metal pins instead of wooden dowels for a log house is unacceptable. Firstly, the metal condenses moisture from the air, and wood rotting in the inter-crown seals inside the walls becomes possible. Secondly, when driving pointed pins, free shrinkage of the logs is impossible; during the shrinkage process, the logs “hang” on the pins, the log house does not shrink, and the gaps between the crowns increase.
- After the log house is assembled, the protruding parts of the logs at the corners are cut to the mark, but not less than 200 mm from the corners to the ends. The ends of the logs are cut along vertical markings. Exposed grain ends dry faster than the middle portions of logs and may develop deep cracks. To avoid this, use acrylic varnish or PVA glue to cover the ends. Historically, clay and lime mortar were used for this purpose.
- To create window and door openings, they do not always leave holes in the frame or make them deliberately smaller. Be sure to leave only an opening for entry into the log house. After the frame shrinks, the openings for windows and doors are cut to the required dimensions, taking into account the connection to the landing tenon.
Where to start?
When the project is selected, the assembly of the log house begins. The foundation of the house is being prepared - the foundation. Since the material is light, any type of foundation is suitable:
- Columnar;
- Tape-grillage;
- Tape.
We do not recommend monolithic, as this is the most expensive option, which will only be profitable if the soil is moving and very crumbling. For loose soil with high groundwater levels, a pile or columnar foundation is suitable. How to build a house if the soil is swampy and mobile? It is wise to use screw piles. They are easy to install with your own hands, and the log house will be less likely to “walk” in the future. But when choosing a columnar or pile foundation, you should understand that in the future the base of the house will have to be additionally surrounded by a frame and insulated. Otherwise, there will be no basement or cellar in the house, and heat loss after insulating the basement will be reduced by 15%.
One of the most popular types of foundation for a wooden frame is strip foundation. It got its name from its resemblance to a concrete strip rolled out on the ground. The height of the foundation is selected individually and is related to the characteristics of groundwater.
If the level of groundwater is high and freezing in winter is more than 1.2 m, the tape-grillage option can be used. The design combines a concrete strip, but on piles every 1.5 - 2 m. Moreover, the piles are poured first, then the formwork is made for the strip. Before pouring, it is recommended to calculate the cubic capacity of the foundation; this will reduce the cost of concrete.
The detailed technology for assembling a strip-grillage foundation is disclosed in one of the previous articles.
Why do the lower crowns rot?
The main reason why the crowns of a wooden house can rot is exposure to moisture coming from the ground. With proper construction and ideal conditions of use, a house can last up to 50 years without replacing logs.
But such conditions arise extremely rarely, and in practice the service life of the lower crowns is almost always reduced several times.
Factors accelerating the decay process:
- low foundation;
- waterproofing between the foundation and the lower logs is of low quality (or absent);
- lack of antiseptic impregnation for wood;
- poor (or absent) basement or subfloor ventilation;
- untimely removal of snow from the blind area and foundation.
There are also reasons that a person cannot influence in any way:
- ants and bark beetles;
- abundance of precipitation;
- high groundwater.
Rot protection measures
To prevent the bottom log of the house from rotting, it is worth taking a number of protective measures:
- Treat the wood with antiseptic impregnations that protect against rot and mold. The lower logs can be impregnated more thoroughly - make more layers.
- Lay only high-quality waterproofing materials between the lower crown and the foundation. In particular, roofing felt is not suitable - its service life is about 5 years, and then it will begin to leak moisture. But euroruberoid is quite suitable.
- Install wide enough canopies around the perimeter of the roof to prevent rain from falling on the walls.
- Install flashings around the entire perimeter.
- Install a high-quality drainage system.
- Clear snow in a timely manner, especially from the blind area around the foundation.
These measures help extend the life of the lower logs of a wooden house. If everything is done correctly, then even in a region with high humidity, replacement of the crowns will be necessary no earlier than in 15-20 years.
Choosing a roof and roofing
The rough roof is erected until complete shrinkage. If the timber is kiln-dried or glued, then the shrinkage is insignificant and you can start finishing the roof. Any material is suitable for roofing: corrugated sheeting, ondulin, soft tiles. The most economical option for garden houses is roofing felt or slate. The pitch of the sheathing will depend on the choice of roofing. The softer the roof and the flatter the roof, the more often the sheathing is done. For example, under soft tiles a backing is made of thin plywood.
The roof structure is selected individually. But the fewer bends and angles in the structure, the more reliable it will be. The simplest option is a pitched roof or a gable roof; they are assembled with your own hands.
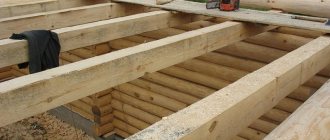
The rafter system is assembled by laying the ceiling joists. A beam with a cross section of 100x50 mm is suitable for work. The technical side will be 50 mm. The front and frame of the rafter system are assembled from material with a section of 150x100 mm. They are attached to the Mauerlat, which is laid on the top of the wall. A beam with a cross section of 150x150 mm is used as a Mauerlat. The most difficult part of the installation is installing the first rafters and matrix. The rafter system can be secured to the walls using metal brackets or anchor bolts. The logs and the Mauerlat are connected to each other using a tongue-and-groove lock. Readers can read more in the article on roof installation.
The finished roof is insulated and waterproofed. This is necessary to reduce heat loss in the house. Next, they begin additional insulation and finishing. A wooden house will shrink completely after three years. At this time, it is not recommended to carry out grandiose designer finishing work, but you can already live in the house.