Floor installation is one of the most important tasks that future owners face when building a house. The floor design may vary. 2 possible options:
- floor on wooden beams; floor on joists.
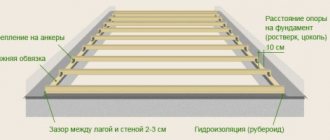
Scheme of a wooden floor by joists
Most often, preference is given to flooring with joists, as it is easier to lay. However, constructing a floor using wooden beams has a number of advantages over constructing a floor using joists. Beams are an important functional element of the structure of a wooden house.
If the floor spreads along them, then the house acquires additional stability, since the beams are built into the load-bearing walls. However, this is the only drawback of such a floor arrangement. By means of beams built into the frame, any mechanical impact on the floor is reflected on the load-bearing walls.
In addition, the advantages of installing a floor on beams include low material costs, since there is no need to make a lower floor under the floor, as well as the low weight of the material used. Moreover, if you build a frame for the floor that does not have points of contact with the walls of the house, then the only drawback of this design will be eliminated.
How to install a beam into a brick wall?
First of all, it is necessary to determine the required number and cross-sectional size of beams. As a rule, beams with a cross-section of 15x15 cm or 20x20 cm are used. The distance between them should be no more than 60 cm. Such a structure will have the necessary strength and stability.
Scheme for installing a beam in a brick wall.
In a brick house, in which the upper part of the foundation is covered with bricks, the beams must be sealed tightly into the walls. This must be provided for at the stage of laying brick walls.
Sockets are left in the required places for installing beams. To ensure that the edges of the beams that will be located in the nests do not rot, it is necessary to line the openings under them with roofing felt in 2 layers, and the ends of the beams must be treated with a fire-retardant compound. It is recommended to apply similar compounds to all wooden elements of the structure.
The ends should not be coated with a compound that would prevent the wood from breathing. If this is not provided for, then condensation will accumulate on the wooden elements. Resin should not be applied to the ends.
If the openings in the wall are larger than the cross-section of the wooden elements, then the space remaining free must be filled with insulation (for example, foam plastic or mineral wool) or cement mortar. It is necessary to take into account that there should be an air gap of 3-5 cm between the timber and the walls of the nests in the brick wall.
The beam is not attached to the brick. The minimum permissible distance between the load-bearing wall and the first beam is 5 cm. Their supporting part must be at least 15 cm, and the depth of the opening in the wall must be 18 cm.
It is necessary to provide for cutting the end of the beam at the desired angle.
This angle is 60°. In addition, the end is laid so that the cut in the upper part is at a greater distance from the wall of the opening than in the lower part. That is, the lower edge of the beam should be as close as possible to the brickwork.
Self-production of glued elements
There are several options for making laminated veneer lumber yourself:
- combination of three elements into one structure;
- gluing two parts in the shape of a Z symbol;
- connection of lamellas using special elements, metal inserts.
The first method is considered the most practical; it is much simpler than the other two. At the initial stage of work, boards for timber are selected and laid on the central element so that the annual rings of the wood face in opposite directions. Marks are made on the surface of the boards with a black marker or a simple pencil, which will indicate the sequence of their laying.
The central element is cleaned on both sides with sandpaper, which will create a rough surface and improve glue adhesion. Side boards are processed only at the point of contact with the main beam. At the next stage of work, the surfaces are degreased with a solvent, an antiseptic and fire retardants are applied. These liquids and protective compositions are applied alternately: first the solvent, then other impregnations after the base composition has dried. Not only the sides of the lumber are processed, but also the ends.
Now you need to apply a thin layer of glue (1-2 mm) to the cleaned and pre-treated surfaces. The top and bottom boards are laid on the central beam so that they are in the same plane. To fasten the elements, clamps are used, which are installed on the beam every 40–50 cm. The curing time of the glue is indicated by the manufacturer (usually does not exceed 2 days).
Installation of beams in a wooden or frame house
Layout of the floor along the joists in a frame house.
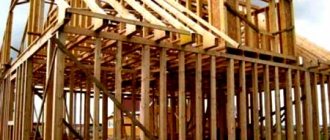
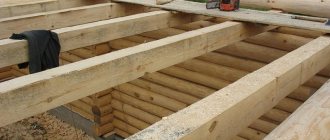
When building a frame or wooden house, the lower floor beams are laid in a different way than in brickwork. If we are talking about a frame structure, then the lower floor beams are mounted on the lower frame of the house. The beams are attached to the bottom frame with nails.
Building a house from logs or timber involves cutting openings in the wall for floor beams. These openings must be treated with an antiseptic composition. In this case, the beams that make up the lower ceiling must be located at a distance of at least 40 cm from the base of the stove and chimney.
Cost of materials
Characteristics of the wood used for the installation of floor joists
The price of beams suitable for repairing floors varies from 3 to 6 dollars per 1 m. Moreover, the price of the material depends on the following parameters:
- types of wood;
- wood species;
- moisture level of beams;
- beam sizes.
As practice shows, a high price does not guarantee excellent quality wood. Therefore, experts do not recommend overpaying for the purchase of 1st grade wood. Even third grade larch is suitable for installing ceilings. The only thing you shouldn’t skimp on is the quality of the preliminary antiseptic treatment of the beams.
Laying the floor on the ceiling
For beam floors, there are certain rules for laying flooring.
It is recommended to adhere to the following tips:
You need to attach bars to each floor beam on both sides. They will serve to fit the flooring tightly. You can use gypsum boards, boards, etc. as flooring.
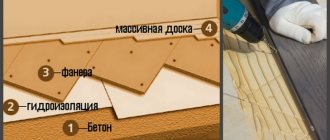
The flooring needs to be built at the level of the lower plane of the floor beams. Waterproofing work needs to be done on top of the flooring. To do this, you can use a solution of sand and clay, which will be spread on the flooring, or roofing felt. Waterproofing is intended to protect the insulation. Tile materials, slag or sawdust can be used to insulate the floor. After completing all the above work, you can begin to lay the covering.
The floor is most often made of planed boards. Their thickness should be at least 3.5 cm. If you first lay logs on the beams, an additional air gap will be created that will provide ventilation.
Thus, building a floor using wooden beams is quite simple. But at the same time, it is necessary to take into account some nuances that will ensure the durability and reliability of not only the floor, but also the entire structure. This is very important, since an incorrectly made floor can cause instability of the entire building.
In a wooden house, there is a different system for laying floors, especially when insulating them. It is important that in the end the circuit remains operational and functions correctly, heating the building. Warm floors in a wooden house are equipped according to different systems, which are:
1. Electrical installation is not so acceptable, because it can cause fires and short circuits, and for wood this is a fire hazard. One of the advantages is the small dimensions of the circuits, and there is also no need to use heavy screeds and the formation of multi-layer flooring devices.
2. Water heated floors in a wooden house are completely safe during installation and operation. However, the likelihood of the floor heating up is reduced since the boards do not have a high level of thermal conductivity.
Options for designing a heated floor are equally used in practice. The main thing is to carefully follow all safety measures during the installation process and comply with the requirements and recommendations of specialists.
The methods of folding the floor in the house differ in different parameters and installation principles. Before analyzing the installation features, we recommend studying the variations in the installation of heated floors in a wooden house. According to their design, they can be divided into two groups: floors made of boards and concrete.
What it is?
A wooden floor is the type of interfloor floor that is constructed from :
- wooden beams;
- lathing;
- other basic elements made partly or entirely from wood.
There are combined types of floors, for example, I-beams can be used as beams, and the flooring can be made of wood. But in this case, it will no longer be a wooden floor, but a floor on metal beams. That is, the main element by which the classification of floors occurs is the beams themselves.
Features of installing a wooden floor
The wooden floor forms a base in several layers, which creates the rough part of the installation, insulating layers, after which comes the final coating and finishing of the surface. In the overall design, heating systems such as pipes or special cables are placed between the layers to complete the heating system in the house.
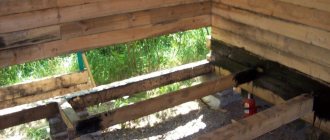
A wooden heated floor in a private house differs in its construction scheme, which involves installation on poles with a concrete foundation or on joists. With a monolithic fill, it is much easier to arrange the floor; in its absence, the entire structure is erected using beams. They have a span of 4 meters in width and are inserted into the walls of the house on support pillars.
In essence, this is a columnar foundation for a building in which the beams are not fastened. The distance between the pillars is from 0.7 to 1 meter, and the top covering is made of roofing material in 3 rows. The cross beams must rest entirely on the supporting elements, and for better fixation, wedges or seals are used, which secure the parts with nails.
Warm floors in a wooden house without screed are divided into two types:
1.
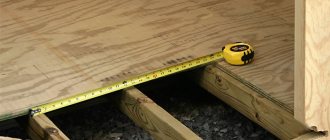
Single-layer structures that are installed both on logs and on another base. The choice of priority depends on the gap between the beams and the thickness of the boards. When constructing a floor on joists, the boards are laid directly on the beams, but it is important that the distance between them is no more than 0.5 meters.
2. The two-layer design involves installing a subfloor with boards attached to both sides of the beams.
A layer of insulation is laid on top of them, for example, sheet material or expanded clay, and its height should be about 80 millimeters. As additional insulation, a layer is placed between the rough and finished floors. In this case, we leave a gap of 4 mm on average, which will allow air circulation between the boards and prevent their destruction.
Using boards and solid timber
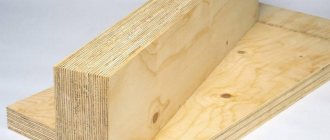
In the case of using solid wooden beams or boards for flooring, the span length is chosen within 4–6 m, which is half the maximum distance when using building structures made of laminated veneer lumber. Parts made from bonded boards are often manufactured directly on the construction site.
The strength of the structure is superior to solid beams. The main advantage of the products is the possibility of constructing a composite part from several boards. Builders can independently regulate the thickness of the beam by fastening the required number of elements. The boards are connected to each other using threaded elements. Rubber or plastic washers are installed under the bolts and nuts. The elements prevent the effects of corrosion on metal embedded parts and protect the wood from cutting into the nut when tightening.
Floor insulation
Wooden and concrete floors always need to be insulated using different materials and heating methods. For greater effect, many builders try to apply additional layers of thermal insulation, which will fill the space between the rows of subfloor and finished floor.
Among the current materials used are polyurethane, mineral wool, and among natural methods you can find sawdust and shavings, dry leaves, and so on. When using any floor insulating material, it is recommended to leave a gap of approximately 15 or 20mm for air exchange.
Characteristics
Construction documentation imposes 5 basic requirements for floors:
- seismic resistance;
- fire resistance;
- strength;
- soundproofing;
- thermal insulation.
Seismic resistance is achieved by strengthening the structure in various ways, which will be discussed later in the article. Fire resistance of beams and other wooden elements is ensured by treatment with fire retardants, as well as non-combustible materials for insulating floors.
Strength depends on the calculations that are carried out at the stage of determining the step between the beams , as well as their cross-section. They must withstand the load from their own weight and from furniture and people who will walk on them every day.
Sound and thermal insulation is provided by a cake consisting of insulation based on various materials and chemical compounds. What is used to insulate the ceiling must also have noise-absorbing properties.
Even more information about the characteristics of wooden floors is here.
Subfloor: installation
An electric heated floor in a wooden house or an infrared one must be equally ventilated and be strong at the base. In order for the insulation scheme to be of high quality and functional, a floor is installed that must meet the following requirements:
- they must be rigid in their structure, which distributes further load; their intended purpose is to serve as the basis for insulation or fillers and create an intermediate waterproofing layer; the air space between the rough and finishing layers provides an air exchange system, which does not allow the wooden boards to rot and deteriorate.
All parameters indicate that in order to build a durable and warm floor, lay a rough layer, which allows you to preserve the top layer of finishing. For them, boards with a width of 16 to 45 cm are used, which can be finished with antiseptic agents.
When furnishing a home on their own, builders assume that the rough construction is the reason for the flooring, but this is not the case.
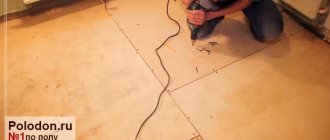
The essence is that the substrate is the laying of plywood or chipboard or the boards themselves on the joists. They are used for the subsequent laying of materials and for their level position, as well as the measured division of the weight of the entire floor onto the floor. Such substrates are used in buildings made of wood and monolith.
The subfloor is also the lowest layer among the base boards as a cover for joists or beams, depending on the structure of the building.
As a rule, the layers of the floor are boards, which are located in a diagonal position relative to the finishing masonry. In this case, the strength of the floor is created, formed by the options for laying the boards. The floor creates a double insulating structure, which allows you to retain heat, as well as fix the insulating layers and regulate the heat supply in the house.
The installation procedure for heated floors consists of the following steps:
1. Creating a ventilation shaft allows for air exchange between the crossbars of the boards so that they do not succumb to rot. The installation process is carried out by drilling several holes in the corners of the house with approximately a diameter of 50 to 60 mm.
They should be rounded, which are then covered with special grilles as a decorative material. Above the subfloor, they should be located at a height of 5 or 6 cm to prevent water from getting inside. In some cases, rough ventilation is installed in the baseboard.
2. Waterproofing the foundation is an important part of installing a heated floor in a wooden house with your own hands. As a building material, roofing felt or other insulating objects are used, which are laid relative to the first step of insulating the building.
3. Joists, crowns and all boards must be thoroughly treated with antiseptic agents, which will remove and protect the wood from the appearance of fungus or mold, as well as insects. Some builders use regular machine oil or other protective items.
4. Laying the subfloor is carried out in three options:
- the arrangement of the boards is installed on the beam shoulders, which resemble the letter “T” in an inverted form; laying on the cranial beams, which act as the same shoulders, but attached to the edges of the beams; installation of the boards in special grooves, which are prepared at the initial stages of construction.
5. After choosing the installation method, you should give preference to the position of the boards on the skull beams; it is necessary to lay a layer of waterproofing. The best option may be mineral wool as insulation, and the last thing to lay out is a vapor barrier.
6.
After laying it, a finishing floor is placed. For this purpose, tongue and groove boards or chipboards are used. Laminate or linoleum is laid on top of them.
It should be noted that the temperature should not differ from the temperature of the room and floor by more than two degrees, so it is necessary to approach floor insulation carefully.
Experts recommend carefully selecting all thermal insulation materials that will retain heat in the room. Important properties include a high degree of energy conductivity, the absence of non-flammable components and allergic substances. Also, the insulation material must be durable and strong in structure and be easy to use in construction work.
The most suitable option is mineral wool, which is hygroscopic and perfectly absorbs moisture, preventing it from seeping through the boards. Other thermal insulation materials are combustible, although they are light in weight; examples include polystyrene foam and expanded polystyrene.
Roofing felt, plastic film, and so on would be excellent waterproofing items. To the question: how to make a warm floor in a wooden house? The procedure for laying all layers is carried out from the installation of the first row of flooring, and then the laying of all waterproofing materials, after thermal insulation materials, and the last row will be the vapor barrier.
Finish floor: installation
The last step is the folding of the finished floor, which consists of subsequent actions. We choose milled boards that are fastened together using tongues and grooves. Their dimensions should be 28-44x98-145 mm, which have special vents on the back edge of 2 cm, which are determined for constant air exchange.
In the absence of these boards, other variations can be used, such as boards with straight or trapezoidal tenons, as well as with tongue-and-groove slats and the like. The only drawback of these boards is the lack of air vents. It is important to remember that when laying boards, they should be directed in different directions, and determined by the rings on the tree.
Optimal wood species
Some craftsmen claim that different types of wood are suitable for floors, such as oak, alder or maple, but the document GOST 4981-87 Wooden floor beams clearly states that softwood lumber, or more precisely pine or Siberian larch, should be used for beams. For cranial bars, you can use hardwood alder and aspen.
Coniferous species were not chosen by chance:
- They have the most durable structure.
- Resistance to deflection, as well as the least vulnerability to moisture.
They are even used for construction in baths and saunas.
Especially if the house is located in northern latitudes, where temperature fluctuations inside and outside the house are significant, the tree must be resistant to condensation. And the presence of resins in the needles prevents the occurrence of various bacteria and fungi in the lumber.
Installation of concrete floors in a wooden house
When installing a concrete floor, you will not need to lay many layers of boards and insulation material. To do this, you only need to make a screed, but it is important to remember some factors and aspects. Concrete floor has its advantages, which are:
- the durability of the material, its reliability and strength; modern construction methods will create a perfectly level base without flaws. You can put linoleum or laminate on it without any problems.
However, you should remember some nuances and rules for pouring a concrete floor and calculate the need to create it. There are two variations of installation: the main one - on the ground, the other - along the logs. In the main version, all work is carried out quickly and simply, but otherwise, you will need to work with new and undamaged lags.
Laying concrete on the ground: installation work
Infrared heated floors in a wooden house or water ones are installed after the process of pouring the concrete base. The sequence of work is carried out in the following way:
1. Determine the pouring level for the concrete floor. Marks are made using a cord and the equal perimeter of the base is measured to be approximately 10 cm.
2. Pour a layer of gravel onto the ground so that the existing pegs should be compared with the level. After this, the tags are extracted.
3. Sand is poured onto the gravel, which compacts the previous layers.
4. A layer of waterproofing is laid using polyethylene film. It spreads on the sand, but the edges should be higher than the floor.
5. After this, concrete is poured onto the waterproofing material, which is evenly leveled.
6. The solution is covered with film, but the base must be constantly moistened with water.
The concrete floor is left for 3-4 weeks for the mortar to set and become durable.
After two months you can start making a cement screed. At the beginning of the work, you should decide on the type of heated floor: electric or water. In this episode, the thickness of all layers should not exceed 25 mm, which is suitable for laying tiles, linoleum or laminate.
Wet screed
The screed using wet technology is made from cement and sand, in a ratio of 1:3 with the addition of water, to a plastic, creamy state.
Such a screed requires careful waterproofing of the base, preventing water from the solution from penetrating onto wooden structures.
The solution is prepared directly at the pouring site and laid in an even layer along the beacons.
It is not advisable to install a wet screed on a wooden floor for the following reasons:
- due to its heaviness, a wet screed requires a rigid and durable base;
- the wet process increases the humidity in the house, which is not desirable for wooden structures;
- with minor damage to the film waterproofing, water from the screed can get onto the wooden base and lower floors;
- a wet screed requires mandatory reinforcement, which additionally makes the structure heavier;
- The drying time and strength gain of the wet screed is 28 days;
- During the entire drying period, a wet screed requires care: protection from drafts and moisture.
Figure 7. Installation of a wet cement-sand screed.