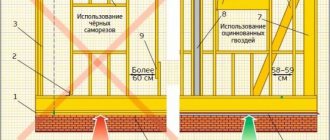
The growing interest in wooden house construction in our country has created a need to inform the population about the methods and techniques used in the construction of wooden structures. Many people are interested in how to fasten timber together, how to mount it to a wall, and also what are the advantages of certain technologies and materials.
We will try to answer these questions.
The reliability of a wooden house or a bathhouse made of timber depends on how the timber is attached to the timber.
Types of fasteners
Connecting bars at right angles is done using different methods. In fact, they are all divided into 2 types : with and without additional fasteners. This is due to the fact that the fastening for such joints is made of metal, and the properties of the latter are very different from the characteristics of wood.
The corner is a universal fastener. The bars are installed at 90 degrees at any length ratio, a metal corner is placed on one or both sides and secured with self-tapping screws, nails or screws. Since parts are produced with different angles between the plates, the bars can be secured at any desired angle.
Curly steel plates and iron staples can be used .
Assembly without corners is more common, although it requires more experience and skill. In this case, grooves are made in one or two bars and elements are inserted so that they form one whole. Due to the heterogeneous structure of the wood, a very large friction force occurs during adhesion, so the fastener is very reliable.
Fastening the crowns of the log house
A crown is one row of timber laid in a rectangle and fastened at the corners. They make up the walls of the building, its foundation. The beams must be fastened together very carefully, both in corners and in straight sections, so that they do not rotate around their axis or shift. This is possible even if the beam is rectangular in cross-section. Iron nails cannot be used for wood - they will not withstand the load and conditions of use. Wood has a certain moisture content, which will cause the iron to oxidize and break down over time. And then the house itself will fall apart.
When constructing log houses, wooden nails are used - dowels. They can be round or rectangular in cross-section, but preference is given to round ones. As the timber structure dries and shrinks, it creates less stress. The dowels must be placed strictly vertically.
On straight sections of walls, holes are drilled at regular intervals of 1.5-2 m, into which the dowels are driven. It is customary to retreat approximately 50cm from corners and openings. Then the top row is combined and installed. To make the task easier, the crowns are assembled on the ground in sections of several rows. For corners, there are several ways to attach timber.
Longitudinal connection methods
The connection of wood blocks is possible in the longitudinal direction to lengthen the element and in the transverse direction. To join beams in length , the following technologies are offered.
- On the root thorn – a tenon and groove are cut out at the ends of the elements and connected. They are recommended to be shaped into a trapezoid - “ dovetail" This option eliminates the possibility of horizontal vibrations.
- Longitudinal on dowels – cuts are cut at the ends of the timber. Then a key is driven into the resulting groove. This part is made from a harder type of wood. For reliability, the key is lubricated with glue. Then the second beam is literally pushed onto the bar end-to-end with the first.
- "Half a Tree" – at the ends a more complex cut is made with an angle of 90 degrees and a depth of half the thickness of the timber. When connecting longitudinally, the clutch must be duplicated with a key. To do this, drill a hole at the joining point and, after aligning the beams, hammer a wooden dowel or dowel into it. You can duplicate the fasteners with metal staples.
- Oblique lock method – first, the ends of the bars are cut at an angle. The angle is small, so the cut is quite long. Then a rectangular recess is cut out in the upper part at a certain angle. The result is a combination of a recess and a protrusion. The same is done with the second beam. The elements are joined together, a hole is drilled for the fasteners and a wooden dowel is hammered into it. The method is complex, but the connection is very strong.
It is impossible to extend the beam using metal fasteners.
Requirements for wood
When choosing timber for building a wooden house, you should proceed from building codes and regulations, and specifically from GOST 2695-83. The first crown of timber must be laid on a foundation made of larch or oak. These materials have good strength and durability. To extend their service life, they must be treated with an antiseptic.
When choosing wood for building a frame house, the following points are taken into account:
- The cross-section of the timber is 20 × 20 centimeters; the lumber should not have any bending, falling knots or other defects.
- The maximum wood moisture content is 20%. It is best to take logs from winter felling, which took place from December to March. The tree should be aged under a canopy or in another room with natural ventilation. Decks are placed in piles in accordance with the rules of storage.
- Absence of defects allowed by state standards. These include damage to wood from bark beetles, mold or mildew.
- Absence of defects that may remain after processing the material on a sawmill.
The quality of the timber is assessed by a specialist based on the worst edge of the layer; inspection of flaws should be done at the ends, as well as along the entire length of the workpiece. After installing all the necessary cutouts and tongues, the product is impregnated with an antiseptic. If possible, store-bought solution is replaced with used machine oil. The quality of the log, the thoroughness of processing and the correct fastening of the strapping to the base affect the reliability and durability of the entire building structure.
Corner connection methods
The angular connection of the beams to each other, on the one hand, is simpler, since the adhesion here is much better;
on the other hand, it is more complicated, since it involves cutting out many cuts and tenons of different shapes. There are 2 main technologies .
- “ Into the bowl” – more precisely, with the remainder. In this case, after fastening, some part of the beam remains outside the corner.
- “In the paw” - or without a trace. The angle looks straight.
The method is chosen taking into account the parameters of the material and the geometry of the entire building. For example, connecting rounded timber in the corners of a hut using the method without residue makes no sense.
With the remainder
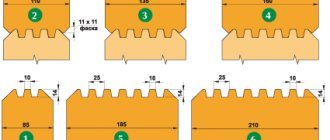
This joining is done using locking grooves. Based on their number and type, there are 3 options .
- One-sided connection - a groove is selected on one beam with a cross-section equal to the cross-section of the second beam, but of less depth. The second element is simply inserted into the first. The method is simple and reliable.
- Double-sided - the cut is made in both bars and the groove is placed in the groove. This results in a double-sided fastening that is equally strong in both directions.
- Quadruple - change the shape of the bar closer to the end so that when connected they fit into the groove, but each subsequent element rises above the joining plane. In this case, the bars are connected and held by adhesion on 4 sides.
The more complex the docking method, the more preparation and calculations it requires.
Without a trace
You can fasten it at right angles without leaving any residue. There are many options here.
- “In half a tree” - as with a longitudinal connection, cuts are made at the ends of the bars to a depth of half the thickness. The material is placed into each other, groove into groove, and a strong bond is obtained. You can duplicate it with a dowel. In this case, another small cut is made in the upper part of the cut, and when joining, a key is driven into the resulting hole.
- Butt joint - simple fastening to brackets or plates. The wood is not processed, but simply laid with tight pressure on the ends and fixed with corners, sometimes even with self-tapping screws. Such fasteners must be duplicated with sealing material, since the joints cannot be made sufficiently tight.
- Root tenon - a groove is cut out in one element, any element, and a tenon of the same size is cut out in the other. When connected, the tenon fits into the groove, literally merging the elements. The technology ensures complete heat retention. Duplication with wooden panels is allowed.
- “Dovetail” - resembles the “half-tree” method, but the grooves are made trapezoidal. It is more difficult to calculate and make them, but this increases the adhesion area and the strength of the joint.
- “In the paw” - a cut is made at the end, which is a characteristic feature of such a connection. The grooves are made approximately half the thickness and with inclined planes. They are a little simpler than dovetail. This option is recommended to be used when constructing interior partitions, since this corner is easily ventilated.
Industrially, grooves and protrusions of more complex shapes are made into the bars. However, this requires special equipment.
Installation of logs to concrete
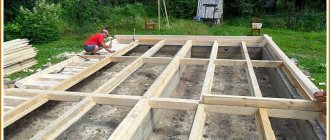
It is not difficult to attach logs to a concrete floor with your own hands. There are several mounting options, one of the standard ones consists of several simple steps:
- The concrete floor is covered with waterproofing material, it can even be a simple PVC film or roofing felt. All joints are taped with special tape.
- The material is laid out with a certain step. Its value will be related to the density of the future finishing flooring. If the finished sheet is a tongue and groove board with a cross-section of 25-100, then you can lay out the logs in increments of 70-80 cm; for other materials, the increment is smaller, from 40 cm.
- The lengths of the chosen sticks are not always enough for the entire room, then they are simply joined together. You can connect them together with an iron angle or simply make cuts like a connection into a root tenon.
- First you need to attach the two logs outermost from the walls. They are laid out level and the height is equalized. This can be done using pieces of plywood or wooden planks. In order for them to lie evenly with each other, you need to use a laser level. Only after they are secured is the nylon thread stretched along which all other logs will be attached.
- To attach the beam to the concrete floor, you need to drill holes in the base and stick. In a concrete floor, a dowel or spacer from a metal anchor is driven into the hole. At least 4 pieces of one joist must be secured with anchors. Screws are screwed in in increments of 40-60 cm.
- Levelers for joists are made in advance. Plywood or chipboard is cut into even strips. Lay plywood to strengthen the floors. It is necessary to strengthen the structure so that after installation the floor does not begin to move and creak. If the concrete floor has bulges, then you will have to strengthen it without placing pieces under the base, but rather by cutting off a part. The main thing is to treat the strengthening of the floor responsibly, otherwise the floor will quickly fall apart and become loose.
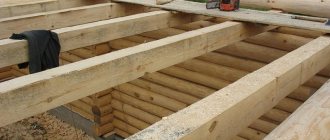
Installation of logs to concrete pillars
Fastening concrete pillars to joists is done in the same way. The same fasteners are used, but for pillars. Before work, the pillars are waterproofed by coating them with bitumen mastic or simple bitumen. From above, the base of the pillars is waterproofed with two layers of roofing felt, having previously cut it to size.
First, a hole is shot into the base of the pillars, just like in a beam. An anchor spacer or dowel is driven into it. You need to screw the beam to the post with a self-tapping screw along a length 2-3 times greater than its width. You can secure the timber to the base of the posts using special metal plates with screws. To do this, they are screwed with dowel nails to the base of the pillars and a through hole is drilled in the joist. A screw will be inserted into it and screwed to the top of the joist posts. This will make it possible to strengthen the logs more thoroughly.
T-shaped beam connection
Such a connection is used when constructing walls inside a house and connecting them with external ones or with each other.
- Semi-pan - a protrusion is cut out on a perpendicular beam with one flat side and the other in the form of a trapezoid. The thickness is about half a block. The mating element has a groove of the same size and configuration.
- Key groove - a cut for a key is cut in the bars. When joining, the key is driven into the hole and held in place by the joint.
- Frying pan - the protrusion in a perpendicular block is made symmetrical in a trapezoidal shape. Docking is more difficult, since driving a perpendicular element into the main bar requires force. But the fasteners are reliable.
- A straight groove on the main tenon is a three-way joint. A groove of complex shape and with small grooves on both sides is cut out at the end of the perpendicular. Two beams of the main wall are joined to a perpendicular edge so as to form one plane on the outside. Retention occurs due to the entry of the spikes into the grooves of the perpendicular.
In a home, it is not recommended to replace the T-shaped joint with corner fasteners. The latter looks extremely unaesthetic.
Claymers - what are they?
The term clamps means a fastening in the form of a steel bracket used for mounting imitation timber, eurolining or block house. The material from which they are made is iron with a galvanized surface that protects the product from moisture. The clamps must be mounted on the sheathing profile using self-tapping screws.
Advantage of using
Regardless of the fact that a clamp is more expensive than self-tapping screws and nails, it is recommended to use it for fixing imitation timber. Installing boards using this fastener provides a number of advantages:
- reduces time spent on work;
- the outer side of the panel is not subject to possible damage (cracks and chips from screws or nails);
- fixation with clamps is quite simple, all work can be done with your own hands;
- the material from which they are made is not subject to corrosion, which suggests reliability;
- Wide selection of fasteners of different sizes.
When choosing clamps in a hardware store, you should pay attention to some nuances:
- metal strength;
- integrity of galvanized coating;
- correspondence of product sizes in one batch.
Material calculation
You need to understand that high-quality cladding of a house with imitation timber depends on how and with what the boards are secured. Proper finishing requires the right number of fasteners. Before starting work, it is recommended to purchase clamps in the required quantity. There are two ways to make the calculation.
First calculation method
For an approximate calculation, let’s take the following values: finishing 1 m2 requires 20 clamps. The total quantity can be calculated knowing the dimensions of the surface that needs to be sheathed (we multiply this value by the total area of the facade and get the value we need).
Second method of calculation
The method of calculating the material is used if the facade of the house has a large number of decorative protrusions. It uses the calculation of the fastener pitch and takes into account the specific installation location of the block house:
- straight facade, with a distance between the sheathing profile of 40 - 50 cm - 4 pieces are consumed;
- roof edges with a distance of 35 cm - 5 pieces;
- finishing corners at a pitch of 25 cm - 6 pieces.
In addition to the clamps themselves, you should consider purchasing additional elements for fastening them (screws, nails). Their calculation can be made based on the following scheme: 1 clamp requires 2 - 3 screws.
Recommendations for choosing a docking method
The joining method is chosen depending on the load on the node.
The choice of method depends on the load that will be placed on the node. The latter depends on weather conditions, the number of storeys of the building and the characteristics of the soil.
- If the corner or wall is mainly affected by compressive force, the “half-tree” method is preferable. It is quite simple and quite reliable in this case.
- If the wall is subject to tearing force, it is better to join it using a straight overhead lock or a root tenon. Dovetail will also work.
- For high bending loads, an “oblique lock” is chosen. It is more complicated, but allows you to level out multidirectional loads.
At the junction on the outside of the wall, the timber is rounded so that water does not accumulate in the grooves.
Tools and materials
To install the beam vertically on the foundation, you need to prepare the following tools and materials:
- building level;
- cement M500;
- sand cleared of impurities;
- antiseptic for treating wood against mold and mildew;
- roll of roofing felt for waterproofing;
- anchor studs;
- wooden beam.
Important! The timber is laid on a concrete foundation if it has stood for 7 days or more.
Conclusion
When constructing cobblestone buildings for various purposes, quite a few types of interfaces are used. They have different levels of strength and reliability, as well as manufacturing complexity. This must be taken into account when choosing one or another type of timber fastening.
It should be taken into account that the fasteners can be either metal or wood. The last option is more preferable. The video in this article develops and complements the topic with more visual points.
Video description
This video shows how to make a groove on the end of a beam using a template and a chainsaw:
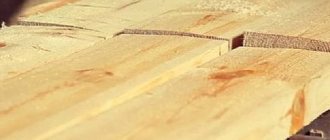
If the structure of spliced beams does not require the formation of smooth edges, they can be overlapped, tightened with nails on both sides or metal pins at several points. This is often done when you need to lengthen the rafters. Or get powerful logs or floor beams by merging two beams not only in length, but also in thickness. In such cases, before joining the timber, the joints must be shifted relative to each other.
Which dowels to choose
It is best to use wooden fasteners to connect the crowns. Metal dowels are much stronger than wooden dowels, but they are used in especially loaded joints. Usually craftsmen are not particularly fond of metal for two reasons:
- Condensation always forms on a steel surface in winter, the wood swells and rots, and the strength of the connection drops to zero;
- After six months of use, the metal rusts and the connection between the crowns becomes jammed. Instead of normal shrinkage, the rows simply hang on metal rods.
If you choose dowels, then square rods made of dried birch wood are best suited. Thanks to the sharp angles, the fasteners firmly cut into the soft wood of the beam, making the connection strong and reliable.
Round wooden dowels are more difficult to install; if you make a mistake in the diameter of the hole by even half a millimeter, the connection of the two beams will not work, and the fasteners will easily fall out of the corner or wall. If you take the size with a margin, you can easily split the timber before a crack forms.
In addition, adhesive materials, paints and mastics cannot be used to assemble corners or walls made of timber. The only exception is polyurethane foam, which is blown in to seal the supporting surface of the tape. Any rigid connections will not help eliminate cracks and gaps.