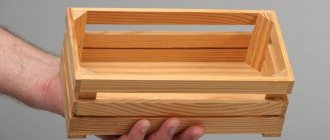
wood boards
- Moisture-resistant plywood Laminated plywood laminated chipboard PRO F for formwork FSF plywood FC plywood Coniferous plywood MDF chipboard laminated chipboard OSB HDF LHDF Glossy boards VDSPSh QUICKDECK
related materials
- Floor coverings Finishing materials Chemicals for parquet work Adhesive materials
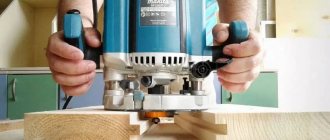
Plywood is very easy to process. It can be processed in a variety of ways, both with simple hand tools and with power woodworking tools. When processing general-purpose plywood, you need to pay attention to the fact that the glue used to glue veneer sheets together quickly damages and dulls the cutting tool, so increased requirements for hardness are imposed on tools for processing plywood. There are also modern laser and hydraulic cutting systems, but in the context of our story there is no point in talking about them, because rarely anyone uses them at home. Sawing
The best cutting results are obtained when using a circular saw.
A band saw can produce a so-called “wave”. To get a clean cut, sawing must be done correctly. First, you need to cut plywood across the direction of the fibers of the front side, then along. This way we avoid splitting corners. On the side of plywood with a higher grade (the front side), sawing is done with a hand or band saw, on the side with a lower grade - with a circular or contour saw. When sawing with a circular saw, it is necessary to use a high blade speed and a low plywood feed rate. The penetration depth of the circular saw teeth should be set to small. Drilling
To get a neat hole, the drill must be sharp enough and equipped with a front cutter.
You need to drill from the side with a higher grade. To prevent splitting on the back side of the plywood board, you need to use a backing sheet. Driving nails
To attach plywood to walls, ceilings and floors, it is best to use threaded nails or special screws; it is advisable that the head is hidden or pressed in.
To ensure that the heads are not visible on the surface, you can also use ordinary wire nails. When using plywood for exterior applications, it is best to use acid-proof nails as they will protect against rust on the surface of the plywood. Nails should be 2.5-3 times longer than the thickness of the plywood. The interval between nails for plywood boards for walls and ceilings is recommended to be 10-20 cm along the edges, 20-30 cm in the middle, depending on the load and type of nails. In plywood slabs under the floor, the interval should be 20-30 cm along the edges and 40-50 cm in the middle. Since the structure of the plywood board consists of veneer strips with transverse and longitudinal fibers, the nails can be placed close to the edge. A distance to the edge of the plywood board of 12-15 mm is considered suitable. In structures where load resistance is required, the strength and reliable fixation of nails plays an important role. The nails must be driven in the correct order, they must be long, with large heads. It is more reliable to use screws or self-tapping screws. The strength of the structure can also be improved by using glue at the joints of the plywood. Installation
During structural work, plywood is fastened using glue, nails, staples, screws, rivets or bolts.
When choosing a method for attaching plywood, it is necessary to take into account the operating conditions, required strength and appearance. Before installation, it is necessary to prepare the plywood from the point of view of the final operating conditions. Precautions must be taken to prevent possible expansion or contraction of the plywood board due to exposure to moisture or temperature changes. It is advisable to leave a gap of 2 mm at the joints. Elastic filler can be used, for example, between the edge of the panel and the steel frame of the structure. In heated structures, normal ventilation of the plywood board must be provided. Butt joint of plywood
The type of butt joint greatly influences the quality of plywood structures.
There are several types of butt joints for plywood slabs: tongue and groove joints, tenon joints and others. When performed correctly, they ensure the reliability of the structure of walls, floors and supporting elements. The ends of a plywood board are usually the weakest link, so the joints must be processed especially carefully, especially if the plywood is intended for external work. When finishing walls and ceilings, the following end-to-end joints of plywood are recommended: open, tongue-and-groove, seam and strip joints. For outdoor work, strip connections provide the best protection from external influences. Vertical and horizontal aluminum profiles protect the edges of the plywood board well. Their resistance to rust makes them a suitable material for facades. However, if for architectural reasons an open connection is preferred in outdoor applications, the edges must be treated in a specific way. Approximately 2 mm/m should be maintained for panel expansion. In butt joints this distance should be 3-6 mm. Tongue and tongue joints are commonly used for floors and panels that go under roofs. It effectively prevents panels from lifting and damaging roofing materials and can withstand greater loads than conventional butt joints. The panel is secured by secret nailing. The best strength is achieved by using a stepped profile or similar special profile with flanges supporting the edges of the abutting plywood boards. Such profiles are used, for example, in the manufacture of floors of cargo containers or trailers. Gluing
To glue plywood, you can use wood glue of any grade that is suitable for the specific operating conditions of the product.
Thus, PVA is used when carrying out interior work. This glue is colorless and has good adhesive strength. Phenolic and epoxy resins are used for the manufacture of products used outdoors, as they are able to withstand adverse atmospheric conditions. In addition, epoxy compounds are indispensable when gluing metal and plywood. The glue must be applied to a dry and clean veneer surface. It is veneer - if laminated plywood is used for gluing, then the film must be cleaned down to the wood layer, for example, using sanding paper. When gluing, it is necessary to coat both surfaces: for this, use a brush or roller. The plywood sheets to be glued can be secured using clamps, screws or nails. Sanding
To sand plywood, use sandpaper designed for woodworking.
Sand across the grain: sometimes you can also use sanding in a circular motion. If an exceptionally smooth finish is required, for example for high-quality varnishing, sand with fine-grain paper along the direction of the wood grain. It is important to remember that fk and fsf plywood grades III and higher are usually already sanded. Surface finishing
Once sanded, the surface of the plywood provides an excellent base for finishing.
There are the following types of plywood finishing: lamination, lamination, painting, impregnation with special paint or solution, etc. The surface can also be covered with laminate or veneer made from valuable wood. It is possible to use thin film. Plywood can be covered with wallpaper. If plywood boards were stored at high humidity, then before finishing it is necessary to dry them to normal moisture content. The surface should be thoroughly cleaned of dust resulting from previous processing. Cleaning must be repeated before each finishing step. Depending on the required quality, you need to apply 1-2 layers of coating. Processing the ends
To align the ends of the plywood board after sawing, they can be planed with a plane.
The best result is achieved if you plan from the edges to the middle, thereby avoiding splitting at the corners. The edges of the panel can also be sanded. The ends must be painted 2-3 times with acrylic paint with special additives. Primer
Wood is a natural material that expands and contracts depending on the temperature and humidity of the environment.
Cracks are observed on the outside of the face veneer, which expand and contract under the influence of changes in temperature and humidity. Therefore, if you plan to paint the surface of the plywood, you must first prime it. Staining
Staining gives plywood a natural textured pattern.
The surface of the board can also be painted completely, without showing the wood texture. The paint is applied with a brush or spray. Painted plywood is used for both internal and external work. But before painting, it is recommended to treat plywood with a special solution to protect it from blue stains and fungi, since the biological resistance of transparent paints is limited due to the minimum content of the binding substance. Varnishing
Plywood with a varnished surface has the best decorative qualities and is easy to keep clean. For varnishing it is necessary to use plywood sanded with fine-grained sandpaper. Before varnishing, it is necessary to carefully remove dust formed during sanding.
How to polish plywood to a shine. Wood polishing: means and technology
Polished furniture has a very “ceremonial” appearance. It is quite specific, but many people like it. The difficulty is that it is easy to spoil a shiny surface, but it is difficult to restore its attractiveness. Often the only solution is to polish the furniture.
The most common problem is scratches. You can also get rid of small ones using polishes with special properties. Deep ones, with damage right down to the wood or veneer, can only be removed by new polishing (if it is old Soviet-era furniture coated with nitro varnish). To do this, first completely remove all the old coating, then apply varnish and sand the entire part. That is, polishing furniture - new or old - occurs according to the same algorithm, with the only difference being that the old layer of varnish has to be removed.
If the product is newer, it is most likely covered with a thick layer of varnish. If the scratch is deep, but does not reach the veneer or wood, the situation is somewhat simpler. First, the scratched layer is cleaned off with 80 and 120 grit sandpaper. Then it is sanded with increasingly finer grains. Next, one or two layers of varnish are applied and, after drying, polished.
Another case when furniture polishing may be required is when the varnish becomes cloudy or yellowing. This happens often. The treatment is also not easy - completely removing the old varnish and applying a new one with polishing. Problems with all other traces that cannot be removed by conventional means () are solved in a similar way.
One more point: furniture polishing is done only and exclusively in a horizontal position. To do this, you often have to take everything apart. It's difficult, but there is no other way out. You can only work on a horizontal surface.
Pre-grinding
Polishing furniture is a long process and it begins with sanding. First, all cracks and other defects are covered with wood putty of a suitable color. After it has completely dried (the period is indicated on the label), sanding begins.
A sander is best for polishing wood or veneer. Tape or disk is a matter of taste and preference; it also depends on the complexity of the furniture shape. You will also need a set of sandpaper from coarse (80) to very fine (1200) grit.
In extreme cases, an angle grinder with a special attachment (disc and Velcro) may be suitable. But when working with it, it is difficult to achieve a really good result - there is no required mobility of the sanding platform, so the result of such wood polishing will not be above average.
We start sanding with 80 grit. We use it carefully, removing only large irregularities. Then we repeat the treatment with sandpaper at 120, then at 180 and 240. During the work, we must periodically remove dust and inspect the surface to identify unevenness and other defects. sometimes they are better identified by touch.
Then take water and 320 grit sandpaper. Wet the surface to be sanded and the sandpaper. We sand everything again, but this time with water. At this stage, you should get a good result - everything should be smooth. If everything is satisfactory, we move on; if not, we polish it for some more time.
Types of installation
Plywood is a universal material that can be attached using a variety of fasteners, from glue to screws. It is very important to consider the choice of what to treat plywood with and the conditions of its operation. Before starting installation work, you need to prepare the plywood; do not forget to take into account the possible compression and expansion of the boards due to changes in humidity levels. For example, at the junction of two slabs, it is imperative to leave a gap of 2 mm, sealed with elastic filler. If the structure is heated, then there must be ventilation.
Types of connections
When installing the boards correctly, the various connections will provide you with the maximum result of practicality and reliability; it is very important to consider the choice of what to treat the plywood with. The weakest part of any plywood structure is its ends. We must not forget about processing the joints, especially if the plywood will be placed outdoors.
If you connect plywood correctly you will get a good floor
For wall finishing, it is preferable to use a butt joint or a strip joint, but for structures located outdoors, the most suitable option would be a strip joint, and profiles made of aluminum will protect the edges of your plywood boards, since their complete immunity to corrosion makes them an indispensable material for facade. But, if for some reason it is necessary to use an open connection, then the edges of the slabs must be properly processed. As stated above, about 2 mm should be left for future expansion of the panel, but for butt joints 3-6 millimeters should be left. Tongue and tongue is used for installing sheets on the floor and roof. It will prevent any lifting of the panels, keeping the roofing material intact and undamaged.
Gluing
Unclad panels are often glued together using regular glue. Which glue to choose depends on the desired result of the work. The most popular: PVA, epoxy resin, phenol. PVA glue is perfect for joining slabs that will be used indoors in the future. Mobile exhibition stands are an ideal solution for marketing campaigns. Thanks to the source mstand.ru
Plywood parts are glued well with PVA glue
It is colorless and connects wood very well, especially unveneered wood. Epoxy resin and phenol will cope well with the harsh and unstable conditions of the outside world. Metal elements are connected to plywood with epoxy glue. Before gluing, you need to check both surfaces for cleanliness and moisture.
It is highly recommended not to glue film-coated plywood, as the glue will not hold it for long. If it is absolutely necessary to glue the board by lamination, then the film layer must be removed.
Video on how to properly treat a surface
For floors and walls, self-tapping screws and screws with a hidden head are the most effective. To install external cladding sheets, acid-resistant nails must be used; they are not subject to corrosion. The length of the nail should be three times the thickness of the plywood. Panels on the ceiling or walls are nailed at intervals of 10-20 cm at the edges and 20-30 cm in the middle of the panel itself. Sheets under the floor are installed at intervals equal to 2/1 of the wall/ceiling interval. It is better to drive nails at a distance of 15 mm from the edge.
Primer
It is necessary to prime wooden and veneered surfaces so that the varnish lays more evenly. When sanding, we opened most of the pores and released some of the fibers. If you immediately coat them with varnish, it will be absorbed unevenly, causing the surface to become stained. The primer closes most of the pores, so the varnish will lay more evenly.
Priming veneered furniture can be done in two ways. The first is quick, but accompanied by a strong odor. You need to take nitro varnish or polyurethane varnish, dilute it by 10-20% (depending on the initial thickness), and cover the surface.
The second method of priming is long, but correct and almost odorless. We take epoxy glue and a soft cloth swab. It’s better to use flannel, preferably white, so that it doesn’t fade or change the color of the furniture. Use this swab to rub the epoxy into the veneer.
While everything is drying, dust will definitely stick to the surface. It needs to be removed. This again can be done in two ways: scraping and grinding. If using a scraper, take a sharp blade (you can use a wallpaper knife) and use it to clean off all the excess. To avoid damaging the veneer, move the blade along the grain. With sanding everything is known: sandpaper with 320 grit and water. The prepared surface is cleaned of dust, washed with water, and dried. After drying, you can apply varnish.
In fact, further polishing of the furniture may not be necessary. Already at this stage the product looks decent.
Applying varnish
Let's talk about which varnishes are best to use. The best are considered alkyd (Tikkurila Unika-super series), polyurethane and water-polymer (good ones are Swedish Bask).
Despite the lack of odor, water-based varnish is not the best choice for your first varnishing experience. Essentially it is a water-based suspension. But it is far from being as harmless as is commonly believed. Water-based varnishes contain very harmful solvents, albeit in small quantities. It’s just that the usual acetone and others cannot keep such a composition in a stable state. So we have to use much “cooler” solvents.
This is by the way, but the reason is essentially different - difficulties during processing. When applying varnish, water is absorbed into the wood fibers and they rise. As a result, after the first treatment, the surface is far from smooth, but very rough. This effect is especially pronounced on pine products. So after the first layer of water-based varnish has dried, take an angle grinder or a sander, attach 320-grit sandpaper to it and sand it until smooth. If you're lucky, the next layer will lie flat and the pile won't rise again; if not, you'll have to repeat the operation again. The situation is not fatal, of course, but unpleasant. This does not happen with other varnishes.
How to apply varnish
Now a little about how to apply varnish. Professionals believe that the best method is spraying from a spray gun. This may be true, but not all home craftsmen have such a device, and you also need to be able to work with a spray gun. Among manual application methods, a popular method is application with a piece of foam rubber (or a new kitchen sponge) or a fabric swab (soft, white, lint-free fabric). To decide, you need to try what is more convenient for you, how it turns out smoother (if it works out at all).
The next method is with a small foam roller. Suitable if you are varnishing a surface of a simple shape without small details (a door leaf, for example).
Applying varnish with a brush is the most unpopular method
The use of brushes when varnishing furniture, oddly enough, is in last place. The fact is that it is difficult to evenly apply a layer of varnish in this way. You need a good brush with soft, thick, natural bristles, which should not tangle under any circumstances.
Technology
Regardless of the chosen method of applying varnish, its layers should be thin and of uniform thickness. Take a little product onto a brush/sponge/roller/tampon and rub it over the surface as thoroughly as possible. Next time we dip it in varnish only after the “weapon” no longer leaves any traces. In this way we cover the entire surface and leave to dry.
The applied layer of varnish does not dry completely, but the time indicated on the packaging of the varnish in the column “tack-free” or “application of the next layer”. On average, for water-based varnishes it is 1 hour, for alkyd varnishes - 5 hours. The next layer is applied using the same technique. The total number of layers is usually from 5 to 9, depending on the quality of the veneer and preliminary sanding. When the surface becomes absolutely smooth, the varnish is dried until completely dry - 2-3 days. After this, sanding begins again.
Characteristic
Plywood sheet can be characterized by:
- Surface treatment.
- Degrees of water resistance.
- Degrees of environmental safety.
- Variety.
- The type of wood used.
- Product size.
- The presence of weight.
Plywood characteristics table.
Surface treatment is grinding. Manufacturers offer a choice of plywood sanded on one side, marked Ш1, and on both sides, marked Ш2. If there are no such marks, the product will be unpolished.
The water resistance of plywood depends on the adhesive compositions. For interior work, a material with average moisture resistance is used. It is branded FK, where the letter K indicates the presence of urea resins in the adhesive base. They have a low hazard class and can be used in places where people permanently live. FSF plywood, which has increased moisture resistance, should not be present in residential premises, even in utility rooms with high humidity. They use other finishing materials. The veneer layers of FSF products are glued together with glue containing toxic additives based on phenol-formaldehyde. FSF is used only for external work.
GOST distinguishes two classes of plywood based on formaldehyde content - E1 and E2. For interior work, class E1 is used, in which the content of harmful substances is minimal.
Groups and grading
The first group belongs to the highest grade and has no errors. Its surface is perfectly smooth. The second group belongs to the 1st grade. This type of product may have bonding points, and the maximum length of warping or cracks should not exceed 20 mm.
Types of plywood varieties and their characteristics.
The third group belongs to the second grade. Cracks up to 200 mm, wood inserts are allowed here, there may be stains from leaked glue up to 2% of the total area.
The fourth group belongs to the third grade. It assumes the presence of wormholes up to 10 per square meter. The diameter of each should not exceed 6 mm.
The fifth group is the fourth grade of low-quality plywood. It may have knots on the surface of the top layer, the number of which is unlimited. Wormholes with a diameter of up to 40 mm are allowed.
The edges of a product of this type may have deformation up to 5 mm deep. It is used to make containers.
For finishing work, second-grade products are ideal as a base on which some kind of coating will be applied.
Size, wood and weight
Dimensions of plywood sheets in millimeters.
General purpose plywood is used in the manufacture of furniture, various containers, as well as in construction and other industries. If the length of plywood exceeds 1800, it is called large-format. In the event that the larger sheet size coincides with the direction of the fibers of the outer layers, it is called longitudinal, if it does not coincide, it is called transverse.
Construction plywood is made from softwood. Larch and pine veneer is used. In an effort to increase the strength of their products, manufacturers make composite plywood, alternating layers of softwood veneer with layers of hardwood veneer. Sheets glued together from birch veneer are available for sale. They have a high degree of material density and a higher sheet weight.
A pack of 8 mm birch plywood, measuring 1525x1525, contains so many sheets that they are enough to cover an area of 53.8 m³. The weight of one product is 12.1 kg. The weight of m³ will be 651 kg. The weight of a sheet of plywood with dimensions 2440x1220 mm will be 15.5 kg, and in a cube it will be 651 kg.
Plywood made from coniferous trees can have dimensions of 2500x1250 mm, the weight of one piece is 13.8 kg, and 552 kg per cube. The manufacturer can produce a product with other dimensions: 2440x1220 mm. The weight of one such unit will be 13.1 kg, and the cube will be 550.
Furniture polishing
The final stage is finishing with polishing paste. To do this you will need polishing paste. You can use furniture ones, but automobile ones are more often used. Any one that does not contain wax is suitable (for example, “Anticirapin”). Good results are given by those that contain at least a small percentage of Teflon. They also smooth out small scratches and irregularities.
Polishing furniture after applying varnish takes less time than all others. For this stage you will need natural felt - they use it to rub the paste over the surface. In order not to work manually, a felt circle cut to size is attached to the Velcro of a sander or angle grinder. Apply paste to the surface to be polished, turn on the sander at maximum speed and bring the furniture to the desired level of shine. With good preparation, it is possible to obtain a mirror surface.
One of the most difficult types of finishing work on wood products is the process of polishing them. But this is a necessary action, as a result of which the coating becomes transparent and very beautiful. After polishing, you can enjoy the pronounced texture of the wood, as well as its shades.
Polishing helps the wood maintain its natural appearance, and the surface gives a mirror-like shine. About twenty years ago, this method was very actively used when polishing wooden car interiors and various luxurious pieces of furniture made of wood. In this way, the beauty of the wood was emphasized without the use of varnish.
Wood is polished at home, only with the help of a special composition called polish. This solution has its own advantage over conventional alcohol-containing varnishes, and it lies in the fact that the polish contains approximately three times less resin. This allows you to make the decorative coating very thin and mirror-transparent.
Tips for the master
The compressive and tensile strength of cement stone is lower than that of hard rock aggregates. This affects the durability of the coating. To increase strength, and therefore the duration of the repair-free period, you need:
- Increase the content of solid aggregate in the mixture (up to 1250 kg/m2).
- Use aggregate with a fraction size of up to 10 mm.
- Portland cement grade no less than 500.
- Use plasticizers (thinners) to increase the fluidity of the mixture by reducing water in the composition. Another effect of their use is that they increase strength.
- Mixing is carried out in a concrete mixer.
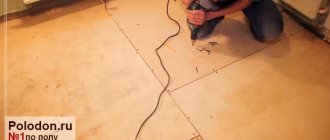
When can concrete be sanded after pouring? Not before it reaches 50% strength.
Polishing a monolith with a strength of less than 20 MPa is not effective.
Polishing and its compositions
Nowadays, there is a huge variety of polishing compounds on the shelves in construction supermarkets. But it won’t be difficult to make such a composition yourself. The most commonly used polish is shellac polish, which can be easily prepared at home.
To prepare it you will need crushed shellac resin, approximately 60 grams. The next ingredient in the future mixture will be alcohol. However, there is no particular difference between ethyl and wine alcohol. The main thing is not to forget that the alcohol strength should be at least 90, but not more than 95 degrees, in a volume of 500 milliliters.
The solution is prepared in a glass or ceramic container with a lid, into which you first need to pour the resin, and then carefully pour in the alcohol and close it tightly. It is imperative to stir the composition periodically until the shellac resin is completely dissolved in alcohol. When this happens over time, the resulting mixture must be passed through a filter, while pouring into another clean container.
Stages of polishing work
Sanding wood
The polishing process itself is carried out in three rather complex stages.
Stage No. 1
At the first stage, before polishing, it is necessary to prepare the surface:
- sand the wood;
- remove all dust and lint from it;
Stage No. 2
The second stage will be priming the prepared wood. It must be carried out using varnish and a woolen thread swab or, in the absence of one, you can take a cotton one and wrap it in linen cloth. Why should you choose linen fabric? Because only this fabric does not leave small fibers. Cotton fabrics are absolutely unsuitable for this process, as they leave fluff, which is unacceptable during the polishing process. Remaining on the surface of the wood, they will noticeably spoil the appearance of the product.
Waxing wood
Dear visitors, save this article on social networks. We publish very useful articles that will help you in your business. Share! Click!
Purpose
Interior decoration of a room involves performing a whole range of works. Plaster and putty are used to level the surface of the wall. Applying plaster is a rough stage of work, but puttying is a more subtle stage.
Even if the surface of the wall seems perfectly smooth to you, you cannot do without polishing. After a thin layer of putty mixture has been applied, irregularities and bumps that are almost invisible to the naked eye remain on the surface.
They often appear at the junction of treated areas, as well as as a result of contact with the corner of the spatula. The main task of belt grinding is to eliminate them. After applying putty to the wall surface, be sure to allow it to dry completely and harden. This requires at least a day, and only after 24 hours can you proceed directly to leveling by grinding. By the time sanding begins, the entire surface of the wall should be completely dry. Otherwise, there is an increased risk of damage to the putty layer.
The choice of material used for grinding is also important.
In this case, it is worth paying attention to the surface features and its most problematic areas.
Proper wood processing
Stage No. 3
The last step in polishing wood at home is polishing.
If you correctly follow the wood polishing technology described above, the final result of the work done will have an excellent appearance.
If the polishing layers are reduced or the workpiece is not completely dry, the polishing turns out to be of poor quality and cloudy.
If you have no experience in polishing, it is recommended that before starting work with the main product, you practice on something small and not very valuable. This needs to be done in order to practice a little, understand the subtleties and complexities of the entire polishing process and not spoil the main product.
And a little about secrets...
Have you ever experienced unbearable joint pain? And you know firsthand what it is:
- inability to move easily and comfortably;
- discomfort when going up and down stairs;
- unpleasant crunching, clicking not of your own accord;
- pain during or after exercise;
- inflammation in the joints and swelling;
- causeless and sometimes unbearable aching pain in the joints...
Now answer the question: are you satisfied with this? Can such pain be tolerated? How much money have you already wasted on ineffective treatment? That's right - it's time to end this! Do you agree? That is why we decided to publish an exclusive interview with Professor Dikul, in which he revealed the secrets of getting rid of joint pain, arthritis and arthrosis.
Video: How to polish furniture
Wood polishing is one of the most difficult types of finishing, but at the same time it provides a beautiful transparent finish that perfectly highlights the grain and grain of the wood. The polished surface has a mirror shine and retains the natural appearance of wood. Polishing is no longer as common as it was several decades ago, when many luxury items, such as car interiors, were inlaid with polished wood. In general, if you need to highlight the beauty of wood without varnishing, then the best solution is to polish the wood.
Polishing is carried out using a special composition - polish. This liquid, unlike alcohol varnishes, contains three times less resins, and due to this, the decorative coating is thin and transparent.
Not all types of wood are suitable for polishing. It is best to use fine-grained types of wood: birch, boxwood, hornbeam, maple, pear and apple tree, mahogany. But pine and oak, which are multi-layer wood, are not very suitable for this type of finishing.
Polishing compounds
Nowadays you can find a wide range of wood polishing compounds on sale. You can also cook them yourself. For example, shellac polish, which was very common until recently, can be prepared at home.
You will need crushed shellac resin (60 grams), wine or ethyl alcohol of 90-95 degrees of strength (500 ml). The resin is poured into a glass or ceramic container, alcohol is added and covered tightly with a lid. The composition must be constantly stirred from time to time, and when the shellac resin is completely dissolved, the liquid is filtered and poured into a clean container.
Polishing work is carried out in several stages; surface preparation (sanding wood, removing dust and lint) is mandatory. Then the surface is primed, and then polished and polished.
Primer
- It is carried out using varnish and a cotton swab (or woolen cloth) wrapped in linen cloth. It is important to use this type of fabric because it does not leave tiny fibers, such as cotton fabrics. Flint on polishing is not allowed, as it degrades the appearance of the wooden product.
- Put a little varnish on a swab and begin to wipe the surface of the wooden product in different directions. In this way, the wood is impregnated and its pores and cracks are filled.
- After the varnish has dried, the surface is treated with fine-grained sanding paper, and the dust is removed with a clean cloth.
- The product is then coated with two layers of varnish at a time. If the tampon with varnish sticks to the surface, then you can drop a couple of drops of vegetable oil on it.
- After this, apply the fourth layer of varnish, diluted with the polish composition in a 1:1 ratio. After priming is completed, the product is left to dry in a closed cabinet for a couple of days.
Polishing
This process is carried out using a polish composition.
- A couple of drops of vegetable oil are again dripped onto a cotton swab wrapped in a cloth so that it moves over the surface to be treated easily, with sliding movements.
- The tampon is brought in from the side and they begin to make smooth movements in a circle. In this case, it is necessary to monitor the amount of polish on the swab - there should not be a lot of it, otherwise drops of the composition will form on the surface, which will dissolve the primer layer and leave stains. After pressing on the tampon, the polish should evaporate immediately, without excess.
- Polishing is carried out in three stages, between which the surface is dried, treated with fine-grained sanding paper and cleaned of dust. After the third layer, a light glossy sheen should appear on the surface.
Plywood for environmental safety
Since the production of wood-based panels uses a substance such as formaldehyde, a generally accepted scale has been developed that determines the level of permissible formaldehyde emissions. Based on the level of emission of harmful substances, plywood can be classified as class E1 or class E2.
E1 grade plywood
Class E1 includes materials that emit no more than 10 mg of harmful substances per 100 g of dry wood. Such indicators are considered acceptable for the use of plywood in residential premises.
E2 grade plywood
E2 class boards are recommended for use only for outdoor use, as the emission level can reach 30 mg.
At the same time, some unscrupulous manufacturers often indicate in the annotations to their products a class that does not correspond to reality. Using such materials in certain conditions is quite risky, so it is advisable to give preference to trusted manufacturers.
Polishing
This stage of work is aimed at obtaining a beautiful mirror shine.
- After the last layer of polishing has dried, the surface is treated with sandpaper with a minimum grit dipped in oil.
- Next, drop a little oil and polish onto the swab and begin to rub the surface until shiny. The amount of oil can be calculated from the ratio of 1-2 drops per 10 square meters. centimeters of surface. It is important that there is not too much oil, otherwise it will dissolve the previous layers of polish.
- To improve the strength of the finishing layers, polishing is carried out several times, and after the second time, the surface must be treated with a soft cloth moistened with a solution of polish and water.
The final result depends on compliance with the polishing technology. If you reduce the number of layers and their drying time, you may end up with poor-quality polishing, which will worsen the appearance of the product. If you have no experience in polishing, then before starting work it is better to practice on some small craft in order to get your hands on and gain some experience in polishing wood.
All photos from the article
The final stage of wood processing is like the finishing touch to a painting. A smooth, shiny or glossy surface begins to “sound” in a very special way. The color becomes deeper, the design appears brighter, emphasizing the perfection of the product. Careful polishing of the material will not only emphasize its beauty, but will ensure its preservation for a long time.
Finishing the base
The sanded, smooth base of the plywood provides a surface that is suitable for further finishing.
Plywood sheets can be laminated, laminated, painted, impregnated with special mixtures, and so on.
Scheme for gluing plywood to the floor.
When choosing a paint or primer solution, you will need to take into account the tendency for cracks to appear on the veneer veneer. The base can be covered with laminate or veneer made from expensive wood. You can also use a thin film. Plywood can also be covered with wallpaper.
If the plywood sheets have been stored in high humidity conditions, they will need to be dried to a suitable moisture content before finishing. The base must be completely cleaned of dust that may appear as a result of previous processing. Similar actions will need to be repeated before all stages of finishing. The number of coating layers is determined based on the quality of the surface that needs to be achieved in the end.
In order to level the edge of the slab after sawing, it will need to be lightly planed. It is recommended to plan from the corners to the middle to avoid splitting at the corners. The extreme parts of the panel can also be sanded. The ends should be painted in 2-3 layers of acrylic-based paint with special additives.
Chic, shine - beauty
What can and should be polished, with what and in what way are exciting questions for those who want or are forced to take up this difficult but fascinating task. Polishing wooden products - brand new walls or restored countertops - performs an aesthetic and protective function ().
Pros and cons of varnish
Take a closer look, you are surrounded by many things made of wood, the treated surface of which shines or glows matte:
- decorative crafts;
- decorative cutting boards, spoons;
- walls/floors;
- furniture;
- laminate (there are also such fans).
But polishing wooden products is not always appropriate and safe, this includes:
- spoons, if they are intended for food and not decoration;
- kitchen knives - a very smooth handle is more difficult to hold, and if dropped, the decorative layer will inevitably crack;
- gun stocks (for the same reason).
Application area
The materials differ most significantly in their area of use.
Products with double-sided grinding are suitable for solving many problems:
- Furniture manufacture. Cabinets, chests of drawers, tables, cabinets, kitchen units - this is an incomplete list of what is made from such plywood. It is taken into account that you can create interior items with your own hands.
- Making crafts and souvenirs. The resulting decor can be purely decoration or serve some function.
- Cladding walls and creating partitions. The presence of sanding will facilitate the work during subsequent painting or varnishing.
- Laying on the floor. For this process, sheets with a thickness of 15 mm or more are used. The resulting surface can be a final coating or used as a base for laminate flooring, linoleum and other products.
- Transport finishing. Due to the fact that the treated surface has fewer protruding fibers, the material is more resistant to moisture.
Application of sanded plywood
Plywood products that have not gone through all stages of preparation at the factory are suitable for the following work:
- Creation of rough foundations. This direction is the most popular. The slabs are suitable for laying on the floor. Combination with subsequent cladding with sanded plywood is allowed, which is especially important for two-layer cladding.
- Manufacturing of hidden furniture parts. This method allows you to reduce the cost of interior items.
- Forming formwork when pouring foundations for buildings or fences.
- Creation of decorative and functional items for the home. To achieve the desired quality of finish, you will need to additionally sand the slabs.
Unsanded sheets are used for rough cladding, in construction work or when constructing furniture elements that are invisible to the eye.
It is taken into account that unprocessed products require a more careful selection: many manufacturers use raw materials that do not always meet the declared parameters.
In conclusion
Every day, throughout our lives, we subject things to tests - touches, impacts, placing them in the scorching sun or a damp terrace. Often, thanks to a decorative coating, it is possible to preserve/restore furniture, decorative elements or objects of art for a long time.
If you want to get super gloss on your furniture, the video in this article will reveal all the secrets of this process.
Wood products - bedside table, shelf, radio box, etc. look much more beautiful if they are finished. Wood painted with oil paint is just as rough and ugly as wood that is not finished at all.
You can, of course, cover the wooden surface with alcohol varnish (transparent or colored), but it is much better to polish it. Deciduous wood is best suited for polishing, especially hard wood: oak, beech, walnut, maple, birch. Oak is difficult to polish, but it has a beautiful pattern that can be further enhanced by tinting. Birch can be easily painted and polished to resemble walnut or mahogany. Coniferous wood is resinous and less susceptible to finishing, but, as we will see, it can also be successfully polished. The polishing process, commonly used in carpentry, although not difficult, requires a lot of labor, time and patience. At the same time, it can be significantly simplified and the results obtained are no worse. The surface intended for polishing should not have flakes, gaps, fiber breaks, cracks, glue drips, etc. There should be no knots on it. First of all, the surface of the product is carefully sanded, first with coarse sandpaper (No. 46-60), and as it is smoothed, with finer sandpaper (No. 80-100). Final sanding is done with very fine sandpaper (No. 140-170). The surface must be sanded by moving the sandpaper wrapped around a smooth wooden block along the grain. The result of this treatment should be a smooth, uniform matte color surface. It should be slightly moistened with warm water and immediately wiped with a dry cloth, and then dried for 1.5-2 hours at room temperature. This operation is needed to raise the pile - the smallest fibers of wood. The pile is then removed with sandpaper No. 120-140. Sometimes moisturizing, drying and removing lint has to be repeated even twice until the surface acquires an even matte sheen with a slight gloss. This completes the carpentry work and you can begin painting the prepared surface with transparent dyes. “To dye brown, stain paint is dissolved in hot water. The concentration of the solution is taken depending on the desired shade. The paint is applied with a cotton swab, after which the product is dried at room temperature for two to three hours. You can also use another dye: brown acid chrome - 15 g, acetic acid - 10 ml, aluminum alum - 55 g, water - 5 l. A reddish-brown color will be obtained if you take 20 g of walnut stain, 2 g of Ruby dye and 1 liter of water. To finish under mahogany, you need to dissolve 50 g of copper sulfate in 1 liter of water and 100 g of yellow blood salt also in 1 liter of water. Mix the solutions. The dried painted surface is rubbed along the grain with a lump of horsehair or wood shavings, after which it becomes smooth and glossy. Apply polish No. 13 or No. 14 to the painted surface using a conventional spray bottle used for spraying cologne. The polish should be applied evenly, avoiding the formation of drops and drips. At one time, you can apply five to six layers of polish, after which you should dry it for 6-8 hours at room temperature. Then the polish is applied again and dried again. This is repeated until the polish covers the surface in an even layer so that the pores of the wood are not visible. If some areas are not sufficiently covered with polish, they can be sealed with thickened polish. It is obtained by evaporating ordinary polish in a small vessel (for example, a saucer) for 10-18 hours. The product coated with varnish is dried for three to five days, after which its surface is cleaned with fine sandpaper. Polishing is done with cloth rolled onto a wooden block and rubbed with GOI paste (instead of GOI, you can also use razor stropping paste or chromium oxide oil paint), and generously moistened with sunflower oil. To prevent the cloth from gathering into folds, it is pinned on the outside with buttons. The polished surface gradually acquires a mirror shine. Sometimes you need to wipe a small area of the surface with clean cotton wool and check the quality of the polishing. When polishing is finished, the entire surface should be wiped with clean cotton wool, then with a swab moistened with sunflower oil, and then again with clean cotton wool. Although it is usually not recommended to polish resinous wood, it can be done as follows: the surface, cleaned with glass paper and painted with a stain solution, is covered with very liquid wood glue and allowed to dry thoroughly. Then, using a spray gun, five to six layers of shellac varnish are applied and polished as indicated above.
Should profiled timber be sanded before impregnation?
Why sand profiled timber before impregnation and painting - after all, it is already sanded. Dmitry, Minsk.
Hello, Dmitry from Minsk!
Profiled timber goes on sale not polished, but after planing. There are several types of logs, beams, and boards depending on the degree of processing.
To put it more popularly, after a tree has been cut down in the forest and delivered to the place of its processing, the following stages are: sanding (removing the bark), passing it through a sawmill, special machines with surface treatment in one, two, three or four surfaces in turn, or simultaneously, processing with a plane, grinding and polishing.
/I say approximately, because after cutting a tree, someone simply scrapes the bark with an ax and makes a log for further manual processing with an adze to obtain a longitudinal groove-groove and a bowl. And some people immediately put unsanded logs into the sawmill to produce slab boards and beams. Etc. and so on./
And all this is done with greater or lesser precision and degree of processing.
The profiled timber has four processed sides. The degree of processing does not correspond to the concept of grinding. If for the upper and lower surfaces, those that have grooves and ridges, this does not play a special role, since they will still be hidden during assembly, then the side surfaces are often then not covered with anything and represent the internal and external walls of the building.
Maybe over time these surfaces will be sanded before selling the timber to the buyer, but so far I have not seen this in my practice. Therefore, after assembling the log house, these surfaces are left as they are. And in most cases they are coated with various impregnations.
But recently, more and more clients are asking to pre-sand these surfaces. And we take angle grinders (they are also called grinders), put on them “petal” type emery wheels with a grit of 36 units and go over all the side surfaces. That is, along two vertical and four 45-degree bevel edges.
If the side surfaces of the beam have a tolerable smooth surface, then you can take circles of 60, 80 or even more units. And when reprocessing the internal surfaces of walls (those that will be indoors), they use flat sanders or eccentrics with soft sandpaper.
I must say that the use of grinders when sanding wood has been our know-how for about five years. After all, these machines are designed to work on metal. The instructions strictly prohibit working on wood, as wood dust clogs the ventilation holes very quickly. In addition, we commit a gross violation of safety regulations, since we remove the protective covers of the angle grinders, which interfere with proper grinding.
I have repeatedly experienced the hard way how low-power (less than a kilowatt) grinders are an insidious tool.
Among other things, well-polished wood surfaces require less impregnation and paint consumption compared to rougher ones.
You yourself can check in detail how much the timber you purchased will differ from the timber itself, polished with a grinder.
Summary. The profiled timber is pre-polished and then coated with impregnations and various dyes. For orientation - in the Moscow region, double grinding of 1 sq. meter of surface (first in circles 36 units, then 80 - 120 units) costs at least 350 rubles as of spring 2022. Painting (no matter what) for the first layer is 90 rubles, the second time is 60. That is, double painting is 150 rubles. The internal surfaces of the walls are only sanded; any internal coating is considered non-ecological.
Someone may have a different opinion from mine.