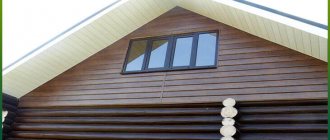
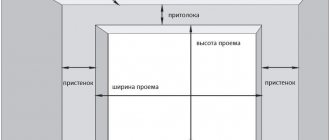
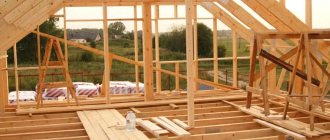
The most common question that arises during the process of building a house is how to make a roof gable canopy so that it fits organically into the overall design of the building, protects from precipitation and saves energy during the installation process. Finishing the roof gable is quite important and necessary work, since the appearance of the house (or building) largely depends on it.
The canopy on the pediment allows you to protect the ends of the load-bearing walls from precipitation.
Carrying out such work is quite difficult, this is due not only to the dangerous work under the roof, but also to the need to carefully think through and implement a design that will correspond to the design of the building. Often a person who has done similar work knows how important it is to think through the design of the pediment in advance: it is this that determines the shape of the canopy. How to make a roof gable canopy is described in this material.
Design Features
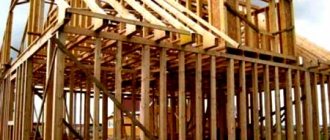
It is better to use wooden beams as a load-bearing structure.
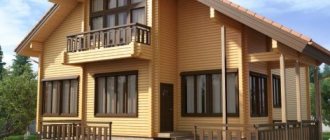
The canopy on the pediment is a necessary element, since it allows you to protect the ends of the load-bearing walls from precipitation, just as the pediment is protected by the roof. This significantly reduces the risk of wall destruction and also increases service life. When installing it, it is necessary to remember about the aesthetic appearance of the building. After all, if it is done untidy or does not match the design of the house, it will be very noticeable. Everyone probably understands that it will be necessary to make at least 2 canopies for the pediment. After all, houses are often built with a gable roof. Accordingly, the building has 2 pediments.
At the moment, a visor can be made from a variety of materials, the main ones of which will be discussed below. An important point in the construction process is that the load-bearing structures under the canopy should be installed before the gable cladding begins. Otherwise, it will have to be attached to the walls and gable cladding, which significantly reduces the reliability of the structure of both the gable and the canopy. Competent craftsmen plan the construction of the canopy long before the roof is designed. In this case, the design must provide the following functions:
- Protection of load-bearing walls and structures from water ingress.
- Stability and strength of the structure under the influence of precipitation and wind.
- Building decoration. The visor will look like a “skirt” that should be organically integrated into the design.
- The covering materials of the canopy and supporting structures must be durable, provide the necessary protection and have a pleasant shape and color.
Hardware is used for fastening both load-bearing structures and roofing.
Almost always the canopy is made with a single slope (less often - flat). At the same time, they try to provide the design for mounting the visor in advance. If the canopy is installed after the work on the gable is completed, the canopy will have less strength. There is a possibility that it will be blown away by the wind or will not withstand precipitation.
As a load-bearing structure, you can use wooden beams or wide boards, which are installed either parallel to the ground (flat pediment) or at a certain angle. It is recommended to choose the width of the visor so that a person can stand under it during rain (so that the rain does not wet it). For buildings with a wall height of about 3 meters, the width of the canopy should be approximately 0.8 meters. The minimum permissible width is 0.5-0.6 meters. This will protect the wall from flooding. To ensure the required width of the canopy, the length of the beams of the supporting structure should be calculated in advance so that the canopy lies completely on them. In this case, the length of the supporting beams must ensure their reliable fastening.
Once you have an idea of what kind of structure the canopy should have, you can begin to create it.
How to make a roof gable with your own hands?
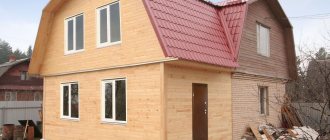
Any building is first of all assessed by people from the outside - they are greeted, as they say, by their clothes. Therefore, the appearance of the building should be given no less attention than its interior decoration. And it is advisable to think through everything to the smallest detail. The pediment is of considerable importance in the overall appearance of the house. It can have different shapes and sizes. The roof gable is finished using a variety of materials. Let's consider how we can decorate this part of the building.
Roof gable finishing
What is a pediment? General information about its structure
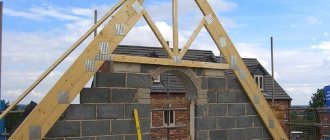
The pediment is the front part of the building under the roof, limited by the roof slopes and cornice; it completes the facade wall. The pediment can be made before the roof is built or after this stage of construction. The second option is preferable if the attic space is small in size, and the first is convenient when building large gables, when the roof slopes are not yet equipped and do not interfere with the construction process. They can have different shapes, which will directly depend on the design features of the roof - they can be trapezoidal, stepped, semicircular.
General concepts about the pediment
However, in any case, no matter how the pediment is built, it will not look complete without finishing. Only then will the materials used during construction last a long time, as they will be minimally exposed to weather conditions. Otherwise, they will quickly lose their quality and deteriorate.
Carrying out work on finishing the pediment
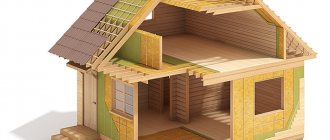
Finishing the roof gable involves laying insulation, waterproofing and vapor barrier materials . They will not allow the cold to penetrate into the interior of the building, and will also keep water outside and prevent the formation of condensation. The vapor barrier is attached under the interior wall sheathing inside the attic space.
Attention! Do not forget about roof ventilation - it must be arranged so that air can circulate quietly in the under-roof space and reduce the amount of condensation formed.
The pediments are made in a classic style
After all this preparatory work has been carried out, the outer side of the pediment, facing the street, is sheathed with some kind of finishing material. Properly sheathed, this building element will provide reliable protection from cold and moisture, and will also decorate the house. This part of the building can also act as a support directly for the roof itself and floor beams, increasing the stability of the roof structure.
Pediment finished with siding
By the way, the pediment is not always a mandatory element of the roof . There are roof options that only have eaves (for example, hip-shaped roofing).
Hip roof - design
Photo of a hip roof
The height of the pediment as a whole can vary from 0.7 to 2.5 m (the optimal option is 2 m). There may also be a door or window leading to the attic space. The presence of these elements is especially important if an attic is being built where people will live.
Important! The pediment needs additional strengthening, which is carried out during the construction phase. Otherwise, this element will not withstand the wind load - and in relation to it, as a rule, it turns out to be very, very large when compared with other parts of the structure.
Table. Varieties of pediment.
| View | Characteristic |
| The most common type of pediment. The shape familiar to many is an isosceles triangle. The latest form to emerge in architecture. |
| Trapezoidal | It has the shape of a trapezoid, while the side cornices do not meet at the top. |
| Semicircular | The pediment cornices are connected into one, shaped like an arc. The form was common during the Renaissance. |
| Stepped | The roof has no overhangs; the roof is adjacent to the facade wall. It has the shape of steps. |
| Luchkovy | The dimensions of the pediment in this case are smaller than those of the semicircular one. The shape resembles a bow with a taut string - hence the name. |
| Keeled | Formed on roofs of complex shapes, with broken lines. Reminds me of the keel of a ship. Previously, it could often be seen in buildings of Russian architecture. |
| Externally, such a pediment looks impressive and rich. It has protrusions that seem to dissect its entire height. |
| Male | It is formed from logs and continues the wall, which has the shape of a triangle. |
| Interrupted | A horizontal cornice interrupted by an installed window. |
| Torn | The ends of the pediment do not meet; in this place some decoration of the roof can be made, which will give it a finished look. |
Pediment finishing options
Wood siding on the gable
Materials used for finishing
The pediment will not look complete without the appropriate finishing. It can be covered with the same material that is used to finish the walls, as well as any other types of coverings. Among them are:
- siding;
- stone;
- tree;
- tiles;
- brick;
- metal profile.
All types of materials have their advantages and disadvantages. They can be selected in accordance with the general style of the building and roof structure.
Finishing the attic gable
Wooden pediment
This option is ideal if the walls of the house are made of wood. Usually, for these purposes, a block house is purchased - a special board, which is used for finishing. In terms of external data, it is similar to the finishing material of the building and therefore allows you to maintain the integrity of the perception of the general appearance of the building.
Wooden finishing is good because this environmentally friendly material is able to “breathe”, does not accumulate condensation, and can be purchased at any specialized store. This type of gable finishing is quite common.
In the photo - a carved pediment on a wooden house
But wood trim has its drawbacks. It costs more than other options, and also tends to change its physical parameters due to changes in humidity and temperature. That is why, before starting work, it is important to treat all wooden elements with protective agents, including moisture-repellent and fire-resistant ones.
Brick pediment
A frequently encountered design option for the pediment when building brick houses. To reduce the number of gaps between the slopes and the walls of the pediment, the edges of the building material can be trimmed. To make the pediment stronger, reinforcing mesh is used during laying. For ease of work, a wooden strip with a height up to the roof ridge is installed in the middle of the end. Thin cords are pulled from it so that an isosceles triangle is formed.
Antique brick pediment
Roof tiles
Quite a beautiful, but difficult to work with option for finishing the pediment. Ideal for finishing attics, decorating dormer windows, bay windows. The difficulty is that it is not easy to work with tiles on vertical surfaces. But such a pediment looks really chic.
Tiled pediment
Profiled sheets and other types of metal products
Flat sheets of metal are not cheap and are rarely used for gable cladding. Therefore, ordinary corrugated sheets are most often used. This finish is not afraid of moisture (due to the polymer protective layer), light, and wind. But working with such materials is not easy.
The pediment of the house, finished with corrugated sheets
Siding for gable finishing
This is the most commonly used material for decorating not only the gables, but also the walls of the house. It is easy to install, inexpensive, and looks quite beautiful, replete with color variations. Of course, vinyl siding cannot be called an environmentally friendly finishing option, but due to its other advantages, you can close your eyes to this drawback. The advantages of using the material include durability, reliability, ease of installation, resistance to weather conditions, and a large selection of colors.
Finishing the gable with siding
On a note! The siding finish looks especially good if there is a low tide.
Siding can be installed either with or without preliminary preparation of the walls (insulation and waterproofing). It all depends on what the purpose of the attic will be (it can be residential, or it can be used for storing things).
Installing siding yourself is quite simple. There are a lot of components that simplify the work. Therefore, even a beginner can cope with the task.
Modern pediment decoration
DIY pediment
Work on gable cladding can be carried out in two ways. You can simply continue to build on the wall of the house, or you can install a new wooden frame.
Gable trim
Let's look at how the pediment is covered with the most popular material - siding.
Step 1. In this case, the installation of the gable sheathing will be carried out under the already constructed roof slopes. After the frame part of the gable is installed, you can begin installing the vapor barrier membrane. A piece of material of the required length is cut and attached using a construction stapler to the wooden elements of the gable frame and to the ebb, which is located along it. It is best to secure this piece of canvas so that it flows from low tide to the lower part of the pediment.
Vapor barrier membrane being rolled out
Vapor barrier installation process
A stapler is used to secure the material.
Step 2. If there is a door or window on the gable, then after installation the vapor barrier material is cut through, and its edges are folded and fixed to the door jamb or the side parts of the window. Fixation is also carried out with a stapler.
The material is cut at the window location
Curved edges are fixed with a stapler
Step 3. After fixing the vapor barrier material, a flashing is formed. It is covered with pieces of corrugated sheets of the required size or siding. In this case, pieces of corrugated sheeting were used. The first section is laid at the edge of the low tide and attached to the wooden base using roofing screws.
The ebb is covered with pieces of corrugated sheeting
Step 4. Next, the next piece of corrugated sheeting is laid, overlapping the one previously laid on one corrugation. It is also fixed with self-tapping screws.
Fixing corrugated sheets with self-tapping screws
Step 5. Wooden slats are mounted on top of the vapor barrier, which will act as a kind of sheathing and additionally fix the vapor barrier layer, and a profile for attaching the siding is screwed to them. The profile is fastened using self-tapping screws.
Installation of wooden slats
Formation of sheathing
Fixing the profile for fastening siding
Step 6. Install the starting profile for the siding. It is fastened with self-tapping screws along the joint between the future pediment and the ebb.
Setting up a starting profile
Step 7. The first sheet of siding is installed at the bottom of the gable. It is tucked into the starting profile and additionally secured with self-tapping screws.
The first sheet of siding is tucked behind the starting profile
Attaching the first sheet
The first sheet is fixed
Step 8. Next, install the next strip of siding.
Setting the next lane
Step 9. The next stage is fixing the siding under the roof slopes. Here you will have to trim it a little to give it a suitable shape. To fix the siding, a small wooden block is mounted under the slope; it will serve as a support. Cutting siding is easy with a regular fine-toothed hacksaw.
Installation of a small support bar
Siding cutting
Step 10. The sheet with a beveled corner is installed in its place and fixed with self-tapping screws.
Installing a Sheet with a Beveled Corner
Another photo of the process
Step 11. This closes part of the pediment on one side of the door.
Covering the first part of the pediment
Step 12. All the above steps are repeated for the other side of the pediment. In this case, a person can be inside or outside the attic space.
The other side of the gable is sheathed
Sheathing process
A craftsman works from inside the attic
Step 13. It will not be possible to cover the last corner of the gable with siding from inside the room. Therefore, you can use a long stepladder or sit directly on the roof.
A small corner of the pediment remains
Cover the last corner of the gable with siding
Attention! It is important to carry out work at heights using a safety rope!
Video - Covering the gable with siding
How to sheathe a pediment with ondulin?
Step 1. Working with ondulin is not difficult. Before finishing the pediment, a sheathing of boards is created, which will serve as support for the material.
Lathing from boards
Step 2. The ondulin sheet is long enough; it will be located on the pediment so that the direction of its gutters goes from bottom to top. Since the roof is gable, the shape of the pediment is triangular. It is necessary to try on a sheet of ondulin in order to form the correct cut.
Trying on a sheet of ondulin
Step 3. The sheet is attached to the sheathing using special screws.
Fastening the ondulin sheet
The sheet is attached with self-tapping screws
Step 4. Sheets, cut in accordance with the angle of the roof slope, are attached to the pediment with an overlap on those previously installed in one wave. This will reduce the risk of leaks.
Fastening cut sheets of ondulin
The sheets are attached with an overlap in one wave
Step 5. From pieces of ondulin, an ebb is mounted along the lower part of the pediment.
Installation of low tide from pieces of ondulin
Step 6. The upper corner of the pediment is closed with a separate piece of ondulin of the required shape.
The gable cladding with ondulin is completed
This is how the roof gables are finished. The main thing here is to understand the specifics of all the work and choose the material with which it will be easier and more convenient for the master himself to work with. In general, there is nothing complicated in finishing the pediment, but if you spend a little time decorating it, you can get a very beautiful house, the appearance of which and the skill of its owner can only be envied.
Stage 1: Necessary tools and materials
To build the canopy, we will need the following materials:
Tools for building a canopy.
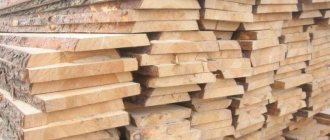
- Beam 50x100. Necessary for the construction of load-bearing structures. The amount of timber is determined by the width of the house, the selected width of the canopy, and the roofing material for the canopy.
- Roofing material. This can be slate, metal tiles, corrugated sheets, etc. It is important that the material has a color and texture similar to the finish of the walls or roof.
- Hardware. They are used for fastening both load-bearing structures and roofing. Most often they are screws or anchors.
- Corners. For attaching timber to the roof structure (rafters or other load-bearing elements).
- Material for ebb tides.
- Measuring instruments. You should get a tape measure, a ruler and a pencil, plumb lines, and a level.
- Screwdriver with a set of bits.
- Glue.
- Ladder.
After all the materials have been collected, we begin to install the canopy.
Roof design options with gables
There are many ways to arrange and decorate the pediment plane. It is clear that the specific design solution largely depends on how the owners intend to use the under-roof or attic space, but at the same time it is necessary to take into account what materials the building frame and roof are planned to be constructed from. Most often, the gable wall is finished in the form of:
- Prefabricated frame made of wooden slats, DSP or OSB boards with laying a layer of thermal insulation and external finishing with siding or lining, edged boards;
- Masonry made of red brick or aerated concrete followed by surface finishing with cement-sand plaster;
- Laying timber or logs in the form of a continuation of the vertical part of the load-bearing walls of a log house.
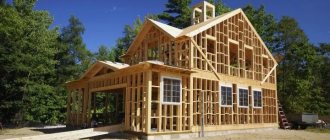
The building with a roof of 4 gable sections looks very impressive. In this case, the four triangles or trapezoids of the pediments of the roof of a wooden house become an integral part of the facade, therefore, for a brick and wooden house, the structure is adjusted so that the masonry is visually perceived as one whole.
Stage 2: Preparatory work
Before purchasing materials, you need to draw up a drawing of the future canopy, in which you indicate the exact location of the load-bearing elements. The pitch for fastening the sheathing for the canopy should be taken depending on the amount of precipitation in a particular region and windiness. On average, the step should be 0.5-0.6 meters. After this, the required amount of materials is calculated and purchased.
Visor attachment diagram.
Next, after drawing up the diagram and purchasing materials, all wooden and metal parts should be processed. The wood is treated with antifungal liquids in 2 layers, a primer and aquastop. Metal materials (if they do not have a factory protective coating) are primed in 2 layers and painted. All materials must be given time to dry, and the boards must be kept for several days so that they straighten and do not have internal stresses after transportation. After which they are cut into parts of the required size.
Calculation of the quantity of materials
The calculation is performed at the design stage of the house.
Usually the pediment is shaped like a triangle. Its top is the ridge of the roof, the two sides are its slopes. Usually this triangle is isosceles - the ridge is in the center. But sometimes the geometry of the pediment can shift. In any case, the sides of the pediment and the end of the rafter system coincide and represent the same figure.
Typically, craftsmen begin calculating the required amount of material by determining the height of the ridge - this figure will be the height of the entire pediment. It depends on what functions the attic space will perform. If a full-fledged floor of a residential building is planned here, then the height of the ridge is usually made from 270 cm to 350 cm. If a simple attic is meant, then a height of 200-250 cm will be sufficient. However, it is worth considering that if the height of the pediment is small, the entire house will will look squat.
If the pediment has the shape of an isosceles triangle, simple geometric formulas can be used to calculate its area:
H = ½ × L × tg a – determination of the height of the pediment by the angle of the slope (where a is the angle of the slope);
tg a = 2 × H / L – determination of the angle of the triangle at the base or the steepness of the roof (where H is the height of the ridge).
S = H × L / 2 – calculation of the pediment area based on the base and height;
However, if the pediment triangle is not isosceles, then these formulas need to be adjusted. So, each side will have its own slope angle (a1 and a2). And instead of (½ × L), in the first formula it will be necessary to substitute the distance from the point of the vertical projection of the skate on the base of this triangle to the angle (L1 and L2).
If you do not have a mathematical background to calculate tangents, various construction sites have special calculators for calculating the area of the gable.
Stage 3: Installation of the visor
The sealant is needed to fix leaks on the roof canopy.
The canopy begins to be sheathed with roofing material only after the pediment has been sewn up. To do this, the material, pre-cut to the required dimensions, is lifted up, placed on the sheathing and secured with self-tapping screws to the sheathing. It is important that there are several attachment points per beam.
The material itself is laid so that there are no leaks at the joints. To do this, sheets of slate, metal tiles, corrugated sheets and a number of other materials are overlapped. Other materials such as roofing felt or bitumen shingles are laid continuously, and the joints are reinforced with an additional layer of material.
If metal roofing materials are used for the coating, they are fastened using self-tapping screws with a special rubber gasket. If slate is used, it is secured with slate nails. Soft tiles and roofing felt are laid on glue.
The last job that needs to be done is installing the flashings. For them, a stainless steel sheet is often used, which is cut into strips about 20-25 cm wide. Next, the sheet is bent along the length by about ¼ of the width (5-6 cm). Then it is attached to the junction of the canopy and the pediment. The attachment points should be on both the gable and the canopy. The gaps that will be between the ebb and flow, as well as between the ebb and the canopy, should be sealed with sealant or silica gel. After the first rain, check the tightness of the cracks. If a leak is detected, it should be repaired with sealants.
After this, the visor is ready. It is worth noting that if slate is used as the material for the canopy, it can be painted in any color.
—>
| Google Ads |
| Site search |
How to hem a gable overhang
Methods for filing overhangs
There are two ways to file overhangs :
- wooden box
- along the rafters.
The first method is used when the roof angle is large. We take a board approximately 40 cm thick and fasten it in the space between the wall and the rafters. There is a small nuance: if one edge of this board is attached to the leg of the rafters, then the second board should be installed vertically to level the plane.
The second method is used for slight roof slopes. The rafters should form a flat surface, but this is extremely difficult to achieve. Therefore, thin boards are used, which are attached to the rafters, the length of which is from the wall to the edge of the canopy. The boards should be aligned with twine and fastened with self-tapping screws or iron corners.
Materials used for finishing overhangs
- Lining. One of the most convenient options. Please note that all elements must be treated with special means before installation. Instead of finishing tongue and groove boards, you can use pine and spruce boards. Installation begins with the timber being attached to the wall parallel to the lower edge of the rafters. An additional board is installed between the rafters and the timber at the same level.
After this, we make the sheathing and proceed to the installation of the lining. Each board is cut to length individually, and when fastening, a distance of 2-3 mm is left between the boards.
- Profiled sheeting. At the eaves level, along the wall and along the rafters, the timber is fastened at the same level. We measure the dimensions and cut the profiled metal sheet. We also do not forget that metal expands at high temperatures and contracts at low temperatures, so we attach strips with small gaps. And don’t forget to install gratings. We fasten with self-tapping screws; nails are not recommended, since
the fastening will not be tight, and you can also deform the surface with a hammer. The joints are decorated with external and internal corner strips.
- PVC plastic hollow panels . They are often used to construct a gable overhang. Currently the cheapest filing method. Very easily damaged and not reliable.
- Sheets of galvanized steel, aluminum or copper. All sheets have a thickness of 0.6 mm. up to 1 mm. Installation is just as simple, just level the surface. We mark the sheets according to the templates.
When cutting galvanized steel, the edges are treated with paint to prevent rust from appearing. And aluminum and copper are coated with a special polymer coating for better protection.
Aluminum and copper sheets are secured using special fixing latches.
- Wall siding. This type of finishing is ideal when the house is completely covered with siding. It turns out beautifully and in the same style. Fastening follows the same principle as fastening the surface of the entire house.
- Soffits.
There are PVC and metal soffits.
The most popular material. They are made in various designs: flat, perforated, or in the form of gratings. They have a rich palette. In the kit for the spotlights, you should purchase strips in the form of the Latin letters L and F.
F is attached from the eaves side. And the L-bar is on a special rail, which is attached to the wall.
It is advisable to mark everything before installation.
Then we take the dimensions from the slats to the F strip, subtract 5-6 mm. for thermal expansion. And cut the soffits to the required length.
The prepared elements are slightly bent and secured in place using metal screws.
Experts do not recommend installing overhang sheathing at ambient temperatures below +15 degrees Celsius.
Installation of a gable roof overhang can be done with your own hands; now there are a lot of photos and videos on the Internet, study and move on. Don't rush and be careful. But it is better to entrust the matter to specialists.
Installation of gable canopies.
Canopy, pediment, ebb.
To prevent precipitation from falling on the end walls (under the gables), canopies are installed at the bottom of the gables . Since there are two pediments, there will also be two pediment canopies.
The canopy is made before the pediment is mounted.
The overhang of the canopy (the distance from the wall to the edge of the canopy) is selected so that rain does not fall on the walls. My visor overhang is 60cm, but this is not enough. If I were making a canopy now, the overhang would be about 80cm so that during rain you could stand under the canopy and breathe fresh air (i.e., smoke).
Frame for the pediment.
First, we mount the window frame from a bar with a cross-section of 50mm by 100mm. We adjust the intersection of the bars so that the window frame fits into it. Window sizes depend on your needs. If there is a full room in the attic, then the dimensions may be larger. The internal dimensions of my attic window frame are: height - 50cm, width - 85cm. It was just that such a window was available.
Installed mini canopy rafters.
Next, a base is made from a 50mm by 100mm block - mini-rafters for the canopy with supports (green in the picture). In my case, the length of the mini rafters is 80cm. The length of the support is 50cm. These dimensions allow you to make the overhang of the visor about 60cm. However, as I already said, it is advisable to make the overhang of the visor larger, 75 - 80 cm. Then the length of the mini rafters will be approximately 100cm.
Mini - rafter and support.
Nails for fastening mini rafters and supports.
Photo of mini rafters.
The end of the mini rafter on the back side of the pediment.
Mini rafters are nailed to the top log, to the window frame and to the front truss posts. The support is inserted with a spike into a recess hollowed out in the log and secured with a nail driven diagonally into the side.
Sheathing bars are nailed to the top of the mini rafters in two rows using 100mm nails. It is advisable to choose a section of the bars that is no less than 80 by 50 mm, since we will walk on these bars when installing the pediment. The distance between the bars is 30 - 40cm.
Fastening the ends of the sheathing.
For strength, the ends of the sheathing can be screwed to the gable overhang.
We complete the installation of the canopies after installing the gables.
Covering the canopy with slate.
We nail sheets of slate (ondulin) cut to the size of the canopy.
In order to prevent moisture from slanting rain or snow from flowing under the canopy from the gable, we make ebbs from galvanized iron. The ebb is bent as shown in the photo.
We screw the ebbs to the pediment and to the sheathing (through slate) with screws of the appropriate length (pediment - 4mm by 25mm, sheathing - 4mm by 120mm). For tightness, under each screw we place an M5 washer and a rubber gasket with a diameter of 10 - 15 mm.
Materials used
The following describes how a horizontal gable overhang can be arranged:
For these purposes, lining is sometimes used. This option is considered one of the most convenient. Before installing it, you need to carry out processing. It is not necessary to use a finishing tongue and groove board here.
Lining is considered one of the most comfortable materials
Instead, you can use pine or spruce boards. A beam is nailed to the wall along the edge of the rafters. A board is attached to it from below. And only after that the lining is attached. It is believed that there should be a distance of 2 cm between the boards. In addition, it is recommended that a ventilation hole be installed instead of every third plank. These measures are necessary to ensure ventilation for the roof.
Corrugated sheet
You can also use a gable roof overhang made of corrugated sheets. Since it is made of metal, during installation it must be taken into account that it can change its size depending on the temperature. Therefore, you need to attach the strips, providing a small gap between them.
It is recommended to attach corrugated sheets using self-tapping screws. It is not recommended to use nails for this purpose.
Gable roof overhang made of corrugated sheets
Blank PVC panels
Such an overhang will be easily damaged, however, this option is the cheapest. The installation is similar. How to install a clapboard overhang.
On our website you can get acquainted with the most popular plots in the Moscow region for the construction of a country house. In the filters you can set the desired direction, the presence of gas, water, electricity and other communications.
Steel sheets
The thickness of the sheets usually ranges from 0.6 mm to 10 mm. Steel must be galvanized to protect the metal from rust. Sheets of other materials can also be used: copper or aluminum. When installing them, actions similar to those previously discussed occur.
Since during the work you will need to cut sheets of galvanized steel, you need to take into account that the edges are not protected from rust. To fix this, you need to paint them in this place.
It is not recommended to use sheets longer than 5 m. This is due to the fact that otherwise they will sag.
Wall siding
This option is advantageous to use in cases where the house was lined with it. If the same material is used for the gable overhang, it will look stylish.
Use of metal soffits
This option is considered reliable and durable.
Such an overhang will be quite expensive
It is made from galvanized iron, copper or aluminum. Not only is it of good quality, but it also looks beautiful.
Content:
The pediment is a section of the wall that is located between the roof slopes, at the bottom of which a cornice is installed. The pediment, one way or another, is present in any roof, with the exception of a hip or hip roof. The gables of houses built from logs can be divided into several types:
- triangular - classic;
- trapezoidal;
- pentagonal.
In fact, in construction there are generally more varieties of this element, for example, semicircular.
Quite often this element of the roof is called the face of the house. But, meanwhile, it also has a certain function, namely, protecting the roof, and the house as a whole, from the effects of wind and precipitation. In other words, its design and construction must be approached with the utmost care.
What is a pediment
The pediment of a building is the front part of the facade, located on top of the building, limited on the sides by the roof slopes, and below by the eaves of the house. From a design point of view, the pediment is the “face” of the house, since it is on it that the gaze of passers-by and family guests falls. That is why it is so important to properly decorate this part of the house. From a construction point of view, the pediment is also not fun, but a very functional part of the house. The main tasks of the pediment include:
- fixing the roof position, as well as imparting rigidity to the building frame in general and the roof in particular;
- acting as a protective barrier for the attic (attic) space, the pediment prevents precipitation, birds, and insects from entering the attic;
- thermal insulation of the attic, helping to maintain a favorable microclimate in all rooms of the house;
- improvement of the attic space from the outside and the possibility of creating a separate living or other functional attic room inside.
Pediment structure
Formally, the pediment is a wall mounted on a mauerlat, but this element can include a cornice and overhang, which are built together with it.
The overhang is a part of the roof slopes that frame the gable on the sides and smoothly transition into the cornice. The size of the overhang beyond the pediment is not standardized anywhere, but practice shows that it is usually built at 0.4 - 0.7 meters. Here it should be noted that the more it protrudes, the better the protection of this element from precipitation on its surface. When forming the roof slope, one must be guided by the fact that it is in harmony with the overall architectural design.
Front overhang structures
Let's start with the concept of a front overhang - this is a continuation of the elements of the roof slope, framing the end gable on the sides and in the final stage turning into a cornice.
Building codes do not regulate the width of the overhang; it usually ranges from 40 cm to 70 cm.
Design solutions can be made as follows:
- The overhang is formed by roof sheathing . This is the most economical way. Simply when installing the sheathing, the rafters are extended by 30-50 cm above the end wall.
This constructive method is used for light roofing coverings (soft roofing, European slate, metal tiles). There are also restrictions on the width of the overhang, no more than 50 cm. If you make the width larger, the roof will warp and bend due to the heavy load on the rafters.
- A method in which there is no gable overhang . This is when the gable is located at the same height as the roof. Inherent in buildings in the style of minimalism.
Rafters are installed both inside the roof and outside the roof gable. The rafter leg plays the role of a foundation for the sheathing and roof.
The overhang is made parallel to the rafter structure.
To strengthen the overhang, intermediate beams and support ridges are taken out, which are classified as load-bearing elements of the roof. This scheme allows for a large overhang.
Used on roofs with heavy roofing (concrete tiles, slate, ceramic tiles).
Pediment canopy
Construct a canopy on the pediment of a wooden house using sheathing during its installation on the rafters. They simply make it longer so that a canopy (overhang) is formed to a given length. This method is used for roofing that will be covered with lightweight materials, for example, bitumen shingles. For heavy materials, this method of forming a canopy (overhang) is not entirely suitable; the sheathing boards may not withstand the load.
Another method of forming a canopy is done using a rafter system. Before making the canopy on the pediment, the mauerlat beam is made slightly longer. In this case, the first pair of rafters and the ridge beam will form it. The distance to which the timber will be carried determines the size of the overhang. It should be said that the second method of forming an overhang is more expensive and more difficult to implement, but this design allows it to withstand any weight of the roofing.
Basic design options - how to hem a pediment
There are several different design solutions for how to make a gable roof overhang:
- The pediment is located above the roof. This solution is considered classic in architecture. It consists in raising the pediment above the roof level. This technique allows you to create the appearance of its pomp and massiveness. The gable wall must be insulated on top with roofing material, usually metal sheets mounted with an overlap or using a rebate. The junction between the vertical surface of the inner part of the gable wall and the roof covering must be properly waterproofed.
- The pediment is arranged flush with the roof, with no overhang. This design is typical for architectural buildings in the style of minimalism.
- The gable overhang is formed by the roofing sheathing. This option is cheap and simple. In this case, the rafter system does not cross the boundaries of the gable walls, but the sheathing elements are released. To cover the roof, light-weight roofing materials are used, for example, euro slate, bituminous tiles, asbestos cement sheets. The sheathing, made of bars or boards, is hemmed from below, and the end of the roof is covered with a metal profile or a complete gable. To prevent deflection, the cantilever overhang does not need to be made large. Its depth is a maximum of 50 centimeters. If such a roof is to be equipped with a drain, a frame is additionally made closer to the eaves on the lower part of the overhang, onto which the gutter hooks are attached.
- The overhang is installed simultaneously with the rafter system. In this case, the rafter beam is mounted not only within the walls of the building, but also extends beyond the boundaries of the pediment. The extreme leg of the rafters is a support for solid or sparse sheathing, and the amount of its extension affects the depth of the overhang. To create a support point for the external rafters, it is necessary to move the load-bearing roofing elements - intermediate and supporting ridge beams - outside the walls. This design solution is reliable and makes it possible to extend the overhang over a long distance, even on roofs where heavy roofing coverings, for example, natural slate or ceramic tiles, will be installed.
- If a light-weight roof is being erected and the overhangs are small, a different design is made. Rafter legs are replaced with thinner and lighter boards, the height of which is similar to this parameter of a wooden beam. They are connected to the outer leg of the rafters with crossbars and secured with a wooden element of the lower eaves overhang. This scheme is less reliable and uneconomical, since it requires a large consumption of lumber and considerable labor costs.
Finishing gable siding
The use of these modular panels, which are made from PVC or sheet metal, will not require annual processing. In addition, manufacturers offer the consumer a wide range of color solutions, which allows you to choose the color that best suits the roof or finished wall of the house.
By the way, when covering the front wall, you need to think about how to make a flashing on the pediment. Although there is nothing special to think about, it is installed using approximately the same technology as those that stand in window openings.
Cladding of the pediment
After this wall is built, the homeowner is faced with the question - how to sew up the pediment of a wooden house? The answer lies on the surface - it is sheathed with the same material that is used for the external decoration of the walls of the building, for example, clapboard.
This method of cladding can be safely called classic; it will never lose its relevance. The thing is, the wood from which the lining is made perfectly protects the building from low temperatures and wind. But when using lining, you must remember that it will have to be treated with protective compounds and coated with paint or varnish at least once a season. If these measures are not carried out, then in 10 - 15 years a major repair of the pediment of a wooden house or its complete replacement will be required.
Why should you sheathe the gable of a house?
One of the tasks that the pediment must solve is protecting the under-roof space from bad weather. That is, it prevents heat loss from the ceiling, and protects the attic from wind, rain and snow. In addition, if it is planned to arrange a living room in the attic, then it is even more necessary to thoroughly insulate it. The sheathing in this case will be part of the thermal insulation.
In addition, a sheathed front wall, after finishing, for example painting the pediment of a wooden house, gives the house a finished look.
Pediment cladding
There are many options to add decorative value to the pediment with your own hands, these include: cladding, wooden and other sidings, plastic and corrugated sheeting, and others. But regardless of the material, you should proceed in the following order:
- Calculating the area is important for choosing materials according to cost estimates. Formulas from a school textbook will be useful for this; knowing the edges of the desired figure, the area is calculated using formulas from the school textbook. It is necessary to subtract the area of windows and doors from the total area, and also take a reserve for damaged material.
- Installation of the sheathing - the sheathing is installed in a classic manner, without any special features; this stage is notable for the need to lay waterproofing and thermal insulation materials, especially if the room is residential.
- Installation of a drain - it is necessary to lay the panels carefully and overlap.
- Facing is carried out according to the instructions supplied with the material.
Types of pediments
In addition to classification by appearance, as discussed at the beginning, these roof elements are divided according to the method of construction. That is, those that are built before the roof is erected, and those that are equipped after all the roofing work is completed, and one must understand that there are serious differences between them in the method of arrangement.
The first ones, as a rule, are made of the same material as load-bearing walls, that is, brick, logs, etc. When making such a structure for this element, it is necessary to build temporary and permanent support, which must be installed from the attic side.
The construction of such a structure will require the future homeowner to carry out careful calculations of the structure and, of course, extreme precision during its construction. There are known cases when, at the stage of arranging the roof, cases arose with the connection of the pediment and the rafter system. By the way, violations during the construction of this structure can lead to it simply falling to the ground.
If the gables erected at different ends of the roof have different shapes, then the rafter system will be skewed. Moreover, if the pediment is built from logs or beams, it is much easier to eliminate this problem than on those structures that are raised from blocks or bricks.
This method will require additional costs and time from the homeowner, especially if errors made during its construction are identified.
Sometimes this approach is used, that is, the construction of the front wall is carried out simultaneously with the roofing system. This approach is necessary when, according to the requirements of the working documentation, some parts have to be built into this wall.
The second approach, that is, the construction of the front wall after the construction of the rafter system is completed, is much simpler. The work starts after the last rafters are installed, and the boundaries of the front wall are immediately drawn in front of the builders.
This method of constructing a pediment is used quite often, especially when constructing country houses. To build the front wall, they use a frame, which is insulated, and then they decide how to cover the pediment of a wooden house with boards or siding.
The frame for the construction of this wall can have a different design, when choosing which, the future homeowner should be guided by the following criteria:
- roof height at ridge;
- how many windows or doors will be installed in the gable.
Finishing the gable wall
Every pitched roof has a pediment, except the hipped roof, so the question of how to inexpensively and accurately decorate this part of the wall worries many. Don’t think that this is just an aesthetic issue, because a properly constructed pediment serves practical purposes:
- Rationalizes the distribution and conservation of heat inside the house. This function of finishing the pediment is especially relevant for the roof of the attic, which is used year-round as a living space. Without adequate cladding and insulation, the pediment will become a black hole into which the money spent on heating the room in winter flies away .
- Protection from adverse weather conditions. In order to preserve the interior decoration, and even the structure of the roof of the house itself, you should take care of a reliable pediment, which will become a protective barrier between you and the external environment, which tests the strength of the piercing wind, lines, and snow.
- Stingray support. Subject to correct calculations and professional work, the gable wall will become an additional point of support, helping to distribute the load from the slopes. Experienced roofers can use gable repairs to fix roofs that have sagged as a result of design errors or from time to time.
- Creation of a unified architectural image of the structure. A pediment, designed competently, in harmony with the roof and decoration of the main walls, without serious expenses makes the image of the house complete, holistic, emphasizing its style and the designer’s idea.
Please note that the material from which the pediment is made does not always match the finish of the main walls. Experienced builders strive to minimize the weight of a home by using lighter materials. This allows you to save money spent on laying the foundation.
Sheathing methods
When starting to build the roof of a house, you should decide in advance in what order to carry out the work. There are two options:
- First the pediment. If you decide to build the gable first, and then install the rafter system and roof, then you will need to install a mast, the length of which corresponds to the height of the ridge, in the middle of the gable hay and pull a cord from it to the corners of the house. The cord will outline the space that needs to be stitched. This option is good because the rafters and beams do not impede access, and the finished pediment will provide additional support for the slopes of the future roof, which is necessary if it has a large weight or area. It is important to strictly follow the project, check, align the corners so as not to warp the rafter structure.
If construction is carried out in winter or in regions with frequent squally winds, it is better to first build the gable and then move on to constructing the roof . This will protect the slopes from tipping over, and the wood of the rafter frame from the penetration of excess moisture.
Insulation
Experienced builders consider insulation to be a key operation in finishing a gable wall. If you plan to heat the attic, then this procedure is mandatory, and for non-residential attics it is highly recommended. Most often, the thermal insulation of the pediment is performed using fibrous materials based on minerals. There are two ways to “seal” heat inside the attic:
- From the inside. According to research and the experience of professional craftsmen, this is a more rational solution, which is more effective. When insulating from the inside, work is carried out from the attic side, setting up a frame, between the beams of which mineral wool is compacted, covered with a vapor barrier and sheathed with plasterboard.
When purchasing insulation for a gable, please note that if it is to be used indoors, you need to choose from options that are safe for human health. Hypoallergenic and non-toxic insulation based on flax fiber has proven itself to be excellent. The so-called ecowool is not inferior to mineral wool in terms of thermal conductivity, hygroscopicity, and noise insulation, but is better suited for use inside residential premises.
Facing
Facing is the finishing line in the design of the pediment. It covers the unsightly appearance of the insulation and protects the wall material from moisture. Whatever material you use, the principle of installing the cladding is the same - first, a frame is set up, onto which decorative boards or panels are then attached. The leading materials for finishing the pediment are:
- Siding. Decorative panels made of polyvinyl chloride, metal or asbestos cement. They are durable, do not suffer from temperature changes, do not fade, do not rot, and do not deform. A variety of colors and textures provides interesting architectural solutions that decorate the exterior of the house. The siding is attached to a metal profile using a locking system.
Important! A metal frame is not suitable for wooden cladding, since wood changes its shape depending on humidity, but metal does not. This difference in properties is detrimental to wood, which is rigidly fixed to a metal frame; it warps and cracks.
Now that you have an idea of how to make a pediment, we remind you that after construction it requires seasonal inspection and preventive repairs (coating with protective compounds) every 5-8 years.
Materials for building a pediment
To build a pediment, you can use different materials. When choosing a material, you must be guided by what the load-bearing walls of the house were built from.
If the walls are built from bricks or blocks, then the pediment is often constructed from the same material. That is, it becomes a kind of continuation of the wall.
Wooden houses mean that this part of the structure should not be overly massive and therefore the pediment is made according to the following scheme - first they build a frame, and then it is sheathed with some kind of material.
There is another variant of the design of this architectural element, it is called chopped. As a rule, they are used in the construction of log houses. In this case, the pediment is also a continuation of the wall.
But the frame method is considered the simplest and least expensive. It can be constructed on a building erected using any building materials. If the homeowner plans to make the attic habitable, then, of course, it is necessary to insulate the gable
Features of a gable roof
Structurally, such a roof consists of several elements:
There are several types of gable roofs:
broken line - the traditional version, which is based on an isosceles triangle;
symmetrical - it is chosen if the room under the roof will be used as an attic; it is the roof with equal sides that allows you to create the most extensive living space;
the asymmetrical design of the roof makes it extravagant; in this design, the ridge is slightly offset from the center, which is why the attic space is reduced.
There is also a multi-level gable roof that will decorate any home, but its implementation is complex, so it is not common.
The uniform arrangement of the two slopes is at a certain angle, which ensures good drainage of moisture from precipitation. According to SNiP standards, the angle of such a roof must be more than 5 degrees. To determine the appropriate parameter, you need to consider:
architectural design of the building;
what finishing material will be used;
climate of the area where the house is being built.
Steep slopes are used for areas with strong winds and frequent precipitation; flatter options can withstand gentle winds and small snowfalls.
When thinking about how to make a pediment canopy with your own hands, you need to take into account that the rafters in such cases rest directly on the walls through the mauerlat. First of all, the gables are laid out, and then the entire roof; they must be made of the same material, otherwise the building will look ugly.