When repairing floors, many questions always arise. This is not surprising if you have such nuances, because the floor is a part of the house that is used almost around the clock. There are many options for making this part of the home comfortable, but you need to dwell in detail on how to build a plywood floor along the joists.
The process of laying a plywood floor at the stage of fastening to the joists.
This type of coating is perfect if you need to do insulation, but it is impossible to fill a cement-sand screed, and even if there are large uneven areas.
What are lags
The bars that form the sheathing when installed are called lags. With their help, the surface in the room is leveled, and they also serve as a basis for attaching sheets. They can be made of metal or concrete, but the use of plywood requires the use of wooden blocks.
The construction of the floor will not be practical enough without lathing, since it gives the necessary rigidity to the sheets. Of course, there is a way to lay plywood without lathing, but this type of fastening can only be used if the room has a flat base. Without this, leveling the floor with plywood without joists will not be done well.
Laying joists on the street. First, they build a frame and connect the sections together.
For logs, timber with a cross section of 50×100 mm is usually used. The rectangular shape is necessary so that the sheets can be joined on the wide side. In other words, if you don't have a support pad, attaching the sheet will be difficult.
Also, before the logs are installed, they must be treated with antifungal and fireproofing agents.
A variation of the first method - laying on adhesive compounds
Sometimes the surface of the old coating is almost perfectly smooth. It will still not be possible to lay laminate on such a floor, but it is possible to replace the hardware with adhesive compounds. For gluing plywood sheets, water-based glue, mastic, assembly adhesive, bustilate, and liquid nails can be used.
Example of glue used Source eco-stroycity.ru
Pros and cons of choosing plywood
To the question: why is this particular material chosen to make an even coating indoors? The answer can only be given if you know its characteristics. The first positive quality is durability.
Compared to chipboard and USB boards, plywood will last much longer. The reason for this is the technology of its manufacture. Unlike other types of wood boards, plywood is glued with veneer, which gives it strength. Three types of adhesives are used for gluing veneer, two of them are moisture resistant, so plywood can withstand moisture for a long time without destruction or rotting.
When using this design, additional communications can be installed underneath it without resorting to cutting niches in the walls.
Plywood is stronger than other floor coverings and will last much longer
The negative nuance is that this material is the most expensive of the entire group of wood boards. But, the opinions of experts always agree on one thing: it is better to do it once and for a long time than to redo it due to the use of low-quality materials.
Conclusion
There are several ways to install a plywood floor. The choice of technology depends on the type and quality of the base, as well as the purpose of the flooring (rough or finishing). But, in any case, you should strictly adhere to the above instructions so that the floor turns out smooth and durable.
The video in this article contains additional useful information on this topic. If you have any questions while reading the material, you can leave them in the comments, and we will be happy to answer them.
What plywood to use for floor joists
In order to make a plywood floor using joists with your own hands, you need to know what type of plywood to choose. If you consider that water leakage is possible in places where heating radiators are installed, you should purchase a moisture-resistant type. Second and third grade worksheets are perfect. It is also necessary to take into account the size of the sheets. Size 1525x1525 mm or 2500x1250 mm would be the ideal solution. These dimensions are chosen in order to cut the sheet into four parts and use them for installation. If the work is carried out in an apartment located in a multi-storey building, it will be problematic to lift large sheets.
Types of plywood
Today the industry produces 5 types of plywood, which are characterized by class.
- The first class is sheets that are sanded on both sides and have no flaws. They are used in the furniture industry;
- The second and third classes are sheets that are polished on one side, while the second remains untouched. This plywood is multi-purpose;
- The fourth and fifth grades are not sanded plywood. It is used for rough work.
A sheet's class can be identified by its seal, which is installed by the manufacturer.
Dimensions of unsanded birch plywood for flooring
Plywood is also divided into three types based on water resistance. This factor depends on the type of glue used.
Sheet thickness
The thickness of the plywood for the floor along the joists is also taken into account in the calculations. Thin sheets will sag, which will lead to destruction, and thick sheets will not be very comfortable to work with. But there is a way out of this situation, and moreover, it will play into our hands. The minimum thickness of floor sheets should be 20 mm. For a more durable coating and ease of installation, sheets with a thickness of 10–12 mm are used, which are laid in two stands. This creates a seamless coating.
With this technology, the plywood floor will be durable and reliable.
Peculiarities
To choose plywood for leveling the floor, you need to understand the features and classification of the material on the market. Plywood varies in grade, thickness, moisture resistance and material of manufacture.
There are 4 types of plywood that can be distinguished visually:
- The fourth grade has defects on the surface, rough, there are holes from knots, since the lowest quality raw materials are used for production.
- The third grade is of better quality than the previous one and there is less defect on the surface.
- The second grade has minor cracks and is smooth.
- The highest quality and most expensive first grade is well polished, all sides are without defects.
When choosing a variety, they are guided by price and quality. For the construction of a subfloor, plywood of the second and third grades is suitable. According to the processing method, they are distinguished:
- Unsanded plywood.
- Sanded (one or both sides).
Plywood is made from deciduous and coniferous wood (usually pine and birch). Wood veneer is bonded together using natural and synthetic resins. The top layer can be treated with a varnished water-repellent composition.
Based on resistance to moisture in residential premises, the following brands are distinguished:
- FBA.
- FSF.
- FC.
In bedrooms and other living rooms with low humidity, FK and FBA brands are laid, made on the basis of urea and albumin casein glue. They are environmentally friendly and have average resistance to moisture.
The thickness of the canvas is determined by the number of layers of veneer. An odd number of them are laid perpendicular to the previous one, creating a durable building material. For laying the subfloor, use plywood with a thickness of 10 mm and above.
An analogue of plywood in the construction market is OSB - oriented strand board. Such materials have similar properties, but differ only in production. For plywood, the raw material is wood veneer, and for OSB, wood chips are processed with natural resins.
OSB is divided into different categories:
- The first one is suitable for minimal load and dryness.
- The second is produced for low-traffic residential premises.
- The third is characterized by high moisture resistance and strength.
- The fourth is used in the construction of walls.
- Varnished or laminated – covered with a protective layer of varnish or laminate.
- Tongue-and-groove - has a connecting groove at the joints.
The best solution for the subfloor would be OSB 3, tongue-and-groove and easy to install. Such sheets are produced with a thickness from 0.5 cm to 4 cm.
Step by step guide
At the initial stage of work, it is necessary to dismantle the old coating, if any. If laying a plywood floor on joists is carried out on a screed, then all cracks and potholes on it must be repaired. Then the entire perimeter of the surface to be sewn needs to be primed. After preparing the base, it is necessary to lay a waterproofing film. To do this, you need to spread it over the entire surface with a slight overlap on the walls.
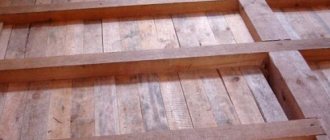
The next step is to install the logs. Initially, the lags must be fastened around the perimeter of the room. To do this, a joist level is marked on the wall. If you have a laser level, then there is no need for marking. With this device, alignment can be carried out at the installation site. All our logs will be installed on substrates made of pieces of plywood or wooden blocks or boards. The substrates are installed along the line of placement of each log at a distance of 50 - 60 cm from each other. After installation at the level of one log, the substrate is fixed to the floor using dowels. You also need to remember that when installing substrates, under each of them you need to adjust a piece of old linoleum or roofing felt.
Preparing lags for further laying of plywood
It is important to note that the logs that are installed around the perimeter should not be in contact with the wall, that is, they are installed at a distance of 20 - 30 mm from each other. This placement is necessary for ventilation. After installing the logs around the perimeter, the remaining parts of the sheathing are installed. The distance between the floor joists under the plywood in our case is 70 cm. This distance was obtained by dividing the sheet in half. If sheets of other sizes are used, the distance between the logs will be different. For different cases it is 40 – 70 cm.
After installing the sheathing, insulation is laid between the joists. This can be polystyrene foam, mineral wool or expanded clay. As practice shows, the best option for the floor is mineral wool. It is not recommended to use polystyrene foam indoors due to harmful fumes, and expanded clay is less effective. Insulation mats should be cut 1 cm larger than the sheathing cells. When laying, such a mat will be tightly inserted between the sheathing bars.
After installing the insulation, the next step is to install a vapor barrier. It needs to be secured to the joists using a stapler.
Tools for work
To perform all the work efficiently, you will need a tool such as:
- Level;
- Roulette;
- Jigsaw;
- Miter saw;
- Hammer;
- Screwdriver.
As can be seen from the list, all work generally requires hand-held power tools.
Sizing adjustment
In most cases, when it comes to installing flooring, the problem that arises is the unevenness of the walls. This nuance does not allow installing parts of the coating exactly along the joists. To do this, you will need to trim each part along a line parallel to the wall.
We fasten the plywood sheet so that there is a small gap at the wall
Marking and cutting are not carried out in a complicated manner. The sheet is placed against the wall so that the second edge lies strictly perpendicular to the joist. You will also need a rail that is aligned parallel to the wall. A cutting line is drawn along it. In this way, trimming is done around the entire perimeter. When adjusting the dimensions, it should be taken into account that there must be a gap between the wall and the covering.
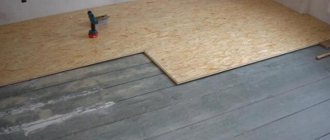
Installation of the first layer
If it was initially decided that the structure would be laid in two layers, upon completion of all work with insulation and sheathing, you can begin laying the first layer - this is a subfloor made of plywood on joists. In order to do the installation correctly, you must first lay out the cut parts along the entire row.
They are attached to the joists using self-tapping screws. There should be a gap of 3 - 4 mm between the sheets. This gap must be sealed with sealant. This technological gap is required for expansion. The installation of the first row is carried out in this sequence.
It is worth noting that moisture-resistant plywood for the floor must be used for the first layer. To drill holes you need to use a tool such as a comfirmat. This attachment fits onto the drill and makes a hole for the screw heads. The screw head, when screwed in, will be recessed into the slab.
Second layer
When installing the second layer of flooring, all work is repeated, as when installing the rough one. An important point is that the sheets must be screwed together with mixed joints. For greater strength, the layers need to be glued together. This is done using construction glue. Installation of sheets must be carried out with the clean side. Thanks to this, upon completion of all work, a wooden covering is formed.
It is also possible to level the floor with plywood without joists. But this is provided that the surface where the installation will be carried out is level. The technology for working with sheets does not change.
Surface grinding
After all installation work, grinding is carried out. This operation is necessary in order to remove all minimal irregularities from the floor surface. This is done mechanically using special grinding machines.
In order to carry out the work of installing plywood on the floor, you do not need to have extensive experience in construction. It is more important to know what kind of plywood to use when installing a floor on joists. The sequence of performing simple actions with the material is also important. If you follow all the requirements, you will get a coating that will last well for a very long time.
Did the article help you? ( 14 ratings, average: 4.00 out of 5)
An alternative method is laying with self-tapping screws and polyurethane foam.
There is an alternative version of how to lay plywood on a wooden floor. This method is applicable if the old coating has sufficient strength, but the horizontal difference is too large.
The essence of the method is as follows: self-tapping screws are screwed into the old coating so that the ends of their heads are located exactly on the same plane. The distance between adjacent screws should not exceed 10-15 cm. The free space is filled with polyurethane foam. The result is a cushion on which plywood sheets are attached.
Protection, operation, storage
In order for plywood to serve for many years, you should know some of the nuances of working with it:
- The material should be acclimatized. 24 hours - with minimal temperature deviation in the store and the room for working with it. 4-6 days – with a difference of 9-12 °C, taking into account the humidity in the room. More than 7 days - with significant differences in temperature conditions, with defects in sheets, and high humidity.
- The damp atmosphere will destroy the material. Use in a damp area is prohibited.
- Laying is carried out only at 19-29 °C.
- Auxiliary processing of the material improves wear resistance and protection against fungi. The use of varnish improves strength, and the use of glue improves moisture resistance.
According to the above data, we can say with confidence that this is the best material for laying on the floor.