Articles
All photos from the article
Sawing out plywood crafts is an interesting and useful pastime. Any plywood product can be loaded with functionality, and then you get what is called two in one - a beautiful and useful craft. This instruction will tell you how to turn a boring sheet of plywood into something useful or simply unusual.
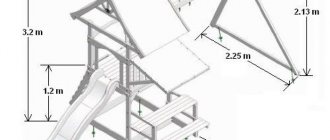
A whole farm in the garden.
DIY wooden cat house made of plywood
I built this cat house with my own hands from wood and decided to share the building experience with you. You can see the entire process of building wooden cat houses in the video or just follow these step-by-step instructions.
Materials:
- Pallet and plywood
- Carpet
- Bucket 20 liters
- Nails and bolts
- Sisal rope
Tools:
- Drill
- Hammer
- Saw (preferably jigsaw or hand saw or circular saw)
- Grinder
- Sandpaper
- Plane
- Stapler
- Sharp knife
Step 1: Gathering materials
Obviously, to build a house you will need pallets. Ask around in places where they may be, for example, at the construction market, most likely they will give them to you for free.
You will then need to divide the pallet into individual boards. This is not an easy task, you will need a hammer and a little patience. Afterwards, remove all nails. You will also need a sheet of plywood for this project. I was able to find a pallet with a plywood top that fit perfectly (and was free).
Step 2: Build the structure
Cut a rectangle from plywood to the size of your future tower. The size of the tower depends on how much space you have, how big your kitty is, how many of them you have, etc. My piece of plywood was already lined with boards on the outside, but if yours isn't, attach boards to the outside for extra support.
Then take the cross beams from the pallet, place them in the form of a triangle and screw them in place using self-tapping screws. Now you can put the tower on its legs, the basic structure is ready.
The two notches in the beam (for forklifts) are curved, so I took a saw and made them rectangular to secure the triangular platforms to.
Step 3: Installing triangular floors
Measure the triangles that will be at the base (top and bottom), then cut them out of plywood. Place the triangles on the inside of your rug and wrap, leaving a few inches on each side to wrap the edges. Cut it out with a knife or scissors, wrap it and staple it. Do this with both triangles, then you can install them into the tower and nail them in place.
Next, cut a rectangular piece of plywood slightly smaller than your base, wrap it in the rug in the same way as the triangles, and secure it on top. Now you have three levels ready. As you can see in the photo, I added triangle blocks below the second level for extra support.
I then took two boards from my pallet and wrapped them in carpet, hammering them into the base and front beams, this will allow the kitty to climb up to the second level and also provide additional support.
Step 4: Build a house
I won't go into detail about the construction of the house I did, take your own approach.
I decided to make the side of the house 25 centimeters wide and the rear 40 centimeters wide. Two boards on each side to make the house tall enough. In total, you get four boards of 25 centimeters and two boards of 40 centimeters. I fastened all the sides with small bars located at each corner. I decided to do the front part of the house after installing the roof.
For the roof, I attached two beams to the front and two to the back (see photo). I made small notches in the ends of the beams to install and secure with nails. I then cut six boards to cover the roof, three on each side.
For the front of the house, I cut a piece of plywood to the shape of the house. Before installation, I cut out the doorway, then nailed down the plywood and the house was finished.
This is optional, but I decided to decorate the house and added a door frame, a sign above the door, and shingles on the roof.
Step 5: Finishing Touches
Almost done... I cut a hole in the top level and secured a rug-wrapped board leading down to the second level. It was a bit of a challenge to cut the hole in the carpet since I had already secured it, but once I had it down it was just a matter of making a hole in the plywood for the jigsaw and cutting out the required hole.
For the pipe I used a 20 liter bucket that I had at home. I made two holes with a drill and cut off the top and bottom with a jigsaw, wrapped the bucket in carpet and sat it down with hot glue since a staple gun wasn't enough. Then I drilled a hole at the second level and in the resulting pipe and secured it with a bolt.
Finally, I took a rope and wrapped it tightly around one of the front legs, this is so that the kitten has something to scratch.
Step 6: Admire the new house
That's all. Place the tower where you want it and place a plywood cat house on top. Since the base is not attached to anything, I added a board under the first level connecting the front legs, this greatly increased the stability of the structure.
masterclub.online
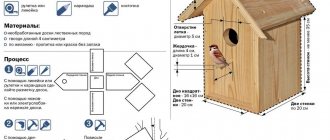
Templates for cutting out figures for the garden
Templates for cutting plywood figures for the garden, continuing the theme “Decorating the garden with homemade figures”
Picture templates are suitable not only for cutting, they can be used as regular stencils.
Crafts made from plywood can perfectly decorate a country house interior. They can be made either multi-layered or flat, which can be nailed to a fence or the facade of a country house.
Moisture-resistant plywood, the price of which is not much different from the usual one, is better suited.
Pets
Poultry yard
20.22. .
Some pictures can be used as a template, you just need to enlarge them and print them first.
14.
1
Sep 17, 2015Galinka
6cotok.boltai.com
DIY plywood figurines for the garden
Many of us spend a lot of time in our garden. At the same time, we want to be surrounded by comfort, convenience and beauty. DIY plywood crafts are a wonderful way to self-realize and decorate your garden.
It's nice to play the guitar after eating a piece of sausage. If mice are not caught, it will be bad.
Working with plywood is easy and pleasant. The material is affordable. In the simplest version, the craft will additionally require paints and some screws. You will need a few tools, see the maximum list below.
You can make decorative crafts from plywood for garden beds and fences, fairy tale and cartoon characters for the playground, birdhouses, bird feeders, flower pots, and so on. To learn how to make a birdhouse out of plywood with your own hands, read the special article. Another description will help you make a feeder from plywood. Having asked the question what can be made from plywood with your own hands, we divided all the figures into two groups: simple ones, which are made from one piece of plywood, and more complex ones, which are assembled from several parts.
"Cartoons" for children and adults
Flat plywood figures
Almost all of the examples presented above were cut from one piece of plywood.
To make crafts with your own hands, it is better to use a sheet with a thickness of at least 10mm. In this case, the image will not warp and will last longer. At the same time, it is preferable to use moisture-resistant plywood in the garden.
There is no arguing about tastes - the choice of your favorite option is yours
The procedure for making a figurine from plywood is as follows:
- The contours of the design are drawn on a sheet of plywood with a pencil.
- The craft is cut around the perimeter with a jigsaw.
- The contours and flat surface of the workpiece are processed with emery cloth.
- Painting boundaries in different colors are applied to the part with a pencil.
- The craft is sequentially painted with all colors. Adjacent layers of paint must be completely dry before applying the next color.
Guys from our yard
The finished product can be conveniently secured with self-tapping screws to a fence or wall. Look at the photo: you can “screw” hair, buttons, shoes, a wire tail, and so on onto the craft.
It is important that these elements hold securely, serve for a long time in the sun and rain, and do not pose a danger to people.
Animals, as always, are useful: a deer holds a flower pot
You can make a variety of decorations for your garden with your own hands from one piece of plywood. We have selected several interesting options for you.
Why does a dog need a hare if it has a bone?
These birds are clearly not friends. Storks, swans, chickens: no one will fly away from you!
A grandmother solves an important problem: what should she cook for her grandfather and granddaughter?
Grandfather understands well that without firewood there will be no lunch
The granddaughter wastes no time and decides to milk the goat
Volumetric crafts for the garden
It is wrong to say that volumetric plywood crafts for the garden are noticeably more complicated. Of course, you will have to cut out a few parts yourself. But some of them should be painted in one color, which simplifies the work.
It’s hard for a donkey to understand how you can sleep for so long, he’s a donkey!
All parts are prepared according to the scheme described above, and then fastened with self-tapping screws. Of course, a three-dimensional figure looks more interesting. The photo clearly shows that it is necessary to use material with a thickness of 15-20mm. Each detail has its own shape and size. They can be placed optimally on a sheet of material and plywood can be used sparingly.
The dog protects, the cat helps: in general, everything is in order
It’s especially nice when a homemade craft not only decorates the yard, but also performs a useful function. In the photo you see only some examples.
The observer is looking out for birds - or a hedgehog?
Templates and diagrams are not problems
It is better to make templates yourself. Firstly, it’s not difficult, and secondly, you can make templates for your own and a new drawing when you get tired of repeating other people’s ideas. Note that there are a huge number of children's applications for crafts made from colored paper, which are quite easy to cut out of plywood.
The easiest option is to apply the design directly to the plywood. Moreover, if you had an A in drawing at school, it is not at all necessary to copy what has already been done.
Otherwise, you should apply a grid on the drawing you like with a pencil. Then the same grid is drawn on a sheet of material with a pencil. All elements of the design are transferred to plywood “in squares”. Conveniently, the squares in the drawing and the workpiece can have different sizes, that is, the drawing can be transferred to any scale.
The most convenient and modern way to do the work is to use a computer, which is what we did. Almost everyone has a Microsoft Power Point program, where you should copy the picture you like. The program presets the sheet size for printing on a printer to 29.7x21cm.
Setting the print sheet size
We have a piece of plywood measuring 57x77 cm, and we set the size of the pattern based on the availability of material. You must understand that the program takes into account the size of the entire image.
Setting the shape size for printing
Then you need to print fragments of the drawing on the printer, sequentially moving it relative to the sheet to be printed. For ease of printing, a grid of sheets for printing should be applied to the drawing and grouped with the image.
Create a grid of sheets for ease of printing
Now the sheets should be glued into a single image and cut along the contour after the glue has dried. The paper template is placed on a sheet of plywood and outlined with a pencil. Subsequently, individual parts of the drawing are sequentially cut off from the template and also transferred with a pencil to the workpiece. You can cut it out!
How to save your work longer
It will be very disappointing if the handicraft you made yourself peels off and warps from the first rain. So it is better to take a number of measures to save your own work.
Firstly, it is better to use moisture-resistant material. Secondly, it is necessary to impregnate it from moisture, for example, with Pinotex. Acrylic and oil paints can be used. It is important that they are for external use. If you want to leave the natural color of the wood, the craft should be coated with transparent yacht varnish.
Prepare for the fact that the figurine will have to be repainted every two to three years. If the plywood begins to delaminate, it must be puttied before painting, for example, with Silacryl sealant. It is very effective to hide the craft from bad weather during the winter.
Let the video help you in your work. All that remains is to wish you good luck!
Share with friends!
samodelino.ru
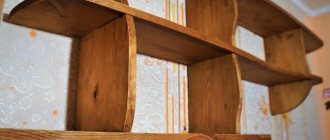
Doll furniture made of plywood is a fun activity for parents and joy for the baby
Any child should always have a lot of toys. Toys give him the opportunity to create his own world, in which he himself determines the rules. For a boy, these are soldiers, cars and children's weapons, but for any girl, regardless of age, dolls are always the main toy. But to create an exact copy of the world that the child involuntarily reproduces, all the required elements must be present. Playing with dolls is impossible without furniture. The most popular is still plywood doll furniture, which you can buy or make yourself.
Assorted plywood doll furniture
Types of doll furniture
Toy furniture belongs to a special category of children's toys. Reduced in proportions, it accurately reproduces interior items used by both adults and children. Doll furniture has its own distinctive features:
- Similarity to the original. The children's version of furniture should almost completely copy real objects. It is very difficult to deceive a child. Children want toy replicas to be exactly like the regular furniture they themselves use with their parents at home or in kindergarten.
Photo of finished furniture from the book
- Careful manufacturing. Production often involves only manual assembly. Small parts from which furniture is assembled for children must be carefully processed, do not contain sharp edges and are always subject to strict control during acceptance of the finished product.
- Safety. Doll furniture always remains, first and foremost, a toy that a child can put in his mouth or leave with him in bed all night. Therefore, only materials and processing agents that are harmless to health should be used for production.
Photo of a template for making furniture from plywood
Plywood has been used for the production of furniture for dolls for quite a long time. This was due to several reasons:
- Strength of the material. Products can serve more than one generation without losing their original properties.
- Ease of processing. A hand jigsaw is enough to give the desired shape.
- Harmlessness. Certain brands are absolutely harmless to humans.
Another indisputable advantage of using plywood is the ability to independently make any items at home.
Photo of finished doll chairs
Making furniture yourself
Everything you can do for a child or with him can confidently be called the best moments of any person’s life. In most cases, furniture for a doll can be purchased. The range of stores for children offers a wide range of different materials. But do-it-yourself doll furniture made from plywood for a child will be the best childhood memory for parents and baby.
Photo of finished toy stools
When starting work, you should decide on the list of elements that need to be manufactured. The easiest way to do this is with a child. Usually girls always know exactly what they need to make their favorite dolls happy. Agree on the list, sizes and quantities of required items. After this, you need to prepare a drawing.
Preparation of the drawing
Making doll furniture from plywood, the drawings of which are to be made, is different from making the usual production process, but the principle remains the same. Furniture is assembled from pre-prepared elements using different fasteners.
Photo of a drawing of a chair back
To prepare the drawing you can use:
- Ready template. Plywood furniture for dolls has been made for several decades since the times of the Soviet Union. In books or on the Internet you can find ready-made templates for doll furniture made of plywood. As an example, below is a photograph of finished furniture and templates for its manufacture.
Important! A distinctive feature of all ready-made templates are the provided fasteners, which allow you to connect the parts together.
- Hand made drawing. Do-it-yourself plywood doll furniture, drawings of which must be made, will take into account the personal wishes of the child and parent.
Even without minimal practical experience, it will not take much time. To visualize what this looks like, below are several examples of preparing a drawing for toy chairs and stools.
Photo of chair seat drawing
A template for making stool legs is also provided.
Manufacturing and assembly
The technological stages of assembly are simple and will not cause difficulties:
- Preparing parts. After preparing the drawing and template, the process of preparing the details of future furniture begins. To do this, you need to take plywood with a thickness of no more than 6 mm. Typically, a four-millimeter plate is used for the frame, and a six-millimeter plate for auxiliary parts.
For cutting, it is better to use a manual jigsaw, which even a woman can operate. The finished parts are first tried on, after which they must be cleaned with sandpaper.
Photo of a template for stool legs
Important! It is better to carry out cleaning by machine, for example, using special attachments on a screwdriver. This improves quality and speeds up the process.
Preparation of individual furniture elements
- Assembly. Finished parts are assembled using self-tapping screws, glue or connections provided in the parts, usually tongue-and-groove. The assembled furniture must dry.
The cracks or technological holes in the finished product are sealed. To do this, you can use acrylic putty, which after drying is almost invisible and completely harmless.
Finished plywood stool.
- Finishing doll furniture made of plywood. Depending on the mood or wishes of the child, the furniture can be coated with any acrylic paint. Often furniture is completely covered with white paint as a base, which is then painted in different colors or a design is applied.
An example of finishing plywood furniture
The result obtained, no matter how it turns out, will bring joy to all participants in the process. If over time, toy tables, chairs or cabinets seem not so beautiful, you can add variety by making soft pillows, or upholstering the furniture with fabric. You can simply make covers of different colors and change them periodically. In any case, everyone will be happy.
profanera.ru
diagrams, templates of flat and three-dimensional products
Plywood is a universal material that is usually used in furniture production and private construction.
With a little skill and creative imagination, you can use this building material to make children's toys, decorative crafts for your garden plot, and small household items. It is noteworthy that this does not require special skills or knowledge.
Let's see what interesting plywood products you can make with your own hands, having a little free time and patience.
Don't forget to share with your friends! The content of the article
Why plywood
The choice in favor of plywood was not made by chance. Unlike simple wood, this material has the following advantages:
- strength. The structure of the sheet is multilayer, which ensures a certain rigidity and resistance to deformation;
- availability. Available in any hardware store and sold in an affordable price segment;
- ease of processing. Cutting crafts does not always require a power tool; you can get by with an ordinary jigsaw;
- safety. The material is environmentally friendly, so you can even make toys from it without fear that your child will develop an allergy.
Plywood initially has a smooth surface, so it does not require additional sanding.
Products are divided into grades, which differ not only in cost, but also in quality. For crafts, they usually use sheets of the 1st and 2nd grades, which do not have veneer delamination, chips and other defects. If the decorative decoration is intended to be used in the garden, it makes sense to give preference to moisture-resistant plywood.
Figurines for the garden
DIY plywood crafts for the garden are the most practical and inexpensive way to decorate your garden plot. Here you can fully realize your creative potential by making your garden or flower bed more original and interesting.
Select a template
The key feature of plywood is its versatility. From a flat sheet you can cut out almost any figure using a template. A cat climbing over a fence at the dacha, holding a piece of sausage in its teeth; a curious man watching his neighbors through binoculars; a herd of reindeer grazing in a flowerbed. There are a lot of options, and crafts can be flat or voluminous.
It is better for inexperienced craftsmen to start with simple flat figures, which are made in 1.5-2 hours, maximum in a day.
As a sketch, you can use the ideas of other masters, look at the design options for your personal plot on the Internet, or create your own funny drawing. It is better to draw the template on tracing paper or graph paper, and then carefully transfer it to the plane of the plywood sheet. A good option is to create an image in Microsoft Power Point.
You can make a high-quality sketch for a plywood craft using this application according to the following scheme:
- transfer your favorite drawing to the working window of the program;
- go to the scaling section and set the aspect ratio based on the size of the existing sheet of plywood;
- break the finished drawing into fragments;
- print them one by one on the printer.
After this, the individual fragments of the picture are glued into one sheet, the template is carefully cut out along the contour, applied to the plywood and traced with a simple pencil. This operation takes no more than half an hour, but this technique allows you to create effective templates, even without artistic abilities.
Manufacturing technology
After drawing the sketch on a plywood sheet, the figure needs to be cut out.
For thin sheets of plywood, a regular jigsaw is suitable; thicker material can be cut faster with an electric tool.
The cut should not be made strictly along the contour, but leaving a margin of about 1 millimeter. This is a common precaution so that the canvas does not accidentally move to the side and ruin the template. If the decorative decoration involves through cuts, the starting groove is drilled with a drill, after which a jigsaw file is passed through the resulting hole.
After completion of the work, the remaining irregularities are removed with a fine file or sandpaper.
Finishing
Of course, even the most original figurine requires at least painting to become brighter and more interesting.
Before applying the design, the entire surface that is supposed to be painted must be treated with fine-grained sandpaper, making the plywood a little rough. This will ensure better adhesion of wood to paints and varnishes. Then you need to remove the wood dust remaining after treatment and degrease the surface with a solvent.
If the template is multi-colored, it is recommended to mark the demarcation lines with masking tape. It is better to paint fragments of such crafts separately to avoid accidental mixing of colors.
The paint is applied in multiple layers, with each subsequent layer applied only after the previous one has completely dried. This painting scheme will make the design more durable: the paint will not fade in the sun or peel off after rain.
At the final stage, the finished surface can be varnished to make the figurine more resistant to environmental influences. The varnish is applied according to a similar scheme: a multi-layer texture with the obligatory drying of each layer.
Note! If the figurines are removed from the garden in winter, the paint will have to be renewed approximately once every 3-4 years.
To increase the moisture resistance of the design, it is recommended to choose acrylic paints for outdoor use. Materials for facade work are more resistant to ultraviolet radiation and moisture and reliably protect wood.
Volumetric figures made of plywood
You can easily make beautiful, three-dimensional crafts in 3D format with your own hands. In general, such products are manufactured similarly to the scheme given above. The only caveat: the figure will consist of several elements.
For example, if we are talking about a rooster, which will serve as a good decorative decoration for the lawn, then the three-dimensional figurine will consist of the following parts:
- body, including head and tail;
- two wings: one on each side;
- a pair of paws.
Each element is cut out separately according to the drawn up sketch. After which the figure is assembled into a single whole using glue or decorative nails. Using a similar scheme, you can make any animal (cat, dog, bear), mushroom, gnome, lantern and much more. Small-sized souvenir items are also cut out and placed on a shelf.
Children's toys made of plywood
Almost any children's toy can be made from plywood. For the little ones, pyramids or mobiles that hang above the baby’s crib are suitable. For example, you can make a pendant of multi-colored stars, which are attached to a fishing line and rotate slowly, evoking pleasant dreams.
For older children, various cars, tanks, airplanes, and puzzles are suitable. It is noteworthy that you can involve a child in the creation of each toy, which will not only allow you to have a fun time, but also teach the boy how to use the instrument.
Girls will not be left out either. You can cut a dollhouse out of plywood and make all the interior furnishings: cribs, chairs, dishes. The appearance of crafts for children made from plywood is much more interesting than that of factory toys, because they are made with soul. They can be given for a birthday, and it will be a very unusual and pleasant gift.
Important! It is recommended to glue children's toys only with PVA; for finishing, use water-based varnishes.
Such compositions do not contain toxic substances, therefore, they will not create health problems, even if the child puts the toy he likes into his mouth.
Setting up the kitchen
Taking into account the specifics of the application, kitchen crafts are made from dense, water-resistant plywood.
This material is not afraid of moisture and steam, so it can last for several years. Plywood is usually used to make carved shelves, boxes for storing spices and other necessary small items, cutting boards, hooks for potholders, and souvenir refrigerator magnets.
If you have some experience, you can assemble an entire kitchen set with your own hands, which will not differ from the products of furniture factories. To do this, use thick sheets of plywood, a jigsaw or a hacksaw. And of course, you need to have some free time and desire.
treegid.com
Plywood drawings for artistic cutting with a jigsaw
Plywood is a very accessible, relatively inexpensive material for various crafts. Things made from it can have not only decorative value, but also be useful in our everyday life.
Plywood is an easily processed building material, which is produced by gluing together several layers of veneer and specially treated wood chips.
Photo: Having drawings of animals made of plywood, you can use a jigsaw to create a special atmosphere in your home, including a cheerful one, for example, this cat made of thin plywood makes you smile. Is not it!
Introduction
These sheets, which can be used for making crafts and structures, may differ:
- number of layers of veneer - three-layer, five-layer and multi-layer;
- the type of wood from which the multilayer sheet is made (deciduous or coniferous);
- according to the degree of processing of the surfaces of the plywood sheet (sanded on one or both sides, not sanded).
Building codes and standards
To learn more about the building material in question (about the classification of the entire plywood nomenclature, grades, standard sizes produced), which can be purchased for the manufacture of many products and crafts, it is recommended that you familiarize yourself with the following documents:
- GOST 3916.1-96 “General purpose plywood with outer layers of hardwood veneer.”
- GOST 3916.2-96 “General purpose plywood with outer layers of softwood veneer.”
Schemes, drawings and patterns for products made from plywood sheets
A pattern of a cat, according to which, using drawing programs, you can easily make a plywood blank of any size with your own hands for further processing (for example, cover it with polyurethane foam and paint it black).
Computer drawing programs
Today you can easily find a diagram, a pattern for a plywood structure, so that you can then prepare any drawing using computer-aided design systems (including the above cat pattern). Next, use a plotter to print it onto a paper sheet of the required format.
Popular drawing programs are the easiest to learn and can be used in 2D and 3D modeling, including for plywood structures:
- "KOMPAS" is a complex of automated systems with the ability to prepare drawings in accordance with the standards of the ESKDI and SPDS series;
- AutoCAD is a two- and three-dimensional computer-aided design and drawing system.
So, if you cannot find a detailed drawing of the plywood product you need, then the application capabilities of the given software will help you make a full-fledged drawing using any diagrams and patterns posted on the Internet.
Kayak
The price of the construction plywood from which the kayak is made is simply incommensurate with the pleasure that the person who made it with his own hands and who loves rowing boats will receive.
Appearance of a single-seater boat, drawings of which are given below in the article
The Eskimo kayak is the same kayak among the Aleuts - a traditional rowing boat of the Arctic peoples. This boat can be single, double or triple. Let's post drawings of a plywood kayak for one person.
For this kayak, plywood sheets were purchased - 1525 x 1525 (mm), thickness 4 (mm).
The algorithm for building a rowing boat from plywood sheets is, in principle, general, with the exception of some nuances. A step-by-step procedure for cutting, processing and assembling a kayak can be seen in the video in this article.
Plywood table - simple and functional
Plywood table: 1 – cover; 2 – inner wall; 3 – side (end) walls.
Clear drawings of a plywood table with your own hands, which will be easy to implement even for a person without special carpentry skills and experience.
Table cover (1 sheet) - 1300 x 600 x 16 (mm)
Inner wall (1 sheet) - 1170 x 400 x 16 (mm)
End wall (2 sheets) – 450 x 740 x 16 (mm)
Plywood constructor
Various plywood construction kit drawings are now gaining more and more popularity. Assembling such models from safe material is a very useful activity for children and teenagers. Such crafts will become good examples of collections and will decorate the modellers' corner.
Tank
The photo shows drawings of a plywood tank: top of the hull
Tank bottom
Tower details
Other tank elements
The stages of work on installing a tank model are as follows:
- The plywood is sanded (first with medium-grain sandpaper and then with fine-grain sandpaper);
- The drawings are carefully transferred through carbon paper onto sheet plywood material sanded with fine-grained abrasive.
- In the corners of the contour transfer, through holes are drilled with a drill (drill 3 mm or more);
- Attach the file to the jigsaw and start cutting out the elements of the tank;
Sawing can be done even by a child
Note! Cutting out parts must begin inside the contours of the tank blanks, and only then around the office itself.
- After cutting out all the parts, sand them again with sandpaper, removing the burrs left from the file;
We polish every detail - Start assembling the parts.
Advice! When assembling the model's plywood assemblies, have different types of needle files on hand so that you can fit the elements together at any time.
- After adjusting all the parts, you can start gluing them (for example, with PVA glue, “Titan”);
Advice! In order for the components and elements of the tank to grip each other more firmly and reliably, you can tie them with thread or rope for a while after gluing them.
- The cannon can be made by cutting the wooden handle of a watercolor brush or from other auxiliary material;
- If desired, you can apply a side number or other inscriptions and patterns to a tank, or any other model, using an electric burner;
- For greater preservation and decoration of the model, they can be coated with varnishes and paints.
The model of the tank is made of plywood with a thickness of (3 – 5 mm), the plywood elements were sanded, joined with “Titan” glue, primed and coated with acrylic varnish and paint. The photo shows the result of the actions described above.
Car – retro (old Mercedes)
Model of a retro Mercedes car
Note! When you transfer these drawings of a plywood machine with your own hands onto the plywood sheets themselves, do not forget to transfer the numbers.
Mercedes parts (1)
Mercedes parts (2)
When assembling the model itself, look carefully at the numbers.
In this case, the process is carried out according to the following algorithm, in accordance with digital notations:
- the part or assembly numbered 1 must be connected to another number 1;
- and part number 2 is attached accordingly to the next number 2 and so on until the machine is assembled.
Gun
Model of a pistol such as "Bulldog" M19
Drawings of a pistol made of plywood model "Bulldog". When assembling, we follow the same rules as when assembling a machine: the same numbers must be mounted with each other.
Pistol parts(1)
Pistol parts(2)
Advice! This model of pistol is best coated from a bottle of spray paint; for a better resemblance to the original, layers of black paint can be applied.
Dinosaur
It’s not difficult to make a model of such a dinosaur; it’s just a matter of patience when cutting out the parts with a jigsaw.
When designing, drawings of plywood dinosaurs, for example, those presented below, can be made in any scale you need according to the presented pattern in a drawing program for a computer.
Preparing the material, model elements and the assembly itself is not difficult, but you will have to have some patience when working with a jigsaw and adjusting the model components to each other.
Parts for assembling a dinosaur
Napkin holder – “Grape leaves”
Very light + simple + necessary part in everyday life
This item in the shape of grape leaves is always useful in the household for its intended purpose - for napkins, and for storing, for example, sheets of paper of the selected format:
Drawings of a plywood napkin holder: before varnishing, staining or painting a plywood blank, you need to burn out the pattern
Napkin holder base with technological slots for attaching vertical parts, in the shape of grape leaves
Vase, stand for pencils, pens, brushes
A vase that can be used for sweets, for writing objects, for storing other small household items
Drawings of a plywood vase, from which you can easily cut out a craft of the size you need:
Stand, with holes for fastening the side walls of the vase
Side, prefabricated walls of the vase with holes for attaching to each other
Plywood panel
It is the ease and simplicity of cutting out plywood sheets of various configurations with different sizes with a jigsaw, and installing various structures from them, that allows us to create a variety of decorative panels for the walls of our homes. Any panel made carefully is an excellent gift for family and friends.
Panel – “butterfly shelf”
Drawings of a plywood panel, which also serves as a shelf in the household:
A panel in the shape of a butterfly with a hole for a shelf (the shelf can be made shaped, rectangular, or semicircular).
Tips for preparing and assembling plywood crafts
To avoid such defects in the workpieces when sawing with a jigsaw, prepare a plywood sheet by coating its surface with a solution of glue and water
Some useful tips and warnings:
- When transferring patterns and drawings onto plywood, use the thinnest and sharpest pencil lead. It's even better to use a used ballpoint pen, then the lines will always be the same and the copy paper won't be torn by the ballpoint. It is convenient to transfer drawings to plywood using a laser printer.
- For better fastening of parts, where possible, it is recommended that the width of the grooves correspond to the thickness of the plywood sheet.
- There are two types of files with large and small teeth. It is more convenient for beginners to learn how to use a thick file, and cut out small parts with a thin file, already having some experience and skills in using a jigsaw.
- The files must cut from top to bottom, so pay special attention to the correct fastening of the file in the jigsaw.
- Files can easily break, so cut carefully and do not allow parts to hang on the saw blade.
- When purchasing a file, make sure that the teeth are sharp, and that the file itself should not bend easily, but rather be firm. It’s not the flat ones that are easy to use, but the so-called “twisted” files – they can be used to make cuts in any direction.
- For those who enjoy cutting out structures from plywood sheets as a hobby, there is no need to purchase a band saw; it is enough to purchase a jigsaw. Although everyone is an amateur, some craftsmen still often resort to a hand jigsaw when they “need to get a feel for the material.”
conclusions
- Before choosing, purchasing and directly working with the material from which you will cut models, panels, construction kits and structures, familiarize yourself with its types and classification according to construction documents (GOST).
- For sawing, purchase high-quality tools, equipment and accessories for it.
- Take a responsible approach to choosing high-quality plywood. Do not limit yourself to a visual inspection, tap it for internal voids and delaminations due to poor gluing of the veneer layers.
- Before working with a jigsaw, optimally equip your workplace. Pay special attention to good lighting so that the cut and markings are clearly visible and your eyes don’t get tired. It’s not a bad idea to use a strobe light to illuminate the area where you’re working with a jigsaw. Convenient and comfortable sawing!
fanera-info.ru