Crafts made from plywood will decorate your garden and flower bed, kindergarten area and playgrounds in the yard. From this material you can create decorative elements for the interior of a room, a wall panel or toys for children. The figures of animals and birds, people and insects look interesting. You can make fairy tale heroes and cut out children's puzzles.
It is not difficult to cut out of plywood; you need to purchase the material, have the necessary materials for surface treatment and painting of finished products. The drawing is thought out in advance, it is either immediately drawn on the surface of a wooden sheet, or an image is copied from Internet sites if you do not have artistic abilities.
In this article we will tell you in detail how to cut plywood and which material is more suitable for the job. You will learn detailed information about the types of plywood sheets, as well as which jigsaw is more convenient to use when cutting along contours. We’ll also tell you how to correctly transfer a design from a sheet printed on a printer to a wooden surface. Let's present several options for products made from plywood sheets, created by craftsmen at home.
Material characteristics
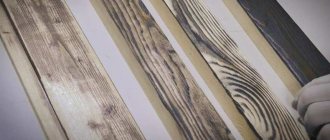
Plywood is a wood-laminated board assembled from veneer or tree bark. Birch or coniferous trees are used. The sheets are distinguished by the thickness of the canvas, the types of coating of the outer layer and the type of glue that is used to glue the layers together.
If you want to place crafts cut from plywood in the fresh air, then it is best to take sheets assembled using phenol-formaldehyde glue. It's called FSF plywood. It has the highest level of protection from moisture and resistance to environmental influences. But such products cannot be used indoors, as they are harmful to health.
For children's crafts and decorative elements for the interior of rooms, use FK type plywood based on urea glue. Such sheets are used for furniture even in kindergartens. It is not harmful, but is not able to withstand moisture. Therefore, such crafts cannot be soaked in water.
Classic and improvised materials for the house
Wooden children's beds
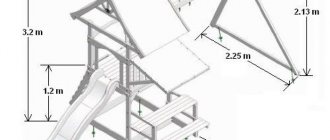
Do you want to give a pleasant surprise to your baby? Then make an attic-type bed-house for him. Believe me, a child will be more happy with such a gift than with any toys.
What is so special about this design? Well, first of all, it is a spacious and comfortable bed. Secondly, under the bed there is additional space for children's games. Essentially, this is a small house.
There are also simpler “attic” structures made of wood - for example, a loft bed with a ladder. To assemble such a bed you will need wooden blocks and plywood.
This loft-type bed will fit perfectly into the interior of a small room. The space under the bed can be used to install cabinets, chests of drawers or other furniture.
Hand tool
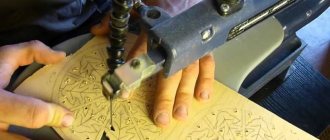
To cut a figurine of a person or animal from plywood, you need to have a special tool. Work at home is done either with a manual jigsaw or an electric analogue.
A hand jigsaw is an arched metal frame with file clips at the ends. The saw blade has a thin size, thanks to which you can cut out figures by changing the sawing direction. The frame is large in size so that the saw can be used inside a sheet of plywood.
If the work begins not from the very edge, but from the inner point, then you must first make a hole in the middle of the drawn figure with a drill, and then insert a saw into it, unscrewing one of the jigsaw clamps. After stretching the blade, secure the saw back with a clamp and continue cutting along the contours.
Since saws for a hand jigsaw are incredibly thin, and plywood sheets are dense, they often break, so purchase several blades for work at once so as not to look for them in the process, if you don’t have enough recommendations for working with the tool, we recommend that you read this article: https ://fb.ru/article/371354/vyipilivanie-iz-faneryi-lobzikom-po-chertejam—podrobnaya-instruktsiya.
What you need for cutting
First of all, let's consider what tool you will need for this. It should be said right away that expensive equipment for cutting out plywood is not required. Therefore, anyone can do this kind of work.
The only thing you need to prepare is the following tool:
- jigsaw;
- hand jigsaw for wood;
- electric drill and brace;
- scissors;
- wood clamps;
- cardboard templates;
- files.
In the photo - a manual jigsaw
In addition, you will need various consumables, such as:
- sandpaper for sanding cut areas;
- tracing paper;
- pencils;
- glue;
- varnish;
- acrylic paints, etc.
In addition, it is necessary to prepare a workplace. Since working with any wood materials involves the presence of sawdust and unnecessary trimmings, it is advisable to set up a workplace not in a living room, but, for example, in a garage.
The workplace itself is a table. It is advisable to attach a jigsaw stand to it, which can be made from a plank. It is also necessary to ensure good local lighting of the workplace.
Electric jigsaw
This tool has a motor that drives the saw. There are battery-powered options for working on-site or on the street, and there are jigsaw models for plywood with an electric cord.
There are guide rails at the bottom of the jigsaw that protect your hands from injury. It's faster to work with, but you need to have the strength to hold it in place and only move along the drawn line. If you decide to take cutting out figures from plywood to an industrial level and make money from this craft, then purchase the following version of a jigsaw.
Cut plywood with your own hands
- All procedures are carried out according to drawings that are drawn up in advance. This will avoid mistakes.
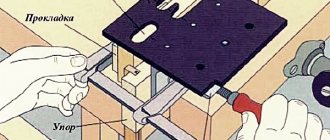
- The marked slab is laid in the prepared place. It is important to ensure free passage of the disk or saw and rigid, stable placement of the resulting fragments.
- The exposed stop is fixed with clamps.
- Based on the most comfortable position, the largest possible cut is made. It is important to ensure that the parts - especially the part being processed - do not sag or jam the tool. Whenever possible, cutting is carried out without stopping.
- Figure cutting is performed in a single section or fragments, the excess is removed gradually.
Masking tape glued to the cutting line can prevent small chips along the edge, but if the blade is selected correctly, you can do without such manipulations
For complete safety, it is recommended to work in safety glasses, a mask and a respirator. All processes are carried out carefully; upon completion, the device is disconnected from power.
Drawing a design on a sheet of plywood
If you know how to draw well, then before cutting a figure out of plywood, draw its outlines onto the wooden surface with a pencil or marker. If you do not have the talents of an artist, then you can either redraw the picture from the finished one, or transfer it using the method shown in the photo below in the article.
The selected design is printed on a sheet of paper using a printer, then draw its outlines with a thick marker and, turning the sheet over with the design facing the plywood, iron the back side with a hot iron. The design will be imprinted on the wood. If the print comes out with gaps, re-draw it with a marker. Then cut out the figure using a jigsaw along the bright lines.
Some craftsmen attach a sheet of paper directly to the plywood with thumbtacks on the edge and then cut out the design with the paper at the same time. But here an opportunity may occur and a sheet of paper will move to the side due to vibration, ruining the evenness of the line.
Log houses
Dwellings have been built with logs since ancient times; they also remain a popular material now. Log houses have good heat resistance in winter and coolness in hot weather, environmental friendliness, and sound insulation.
Disadvantages: flammability, shrinkage, various types of destruction by external environmental factors, for this it needs to be treated every year from rotting and various kinds of rodents. The cost of log house housing will be 18,000 - 80,000 per m2, depending on the type of wood.
Figurine processing
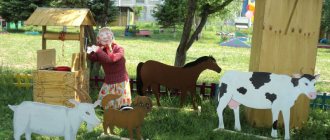
Let's first look at what can be cut out of plywood. These can be large figurines for the garden, for example, a rat running away from a cat, a bunny sitting in the middle of a flowerbed, figurines of the fabulous Cheburashka and Gena the crocodile playing the accordion. They can be installed on a long block and buried in the garden.
In order for the figurine to look neat, it needs to be processed correctly. Plywood has rough edges after sawing. All irregularities must be removed using sandpaper. First take a coarser one, for example No. 80, then wipe again with No. 100, fix the result with a fine one, for example No. 180 or No. 240 grit.
Types of plywood crafts
You can make a huge number of items from plywood that will decorate and diversify your interior.
- Decorative items. Such products include boxes, vases, lamps, signs “To my beloved mother”, “To my beloved daughter”, names of family members, watches.
- Crockery and kitchen utensils. Kitchen boards, spice racks, storage barrels, bread bins, sets of kitchen spatulas and other tools.
- Furniture. Chairs, ottomans, armchairs, beds are made of thick plywood. Thin plywood is used to make various shelves: wall-mounted, floor-mounted, corner. Such shelves look good in the interior of any room: children's room, office, living room, kitchen, hallway.
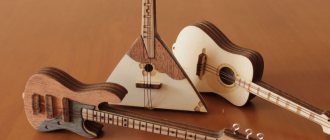
- Toys. It is very popular among children to assemble wooden puzzles. Making wooden crafts with children is quite an interesting activity. Toy houses, cribs, cars, planes, tanks and other equipment can be made from plywood using a jigsaw. It will be interesting to make a feeder with your child and feed the birds together.
- Garden figures. Figures carved from thick plywood look interesting in a summer cottage. Such crafts can be painted with moisture-resistant acrylic paint, and they will serve as a decoration for your site for many years. Usually they make figures of animals and birds or fairy-tale characters.
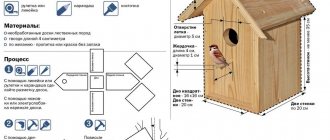
Garden buildings. Gazebos, decorative walls, birdhouses, and original porch design can be made from moisture-resistant plywood.
Step-by-step instructions for creating crafts from plywood
Before starting work, decide what kind of craft you want to make and select the appropriate plywood for it. If you plan to paint the product, it is better to take plywood from coniferous trees. It is good to varnish birch plywood; the beautiful texture of the wood looks good in work.
- Draw part templates on the sheet. If you are afraid for your artistic abilities, then you can download templates from the Internet and transfer them to a sheet of plywood. Large parts are printed in parts and then joined together.
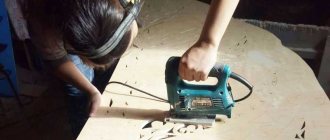
- Using a jigsaw, carefully cut out all the parts. You need to cut out the details not exactly along the pencil line, but approximately 1 millimeter away from the edge of the outline. This is done so that inaccuracies in working with a jigsaw can be corrected and parts can be polished.
- Use sandpaper to sand the edges of the cut. First use coarse sandpaper. And then they move on to fine abrasive paper. You can use a sanding machine when cutting parts from thick plywood. For high-quality cleaning of the saw cut, the parts are placed in a construction vice.
- Parts are coated, if necessary, with an antiseptic solution, and then with varnish or paint. Before painting, the workpieces are lightly sanded with fine sandpaper to give it roughness. This surface is easier to paint. Then remove all wood dust, degreasing the surface. If you intend to use several colors of paint, then separate each area of painting from each other using masking tape. Paint after each element of the design has completely dried, so that the paint does not mix and there are no smudges. For strength and durability, it is possible to coat the entire product with varnish.
- The parts are connected using wood glue, and large structures using a screwdriver. The glued parts must dry well. If the design allows, the parts can be pressed together using a vice.
Making Tips
If, when cutting out a part, it is necessary to make a cut in the center of the work, then first make a hole using a drill, and then cut out the pattern with a jigsaw.
- Works designed using a burning machine or decorated using the decoupage technique look interesting.
- When planning a craft, pay attention to the weight of the product and the thickness of the material. A thin cutting board will slide across the work surface, and a lightweight bird feeder will prevent them from picking up food in strong winds.
- If plywood figures decorate a summer cottage, then it is advisable to remove them in the winter to avoid deformation.
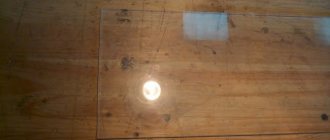
- For beginners, the easiest craft option is to make a kitchen board.
Working with plywood will bring pleasure to the whole family. Children willingly take part in making crafts. You can attract them to apply a template to parts, when burning a design with a machine, or coloring the work.
Handmade crafts are always unique and original. Such works can be safely given to relatives and friends as a souvenir.
Surface coating
After sanding, the surface of the plywood must be dried and dust and sawdust residues must be thoroughly wiped off. If necessary, cover the top with a thin layer of putty to perfectly level the surface. If this is not important, since the craft will be located on the street or in the garden, then you can skip this procedure.
Before painting, the surface must be primed. Most often, ordinary drying oil or a primer with an alkyd base are used for these purposes. Now there are special compounds on sale that fill the pores of wood.
This is an important stage in preparation for painting. After all, wood is a living natural material; it can change size due to changes in temperature and humidity, the pores of the wood narrow or expand. If you apply paint right away, such changes will quickly cause it to crack. The primer fills all the cracks and pores, which will protect your craft from such a fate.
Painting of products
It is best to paint plywood with acrylic paints. They are safe and environmentally friendly, sold in a variety of colors, which allows you to make the figurine bright and colorful. The paint adheres easily to the surface of the plywood. If the craft is installed outdoors, then you can use facade paint. It is as durable as acrylic, but has a specific smell.
If the surface is monochromatic, you can use a sprayer or roller. If you are applying a multi-color design, you will need several brushes.
Plywood is painted only along the grain. After the first layer has dried, you need to sand the dried craft again with fine sandpaper, since the paint raises the wood pile a little. Re-paint the figurine to brighten the color.
Crafts for home
If we cut out animals from plywood to play with children, then it is advisable to treat the surface of the toy only with sandpaper or, in extreme cases, cover it with acrylic varnish.
When cutting along the contours, you can make such a wonderful puzzle of elephants of different sizes. This is an educational game that teaches children to navigate in space.
As you can see, plywood figures can have a thematic focus. This could be a craft for the birth of a child in the family or a heart for a wedding in the shape of a puzzle. But most often such figures are made to decorate a personal plot.
Crafts for the cottage and garden
Plywood, as a consumable material, has found its application in a summer cottage. You can make several interesting ideas from plywood sheets:
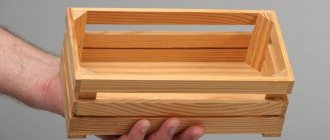
- Tool box with comfortable handles. The material is very light, but at the same time, has sufficient strength.
- Racks for garden tools.
- Coasters for hot cups and bowls on the table.
- Decorative borders for flower beds.
- Hanging flower pots.
For all country crafts, you should carefully follow the principle of pre-treatment of surfaces with solutions of an antiseptic and a moisture-resistant composition. This approach can significantly extend the service life of finished products.
Expert opinion
Strebizh Viktor Fedorovich, leading construction foreman
A distinctive feature of this kitchen accessory is the favorable color of the material, which does not require additional decor. If you want to clarify something, please contact me!