Henna and clay varnish
We will need: henna, olive oil and white clay.
Combine oil and clay in proportions 2:1. Add henna and give the mixture a smooth consistency. Apply the substance to your nails. The layer should be thick enough. We wait about 15 minutes. We wipe the nails with a cotton swab. Polish the nail plate with a piece of silk.
If you apply this coating to your nails two or three times a week, they will soon become healthier and acquire a natural shine.
Parquet coating with special means
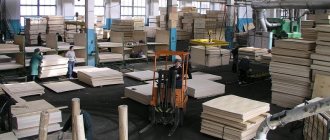
Parquet, parquet and floor boards are made of wood, which is susceptible to the negative effects of water, street dirt, mold, fungi, and abrasive loads. To protect against all these factors, special products are applied to the surface of the parquet, which can be combined into 5 main groups.
Primers and impregnations
They contain antiseptic, biocidal, fire retardant and tinting additives that protect the wood from mold, wood-boring beetles, fire, and also give a certain shade. For the latter, stains and drying oils, widely known in the post-Soviet space, are also used.
Primers significantly reduce the consumption of base material. Often, instead of impregnating compositions, a base varnish is used, diluted with a solvent in the ratio indicated on the product label (20:80, 40:60, etc.).
Oils
They are rubbed into the wood with a hard brush, making it resistant to water and dirt, but do not protect against abrasion and impact loads.
Oils are chosen by those who care about the safety of their family and prefer to enjoy the touch of warm natural wood.
Waxes
Carnauba, candelilla and beeswax are applied to the surface with rubbing strokes, creating a moisture-resistant film that is not resistant to impacts and significant foot traffic.
The coating must be renewed periodically.
Oils with hard waxes
The parquet surface is treated using Scotch-Brite, a silicone spatula or a soft cloth. The special composition makes it possible not only to saturate the top layer of wood by 2-5 mm, but also to create a thin layer of wax film on the surface.
This coating perfectly protects the parquet from pests, mold, water and other harmful factors, and does not crack or peel over time.
Lucky
Varnishes are recognized as the best and most practical means of protecting wood from negative factors.
Thanks to their protection, dirt and dust do not eat into the structure of the parquet plank, and the appearance of the floor remains in its original condition for many decades, subject to proper care. The disadvantage of this type of finishing coating is that minor damage is difficult to restore.
Alkane and beeswax
Alkane roots have a healing and coloring effect. Therefore, it is quite acceptable to make varnish out of it.
Heat 3 tablespoons of olive oil and 0.5 tablespoons of alkane root in a water bath. Let it brew for 5 minutes.
Strain through a strainer and place in a steam bath. Add a little beeswax and wait until it melts.
Add a few drops of vitamin E there. Mix thoroughly and cool. Gently apply the mixture with a brush to the nail plate.
Samodelkino
Black varnish for cast iron stoves.
Heat 1 kg of tar almost to a boil and add 50 g of powdered iron sulfate. This varnish, while still hot, is used to cover a heated oven; It dries quickly, is quite beautiful and has no smell.
131. Water-based adhesive varnish.
1 part of wood glue or gelatin is dissolved in 22 parts of water and 28.5 parts of potassium dichromate are added before use. This mixture can serve as a primer for many leather polishes. For better preservation, add a little borax to the varnish.
132. Water-based albumin varnish.
Mix equal parts by weight of water and egg white; For storage, add a little carbolic or salicylic acid. Instead of fresh egg white, you can dissolve 28.5 parts of dry albumin in 564 parts of water. The varnish gives a good gloss when dry. When objects coated with this varnish are dried in hot air, a coating that is indelible with water is formed on them.
133. Water-based gelatin varnish.
Take 1 part of gelatin and dissolve it in 22 parts of water and add 28.5 parts of potassium dichromate before use. This mixture serves as a primer for leather varnishes. For storage, add a little borax.
134. Water-based glaze varnish.
Mix equal parts by weight of water and egg white (or albumin). To prevent albumin from decomposing, add a little formalin or salicylic acid. The varnish gives a good gloss when dry. When objects coated with this varnish are dried in hot air, a coating that is indelible with water is formed on them.
135. Water-based shellac varnish according to Kaiser.
Take 1 part borax, 3 parts crushed white shellac and 20 parts water, heat in a water bath until completely dissolved, after several hours allow to cool and filter. Adding a small amount of glycerin to the varnish makes it flexible. This varnish can be painted with any aniline dye or a mixture of several dyes.
136. Wallpaper varnish.
Dissolve 2 parts borax, 2 parts shellac, 24 parts hot water. So that you can wash the wallpaper with soap and water without damaging the design and paints, they are first coated with this varnish several times. Then, after each application and drying, rub the wallpaper with a soft brush until a shine appears on it.
137. Discoloration of shellac.
In 8000 parts of water, grind 200 parts of chlorine lime and add 1000 parts of shellac in coarse powder. After 24 hours, add a mixture of 1 part concentrated sulfuric acid in 1000 parts water and, finally, 6000 parts boiling water. The completely white shellac floating on the surface of the liquid is removed and the sticks are rolled out of it.
138. Italian varnish.
Italian varnish is known to mean a transparent oil varnish that covers the stringed instruments of Amati, Guarneri, Stradivari and other Italian masters. The recipe for this varnish was lost around 1770. Since that time, violins and all stringed instruments in general have been coated with alcohol varnishes and very rarely with dark brown oil varnishes. In view of this, we consider it useful to provide a recipe for Italian varnish created by the famous Russian violin maker A. Leman. Before making primer, you need to take care of painting the wood. Well-sanded wood is coated with an aqueous solution of brown sepia paint (a liquid extracted from cuttlefish). When the paint, applied with a very moderately wide brush, has dried, the wood is sanded with very fine flint paper and covered with a layer of colorless, quickly drying oil varnish. Then the wood is again sanded with the same fine flint paper, but this time with wood oil, after which it is wiped dry with a clean rag and coated with a colored varnish using a soft round brush, which dries very quickly, so that after a day it is already suitable for sanding with flint paper with oil or water. Colored varnish is made from colorless varnish (it is best to take amber in oil with strong drying), to which well-erased paints are mixed in tubes: brown, red and yellow. To cover a violin, 2 tablespoons of varnish are enough, and no more than 2 coffee beans of paint. The following paints can be used: Indian and Japanese yellow, Robert varnish No. 7, brown varnish, asphalt and speckled varnish. It is best to put colored varnish on a plate. First, paint is released from the tube, thoroughly rubbed with a glass pestle, varnish is added and the varnish and paint are thoroughly mixed. Then, taking a round brush, slowly apply the varnish to the wood. The varnish dries immediately, and therefore you should not brush over one place more than 2-3 times. You need to be careful when making a primer using glue and alcohol varnish, which goes too deep into the wood and greatly affects the sharpness of the sound of the instrument. Quick-drying oil varnish, on the contrary, almost does not penetrate the wood and forms a primer that does not crack or peel like alcohol varnish. After varnishing, the brushes should be immediately rinsed in kerosene and then washed with soapy water. It remains to be noted that coating a significant number of new and old stringed instruments with Italian Leman varnish gave very good results.
139. Alcohol varnish for violins.
Take 1 part mastic, 5 parts alcohol, 2 parts turpentine, 2 parts linseed oil, mix, let it sit for a week with frequent shaking and drain the clear liquid (The Brit and Gol. Drugg).
140. Varnish for drawings.
Take 1 part of dammar resin and infuse it for two weeks in 5-6 parts of acetone, then drain the clear solution and add 3 parts of thick collodion to 4 parts of it and let the mixture settle until it brightens. Varnish is applied to drawings, watercolors, etc. kolinsky brush. First, a matte layer is obtained; however, once it dries, it becomes completely clear and shiny.
141. Fixative for drawings.
Take 8 parts of sandarac and 92 parts of alcohol (or cheap cologne), dissolve and filter. The above fixative is used to cover the back side of the drawings or spray the left side with a spray bottle, after which the drawing is no longer smeared.
142. Varnish for gilded baguettes.
When producing baguettes and for refreshing old ones, two varnishes are required: shiny and matte. I. Glitter varnish. Take 175 parts of shellac, 30 parts of gum, 20 parts of Venetian turpentine, 75 parts of sandarac, 30 parts of sandalwood, 730 parts of wine spirit. II. Matt lacquer. Take 1 part shellac, dissolve it in 8 parts turpentine and add 1 part powdered chalk.
Source
Eyeshadow based varnish
With this technology you will get a unique coating with a unique shade.
Pour a small amount of shadows of any color onto a piece of paper. Grind them with a teaspoon. And pour it into a bottle with clear varnish.
Mix everything thoroughly with a toothpick. After applying this nail polish, you should wait at least 15 minutes for complete drying.
When making decorative varnish coatings, of course, you cannot do without using store-bought varnish. The Internet offers a lot of options on how to get a unique design product from an ordinary transparent varnish.
And among this variety there is one interesting idea - how to make a transparent reflective varnish with your own hands. Read more about this.
Advantages, disadvantages and useful properties
The varnish layer applied to the decorative coating demonstrates the following advantages:
- increases the strength of the plaster coating and resistance to scratching, abrasion, and impact;
- fixes the color of the finish, preventing fading or changes in quality due to sun rays or other reasons;
- makes it possible to wash and clean walls with detergents;
- relatively high strength;
- easily evenly lays on flat and embossed surfaces;
- easily removed with solvents;
- Water-based compositions are environmentally friendly and harmless.
Minuses:
- the total cost of finishing increases;
- the damaged area cannot be easily repaired without being noticed.
Plaster varnish allows you to wash and clean walls with brushes. It is an independent decorative product if it is tinted, mother of pearl, metal dust or glitter are added.
Luminescent clear varnish
First of all, you need a phosphor - a special pigment that accumulates and reflects light. You also need a clear varnish and a solvent for it.
Pour varnish into a glass or ceramic container. Add a phosphor. The amount of pigment will determine the brightness of the glow.
The recommended dose is 30%. For better distribution of the phosphor, add a little varnish solvent to the mixture.
Mix the mass thoroughly, bringing it to homogeneity. The resulting transparent enamel will glow beautifully in the dark.
What tools will you need for the job?
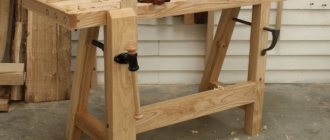
Varnishing a floor is a labor-intensive process that requires careful preparation. Start with tools and equipment.
You will need:
- paint and varnish materials: primer or impregnation, tinting glazes or stains, parquet putty, varnish, solvents;
- application tools: wide and narrow brushes (for painting corners and joints of walls and floors), velor rollers, spatulas;
- a bath or bucket for mixing the varnish composition;
- fine-grained paper (220-400 units) for intermediate sanding or attachments for a sander (grain size - from 120 units);
- belt grinder, surface grinder (planetary) and angle grinder (boot); It is preferable to rent from the professional category;
- construction vacuum cleaner.
Before work, carefully read the instructions on the labels of paints and varnishes. The consumption indicated on them is an average and does not always correspond to reality.
Gel polish at home
Many people are interested in how to make gel polish with their own hands. Unfortunately this is not possible. After all, gel polish is made using a special technology, using certain chemical components.
It contains a photoinitiator, due to which the coating reacts to ultraviolet radiation. There is also a film former responsible for strength.
It also contains diluents, various pigments and fillers. It is very difficult to get all this, and even more so to make gel polish at home.
Some, however, advise mixing regular polish with gel. But such a mixture will not give the desired result at all.
Safety precautions when working with varnish
Despite the fact that it would seem that there may be threats with the usual coating of a surface with varnish, they still exist.
Let's study the basic rules that need to be followed:
- Protect the skin of your hands and face - such substances contain many chemical elements. When spraying varnish, a lot of toxic substances are released into the room. In case of contact with human skin, there is a risk of burns.
- Use a respirator - toxic substances can enter the respiratory tract, which can also cause irreversible harm to a person.
- Wear glasses - if chemical residues get on the mucous membrane of your eyes, they can cause a burn.
If paint and varnish material does end up somewhere, follow the following instructions:
- Rinse the splashed area. If you find deep damage, immediately seek medical help from specialists.
- If you inhale a toxic substance, you must immediately leave the room for fresh air and try to cough. Be sure to rinse your nose.
If you start to feel unwell or experience pain in the lungs, dizziness and lack of oxygen, immediately call an ambulance and seek help from specialists.
Varnish storage
If you wish, you can make many original and effective varnishes yourself. But then a logical question arises - where to store them?
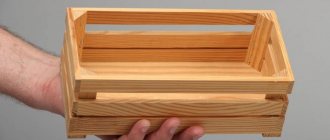
Of course, in an organizer, which you also make yourself. Want to learn how to make your own nail polish organizer? From ordinary cardboard. This simple job won't take much time.
Cut out a couple of pieces from cardboard and glue them perpendicularly. This will be the bottom of the product. Next, we cut the partitions and shelves and glue them to the base in tiers.
It would be interesting to add drawers in the empty space under the upper tiers. We decorate the organizer to your liking. The easiest and fastest way to decorate is to cover the organizer with gift wrapping.
Main advantages
Gone are the days when compositions for coating wooden products and surfaces left much to be desired in terms of their environmental performance and impact on human health. Unlike oil-based or purely chemical-based paints and varnishes, modern acrylic varnish or paint has a number of quite obvious and undeniable advantages. The main ones are the following:
- environmental friendliness, health safety, absence of harmful emissions;
- high fire resistance and fire safety;
- immunity to moisture and the effects of atmospheric phenomena, or temperature changes;
- resistance to direct sunlight and ultraviolet radiation;
- resistance to active chemical components and aggressive environments;
- good antiseptic properties that prevent the accumulation of dirt, mold or mildew;
- effective protection of wood from rotting and pests;
- easy application, quick drying, low maintenance;
- durability and resistance to mechanical or shock loads;
- aesthetic appearance, variety of textures, textures and colors.
Thanks to such high consumer and functional properties, the composition has high versatility of use. With its help, you can solve a wide variety of problems, perform both external and internal finishing work, using it in a variety of fields and areas. Such compositions are often used not only in the field of repair and construction, but also in artistic creativity, for example.
Which is better: heated floors or radiators?
Warm floorBatteries
DIY varnish photo
How to make paste: time-tested technologies
The need to make special mixtures with your own hands is explained not only by cost savings. The use of appropriate technology will allow you to personally control the composition and ensure truly high quality. This knowledge will be useful for creating reliable adhesive joints in a hurry, when there is no time to visit hardware stores. This article describes how to make a paste yourself. Here there are detailed descriptions of the relevant techniques, features of the use of ready-made products in practice.
There are no significant mistakes in this bold title. If necessary, you can create effective glue yourself in just a few minutes from inexpensive improvised components.
How to make paste for wallpapering
The title of this section specifically limits the scope of application of the composition. In fact, before starting to manufacture it, it is necessary to clarify the intended purpose. In this case, we are talking about the creation of finishing decorative coatings that will be used in residential and office premises. During operation, they should not worsen the healthy state of the atmosphere or provoke allergic reactions.
For this reason, you need to figure out how to prepare a paste from safe ingredients. It is advisable to purchase them inexpensively, since you will have to process large areas of the elements being connected. You should expect a long enough service life to avoid having to carry out repairs too often.
If you learn how to make wallpaper paste at home, you will be able to quickly eliminate such defects
Additionally, it is necessary to take into account the characteristics of the materials used. Non-woven wallpaper is characterized by good resistance to adverse external influences, but weighs relatively much. Paper-based analogues are lighter. But they deteriorate quickly in high humidity. It is necessary to clarify how to prepare a wallpaper paste that will not damage the corresponding coating. In some situations, temperature and other conditions during work operations will be of particular importance.
How to make paste from flour: time-tested technology
There are no claims regarding environmental safety for this main component. The following advantages and disadvantages of flour should also be noted:
- Attracted by the low price, availability in any grocery store. It is clear that based on such a component, even large-scale projects can be implemented without excessive financial costs.
- Flour compositions have excellent adhesion characteristics. If the technology is correctly reproduced, the finished mixture will be no worse than expensive professional analogues.
- If such a need arises, the wallpaper can be separated from the wall using simple wetting. For this procedure, it is recommended to use warm water (not boiling water) and leave it for 10-15 minutes after application.
- The absence of unpleasant spots and lumps is also an advantage. But in order to create just such a composition, you must strictly follow the rules of the corresponding recipes.
- A significant disadvantage is the low water resistance mentioned above. In rooms with high humidity, wallpaper is not firmly fixed to the surface. There may also be difficulties when gluing ceilings.
How to make wallpaper glue from flour is described in the following instructions:
For your information! When cooling, a film may form on the surface of the mixture. It needs to be removed. To separate other mechanical impurities, use the same sieve or a suitable piece of gauze. To reduce the sensitivity of the composition to high humidity, standard PVA wood glue is added to it (4-8% of the total volume).
Making a paste from starch: a recipe with inexpensive ingredients
The use of such a basic starting component allows you to create a mixture that does not leave stains on the wallpaper.
For your information! Information on how to make a paste from starch will be useful for performing various construction operations. This composition is well suited for pre-priming walls. After this treatment, the wallpaper is pasted using conventional technology. This method provides better adhesion on different surfaces.
The cooking technology differs from the previous one in the following nuances:
- For every 2 liters.
The finished composition consumes from 180 to 220 g of starch. - When adding water, it creates a consistency similar to that of medium-fat sour cream.
- The prepared adhesive solution is used immediately. Its positive characteristics deteriorate faster compared to flour-based mixtures.
- For a more delicate temperature effect, experienced specialists recommend using “water bath” technology. The container with the solution is immersed in a large pan of water, which is placed on the hob.
Method for creating high-quality papier mache paste
It is necessary to take into account the features of crafts and consumables
This information will help you figure out exactly how to prepare papier mache paste with the desired characteristics:
- To ensure a high level of safety, the same basic ingredients (flour, starch) are used. It is worth remembering that children are often involved in such creativity, so the requirements for all components of the process increase. An additional advantage is the ease of cleaning hands, tools, clothing, and the surrounding area.
- Starch-based formulations provide a less stable compound. They do not distort the color scheme and are suitable for working with thin materials.
- More durable crafts are made from flour using glue. In some cases, its white color will not work, so you will have to use the previous option.
To prepare mixtures, use the recipes discussed above. Density is adjusted taking into account the parameters of specific products. As with wallpaper, it is better to start working operations as quickly as possible. As a last resort, you can store the finished composition (40-48 hours) in the refrigerator compartment at a temperature of +4°C to +6°C.
Other adhesives
The following technologies are used to create various structures using adhesive joints. Some recipes are as effective as high-quality factory samples.
How to make PVA glue at home
Don’t think that everything you need for construction or creating homemade products can be purchased in modern stores. Sometimes a special color is needed. In other situations, increased water resistance is required. Making your own glue allows you to obtain unique characteristics.
But before studying production technologies, you should list the features of this category of products:
- Some of the ingredients are encrypted in the name. PVA is a polyvinyl acetate compound.
- It has excellent adhesive characteristics. If the manufacturing procedure is followed, the tensile strength of the adhesive joint can exceed 450 N/m.
- In a liquid state, the glue loses its beneficial properties in severe frost.
But the created connection is resistant to low temperatures. - This composition does not contain components hazardous to humans. It is still recommended to avoid contact with mucous membranes and eyes.
Washing with water will quickly remove the adhesive in situations like these.
The following PVA glue recipe will help you create a high-quality composition on your own at home:
- First you need to prepare a mixture based on finely dispersed gelatin (10 g for every 100 g of water). It is mixed and left for 24 hours in a room with a positive temperature.
- The next day, you need to take the necessary containers to heat the components using the “steam bath” technique.
- First, raise the temperature of the original mixture to a boil. Next, add flour very slowly (100-120 g for the doses given above) with stirring. This procedure will take at least 50-60 minutes without forming lumps.
- At the next stages, in the same thermal regime, alcohol (30-40 g), glycerin (10-15 g), and coloring pigments are added sequentially (use the required amount). Continue heating for 25-30 minutes, after which the mixture is cooled.
For your information! The shelf life of glue in a sealed container at temperatures above 0°C is 6-8 months or more
Mixing with dyes using a special technique will help change the aesthetic parameters of the factory adhesive composition
How to make glue from polystyrene foam and gasoline
The low cost of this composition largely explains its popularity.
The required amount of polystyrene foam is placed in a container that is resistant to the appropriate chemical compounds. It is filled with gasoline. Using mixing, a fairly homogeneous viscous mass is created. It is applied to degreased surfaces, squeezed, and left in this position until completely dry. To create the required force, use a load, a clamp, or a vice.
A similar result can be obtained using such a solvent
It is difficult to determine which glue is better, polystyrene foam in acetone or gasoline. In both cases, liquids act as solvents. After their evaporation, a sufficiently strong connecting layer is created that cannot be deformed. It is used for fastening metal, wood and other solid products. Here we can only note that acetone evaporates faster. Both compounds can cause harm to human health, so it is necessary to ventilate the room well, or transfer work operations to the open air.
How to change the consistency to liquid or thick?
The paintwork material in question initially has a thick consistency. Before use, it is diluted with a solvent. Manufacturers of such coloring compositions usually indicate with what means they can be diluted to make them more liquid. This can be gasoline, white spirit, kerosene, turpentine, special products (for example, “Relocryl acryl”). When preparing the product for use at home, clean cold water is usually used, which is one of its components. Increasing its quantity will not disturb the texture of the paintwork material, and it will become more convenient for application.
When diluting the coloring composition, it is important to maintain the proportions of liquid and base:
- Mix in equal parts. The result is a fairly thick, but not sticky product that applies evenly.
- Proportion 1:2. One part of the base is diluted with two parts of water. The resulting composition has a semi-liquid consistency, which is applied in a thin layer. It is used for painting smooth surfaces and reduces the saturation of dark shades.
- Proportion 1:5. The volume of liquid is five times the volume of the base, resulting in a product called tinted water. It will provide barely noticeable coverage. It is used for painting textured surfaces.
- Proportion 1:15. This paintwork contains only one part base and 15 parts liquid. It is used to create invisible transitions between shades.
The liquid should be poured into the paintwork in a thin stream, constantly stirring the mixture. This method of diluting paint has one drawback - the color becomes cloudy.
The so-called thickener for too liquid paint can be made independently from available materials:
| Ingredients for thickening acrylic paint | Preparing the thickener | Application |
| Gelatin | Soak 1 tsp. gelatin in 200 ml of cold water, then heat the mixture. | Add a thickener to the base. The proportions of the components will have to be determined experimentally. |
| Starch | Dilute 1 tsp. starch in a small amount of cold water. Pour it into boiling water. Continuously stirring the mixture, bring it to the consistency of jelly. It should be uniform. |
copal species
- soft, light-colored copal (1 dose);
- turpentine (2 doses);
- camphor (3%).
The third element is needed to give the varnish good elasticity. This composition is placed in three quarters of the bottle. The bottle is thoroughly corked and kept in a warm place, for example, near a radiator. The bottle needs to be shaken periodically. You should get a high-quality solution from all components. It settles and filters. Cotton wool serves as a filter here. If the resulting varnish is not transparent enough, concentrate the bottle in a water bath for 10-20 minutes.
What is acrylic paint made from?
This type of paint is a water-dispersed composition, in the manufacture of which polyacrylates and their copolymers are used, which play the role of film formers. Its popularity is primarily due to its ability to be used for both interior and exterior painting work. These compositions are diluted with water and tinted by adding various pigments. Despite the addition of liquid, after drying they become waterproof and do not wear out.
These paints appeared on the market of paints and varnishes not so long ago. Their appearance is associated with the discovery of the possibility of releasing a substance during the breakdown of acrylic acid, which became the basis for the manufacture of the polymer. This paint has a transparent texture and excellent technical qualities. The composition does not have a pungent odor. The big advantage is that this synthetic material is very durable and resistant to temperature changes and the destructive effects of sunlight.
Manufacturers make paint and varnish materials based on acrylic resins. A polymer dispersion, a binder and a pigment are added to the finished solution, resulting in a composition, after application of which a film is formed on the painted surface that is not susceptible to the destructive effects of external factors. Its quality depends on the type of acrylic resin and additives used. In Russia and the CIS countries, such paints are designated as VD-AK-(index), where VD means “water-dispersed” (LKM), AK - acrylic, (index) - LKM number.