Putty for wood for painting - choice of product
If you have many objects in your house that are made of wood (window frames, floors, furniture), sooner or later they will need to update their appearance - painting.
But wood will have such a feature that after time or due to mechanical stress, cracks, irregularities and other types of defects may appear, which paint can even highlight if you do not treat the surface with putty in advance. It will make it possible to achieve evenness, filling even the smallest holes in the product, and ensure long-term preservation of the paint layer.
Let's figure out how to choose the right material for preparing a wood surface for painting. You will learn about the best putties for wood for painting.
Features of putty for painting
Wood putty is available in the form of a paste; it is very easy to apply and convenient to use. The principle of its operation is that it fills the smallest pores and irregularities, leveling the surface of the wood.
When the putty dries, the wood is sanded and coated with varnish or stain. Wood putties differ from each other in composition and characteristics.
The substance must meet specific criteria.
- Homogeneous pasty consistency.
- High level of adhesion.
- Minimal shrinkage to reduce consumption.
- No cracks after drying.
- Light sanding.
High-quality putty is very plastic; it covers the wood with a thin, dense layer. The putty is sold in ready-made paste form, but you can also prepare it yourself.
Process Details
Required Tools
The process of decorating wood products has several stages - first, the surface must be prepared as required, and after that it can be puttied and then painted. But depending on the type of materials that will be painted, the technology will be slightly different.
A general list of required tools for painting will include the following:
- Paint and varnish composition of the required composition and color.
- Tassels.
- Primer and putty.
- Putty knife.
- “Sandpaper” (we are talking about sandpaper).
- A hairdryer for construction purposes or a cleaning product.
We will need a hairdryer or cleaning agent to remove the old layer of paint and varnish from the product. You should be extremely careful, because the temperature of heating the surface with a hairdryer is quite high, and this can negatively affect the wooden object being processed. For this reason, if you wish to repair antique items, it is better to use chemical cleaners.
Recommendations for applying a leveling layer
Wood putty for painting helps solve many problems:
- Seal artificial holes in the surface of wood, for example, nail marks.
- Fills natural pores on a wooden surface for further leveling (if there are porous types of wood, for example, oak) and protection from damage.
- Forms a homogeneous layer on which paint adheres perfectly.
To ensure that the treated area is completed according to all the rules, you should use several recommendations:
- If you work with putty outside, you should choose a day when the air temperature is higher than +6 degrees. Otherwise, the composition will begin to thicken and will not fill the cracks well.
- If there are voids on the surface, they should be filled in advance with putty, and then go over with sandpaper, remove the “sand” that appears and begin to fully process the wood using putty, and after it has dried, you can begin painting.
- The best material for a spatula is stainless steel.
- Holes in wood with great depth (more than 1 cm) should be filled with putty in several layers, allowing each layer to dry. The application thickness should be from 0.2 to 0.4 cm.
Next, we’ll look at how to prepare plywood and natural wood.
- Preparation for plywood
Although it is quite difficult to call a plywood sheet full-fledged wood, since such material is often obtained from veneer, it is often used in the construction industry. Using plywood you can make a large number of interior items, or use it to decorate walls, make partitions, and more. Due to the smooth surface, plywood can be easily painted, but everything should be puttied first. Plywood sheets are on sale in different sizes, and besides, it will not be difficult to cut, but to cover a huge area, as a rule, you cannot do with just one sheet - you need to install several pieces at once, right next to each other. As a result of this action, joints appear that must be sealed, as otherwise cracks may appear in the paint layer.
To hide the seams, they should be covered with putty - apply the compound across the joint to form a dense layer. It will be most convenient to work with a 10 cm spatula, which should be periodically moistened with water, because acrylic compositions dry quickly and lumps may form. After the puttying process, everything should be leveled on the surface using a grinding machine. When the layer dries, it is worth repeating the action, but covering the entire surface, and not just the seams.
- Preparation for wood
Wood putty for painting is very important in preparation. Wooden surfaces often retain unevenness on the wood from knots, and also have places where resin can appear - these points must be eliminated before applying the leveling compound. Knots should be cut out with a chisel (approximately 0.3 to 0.5 cm deep), creating a small depression, which should then be filled with putty. But before that, wood objects that have not previously been coated with varnish should be oiled - for this, heated drying oil is used.
Please note that when you work with a product that has traces of paint, paint or other substances on it, the top layer must be completely cleaned. To do this, you need to wipe the surface with a cleaner and wait until the soaked paint can be easily removed with a spatula.
Next, wash with plain clean water or add vinegar to neutralize the alkaline environment. After this, it is important to go over with sandpaper to lift the wood fibers. To improve adhesion to a wood surface, you should apply a primer mixture, choosing one with the same composition as the putty, for example, acrylic.
Final puttying before painting
The process of treating wood surfaces with putty comes down to the following steps:
- The mixture should be diluted to a creamy appearance by beating using a drill with an attachment.
- There is no need to apply a large amount of putty at once, because it can dry out quickly.
- Start treating cracks and holes, creating a layer of 0.2 cm.
- When the first layer is laid, wait until it dries, and smooth everything out with sandpaper.
- Repeat application of the product, reducing the thickness of the mixture to 0.15 cm.
- Cover everything with primer.
Now your wood product is completely ready for painting, and for this it is better to take coloring compositions with the same component that is in the putty - acrylic paint, oil paint, water-dispersion paint. When you work with the composition on wood or another type of material, remember that the air humidity in the room cannot be more than 50%, and outside it cannot be more than 76%. The ideal temperature in the room for quick drying of the product is from +20 to +26 degrees.
Modification of putty for wood
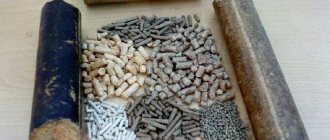
The putty contains substances of different fractions, so it can be divided into two types of modification.
- Putty start. It contains large particles; this paste is used for heavily damaged wood with obvious defects. After drying, the surface becomes slightly rough.
- Putty finish. It is used as the final layer before the decorative coating. This paste forms a smooth and even surface; it is applied to the starting putty after it has completely dried.
The compositions of these putties are almost identical, they differ only in particle size.
How to properly putty and paint a staircase? — answers from 7dach.ru experts
A modern country house is rarely complete without a staircase - to the second floor, to the attic or to the basement. In addition to the main one, it can also perform a decorative function - giving a special style and completeness to the interior. It can also be effective.
If I were building my house now, I would make it one floor. Large, wide, spacious. But I lived in times when strict limits were set for the construction of dachas. Therefore, the area of my house is very small, and they increased it.
Question from our subscriber Lyubov: I need to make a staircase to the second floor, but it so happens that the hole to the 2nd floor is 0.9 m x 1.0 m, and cannot be expanded in any way. Perhaps someone can advise something?
Beauty can and should be useful. Do you agree? Then let's build an object on the summer cottage that meets these qualities. Do you want to make your country corner not only beautiful, but also comfortable to live in? Start... with the stairs! Staircase to the garden.
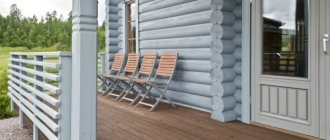
Initially, I did not order a staircase to the porch, so the house was handed over to me in approximately this form: There is almost a meter between the ground and the floor of the porch. I had several “spare” boards of mini-beams 6 m long left. Therefore, it was decided to make one.
See all materials about stairs: See all
Types of wood putty
Wood putty has many types, but, in fact, it is made from two main components - water and solvent.
- Solvent putty. This substance is used only in enterprises, it is not used for domestic purposes. The main disadvantage of this putty is its toxicity. It is presented in a wide range of shades and is not afraid of temperature changes.
- Putty on glue. The main binding component of this paste is PVA glue. It is white in color, but after drying it becomes completely transparent. To give a specific color, you can use tint.
- Putty on acrylic. It is used for floor coverings; it can be used to seal joints on floorboards, between tile seams, linoleum, parquet and laminate. This coating dries quickly, but is considered short-lived.
- Epoxy putty. It is considered the most waterproof among all types of putty. This type of paste cannot be used if the wood will be covered with stain.
- Polymer putty. An environmentally friendly product without unnecessary odors, which has the property of drying quickly. They can be used on any wooden surfaces, walls and floors. The only disadvantages include the high price of polymer paste.
- Oil putty. This type of paste takes a very long time to dry, but after drying it forms a strong and durable protective layer.
- Putty on plaster. It does not cope with moisture, but is considered quite durable and inexpensive.
General information
Types of wood putties
There are all kinds of decorative types of putty, and you need to clearly determine whether you need putty in order to preserve the wood grain when the top of the wood product is coated with a varnish composition, or whether you plan to tint the paint and varnish. The first types of products are almost invisible on the surface and copy the woody shade. The latter are most often made in white.
There are different types of putties:
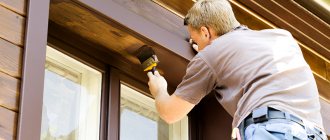
Oil-based - due to the presence of drying oil, such products will make it possible to protect the surface from moisture. And its high resistance to changing weather conditions makes this putty an excellent choice for applying to wooden windows, for treating house facades and other objects located on the street.- Acrylic - polymer-type compositions with acrylic will be environmentally friendly, they can withstand heavy loads and get along well with a humid environment (they do not allow moisture to penetrate deep into the wood).
- Water-based - do not contain harmful chemical components, and also do not conduct liquids. This putty can protect the wood from fire, but it takes a long time to dry.
If you are specifically interested in natural wood color, then oil-based or water-based samples will be most suitable.
Criteria for choosing a paint product
Depending on the conditions where the operation of wooden objects will be carried out, the most suitable types of covering material should be selected. When carrying out repair work outdoors, an important parameter for selecting a puttying agent is resistance to heat, high humidity and cooling. For this reason, oil putty is the best choice for treating the walls of wooden houses, fences and other attributes of architecture. It can be used after wood components have been treated against rot and insects, but before final painting.
Acrylic compositions will be the most versatile, and they are also suitable for wooden products indoors and outdoors, because they have a high level of wear resistance and strength. It should also be taken into account that such putty products are usually made in white color, because they are intended specifically for applying paint on top, and not a varnish composition. For furniture, parquet floors and other objects that people constantly come into contact with, you should choose safe materials, and therefore you can use harmless aqueous compounds. Their characteristics are mostly similar to acrylic putty mixtures, but the cost is much less.
Scope and purpose
Wood putty is used to restore wooden surfaces. It can be used to process flooring seams, window frames, door panels, furniture, and so on.
In order for the putty to be durable, the wood must be cleaned of dust and greasy stains, applied primer and only then puttyed.
A surface treated with wood putty acquires the following characteristics.
- Moisture resistance. This quality directly affects the durability of the tree;
- Hiding defects and cracks. Using starting putty, you can get rid of even major damage;
- Emphasizing the natural texture of wood;
- Formation of good adhesion with other materials.
Stain processing methods
In order to make wood products more decorative and aesthetically pleasing, certain rules and techniques should be followed when processing with stain.
An important role in the quality of the final result is played by the tools with which the dye will be applied. And in this situation, water stains also have some superiority. If quick-drying alcohol-based compositions require a spray gun, and luxury acrylic ones require a wide brush with natural bristles, all you need is an inexpensive foam roller or a brush with synthetic bristles. For small surfaces, a simple foam swab is also suitable.
When working with a brush, it is very important not to go into adjacent areas already painted with stain. Failure to follow this simple rule can cause uneven coloring, streaks and stains.
Self-production
At home, you can prepare high-quality putty, but only in a small amount at a time.
- The most inexpensive way to prepare putty is to combine regular PVA glue and chalk. The consistency should be pasty; wood shavings are added to the mixture to mix the finishing putty. This putty takes a long time to dry, but it turns out good and durable.
- The second method is also simple, but instead of glue, chalk must be combined with acrylic water-soluble varnish. The paste can be painted in any suitable color using pigments from water-based coloring compounds.
- Putty with nitro varnish is used for processing particle boards. It is made by combining nitro varnish, chalk and sawdust, which are a necessary component. The paste is of high quality, dries quickly and forms a durable protective layer. The disadvantages of this mixture include a strong toxic odor.
Oil varnishes
Oil varnish
Among the main components are resins and pigments that are dissolved in oil. The consistency can be liquid or semi-liquid, which allows it to be applied to the surface of wood with a brush or roller. Affordable price is an attractive and positive factor for the majority of the population. After treatment, a thin transparent film appears on the surface, which acts as a protective barrier to moisture and ultraviolet healing. A characteristic yellow tint may appear.
A high degree of protection allows you to coat wooden products that are in the open air with oil varnishes.
Technology for working with wood putty
When working outside the room, it is necessary to observe the temperature regime - the temperature should be above five degrees. If it is colder, the paste will quickly harden, which will prevent the cracks from completely filling.
As for indoor work, the temperature should be from 21 to 23 degrees.
The largest defects are treated first, when the paste dries, the wood is sanded and covered with a new layer of putty. It is convenient to apply putty on wood with a metal spatula.
To significantly reduce paste consumption, soil is used. The wood must be cleaned of dust and other contaminants, then a layer of liquid primer must be applied. Only after this, putty is applied, which after drying must be sanded with sandpaper.
Required Tools
The process of decorating wooden products has several stages: first, the surface must be properly prepared, then it can be puttied and painted. But depending on the type of materials that will be painted, the technology is somewhat different. The general list of necessary tools for painting includes:
- paint of the desired color and composition;
- brushes;
- putty and primer;
- putty knife;
- “skin” (sandpaper);
- construction hair dryer or cleaning agent.
We will need a hair dryer or a cleaning agent to remove the old paint layer from the product.
You should be very careful, because the temperature of heating the surface with a hairdryer is quite high, which can negatively affect your wooden object. Therefore, if you are going to repair an antique item, it is better to use chemical cleaners.