Articles
All photos from the article
In this article we will look at how to make a dollhouse from plywood. Of course, you can always go to a toy store and buy a ready-made model there, but there are several reasons not to rush into such a decision and still pick up the tools in order to create a small miracle for your child. So let's get started.
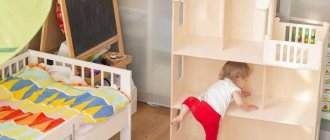
Photo of a dollhouse made of wood-laminated board
What must be considered when creating a design?
When building a house for Barbie with your own hands, you need to take into account several important criteria. They include the following items:
Decide on the size and shape of the future structure. Experts first recommend preparing a detailed plan for creating a future doll house with your own hands.
Drawings allow you to navigate when preparing parts and have a clear idea of the finished result. When choosing sizes, it is necessary to take into account the height of children's toys with which the child will play.
It is important to take care of the safety and stability of the doll's home. To do this, wide legs are made in the lower part, which will be able to support the entire structure and prevent trauma to the child’s body.
Experts recommend making the distance from floor to ceiling twice as large as the size of the doll. This way, the child will be able to freely visit different areas of the structure without making any effort.
The depth of the room should be at least 50 cm and the width up to 30 cm.
When choosing a form, it is necessary to take into account the number of floors and future rooms. For example, when creating a house for dolls with your own hands, it is best to choose a rectangle shape. It can accommodate three spacious floors and six rooms.
Most specialists prefer to work in special 3D designers. These programs help model consumables and templates for future parts.
Drawings and diagrams
Each homemade children's house differs in size. Based on how many “inhabitants” are planned in it. If the child plays alone, then 1.5 * 1.5 m is more than enough. If there are two children, larger sizes are already needed. At least 2*2 m. Decide for yourself on height too. But it’s better not to do less than 1.5 m.
Approximate dimensions of a children's playhouse Drawing and layout with dimensions
Hut house
House made of boards and plywood with a slide roof
House for children with a slide Stages of construction of a children's house with a roof in the form of a slide
Materials for building a children's house
Playhouse
Hut house with playground on the second floor Construction stages
What is better to choose: plywood or laminate?
Plywood is considered a good type of finishing material. Its durable composition and plasticity allows you to make any type of structure. The finished products hold their shape perfectly and are easily connected using construction adhesive or small self-tapping screws.
When creating a dollhouse with your own hands from plywood, you need to take into account the thickness of the consumables. For work, it is best to choose a wooden base whose thickness does not exceed 3 mm. This material is easy to work with. In addition, the weight of the finished structure will not exceed 5 kg. The child will be able to move the finished structure independently.
When creating a dollhouse from plywood with your own hands, it is important to consider the option of decorating the interior and exterior of the entire structure.
Some people prefer to paint the walls and ceiling with white acrylic paint, while others choose paper types of wallpaper with small patterns on the surface.
Laminate products are in no way inferior to plywood structures. The main advantage is the aesthetic appearance. The fact is that one surface has a decorative pattern or unusual texture.
Features of product decoration
Paint the dollhouse with environmentally friendly paint, such as acrylic. You can get a bright, rich or soft, pastel shade by adding tinting paste to the base composition.
Material for painting plywood
After the house is assembled, you can begin to decorate the interior walls, floors, and arrange plywood doll furniture.
Internal filling of the dollhouse
To make the structure more realistic, it is electrified using autonomous lamps powered by batteries, which are secured with double-sided tape.
Autonomous lamps
Laminate house
How to make a dollhouse with your own hands? We present to your attention a detailed master class on creating a home for toys from laminate. For work we will need:
- • Detailed drawing;
- • Wood glue or construction PVA;
- • Jigsaw or hacksaw;
- • Small pieces of old paper-based wallpaper. You can use acrylic compounds without a pungent odor. After drying, the surface of future walls can be decorated with various images in the form of stickers or drawings.
- • Wide brush;
- • Sponge with a porous base;
- • A simple pencil for marks;
- • Construction meter.
Let's start making a house for Barbie with our own hands. The working stage consists of several points:
On the back side of the laminate we draw the boundaries of the future walls in accordance with the drawing. After this, we carefully cut out all the components with a jigsaw;
Next, we mark the places where the windows and doors will be located;
Using wood glue we fix all the parts together. When carrying out installation work, we take into account the parameters shown in the project drawing;
Now you can move on to decorating the planes. If paper wallpaper was used for work, then they decorate the walls and ceiling. The flooring can be decorated with soft fabric or left wooden. If acrylic paint was chosen, then the work will require the use of a sponge with a porous structure.
Place a small amount of dye on the back of the working tool. With light pressure we decorate all planes. After applying the composition, leave the entire structure until it dries completely. This will require an average of 1 to 3 hours;
Let's start arranging the doll furniture. It can be purchased in children's stores or ordered from professional craftsmen;
Next, we proceed to decorating the interior space. To do this, we use curtains made from several pieces of decorative fabric, soft rugs, and light organza tablecloths.
As decorative accessories, you can use small plastic bubbles, the surface of which is pre-painted with an acrylic composition. Small artificial flowers are ideal for creating floral arrangements. The photo of the dollhouse shows do-it-yourself options.
Model of a toy dwelling made of plasterboard
Drywall sheets are considered a fairly popular type of finishing material, which is widely used to create various structures and structures. Surely in every house after renovation there are small pieces left that can be used to create a house for dolls with your own hands.
To prevent the structure from deforming during its operation, it is recommended to use metal corners and small screws. It is recommended to cover the fastening points with putty so that the metal elements do not cause injury to children’s hands.
For work, you can use the scheme for creating a house for dolls from plywood. The principle of operation is practically no different from the previous version.
To work with drywall you will need to use a sharp knife. This tool will allow you to carefully cut blanks to create walls, ceilings and floors. To prevent the edges from crumbling, they must be coated with furniture varnish. All walls, ceiling and floor are attached to each other using corners.
Connecting rooms
It is more convenient to connect the walls with wide masking tape. It does not damage the cardboard when removed, does not make the work sloppy and does not interfere with decoration. Adhesive Moment Crystal will help fix cardboard walls relative to each other: it sets quickly and leaves no marks.
To connect the walls to each other you should:
- Coat the cut of the side wall with glue and press it tightly against the edge of the rear wall, trying to maintain an angle of 90 degrees.
- Cover the resulting corner with masking tape on the outside and inside, so that the middle of the adhesive tape is at the junction of the walls.
- Similarly, attach the second side wall, forming a U-shaped frame for the future house.
- Coat the cut of the floor part with glue on three sides, press it to the edges of the walls, while simultaneously adjusting the internal corners of the house.
- Reinforce each joint between the floor and the wall with adhesive tape on the outside and inside.
- Apply glue to those sections of the inner wall that will be attached to the floor and the back of the house.
- Press the part strictly perpendicular to the floor and parallel to the side walls of the house (check the distance between the walls below and above with a ruler, adjust if necessary).
- Cover the resulting corners on both sides of the partition with masking tape.
Pasting the corners on both sides will make the structure stronger and fix the shape more rigidly. To ensure a tighter fit of the tape to the surface, it is recommended to forcefully iron the gluing areas with the edge of a ruler or plastic card.