There are different types of art and hobbies, so we invite you to consider flat-relief carving for beginners, what types exist and what it is needed for. Since ancient times, products made from such material have entered human life (from toys to houses). And when making wooden objects, craftsmen often try to show their natural beauty. Carving became one of the first decorations in the world: it was applied to dishes, fences, furniture, boxes, etc.
But different techniques were used to make each item. For example, for home decoration, decorating dishes or pieces of furniture, openwork or slotted carvings were used, and when decorating ships, souvenirs, carved balusters for stairs or toys, only sculptural carvings were used.
Types of wood carving
Wood carving is a traditional craft of many peoples. This type of applied art has a long history. And during this time, masters created several types of technologies, such as:
- flat-relief carving;
- blind relief carving.
In addition, experts distinguish wood processing in the Kudrin style (Kudrin-Abramtsevo) as a separate variety. The style owes its name to the place of its birth - the village of Kudrino in the Moscow region. It is distinguished by abundant floral ornaments, garlands of flowers, in which peculiar animals and birds are placed.
The type of wood processing gets its name from the word “relief”, which in our case is understood as areas raised above the general surface. Flat-relief carving, in turn, is divided according to execution methods into:
- bas-relief;
- high relief.
The first type has a high relief, the second has a lower relief. A sign of a blind type of wood processing is a continuous carved surface of the background without smooth surfaces.
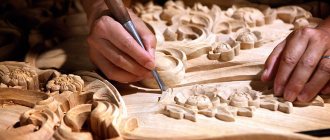
Step-by-step execution of flat-relief carving
In flat-relief carving, the background is located below the level of the design, and it is selected with a chisel of one type or another. One of the types of artistic wood processing is contour carving. It differs from relief in that a pattern is applied to the surface of the material, the contours of which are selected with a special tool.
The protruding part remains flat, and only the contours emphasize the image, while the relief carving has a figured surface of the design.
Note that slotting involves a complete selection of the background, that is, the drawing seems to hang in the air.
Geometric carving master class
As mentioned above, geometric carving is considered one of the simplest, so it is ideal for teaching beginners. A minimum set of tools is required for work. During the cutting process, only precision matters. The elements of the drawing must have clear symmetry. The images themselves consist of repeating zones that form a single elegant composition.
Technology and sequence of geometric carving
The design using the geometric carving technique is based on various simple shapes: circles, triangles, squares, rectangles, trapezoids and rhombuses, which are complemented by straight and broken lines. Contrary to the misconceptions of ordinary people, the finished compositions are devoid of angularity and roughness. The play of light and shadow emphasizes the relief of the image. Geometric carvings have no subjects, as such. It conveys the mood and clearly demonstrates the author's skill. The finished product can amaze with the complexity and subtlety of the work, and sometimes adheres to the principles of laconicism, which does not in any way affect its perception. Very often, the composition is based on traditional Russian ornaments, which were previously considered “amulets” against evil forces. The process of working in the technique of geometric carving is conventionally divided into stages:
- Preparatory. It includes the production of a blank (blank) and rough leveling of its surface, that is, the removal of defects, chips, and relief elements.
- Working on a composition using knives.
- The final stage. Final processing of the workpiece: grinding, impregnation with special compounds, coating with varnish or paint.
After drying, the carved craft can be used for its intended purpose.
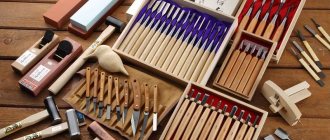
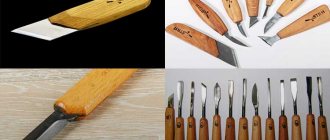
Required Tools
To work in the technique of geometric carving, you will need a minimum set of tools:
- Pencil, compass and ruler (pattern) for drawing up an accurate drawing.
- Two types of knives: “jamb” and “feather” (a type of Bogorodsk knives).
The first type of knife is used for cutting straight lines that form angular geometric shapes, and the second is used for “grooves” with soft curves.
Sketching a pattern
Craftsmen who have a “full hand” apply patterns directly to the workpiece using a pencil, a compass, and a ruler. For beginners, it is better to first draw a sketch on paper or use ready-made drawings that can be easily found on the World Wide Web. The patterns are printed, then applied to the blank and traced along the contour using carbon paper. When the design is completely transferred to the workpiece, you can begin cutting out the composition.
Cutting out patterns
You need to start with soft details (circles, petals, smooth lines). For work, use a pen knife. It is held in the hand between the palm and the index finger. The thumb is set aside and leaned against the workpiece. It will serve as a support. The bent index finger will become the regulator of the force of pressure on the instrument and its angle of inclination. The depth of the “groove” will depend on this. Remember that you need to cut on your own. First, one part of the composition is processed (on the left or right depending on the leading hand), and then the blank is turned over and the second part of the pattern continues to be cut out.
Now the joint knife comes into play to work on the triangular elements. This instrument is held differently. It is held between the index finger and thumb, like a pencil, but at the very end of the handle, closer to the blade. The “heel” of the knife is forcefully driven into the workpiece at an angle of 45 degrees, but not at the very edge of the figure, but with a slight indentation. It must be done so that the recess has “flat” edges. “Grooves” with such a relief look more beautiful. The edges of the triangles must meet. Using the same algorithm, the remaining elements of the design are cut out. The used pieces of wood should be in the shape of pyramids, then the work will be done correctly.
Grinding and impregnation of the finished product
To smooth out the roughness of the edges of the “grooves,” the surface of the craft should be lightly sanded with sandpaper. Then the product is impregnated with a special composition. Some varnish their crafts, but most craftsmen prefer the process of waxing (wax mastic) or coating the surface with oil. In this case, the craft will acquire a light, natural shine. Usually flaxseed, dandelion, peppermint, and seven-herb oils are used. These same compounds are excellent for impregnating dishes. The craft is thickly lubricated with the product, after which the oil is “rubbed” into the wood. The product should now dry. It is best to put it outside to dry in the sun. Some people place the products near the battery or use a hairdryer to speed up the process.
What can you get by carving wood?
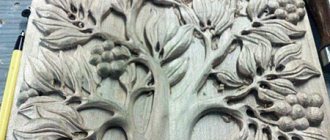
The main design, which is made using the technique of flat-relief carving or another variety of it, is a carving ornament. It can be a simple geometric pattern or vegetation, stylization.
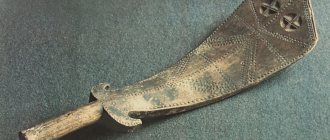
An example of a box made with relief carvings
More experienced masters include images of animals, birds, and people in their works. There are both traditional folk stories and compositions on modern themes. It all depends on the skill of the author and his ability to transfer the image to the board.
Electrical tools
When you start making workpieces yourself, you will need a band saw. A huge selection of blades will allow you to make the most difficult cuts with ease, far surpassing anything that can be done with a bow saw. An openwork saw will help to process the inner surface, but not every tree can handle it. Belt and disc sanders are good for both finishing and removing bark. Many carvers use rotary tools with a wide range of heads to machine parts such as feathers. There are hand-held grinders and small high-speed cutters. There are also at least four types of electric chisels with a reciprocating motion, allowing arthritic people and people with tennis elbow to enjoy carving.
How to select and prepare wood for carving
You can start practicing making carved relief surfaces on ready-made boards. Shelves from old racks are suitable, parts that can be bought for next to nothing in any carpentry shop or sawmill. Linden wood is considered the most suitable for carving. Among the advantages of this breed, craftsmen note its uniform density, slight shrinkage during drying and rapid drying, in addition, the ability to cut in relief both along the fibers and across them.
Before work, the material must be dried. The tree is harvested from November to February, when there is little juice in it. If the master buys a ready-made workpiece, then you need to clarify whether it has been dried. If you do it yourself, the process looks like this. First, the trunk is cleared of branches and bark, then cut into pieces.
Then the wood for carving is boiled in a container with salt added for 4 hours. This will remove juices and speed up the drying process. Then the blanks are lowered into the basement, where they are placed upright on the concrete floor. This will draw out excess moisture, after which the wood is laid in a ventilated area under a canopy for drying. A moisture content of 12-10% is considered normal. Without special equipment, the content can be found out like this. A piece 3 cm long and 15 cm wide is cut from the end (the excess is removed).
The fragment is weighed and then dried for 5 hours at a temperature of +100°C in the oven. Then they weigh it again and make calculations. To do this, the resulting difference is divided by 150 and multiplied by 100. The result will show the existing humidity.
Wood used for carving
The starting material is different types of wood. Linden became the most popular. It most successfully combines the technical characteristics necessary for specialists. It is soft, has a dense, smooth surface, is easy to process, can be stained, sanded, and varnished. When properly prepared, it will not warp or crack.
Other thin-layer trees are used: maple, apple, rowan, alder, walnut, poplar. Oak is also taken as a basis, but it is quite durable and requires not only dexterity, but also brute male strength. Some people use resinous softwoods, but they have a lot of disadvantages. Selected trunks are prepared at least a couple of years before use. They are thoroughly sanded, leaving rings of bark (10-15 cm each) only at the ends. The ends are carefully treated with a clay solution and paint - this way the appearance of cracks is prevented. Drying is carried out under sheds, in sheds with good ventilation. Subsequently, all this stuff is dissolved into boards and chopping blocks.
What tools are needed for the job?
Working with wood is carried out in several stages.
Wood carving stages
And each of them needs its own set of tools and accessories. The first stage is preparing the material. To do this, well-dried wood is selected, the surface of which is leveled and sanded. It is better for beginning craftsmen to use materials made from softwood, pine or linden. Working with them does not require much effort, and if you make a mistake, you can take a new board, because these species are inexpensive and accessible.
As the level of skill increases, the carver will move on to processing more beautiful wood, such as alder, maple, ash, as well as harder wood - oak, beech, etc.
The second stage is choosing a pattern. Having chosen the one he likes, the master makes sketches for carving, that is, transfers the image to the surface of the wood. Experienced craftsmen advise starting the first steps in processing wood into relief with simple geometric patterns.
A selection of sketches and patterns for relief carving
Having mastered the technique and gained experience, you can move on to complex plant patterns.
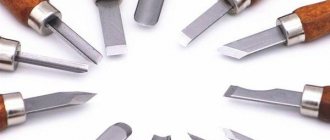
To work you will need:
- chisels;
- gravel;
- cutter knives;
- incisors;
- hammer for chisels;
- tool straightening kit.
Experts note that each type of wood requires its own set of tools. To treat the surface you also need sandpaper of different sizes and a set for sanding wood. Slotting also requires a set of needle files.
Preparing for work
For the first lesson, you need a board measuring 170 by 110 mm and 2 cm thick. Sketches for this work will be given below. The surface of the board must be sanded with sandpaper. Now, using a ruler and a simple pencil, draw out the entire surface of the tree in 5 cm cells.
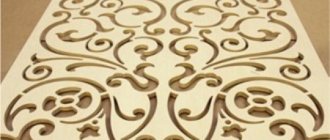
Then we draw all the figures, as shown in the figure below. There were 7 figures in total: pegs, diamonds, a twist, a pyramid, stars, squares and a rosette. From these figures you can then create new patterns. A photograph that shows what compositions can be made from just elements, and how the composition looks after processing and painting the wood.
Features of relief carving
Experts note that flat-relief carving and other types of similar wood processing have a number of features. The technology makes it impossible to polish wood. Therefore, craftsmen limit themselves only to finishing and polishing large elements of the design.
Sketches are made on a 1:1 scale to make it convenient to transfer the drawing to the surface. To do this, it is better to use graph paper and tracing paper, which will make transferring the image easier.
Self-made sketch for relief carving
When making a relief image, the outline is first cut and then processed, giving convexity to the design. When making sketches, you need to remember this. Note that slotted processing is formed from flat-relief processing. To do this, you need to remove the existing background, leaving only the convex pattern.
DIY making
There is no need to purchase such equipment in retail establishments. It is not difficult to make a mechanical wedge with your own hands. Before starting work, it is recommended to first make a drawing. You can sketch it yourself, or find it on special websites. There you can also get acquainted with the detailed manufacturing technology of the structure.
Necessary materials
To construct weims with your own hands, a special load-bearing beam is used as a base. It must certainly be highly durable. In addition, you will need a profile pipe; you can use a rectangular or square one. It is also possible to use a metal corner or channel as a basis. This, of course, will make the structure heavier, but will give it additional strength. Such a clamp can also be made of wood, but the gluing of parts on it will not be sufficiently reliable and of high quality. Therefore, it is preferable to assemble this structure from metal parts.
As for materials and equipment for such work, you will need the following.
- Profile pipe.
- Channel or metal corner.
- Fastening elements.
- Wooden spacers.
- Square.
- Level.
- Welding machine.
As a result, the finished structure, made by hand, should be durable and withstand serious loads. Otherwise, the product may become deformed or even break during operation. It is advisable that the clamps be secured in such a way that they can move freely. This will allow you to use a home-made clamp, even for fairly large parts.
Step-by-step instruction
First of all, you need to make a base. Profiled pipes are used for this. They must be at least 1 m long. Sometimes it may be necessary to use a pipe bender. Then the parts are assembled using bolts. They need to be connected by welding. In cases where the assembly is carried out on metal corners, the channel must be fixed, and the spaces between them must be equal.
The short corner together with the edge of the channel are installed perpendicularly between the long parts. It would be a good idea to place shims about 10mm thick under the nuts. After this, connections are processed. For this purpose, a welding machine is required. Only the joint between the corner and the channel should be left untreated, otherwise a seam will appear that will interfere with gluing.
For clamps, you can use ordinary metal rods. Their diameter should be approximately 5 cm. Holes (1 cm) must be drilled in the end. Then insert ball bearings into them. This is done to reduce friction, which will extend the life of the structure.
Holes are also drilled to secure the clamps. Their diameter should be 10 mm. Pins are inserted into them. They will make it possible to change the position of the wooden element during processing. For additional stability and strength, it is recommended to weld special stops to the structure from below.
In the process of creating a carpentry frame with your own hands, you must strictly monitor the position of the parts. They must be installed exactly in parallel. A building level is used for clarification.
In addition, it is also important to ensure that there is no distortion of the metal during welding.
Types and areas of application of taps
Internal thread cutting can be done manually or using various types of machines (drilling, lathe, etc.). The working tools that perform the main work of cutting internal threads are machine-hand or machine taps.
Taps are divided into different types depending on a number of parameters. The following principles for classifying taps are generally accepted.
- According to the method of rotation, a distinction is made between machine-manual and machine taps, with the help of which internal threads are cut. Machine-hand taps equipped with a square shank are used in conjunction with a special device with two handles (this is the so-called tap holder). With the help of such a device, the tap is rotated and cuts the thread. Thread cutting with a machine tap is carried out on metal-cutting machines of various types, in the chuck of which such a tool is fixed.
- Based on the method by which internal threads are cut, a distinction is made between universal (through) taps and complete taps. The working part of the former is divided into several sections, each of which differs from the others in its geometric parameters. The section of the working part that first begins to interact with the surface being processed performs rough processing, the second - intermediate, and the third, located closer to the shank - finishing. Cutting threads with complete taps requires the use of several tools. So, if a set consists of three taps, then the first of them is intended for roughing, the second for intermediate, and the third for finishing. As a rule, a set of taps for cutting threads of a certain diameter includes three tools, but in some cases, when products made of particularly hard material are processed, sets consisting of five tools can be used.
- Based on the type of hole on the inner surface of which it is necessary to cut a thread, taps for through and blind holes are distinguished. A tool for processing through holes is characterized by an elongated conical tip (approach), which smoothly passes into the working part. Universal type taps most often have this design. The process of cutting internal threads in blind holes is carried out using taps, the conical tip of which is cut off and performs the function of a simple milling cutter. This design of the tap allows it to cut threads to the full depth of a blind hole. To cut a thread of this type, as a rule, a set of taps is used, driven manually using a wrench.
- According to the design of the working part, taps can have straight, helical or shortened chip removal grooves. It should be borne in mind that taps with grooves of various types can be used for cutting threads in products made of relatively soft materials - carbon, low-alloy steel alloys, etc. If threads need to be cut in parts made of very hard or viscous materials (stainless, heat-resistant steels, etc.), then for these purposes taps are used, the cutting elements of which are arranged in a checkerboard pattern.
A good tap is made of high-quality tool steel, looks neat and has smoothly machined turns and grooves.
Taps are usually used for cutting metric threads, but there are tools that can be used to cut pipe and inch internal threads. In addition, taps also differ in the shape of their working surface, which can be cylindrical or conical.
Introduction
Wooden art products are household items that organically combine beauty and utility. These include decorations of wooden houses - carved platbands, valances, ridges on the roofs; decorative elements in the interior - mosaic parquet floors, carved decorations of doors, ceilings, wall panels, etc.; furniture and lamps; household utensils - dishes, cutting boards; wooden toys and souvenirs (turned, carved, painted); clothing decorations, etc.
Artistic products made of wood, in addition to expressive proportions, color, shape, often have some kind of decoration: an ornament or a revealed texture of the material. Contemporary artists of decorative and applied arts - folk, professional, amateur - in search of forms and means of artistic expression rely on the centuries-old traditions of national and world art.
Artistic woodworking is one of the oldest crafts mastered by man. In our country, especially in Russia, wooden architecture, interior decoration, furniture, and various household items made of wood belong to one of the most important types of art and occupy a significant place in the national culture of the people.
Woodworking workshops produced various products decorated with carvings, which were dominated by a floral pattern consisting of shoots with leaves of complex shapes, flowers and bunches of grapes. Carved decorations were made on solid wood and overlaid using the technique of flat-relief and high-relief carving. For finishing, gilding and painting with tempera, oil and glue paints, as well as natural dyes (stains), wax mastic, and resin varnishes were used.
Existing types of wood carving are conventionally divided into the following main groups: flat-notched, or recessed; flat-relief; embossed; slotted, or openwork; sculptural, or volumetric; house (ship)
Flat grooved carving is characterized by the fact that its background is the flat surface of the product or workpiece being decorated, and the pattern is formed by variously shaped recesses - recesses. The lowest points of the relief are located below the level of the surface being decorated, and the highest points are at its level. Depending on the shape of the recesses and the nature of the pattern, flat carvings can be geometric or contour.
Geometric carving is one of the most ancient types of wood carving. It is made in the form of two-, three- and tetrahedral recesses, forming a pattern of geometric shapes on the surface - triangles, squares, circles. Sometimes they are supplemented with bracket recesses.
Geometric carving differs from other types of carving in a wide variety of techniques for decorating a wooden surface. At the same time, this carving is not complicated in execution and does not require, as with relief carving, special knowledge of the theory of design or a complex set of tools. Its advantage is also the shallow depth of the carved design, which does not interfere with the composition of the product itself.
Contour carving is characterized by shallow, thin dihedral grooves running along the entire contour of the design. Unlike geometric carving, contour carving uses mainly figurative motifs: leaves, flowers, figures of animals, birds, etc. An image made with contour carving is similar to an engraved drawing: its cutting lines are rigid, and there is almost no play of chiaroscuro.
Contour carving is most often used in combination with other types of carving - geometric, flat-relief, and also with painting. As an independent type, this carving is used to make decorative panels on wood.
When performing contour carvings, not only a joint knife is used, but also various chisels. The technique of contour carving requires a lot of attention from the performer, fluency in the instrument and high artistic taste.
Flat-relief carving has several varieties: carving with oval contours (oval, or oblique); carving with cushion background; carving with a selected (selected) background. What they have in common is a low conventional relief located in one plane at the level of the surface being decorated. Flat-relief carving is, as it were, a transitional type from Contour to relief carving.
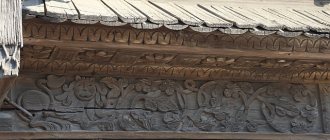
The so-called Abramtsevo-Kudrin carving, which arose at the end of the 19th century, played a large role in the development of flat-relief carving. in the Abramtsevo estate near Moscow, where a wood carving workshop was organized. Many craftsmen who worked and studied in Abramtsevo lived in the neighboring village of Kudrino, so the carving was called Abramtsevo-Kudrino. The traditions of the old masters are still preserved in the works of the carvers of the Khotkovo factory of artistic products made of wood and bone. A sample of the Abramtsevo-Kudrin carving is shown in Fig. 1
Rice. 1 Sample of Abramtsevo-Kudrin carving
Relief carving is done by trimming a flat ornament left on a recessed background and working out shapes on the surface of this ornament. Relief carving has almost no flat surface. The shapes of the ornament are revealed by relief of different heights.
There are bas-relief carvings - carvings with low relief and high-relief carvings - with higher relief, more clearly expressed and having a richer play of chiaroscuro.
Relief carving is highly expressive and decorative. In the past, it was widely used to decorate interiors - wall panels, portals, doors and furniture. Currently, relief carvings are used to decorate the interiors of public buildings in the form of wall panels, as well as in the manufacture of modern stylized furniture: on the backs of chairs, in the form of applied decorative elements on cabinet furniture (Fig. 2).
Fig.2 Relief carvings on modern stylized furniture
A carved thread is a thread in which the background has been removed. Carved carving is performed both in the technique of flat-relief carving (with a flat ornament) and in the technique of relief carving.
Antique Russian furniture was decorated with flat carved carvings. In Fig. 109 shows a chair made of pine wood with flat slotted and contour carvings (late 17th century). In cabinets and screens, bright fabric was placed under such carvings as a background.
The background in the slotted thread is removed with a chisel or saw. In the latter case, the thread is called kerf. Since this operation can be mechanized, saw threads are used in the serial production of furniture.
Carved carving with a relief ornament is called openwork. It was widely used to decorate furniture in the Baroque and Rococo styles at the end of the 17th-18th centuries. (Fig. PO). The execution of such carving requires high skill.
Sometimes the slotted carvings are glued to a wooden base. In this case, it is called an invoice or sticker.
Sculptural, or volumetric, carving is characterized by the fact that in it the relief image is partially or completely separated from the background, turning into a sculpture. Unlike the one-sided image of an object in flat-relief and relief carvings, in volumetric carvings the object is depicted comprehensively.
Sculptural carving was used to decorate interiors and furniture of classical styles. The legs of chairs and armchairs were often made in the form of animal paws, and the armrests of the chairs were decorated with figures of fantastic animals and birds. Figure 3 shows a Russian-made chair from the early 19th century, decorated with sculptural carvings.
Fig 3 Armchair made in Russia in the 17th century. with contour and slotted thread
This type of carving also includes modern easel sculpture made of wood. Many famous artists-sculptors created and are creating their works from wood: S. D. Erzya, V. I. Mukhina, S. T. Konenkov, V. A. Vatagin and others.
Three-dimensional carving also includes miniature wooden sculptures and carved toys. The toy makers of the city of Zagorsk and the village of Bogorodskoye gained particular fame. The peculiarity of Bogorodsk carving is the patterned elaboration of the surface of the product, imitating the skin of an animal or the plumage of birds.
House carving is large-scale, done mainly on softwood wood using an ax, saw and chisels and is used to decorate wooden buildings. Although house carving was already developed in the 16th century, examples dating back to the 19th century have reached us. Wooden buildings decorated with carvings have been preserved mainly in the north of our country and in the Volga region.
It is believed that carved decorations on residential buildings were transferred from wooden ships, which is why house carving is also called ship carving. According to the nature and technique of execution, house carvings can be relief, slotted (openwork) and volumetric. Blind relief carvings - carvings with an uncut (blank) background and a high relief pattern - decorated the pediments of houses and window frames. The carving motifs were most often floral ornaments, where the leaves curl in steep counter spirals, they are connected and at the same time separated by flower rosettes. Among the leaves and flowers, images of mermaids, lions, and the Phoenix bird were often inserted.
Carved, or sawed, house carvings appeared in the middle of the 19th century. It was done with a jigsaw. Openwork valances decorated the pediments of houses, window frames, railings, and framed entrances.
An example of volumetric house carving is the so-called “okhlupen” - a figurative image of the head and upper part of the body of a horse, deer, or large bird, which was cut out from a whole rhizome with an ax and placed on the roof ridge above the pediment, and previously decorated the bow of the ship.
Various types of wood are used for wood carving. The choice of one species or another depends on the purpose and shape of the item being decorated and the type of carving. Of the soft hardwoods, linden is most often used, on which flat-notched and flat-relief carvings are especially good. Due to its low hardness, linden is used only for the manufacture of small household items - boxes, frames, shelves, as well as carved toys and dishes. Alder wood is suitable for various types of work, however, due to the small size of the trunks, the frequent bending of the fibers and rot in the core, and also due to the small reserves, it is used less often than linden and only for the manufacture of small products. Dishes are made from aspen and poplar wood, and souvenirs are also decorated with carvings. The use of these species is limited by heart rot, which is often found in growing trees.
An excellent material for carving is birch wood. It is harder than linden and alder and is more difficult to cut, but the quality of the carving is better - the relief is clearer and cleaner. You can make applied carved decorations and small details from birch. From hardwood, oak, beech, walnut, elm, pear, and maple wood are used for carving.
Oak has long been used for large decorative carvings and for the manufacture of carved furniture. Oak carving is complex and labor-intensive, but very expressive and decorative. Beech wood is close to oak in hardness, but chips more when carved. It is used mainly for small carvings and applied carvings.
Walnut wood is the best material for carving work. It is used in the production of highly artistic carvings of small forms, easel sculpture, and also in furniture.
Small souvenir items decorated with carvings, applied carved decorations for furniture, and miniature wooden sculptures are made from pear and maple wood.
Coniferous wood used for carving is pine, spruce, cedar, and yew. Decorations for window frames, cornices, house walls, and gates (house carvings) have long been carved from pine. This carving is large, so the unevenness in the density and color of the layers of early and late pine wood does not make it difficult to perform and perceive the carving. The resinous nature of pine ensures the durability of carved house decorations.
Spruce is softer than pine and cuts easier, but it has more knots and often has very hard knots that cause tool breakage. In addition, spruce has little resin and is less durable than pine, so it is less often used for carving.
Cedar wood cuts very well, has a beautiful texture and color, and is used in the furniture industry. It can be used to make beautiful products decorated with carvings. Even more valuable is yew wood. It has great uniformity, beautiful color, is durable, lends itself well to carving, turning, and finishes well. Limited reserves of this wood allow it to be used only for the manufacture of small artistic products.
Of the foreign species used for carving, varieties of mahogany are used: mahogany and makore. In terms of hardness, they are close to walnut, but they cut worse, causing chips. These rocks are used for the manufacture of applied carvings and models for the production of plastic applied decorations imitating carvings.
For carving, it is necessary to select high-quality wood that does not have such defects as bent fibers, curling, overgrowth, knots, cracks, wormholes and rot. Only in large house carvings are small healthy fused knots allowed on pine.
Wood for carving is harvested from October to January, when the movement of sap in the trunk stops and the danger of wood cracking and damage by fungi and insects is reduced.
Ridges intended for volumetric carving (toys, small sculptures) are cleared of bark and split into pieces along a radius. The workpieces are dried to a moisture content of 8-10%.
Boards intended for carving are dried to a moisture content of (8 + 2)%, making sure that cracks and warping do not form. Wetter wood cuts easier, but the surface finish of the thread is poorer. In addition, in the future such wood can shrink and crack. Wood that is too dry is difficult to cut and is more likely to chip.
The cut of the board is of great importance - tangential or radial. It is more difficult to cut on a tangential cut, but the carving is more expressive and beautiful. Radial cut boards are easier to cut and less susceptible to warping, so when making large parts, such boards should be given preference.
Docks intended for carving work are first cut into blanks on circular saws, then cut to size on jointing and thicknessing machines.
Wide blanks are obtained by gluing individual bars or planks. In this case, it is necessary to select wood plots so that the cut and direction of the layers are the same. An incorrectly glued workpiece made of bars with opposite directions of wood layers makes the work of the carver more difficult, reduces the artistic value of the carving, and when painted with water-based dyes, it can give a different tone across the bars. The glued workpiece is planed according to the surface on a surface planer or well aligned and cleaned manually with a double plane.
Before carving, the surface of the workpiece is leveled by scraping. Do not sand the surface with sandpaper, as abrasive grains can get into the pores of the wood, which will quickly dull the tool.
It is more convenient to carve furniture parts before assembling them into a product, so the parts must first be carefully adjusted and processed.
To work, carvers need a dry, bright room with an air temperature of 18-20 ° C and a humidity of 60%. The walls and ceiling of the room should be painted in light colors.
The equipment of the carver's workplace depends on the nature of the carving work being performed. When making small items - boxes, spoons, small carved panels, small decorative sculptures and toys - carving can be done on a regular table while sitting on a chair. Large-sized products - sculptures, carved furniture parts, large panels - are made on a workbench for carvers. Workbenches are available for one or two workstations. The workbench cover, 700–900 mm wide and 1000–1300 mm long per carver, is usually made from pine boards 60–70 mm thick. The height of the workbench is designed for standing work and should be at the level of the carver’s elbows, i.e. 1100-1200 mm. For sitting work, use a stool with a height of 650-750 mm. The legs of the stool should be at a height of 200-300 mm so that it is comfortable to place your feet on them.
Rice. 4 .
Securing a workpiece for carving on a workbench.
a) Using a screw clamp
b) Using an overhead holder.
Workbenches are placed so that the light falls from the front and left. The best lighting is natural without direct sunlight. With artificial lighting, the light should come from two or three points so that there are no sharp shadows on the workpiece (thread).
To secure parts or products to a workbench, use a workbench screw box (Fig. 4, a), clamps, as well as wooden holder blocks (Fig. 4, b), made of soft wood, such as linden, in the form of bars or staples of various shapes , which allow you to secure the workpiece from the ends or corners anywhere on the workbench cover and quickly change the position of the workpiece.
The workshop should have one carpentry workbench for preparing material for carving, as well as a sharpening machine and a table for sharpening and dressing tools.
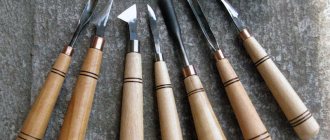
Chisels and chisels of various shapes are used for wood carving. Straight chisels (Fig. 5, a) with a blade width of 3-30 mm are used mainly for cleaning the background in relief carvings, sometimes in contour carvings.
Semicircular chisels with a blade width of 3-25 mm, depending on the radius of curvature, are divided into flat - with a large radius of curvature (Fig. 5, 6), medium (Fig. 5, c) and steep with a small radius of curvature (Fig. 5, d ). This is the main tool for performing all types of carving, except geometric, where these chisels are used only for cutting semicircular holes.
Cranberry chisels (Fig. 5, e) are distinguished by a short blade 2-15 mm wide and a long neck curved near the blade. The shape of the canvas may be different. They are used when making high-relief carvings for cutting in hard-to-reach places.
Corner chisels (Fig. 5, e) with a blade width of 5-15 mm are used when selecting narrow lines - grooves. In cross section, the chisel forms an angle of 50-70°. They can be made in the form of a cranberry or with a straight neck.
Rice. 5 Carving chisels
Ceramic chisels (Fig. 5, g) with a blade width of 2-3 mm are close in shape to steep semicircular chisels, but their profile is deeper. Cerasics are used for cutting narrow veins.
Chisels-jambs (Fig. 5, h), also called cutters, come in two types. Long joints are made from straight chisels cut at an angle of 60-70°. Short joints (web length 40-50 mm) are made somewhat wider. The jamb is the main tool for making geometric carvings.
The quality of a cutting tool depends primarily on the material from which it is made and on the correct hardening of the tool. A well-made chisel should be easy and quick to sharpen. The chisel blade must be durable and should not quickly become dull, bend or crumble under the blows of the mallet.
The shape and size of the handle (handle) of the chisel are of no small importance. The most convenient are handles that have an oval or oval-faceted cross-section. A chisel with such a handle is stable in the hand and does not roll over the top of a table or workbench. The end of the handle is oval for ease of pressing on it with the palm of your hand. The length of the chisel handles is 105-130 mm, diameter 22-28 mm.
A new or used chisel is first sharpened on a sharpening machine to obtain a point angle of about 20° and a smooth, flat bevel. Hold the handle of the chisel with your right hand (the end of the handle rests on the palm), and with the fingers of your left hand, not far from the blade, press the chisel to the sharpening wheel. To make sure that the angle of inclination of the chisel to the surface of the circle corresponds to the required one, you need to check the width of the resulting chamfer: it should be approximately 2.5 times the thickness of the blade. To ensure that the angle of the chisel does not change and the chamfer is flat, the elbow of the right hand is pressed towards you. To wear the circle evenly, move the chisel blade slightly from right to left and back. When the correct chamfer is obtained and a thin strip of burr appears along the entire blade, sharpening on the sharpener is stopped and the chisel is sharpened on a fine-grained whetstone.
The chisel is taken by the handle with the right hand, and with the fingers of the left hand closer to the blade, it is pressed against the block so that the chamfer fits tightly to the surface of the block (Fig. 6, a, b). Sharpen the chisel with smooth movements back and forth along the entire length of the block, trying to keep your right hand at the same height, otherwise the chamfer will turn out not flat, but oval.
The chisel is sharpened from the chamfer side until the burr becomes very thin. Then the chisel is turned over, pressed tightly against the block and sharpened from the front side with two or three movements (Fig. 6, b). Then they sharpen again in the first position until the burr falls off.
After sharpening on a fine-grained whetstone, the chisel is straightened (finished) on a whetstone using the same techniques, only the chisel is turned over more often and the chisel is straightened for the same length of time in both the first and second positions.
When sharpening on a block, narrow straight chisels are moved in different directions so that grooves do not form on the surface of the block. These chisels are adjusted with a whetstone in the air.
The cutting part of the jamb (Fig. 6, d) consists of two chamfers: the first 6 flat and wide and the second 5 narrow. The sharpening angle 7 formed by the second chamfers should be equal to 20°. The sharpening angle of 1 blade should be 60-70°.
Rice. 6 Sharpening the cutter
The jamb is sharpened on a sharpener in the same way as a straight chisel, until the first chamfers and burrs appear. After obtaining the first chamfers, they proceed to sharpening the jamb on a fine-grained whetstone (Fig. 6, e).
The joint is taken by the ribs, and the index finger is placed on the chamfer. Apply the joint to the block at an angle of about 10° from the horizontal plane and sharpen it with very light pressure, turning it over after two or three movements, until the burr flies off and second chamfers appear. Then they edit the joint on the whetstone using the same techniques, only they turn it over more often.
Semicircular chisels are processed on a sharpener, sharpened on a whetstone and straightened on a whetstone. During sharpening on a sharpener, the semicircular chisel is slowly turned from side to side and moved along the sharpener from left to right and back. The same is done when sharpening it on a whetstone. A groove gradually forms in the block, corresponding to the profile of the chisel, which ensures the correct chamfer. On the inside, chisels are sharpened with rounded bars on a table or suspended (Fig. 6, e). Semicircular chisels are used only by weight.
Sharpening and straightening other types of chisels is not fundamentally different from sharpening and straightening semicircular chisels, but requires more attention and accuracy. Small chisels (cerasics, angles, cranberries) are sharpened only on fine-grained whetstones. For each chisel profile, you need to have appropriately shaped bars and whetstones.
The sharpness of the tool is checked when cutting soft wood layer by layer. If the cut is smooth and shiny and there are no signs of nicks or burrs on it, the tool is considered ready for use.
When sharpening chisels on a sharpening machine, you must follow safety regulations.
Chisels are stored in a workbench drawer, where a nest should be made for each tool, or in a cabinet in special slots on slats attached to the wall. It is convenient to store chisels in a roll of thick canvas, placing them with their handles alternately in different directions. In case of long-term storage, the chisel blades are lubricated with a thin layer of machine oil.
In addition to the main cutting tool, the carver must also have auxiliary tools: marking tools, tools for drilling, sawing.
In some cases, to process the background, punches (chases) are used, which are metal rods with notches in the form of a grid, dots, and stars at one end. They are used for embossing the background mainly in Kudrin carving.
In addition, the carver may need carpentry tools when preparing parts for threading: a plane, jointer, scraper, etc.
Wood carving has always been an indispensable element of Russian wooden architecture. The development of this decorative and applied art was facilitated by the ease of processing and availability of material, the presence of skilled craftsmen and rich traditions. The most famous were the carvers of the Russian North, the Urals, Siberia, the Volga region, Kostroma, Vladimir and other regions.
How many beautiful examples of wooden architecture and artistic creativity our ancestors left us! Many museums in our country contain products of ancient craftsmen who, using a saw, an ax and a chisel, created unique works of architecture and carved decor.
The construction of new cities and villages, churches and monasteries, fortifications, and the development of shipping required a large number of wood processing specialists. Entire teams of carpenters, joiners, and carvers went from city to city, from village to village, creating amazing works of architecture with their labor and talent, decorating homes and everyday life with original carved items. And to this day, like fairy-tale towers, ancient temples, princely chambers and simple huts stand in carved patterns.
The talent of the Russian people, their inherent sense of beauty and harmony made it possible to create deeply original works and contributed to the rise and flourishing of the high art of folk architecture and house carving.
The origins of wood carving can be traced back to ancient times, when images of neo-celestial bodies, animals and birds were of a cult nature.
In recent years, the demand for highly artistic furniture has been growing and its production has been expanding. In the design and production of such furniture, three main directions can be noted. The first direction is the creation of furniture in a folk, peasant style from solid wood, mainly coniferous species, using carved and turned elements. The second direction is furniture in the so-called retro style, in the forms and decor of which the features of classical styles (Baroque, classicism, etc.) are manifested. The third is a design direction, when furniture is designed in an unconventional, often sharp, unusual way, using new forms and designs (addressed mainly to young people).
The demand for artistic wood products, especially furniture, is constantly growing and has not yet been fully satisfied. Some enterprises have mastered the serial production of furniture sets with developed architectural and artistic forms, with decorative elements in the form of applied carvings, turned parts, and mosaics. Highly qualified specialists are involved in their implementation.
Some folk craft enterprises, which produce mainly small souvenir items, are mastering the production of small pieces of artistic furniture. The network of cooperative workshops is expanding, specializing in the production of individual samples or sets of furniture, including in folk style or in the style of past eras.
Today it is necessary to pay maximum attention to the preservation of this type of craft, to organize extracurricular clubs at school or separate woodcarving clubs, where masters of their craft will pass on their knowledge and secrets to future generations.
Tags: Types of wood carving, organization of the workplace during work and materials Abstract Literature