Insulating a wooden house from the outside with polystyrene foam is a very common occurrence. This thermal insulation material has both many advantages and some disadvantages that limit its use as insulation. Among professional builders, debates about the possibility of using polystyrene foam in a wooden house continue. Due to the high flammability of this material, many experts do not recommend using it for thermal insulation of wooden structures. In this article we will take a detailed look at the characteristics of the material and try to figure out how safe it is to use it as insulation. You will also learn how to properly cover a wooden house with foam plastic.
What is this building material?
First, let's figure out what polystyrene foam is? Knowledgeable people sometimes call it expanded polystyrene. This material, which is often used in construction for insulating houses, is a plastic mass.
These masses are usually filled with gas or air. The most common type is foamed polystyrene. The dimensions of the foam do not exceed 15 millimeters. Polystyrene foam contains 2% polymer, the rest of the space is filled with air.
The material is made from polymer under high pressure and using a gas generator, due to which it has a high density. High sound and thermal insulation are the distinctive features of this material, which is why it is so popular in construction.
Foam plastic or mineral wool: what is better for insulation?
Developers and installers argue about how to cover the outside of a house - foam plastic or mineral wool. Mineral wool has a vapor permeability rate that is 10 times higher. According to practice, walls are insulated in several layers using different materials, on which the final vapor permeability depends.
With a polymer structure of the insulation system, mineral wool is not recommended. This is explained by the fact that the outer layer is made of a polymer that does not allow moisture to pass through well. If condensation gets inside, the mineral wool becomes saturated with it, which will lead to loss of thermal insulation properties. Polystyrene foam is not capable of transmitting or accumulating steam.
Mineral wool is not capable of ignition when exposed to high temperatures, therefore, from a fire safety point of view, it is recommended to give preference to it. When using expanded polystyrene, it is treated with fire retardants, which reduces the possibility of fire spreading. During the operation of the building after insulation with polystyrene foam, it is recommended to follow fire safety precautions. Expanded polystyrene ideally resists heat loss, and mineral wool allows it to pass out. From an environmental point of view, polystyrene foam for heating the outside of a house is a safe material.
Mineral wool and polystyrene foam have their advantages and disadvantages, so the choice is made based on the operating characteristics of the building and the financial capabilities of the user.
Polystyrene foam is a material with insulating properties that is used indoors and outdoors. When using the material, it is recommended to take into account its features and technical characteristics, which will extend its service life.
The advantages of this insulation
What are the main advantages of insulation with this particular material? Several points can be highlighted here.
The first is, as mentioned above, high thermal insulation. Polystyrene foam is made using gas, which allows it to maintain the optimal temperature in the house.
The second is environmental friendliness. The material does not contain toxic substances, but only if the manufacturer did not use heat treatment during production.
The next advantage is high moisture resistance. This material does not retain moisture or accumulate it, that is, when insulating, dampness or the possibility of mold appearing is completely eliminated.
The fourth advantage is ease. The lightness of foam plastic greatly simplifies the insulation process, since the material can be easily cut or sawn.
And the last thing I would like to note is accessibility. The cost of this material is not high, absolutely anyone can afford it.
How to deal with slopes
Thermal insulation of house slopes is also important for comprehensive insulation. In some situations, it’s even worth starting with the windows, and only then insulating the walls. When choosing insulation for windows, do not forget that there will still be a layer of finishing on it, and all this thickness should not interfere with the operation of the window. Where the slope insulation connects to the wall insulation, you just need to cut off the first one.
When everything is ready, the walls and slopes are insulated, you can choose whether to line the wall with clapboard, more modern siding, or simply plaster the house.
Both lining and siding require the installation of additional slats, which are nailed to the ends of the sheathing slats directly onto the membrane. The strips of siding or lining themselves are attached to these mounting rails.
To plaster the walls, an adhesive composition should be applied to the insulation, a reinforcing mesh should be placed in it, and then the entire structure should be allowed to dry. We level and clean the surface, apply the finishing touch.
Now you know how to insulate a house with polystyrene foam. Remember that each case has its own optimal solution, and you will definitely have your own opinion and answer to the question whether it is possible to insulate a wooden house with foam plastic from the outside. Considering that thousands of home owners in our country have insulated and will continue to insulate their homes with polystyrene foam, we can conclude that this method has the right to life. Don't forget to install good ventilation and don't freeze in your wooden house in winter!
Designation of foam plastic and types existing on the market
Many beginners come across different letters when comparing this material and do not know what they mean. These letters are a type of foam. Usually, it is marked as “PS”, then other letters and numbers are added depending on the type. There are several types of foam on sale.
The first type is non-press, it is manufactured without pressure. The granules are dried and foamed, and the process is repeated several times. The output of this material is more voluminous, airy, and the cost is much cheaper than the others.
The next type is extruded. It is made using a forming hole and the material is passed through it. This foam is completely waterproof.
The third type of foam is pressed foam, it is made by pressing. The material turns out to be more dense, but this does not make its thermal insulation higher. Pressed foam is not popular, since the market price for it is higher than that of non-pressed foam, but at the same time it is almost no different.
The last type found on sale is autoclave. It is produced by one American company, there is no additional information about it.
Advantages and disadvantages
Each method has advantages and disadvantages.
Frameless method
The frameless installation method involves finishing the wall with plaster. This is due to the need:
- To “ennoble” the appearance of the building - white sheets of foam plastic with visible dowel heads and foamed joints create the impression of unfinished construction.
- Expanded polystyrene of any brand is susceptible to destruction under the influence of ultraviolet radiation; an opaque “covering” material is used for protection.
- The structure of polystyrene foam does not allow it to effectively withstand destructive mechanical influences.
Advantages of the method:
- Minimum number of technological operations.
- Short lead times.
- Long service life.
The advantages are slightly offset by the difficulties that may arise for a master who does not have plastering skills:
- Additional costs for skilled labor.
- Finishing must begin immediately after installing the insulation and finish as quickly as possible, minimizing the time the foam is exposed to the sun.
Frame insulation option
The method involves preliminary installation of a frame on the walls of the building, with insulation installed between the joists. The finishing trim is attached to the sheathing.
Wireframe method:
- Suitable for using foam with a density of 15 kg/m3.
- Saves building materials for fastening the sheathing.
- Available for beginners and inexperienced craftsmen.
- External finishing and a layer of waterproofing reliably protects thermal insulation from mechanical damage and weather conditions.
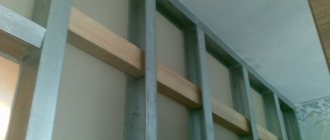
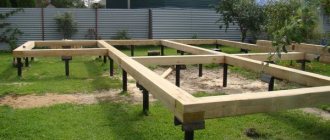
Drawing. Insulation using frame method.
Foam depending on density
When insulating a wooden house with polystyrene foam, it is important to choose it wisely. The material is also distinguished by density.
- PSB-15 is the lowest density. It is used when strength is not required. This type of foam is used in insulating carriages, attics and attics.
- The most popular type is PSB-12, it is found most often on the market. This material is universal and is used for insulating walls, floors and facades. A big advantage of this type is also its high sound insulation.
- The third type is PSB-35. You can guess that this is high-density foam. This type is used for insulating foundations or, for example, underground structures.
- The final look is PSB-50. This material has the highest density and is used, for example, in road construction or in industry.
Preparatory work
For high-quality results, it is recommended to carry out work in the warm season. Dry, hot weather would be ideal. At higher temperatures, the walls dry deeply, which prevents moisture from penetrating inside.
Before starting work, you need to prepare the necessary materials and tools:
- antifungal primer;
- polyurethane foam;
- wooden slats;
- vapor barrier film;
- stapler;
- mushroom dowels;
- diffusion membrane;
- duct tape;
- glue;
- reinforcing mesh;
- finishing materials.
Necessary materials for insulating a wooden house
When preparing walls for insulation with foam plastic, the surfaces are thoroughly cleaned from the outside of dirt, paint and varnish, and any gaps found in the cracks of the logs are eliminated using polyurethane foam. It is advisable to coat the walls with an antifungal primer. Window drains are attached to wooden or plastic windows prior to the installation process. To do this, they are foamed from below and pressed down with a small weight for several hours.
Recommendations for selecting polystyrene foam
Thickness is the main and most important criterion when choosing polystyrene foam, and here you cannot be guided by the rule that the thicker the insulation, the longer it will last. After all, if the material is thick, there is a possibility that the material inside will begin to bulge when the temperature changes.
Indeed, it is important to take into account the density of the material, as well as manufacturing standards (when purchasing, look carefully at the fault line, it must be correct), it is worth choosing well-known manufacturers.
Foam selection
When choosing foam boards for external insulation, you need to pay attention to 3 main factors:
- Thickness. To do this, the climatic conditions of the region in which it is planned to carry out insulation are taken into account. For the Krasnodar Territory, foam plastic with a thickness of 40-50 mm is recommended, and for the northern regions - at least 150 mm.
- Price. Domestic-made material will cost much less than its foreign counterpart.
- Density. Most experts recommend choosing foam plastic with a density of 15-25 points, which has self-extinguishing properties, for external insulation.
Preparing walls for insulation
You can’t just go ahead and start attaching polystyrene foam to the walls. A special insulation technology was invented a long time ago; it is quite simple. For insulation with this material, a special construction adhesive is used.
It can be purchased in “build. materials." Just like tile adhesive, it is sold in powder form, which must be diluted with water. This glue provides excellent “adhesion” of the foam to the wall.
If the surface is perfectly flat, then you should apply the adhesive mass as thinly as possible. Thin application should be both on the foam and on the wall.
In order not to “accidentally” waste all the glue at the very beginning of work, you can run a comb over these layers. After this, lean the foam against the wall, press and hold until it “sticks” completely.
If the surface is not smooth, then the application principle is different. The glue should be applied to the surface in small sheets, as well as along the boundaries of the wall and the material. For optimal fixation, you also need to apply glue to the existing recesses.
The insulation is glued onto the wall in a strict order, like on a chessboard, and after installation it is secured with special mushrooms. Here you will need a hammer drill to make holes and install the mushrooms. They are also attached in several ways: along the edges and at the joints.
Where do doubts come from?
There is an opinion that polystyrene foam is not very suitable for insulating the outside of wooden houses. Some doubt and study this issue before insulating a wooden house with polystyrene foam.
This is due, in particular, to such a material characteristic as vapor conductivity. Hence the conclusion is drawn that such insulation will not be able to prevent moisture, and therefore rotting of the walls. At the same time, in fact, foam plastic has vapor conductivity comparable to the vapor conductivity of pine wood itself, so it is logical that fears are unfounded. The main thing is to follow the insulation technology, then the house will be warm and the walls will not be damp. The only thing is that it is not recommended to choose polystyrene foam for external insulation of baths, saunas and similar premises. Here it is better to focus on other material. If you have a home, then use it for your health!
Opinions and reviews of various builders and home owners on whether it is possible to insulate a wooden house from the outside sometimes differ significantly, here is what experts say about the pros and cons of foam insulation for wooden houses.
Frameless and frame methods of insulation
There are several methods of insulation - frameless and frame. What is their difference? The first one differs in that when insulating, the foam is mounted close to the wall.
All surfaces are treated in a certain sequence so that the insulation adheres better. The frame method of insulation differs in that processing is required only where the guide bars will be installed.
Stages of do-it-yourself foam insulation work
Before starting work, the walls of a timber house must be treated with antiseptic compounds.
- To install a ventilated facade, it is necessary to make a vertical sheathing. To do this, wooden boards are nailed to the walls so that the insulation fits as tightly as possible, the distance between them is 5-8 mm less than the width of the boards.
- A vapor barrier film is stapled onto the top of the sheathing.
- Counter-lattice slats are placed on the vapor barrier, which serves to create a ventilation gap between the wall and the insulation.
- Foam plastic is placed between the racks, which should fit tightly to the slats. The gaps between the plates must be filled with foam.
- A diffuse membrane is laid on top of the insulation. The smooth side of the material should face the wall. The membrane ensures good air circulation and removal of excess moisture from the house.
- The joints between the sheets are taped with adhesive tape.
- The last stage is cladding with decorative material. Siding, facade panels, lining, etc. can be used as finishing.
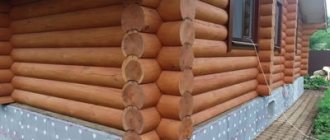
When externally insulating a log house with polystyrene foam, which due to the natural roundness of the logs has uneven walls, a two-layer sheathing is made. To do this, first install vertical posts, and then, after laying thermal insulation boards in them, they are additionally secured with horizontal guides. This fastening ensures a tighter fit of the insulation and makes the structure even more reliable.
When thermally insulating a log house, there is no need to install a counter-lattice, since a natural air gap is created between the logs and the insulation.
Technological difference between internal and external wall decoration
Most often, interior wall finishing is done using wet technology, that is, using glue. To save space inside the house, you should not use an additional frame or anything else. The stages of work are as follows:
- Surface preparation and adhesive application.
- Installation of foam plastic boards and blowing out the joints between them.
- Applying the base layer of plaster.
- Applying the final layer of plaster.
Exterior finishing is also done using wet technology in most cases. There is almost no difference between them. External installation differs only in some details and the number of work processes. An insulating film is used here, since external factors act on the foam from the outside. Stages of work:
- Cleaning the base and priming it.
- Installation of the base profile.
- Layout of insulation placement and “fitting” on glue.
- Eliminate gaps with foam and fix them with dowels.
- Attaching the waterproofing film.
- Applying the first layer of plaster.
- Reapplying a layer of plaster.
- Final application of the third layer of plaster.
- Decorative finishing upon request.
On the sheathing
Attaching to a wooden wall on a lath: first, nail boards vertically onto the wall at a distance of the width of a foam sheet from each other. The distance still needs to be made a little wider than the sheet, you can estimate it like this: the thickness of the slats between the sheets is minus 0.5 cm. And add this distance to the width of the foam sheet.
It is not difficult to attach the sheathing to a house made of beams. With round logs you will have to tinker more; some logs will definitely need trimming.
The boards should be of a thickness identical to the gap for ventilation between the insulation and the walls of the house. To insulate wooden houses made of logs, you can immediately attach slats to the logs, and then nail a vapor barrier to them with a stapler. In general, the end result should be a structure with boards and slats (or with slats on logs), with a vapor barrier. How often to nail the slats? Based on the width of the insulation sheet and reduce this value by 5 mm.
If you decide that the outer foam will be attached without lathing, you will need a spatula with which you will need to apply special glue: along the edges of each sheet and a little in the center (at several points). At the bottom of the slab it is necessary to align and glue the sheets from bottom to top, but always in a checkerboard pattern to achieve the effect when the joints of the sheets do not match. The glue needs to dry for 3 days, and only after that the slabs are nailed to the walls using special disc-shaped dowels. After this, all the joints of the floors, as well as the dowel heads, are puttied.
Description of insulation processes
Each of the above insulation methods is carried out according to an individual technique.
Thermal insulation algorithm using the frameless method
The method involves attaching the insulation directly to the wall of the house and subsequent finishing.
Sequencing:
- Calculation and purchase of foam plastic and fasteners. It is easy to calculate the amount of insulation required. The perimeter of the task is multiplied by the height of the walls and the area of window and door openings is subtracted. Dividing 100 by the selected sheet thickness in cm, you get the area that 1 m3 of material can cover. 5-10% is added to the result obtained in case of unforeseen situations. To fasten the foam, dowels with disc-shaped caps are purchased. To attach one sheet measuring 1x1 m you will need 5-6 hardware.
- To seal the seams, buy adhesive foam or polyurethane foam. You will need a special gun for application. It should be noted that foam adhesive is more expensive, but is better suited for sealing seams, since it expands less after application, without deforming the insulation sheets.
Excess foam that needs to be removed
Important! Be sure to purchase a foam cleaner - you won’t be able to wash your tools, hands and clothes with any other means.
*
- Prepare the surface of the walls for insulation. It is best to carry out work in the summer, when the walls are best dry. Timber, logs, boards are cleaned of dirt and old paint is scraped off. Gaps in walls made of logs and timber are sealed with tow or caulked. The surface is treated with an antiseptic to prevent the appearance of fungus, mold, and destroy wood pests. Damaged areas of the walls are restored by removing the damage. Finish the work by applying fire retardant (fire retardant impregnation) twice. The walls are drying.
- Using a building level and a plumb line, apply horizontal and vertical markings for the first row of insulation. If the first row is suspended, a support bar is attached to the wall.
Installation of the first row of insulation
- Using a drill, the insulation is attached using dowels. The second and subsequent rows are installed offset relative to the first. It is important to install the first row strictly in a horizontal position - this will prevent gaps from occurring in subsequent rows.
- Seal the seams with foam. Removal of excess sealant is carried out after it has completely cured; the process usually takes from 12 hours to 24 hours.
- Using a toothed roller or improvised means, perforations (punctures up to 1 cm deep) are applied to the surface of the insulation. Perforation promotes better adhesion of the plaster to the foam.
- A layer (1-2 mm) of polystyrene foam glue is applied to the surface of the foam and leveled.
- I apply and lightly “sink” a fiberglass plaster mesh onto the surface coated with glue. The joints of the canvases overlap by 10 cm. The seams between the foam plates and the edges of the mesh should not coincide.
Laying reinforcing mesh
Important! When purchasing a mesh, check its compatibility with the composition of the plaster adhesive that they plan to use - some meshes can be destroyed by the cement included in the adhesive composition.
- The reinforcing mesh is leveled with a spatula from the center to the edges, embedded in the adhesive composition. Having leveled the mesh, apply a second layer of glue, leveling the surface.
- The dried surface is treated with a deep penetration primer; it is advisable to apply a second coat after the first has dried.
- The surface is plastered with compounds for external use. As a finishing option for experienced builders, we can recommend bark beetle plaster. A simplified option is to paint the surface with facade paint.
*
Frame thermal insulation method
The frame method differs from the method described above. Here is his step-by-step algorithm:
- Geometric measurements of the walls of the house are taken, including the perimeters of windows and doors. Having calculated the area to be insulated, purchase polystyrene foam; you can buy material with a density of 15 kg/m3.
- Calculate and purchase wooden bars and a galvanized profile for the frame. The amount of material depends on the finishing material used. Usually I make vertical logs at a distance of 50 cm so that the siding can be securely fastened and foam sheets can be used without waste. In cases where extruded polystyrene foam is used, they are guided by the geometric dimensions of the insulation plates.
- Similarly, with the method of frameless insulation, the walls are prepared - cleaned, treated with impregnations.
- Fix the sheathing on the wall. For wooden blocks, use self-tapping screws and nails of suitable length. Wide products are secured using corners. The metal profile is mounted on pre-installed brackets. It is important to maintain the exact distance between the frame guides so that the foam “lays down” as tightly as possible. For example, if foam plastic with a width of 50 cm is used, then the distance between the edges of the joists should be 49.5 cm.
Ready-made sheathing for foam insulation
- Install the insulation between the sheathing joists, securing the polystyrene foam additionally with dowels with disc-shaped caps.
- Gaps between the insulation and the frame larger than 1.5 mm are foamed - this will prevent the appearance of cold bridges in winter.
- A waterproofing membrane is attached on top of the foam to protect the house from moisture penetration, and the foam from destruction.
- If the house is finished with siding, thin slats are attached on top of the waterproofing membrane, which will provide a gap for ventilation.
- Install the finishing material using self-tapping screws.
Insulation of a wooden house from the outside with penoplex
Often wooden houses have good thermal insulation properties. Therefore, external insulation of a wooden house with polystyrene foam is necessary only if:
- during long-term use, the wood began to leak air;
- there was a violation of the caulk layer;
- blowing occurs at poor joints;
- The moisture evaporated from the wood, and the logs began to crack.
If you are not sure that you can properly insulate your house with your own hands, it is better to seek help from specialists.
Insulation of a wooden house with polystyrene foam takes place in four stages:
- Surface preparation.
- Installation of a vapor barrier.
- Laying insulation.
- Finishing work.
Preparation
Wood is a rather whimsical material. Therefore, before starting installation of insulation, you need to properly prepare the surface.
Preparing the surface for laying thermal insulation material consists of:
- Removing old paint.
- Drying the walls.
- Checking the joints between beams/logs.
- Re-caulking the walls (if necessary).
- Filling potholes.
- Sawing off protruding parts.
- Processing and impregnation of wood with special substances.
Methods
There are two fundamentally different options for carrying out floor insulation work.
In some cases, flooring is made of heat-insulating materials over beams. The result is a cake consisting of two plank floors, between which a waterproofing film is laid out, and a layer of insulation on top. In such structures, the wood, despite preventive measures, gradually becomes saturated with moisture and begins to rot.
Another type of insulation is performed directly on the ground by casting a reinforced concrete monolith with a lower waterproofing gasket and an upper heat-insulating layer. The resulting slab, in fact, is a cushion floating on the foundation, withstands and transfers to the ground the load from the weight of the inhabitants, furniture and household appliances in the house.
The insulation in such structures must have high densities and low hygroscopicity, because some moisture can seep through the waterproofing and concrete.