Wood is perhaps the best type of material for flooring, which is “suitable” in terms of environmental friendliness, aesthetics, and practicality for literally everyone. In addition, such a coating is quite easy to install (and dismantle) - during the fixation process, special screws for floorboards or chipboards are used.
And in this article we will look at such “floor” screws, touching on the assembly diagram of the floor covering, where these hardware products appear.
Self-tapping screws for fastening floorboards - features
A self-tapping screw for a floorboard “works” much better than a conventional nail, which tends to slip out of the timber under the influence of operational loads. The self-tapping screw is held almost tightly in the wood.
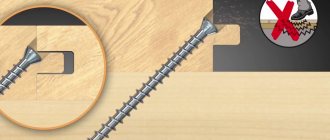
However, not all screws demonstrate such stability, but only special screws for flooring. The tip of such a hardware product is equipped with a “spatula” - a tip whose shape resembles the cutting edge of a feather drill. Thanks to this tip, the screw is screwed into wood of any density without preliminary drilling at the installation point and gets stuck in it.
Wood fibers are woven into the screw groove on the self-tapping screw and do not allow it to move under the influence of transverse or longitudinal loads. Such a screw can only be removed by turning it by turning the screwdriver in reverse.
As a result, fastening floorboards with self-tapping screws of this type is carried out very quickly, and the board itself remains motionless until the coating or beams are destroyed.
Moreover, hardware products with a countersunk head, a core diameter of 3.5 millimeters and a length of 35 to 55 millimeters are used as “sex” self-tapping screws. Such a screw will not “split” a thin floorboard and will pierce a fairly thick coating.
Moreover, the screw thread pitch (1.8 millimeters) and the groove angle (40 degrees) were selected for the most gentle installation mode. Therefore, it is simply impossible to split even the thinnest and most fragile flooring plank with such a self-tapping screw.
The coating of such a self-tapping screw also deserves special attention. It guarantees anti-corrosion protection for both the conventionally visible part - the cap, and the rod hidden in the board. A coating based on copper and zinc is applied to the self-tapping screw with a micron layer (using the electrolysis spraying method), so every square millimeter of the product is covered with such protection.
Scheme for fastening the board with self-tapping screws
We have already figured out what screws to use to secure the floorboard, so let’s move on to a review of the flooring installation technology.
Interfloor and basement floors can be assembled using concrete slabs or beam structures sheathed with a finishing and rough layer of lumber. As the first (rough) layer, a planed board 5 centimeters thick or an oriented strand board about 2 centimeters thick is used.
An additional layer of thermal insulation (polystyrene film 1-1.5 millimeters thick) is rolled out on top of the rough coating, on which laminate, parquet, linoleum or floorboards are laid.
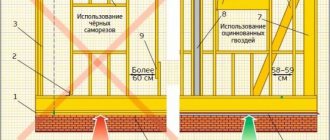
To fasten the finishing coating, as well as to fix the “subfloor” to the sheathing, the “floor” screws we are interested in are used. Moreover, fastening is possible both through a board, when a self-tapping screw pierces the surface of the covering at a pre-drilled point, which is then sealed with a “hatch” made of the same wood, and through the lower edge of a tongue-and-groove lock cut at the side end of the board.
However, the direct fixation method will still be more reliable, and the operation itself will be much faster.
Well, in practice the process looks like this:
- On top of the heat-resistant coating, along the walls, boards are placed, laying them on the end. This creates a gap between the first row of boards and the wall, which will then be closed with a plinth.
- Next, the first row of boards is laid along the wall, which is mounted with emphasis on the masonry located at the end. The second row is laid staggered - the transverse seam should overlap with the entire board from the previous row. And so on.
- After 3-4 rows, the boards are “knocked down” together, moving them towards the wall. After this, you can start drilling secret holes and fixing the board with a self-tapping screw, followed by sealing the fastening with veneer made of the same wood. Self-tapping screws are screwed in in increments of 30-40 centimeters, but at least two pieces per board.
After the operation is completed, the finished surface is shaded with “stain” and opened with varnish, which will fill the gaps between the boards and finally secure the veneer “hatches” over the secret holes.
When arranging floors in a house, in addition to choosing the type of flooring, you need to be especially careful when choosing a method for attaching the purchased material. Each building material has its own fastening methods, including floorboards. Let's look at how to fasten floorboards using the most reliable and popular methods.
We invite you to familiarize yourself with our range of materials
Floorboard - Extra grade
Wood Larch Width 120 mm Thickness 27 mm Length 3 m Qty.
in pack 4 things. 3400 rub/m2Floorboard – Prima grade
Wood Larch Width 120 mm Thickness 27 mm Length 3 m Qty.
in pack 4 things. 3000 rub/m2
Methods for fixing floorboards
As a rule, this happens after a short period of time. The floorboards move, the initially flat floor begins to make an unpleasant creaking sound, and often it simply collapses.
There are several most common ways to attach floorboards:
Next, we will look at how to fasten floorboards using each method.
In this case, the floorboard is fastened to a wooden base, which can be solid or made of joists.
When adjusting the next row, the nails must be hidden. All subsequent rows of boards are fixed by driving nails through the surface.
Glue method
If the floorboard is laid on a solid base, it can be fixed with glue. To do this, the grooves of the boards are coated with an adhesive, you can use regular PVA glue, and then they are placed on the tongues of the previous row.
The glue should be applied in a thin layer in 50 cm increments along the entire groove. The final tongue-and-groove edges should also be coated with adhesive.
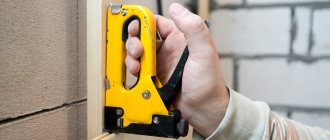
Fastening with clamps
- Waterproofing material is laid on the subfloor, which should be secured to the walls with construction tape.
- The clamps should be driven into the cracks of the boards laid in the first row using a hammer. This is done in the direction of the tongue.
- The ends of the planks are coated with glue, and then the first row is laid.
- Wedges about 1 cm thick should be inserted between the wall and the boards.
- Clamps are also attached to the second row of boards. The floorboards are secured in place by gently tapping a hammer through a block along the edges of the row.
- The remaining rows are laid out similarly.
- Then the wedges between the wall and the covering are removed.
- Installation of baseboards is in progress.
Professional craftsmen use special screws for floorboards to attach floorboards. The use of such fastening material allows you to obtain a reliably fixed floor covering with a fairly long service life.
- These fasteners are available in various sizes. Standard cross-section is 3.5 mm, length can be 35, 40, 45 and 50 mm. Depending on the thickness of the floorboards, the size of the screw is selected.
- This fastener for floorboards is not subject to corrosion, as it has a protective coating.
- There is a cutter at the end of the self-tapping screw, which allows it to be screwed into wood without pre-drilling holes. In addition, this structure allows the screw to fit more tightly, which means that the fixation of the floorboards to the base of the floor will be more durable.
- The self-tapping screw has a special milling cut. It has an angle at which the fastener easily enters the wood without splitting.
- Self-tapping screws for floorboards have another structural feature, which is the absence of a threaded thread in the upper part. This design allows the floor covering to fit more tightly to the base.
Here are some tips on how to properly lay a floorboard:
The strength, reliability and service life of the floor covering will depend on how you lay the floorboard. Therefore, correct fixation of floorboards is a very important point in floor installation; therefore, it is worth approaching the choice of the method of fastening the boards with special care.
When building your own home, it is not enough to pay attention to what materials are used for this - you also need to be very careful about the method of attaching these materials. As you know, any building material “requires 9raquo; its fastener and method of its use. The floorboard is no exception in this regard. Considering the loads that fall to its share, the choice of method of fastening the floorboard simply cannot be an insignificant issue. Indeed, if the boards are not fastened well enough, after a short time they will begin to “demonstrate their dissatisfaction”, loosening and changing their position, and the initially smooth and even plank floor will not only begin to creak underfoot - it will literally fall apart into individual components.
Today, manufacturers produce special screws for floorboards, which ensure reliable fastening of the board to the base and guarantee a long service life of the flooring without any additional investments in its repair.
However, it is worth noting that such self-tapping screws are somewhat more expensive than conventional fasteners used in construction. But at the same time, they perform their work very efficiently and as efficiently as possible. As a result, the entire floor covering will last much longer than if conventional screws were used to attach the boards. Saving on self-tapping screws in this case is an almost guaranteed need to repair the floor in the very near future. And on the boards themselves, fasteners that are not specifically designed for them can have a very negative impact - for example, screwing such fasteners into the board can cause a crack.
As a rule, screws for floorboards are produced in several standard sizes: 3.5x35, 3.5x40, 3.5x45 and 3.5x50 mm. The size of the screw is selected depending on the thickness of the boards used when installing the flooring. All self-tapping screws have a special protective coating that prevents the possibility of corrosion on their surface.
And you can find out the special screws for attaching the floorboard very easily - there is a milling cutter at their tip, which allows you to screw these screws into the board without first drilling the holes. This allows for a more “dense” 9raquo; the entry of the self-tapping screw, which means a stronger fixation of the board to the base. In the same case, if you pre-drill a hole for a self-tapping screw on the base of the floor, spontaneous unscrewing of the self-tapping screw may occur, and the correct diameter of the drill can be selected for subsequent “fitting”; Self-tapping boards are not always possible.
Step-by-step instructions for attaching joists to a concrete base with your own hands
The simplest solution for installing a wooden covering over joists is to fasten the profile using dowels.
To carry out the work you will need the following materials:
- Beam 50 x 70 mm.
- Dowel-nail 8 x 120 mm.
- Fiberboard sheet.
- Polyethylene film.
- Insulation mats.
Installation work:
- We clear the room of unnecessary objects and debris.
- We cut out spacers 100 x 100 mm from fiberboard.
- Using a water level, we level the floor and mark the locations of the joists on the walls (it is better to mark a solid line along the contour).
- We prime the surface.
- We lay plastic film on the base. Each subsequent layer of material should overlap the previous one by 3-5 cm. We seal the joints with tape.
- We lay out the timber according to the marks on the wall parallel to the window opening. We splice the logs using angles or perforated plates.
- We begin installation of the structure. To do this, we make through holes in the log furthest from the window, the diameter of which should be equal to the size of the plastic plug of the dowel. The drill must pass right through the body of the wooden profile and also capture 50-70 mm of the concrete base.
- We press the part tightly to the floor. We check the coincidence of the holes and install the dowel-nail.
- Use spacers to level the horizontal level according to the marks on the wall and secure the profile with a hammer on the nail head. Using the same scheme, we install the next lag at the doorway. We stretch the cord between them on both sides and continue installation.
- When all the profiles are laid in place, the gap formed as a result of level adjustment between the base and the joists is sealed with polyurethane foam.
- We lay insulation mats in the gap between the beams and pre-fix the structure with transverse slats.
Self-tapping screws for fastening floorboards - features
However, not all screws demonstrate such stability, but only special screws for flooring. The tip of such a hardware product is equipped with a “spatula” - a tip whose shape resembles the cutting edge of a feather drill. Thanks to this tip, the screw is screwed into wood of any density without preliminary drilling at the installation point and gets stuck in it.
As a result, fastening floorboards with self-tapping screws of this type is carried out very quickly, and the board itself remains motionless until the coating or beams are destroyed.
The coating of such a self-tapping screw also deserves special attention. It guarantees anti-corrosion protection for both the conventionally visible part - the cap, and the rod hidden in the board. A coating based on copper and zinc is applied to the self-tapping screw with a micron layer (using the electrolysis spraying method), so every square millimeter of the product is covered with such protection.
We have already figured out what screws to use to secure the floorboard, so let’s move on to a review of the flooring installation technology.
An additional layer of thermal insulation (polystyrene film 1-1.5 millimeters thick) is rolled out on top of the rough coating, on which laminate, parquet, linoleum or floorboards are laid.
However, the direct fixation method will still be more reliable, and the operation itself will be much faster.
- On top of the heat-resistant coating, along the walls, boards are placed, laying them on the end. This creates a gap between the first row of boards and the wall, which will then be closed with a plinth.
- Next, the first row of boards is laid along the wall, which is mounted with emphasis on the masonry located at the end. The second row is laid staggered - the transverse seam should overlap with the entire board from the previous row. And so on.
- After 3-4 rows, the boards are “knocked down” together, moving them towards the wall. After this, you can start drilling secret holes and fixing the board with a self-tapping screw, followed by sealing the fastening with veneer made of the same wood. Self-tapping screws are screwed in in increments of 30-40 centimeters, but at least two pieces per board.
On what basis is it better to lay tongue and groove?
After purchasing tongue and groove boards, you can proceed to laying them. As a base you can use:
- Wooden logs fixed on top of any covering - screed, plywood, wooden floor. Also, logs can be laid on brick supports.
- Concrete floors with screed.
- Moisture-resistant plywood.
- Old wooden floor.
- Subfloor made of tongue-and-groove boards or low grade lumber.
The gold standard in construction is the laying of tongue and groove boards on pre-fixed joists. They allow you to efficiently tighten the boards during installation and prevent further floor deformations. Therefore, we recommend that you choose this option.
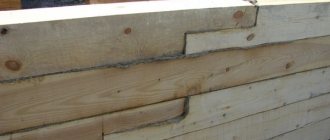
"Black" floor
Rough floor boards, as a rule, are ordinary edged “forty” or “fifty” (depending on the selected lag pitch). Since ancient times it has been fastened using construction nails 100 to 150 mm long - this is the cheapest method. But now the methods of fastening have acquired some variety.
Of course, it is better to use dry boards. The only condition is preliminary control of their quality. However, in the case of a “sub-floor”, you can safely use undried material: the floorboards will get rid of moisture naturally after laying the floor within 1-1.5 months, and with such gentle drying, the likelihood of warping is minimized.
Fastening “black” floor boards with self-tapping screws (usually 76-100 mm long) is similar. But in this case, you don’t have to adhere to the “ruff rule”: their thread itself reliably fixes the floor to the joists.
Nail heads and screw heads must be recessed into the body of the board. Otherwise, during subsequent planing of the floors, there is a high risk of damaging the instrument. It is better, however, to do this not immediately during the flooring process, but immediately before starting to lay the finishing coating.
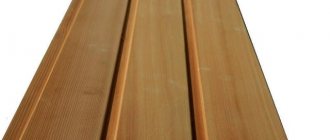
It is much more labor-intensive to produce “white” floors from specially treated floorboards. As a rule, a so-called tongue-and-groove board is used for this. In some cases, it is permissible to use floorboards whose ends are chosen as a quarter. But the source material must first be dried in a chamber.
When laying a “white” floor, there should be no gaps between the boards. To do this, the canvas must be “pulled.” Each subsequent board is tacked to the previous one with special wedges, and then, if the joint is of good quality, it is attached to the joists. Sometimes you have to touch the end with a plane. To consolidate the floor, you can also use special screeds, but this is already a professional tool, which does not make sense for a home craftsman to spend money on.
Ordinary construction screws 35-55 mm long are also suitable for this. But it is best to use special screws for floorboards currently on the market. They have a different pitch and length of the thread, a “spoon”-shaped thread that imitates a drill, which makes it possible to avoid pre-drilling channels with a drill, and a flatter angle of the head (it does not split the edge of the floor board into which the self-tapping screw is wrapped). They cost, of course, significantly more, but the overpayment is justified.
But this method, as a rule, is accompanied by the appearance of a considerable amount of scraps. There is a method that gives greater freedom, but requires, however, the use of a professional tool.
The only correct installation of floorboards
Repair: how to level a wooden floor without tearing off the boards
Tools
To carry out the work you will need the following tools:
- roulette,
- square,
- pencil,
- electric saw (circular or reciprocating) or jigsaw for sawing and cutting the coating;
- hammer drill for attaching joists to the ceiling,
- screwdriver,
- grinder when mounted on studs,
- chisel,
- construction knife,
- level,
- broom,
- brush.
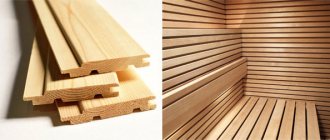
General rules for preparing lining before installation
The humidity of the lining during installation should not exceed 14-18%. It must first be kept in the room where the installation will take place. The minimum period is three days, but a week or more is better. During this time, the wood will accept the humidity of the room and will warp less.
Check the geometry of the lining. The groove should be deeper than the tenon, they should fit together without effort. The boards must be level. Anything that doesn't pass the test, put it aside.
The lining must be pre-sanded until smooth. Especially if it has a figured front surface. After installation, you can only sand down minor imperfections. This does not apply to eurolining. It is perfectly processed, often each plank is packaged separately.
Lining on the wall in the room - stylish and modern
Before laying on the walls, the board must be cut into pieces of the required length. Subtract a couple of centimeters from the height of the wall. Leave 1 cm from the end of the board to the ceiling and floor. This gap is subsequently closed with a floor or ceiling plinth. If the floor or ceiling is curved, it is better to cut the ends with the required slope.
Advantages of fasteners of this brand
Spax self-tapping screws have proven themselves all over the world as the best fastening element for floor coverings made of natural wood, OSB and fiberboard. While traditional self-tapping screws lead to damage and cracking of expensive solid wood material, Spax products provide not only a high-quality and reliable connection, but also the integrity of the board, as well as the beauty of the coating. In addition, they significantly speed up and facilitate the process of laying the top layer of solid wood flooring.
Advantages of Spax self-tapping screws:
- The tetrahedral tip of the Spax fastener makes it easier to screw in and protects the board from cracking. This shape of the tip carefully removes wood fibers, protecting the solid wood product from damage.
- The wavy profile of the screw promotes smooth running and reduces physical stress when screwing.
- The patented milling tip of the fastener allows it to be screwed in without pre-drilling a hole. The self-tapping screw head with a cutter makes the hole itself during the screwing process.
- The special design and tilt of the head ensure a hidden fastening and prevent the fasteners from being unscrewed after installation.
- The self-tapping screws are supplied with T-Star bits, which ensure complete seating of the key in the head, simplify work at any screwing angle and provide the necessary safety.
- To prevent spontaneous unscrewing of the product during operation of the floor covering, there is a special perforation on the back side of the head. It has a braking effect on the fastening element.
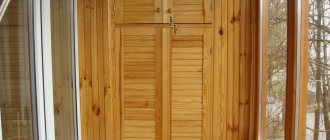
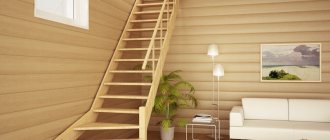
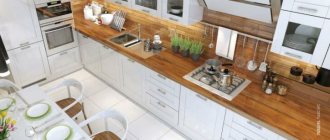
Imitation of timber in the interior
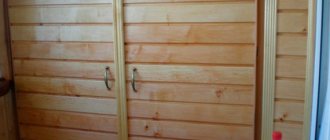
Interior decoration using wooden boards creates that unique coziness and comfort that can only be found in old village houses. This material is ideal for creating decoration in the Provence style. Finishing with imitation timber inside the house can be complete or partial. Some people prefer to make everything from boards, while others use them only to create hearth islands, where it is always warm and pleasant to be.
If imitation timber has not found its way into interior decoration, there is always a place for it in a bathhouse or sauna, on a veranda, attic or balcony. Any uneven and curved surfaces can be refined with the help of wood, giving them a finished, natural look, evoking the romantic atmosphere of rural life. False timber can be used to focus attention on one specific area. At the same time, the material combines perfectly with other textures - brick, concrete, glass, metal and so on.
Advantages and disadvantages
The key advantages of a wooden floor on joists include the following:
- environmental cleanliness, absence of toxins, safety;
- increased heat and sound insulation;
- low load on the base;
- beautiful appearance;
- the possibility of using insulation or installing utilities under the floor.
The disadvantages include:
- flammability of the material;
- the need for treatment with special compounds;
- high price;
- complexity of installation.
When laying the floor in compliance with all the rules, the result will be high-quality and durable, so do not forget about the above recommendations.
Options for processing joints in corners
Features of the installation of imitation timber lie in the correct processing of the corners. It's not that hard to do. If you do this incorrectly, the finish will be unsightly and precipitation will penetrate there.
Finishing methods:
- Cut the products at an angle of 45°. Only those boards that are found in the corner are processed. They are filed in a mirror image. After which the wooden paneling is fixed using the chosen method.
- Stores sell decorative timber that hides corners. It is laid on an already created wall.
There are cases when the length of the imitation timber is not enough to cover the width of the wall. Then the panels are fixed to each other end-to-end.
Installation technology
Panels that imitate timber have special locking connections, so their installation is simple and quick, and any home craftsman can cope with this task.
To complete the work you will need the following tools and materials:
- calculated number of panels;
- timber with a section of 50x50 mm, which is used to create sheathing;
- timber section 25x50 mm for counter-lattice;
- pendants;
- jigsaw;
- hammer;
- measuring instruments;
- self-tapping screws;
- clamps if installation is carried out inside the building.
First, preparatory work is carried out, during which the surface of the walls is cleaned of dirt and dust.
After this, the wooden sheathing is installed, for which bars with a section of 50x50 or 25x50 mm can be used, it all depends on the thickness of the insulation. If the wall is flat, then the sheathing can be attached directly to it; in other cases, installation is carried out using hangers.
Vapor barrier of the walls must be carried out; for this, a special film is attached under the sheathing. They do this with an overlap, which should be 10-15 cm, and use tape to seal all the joints well.
Facade finishing
If imitation timber is mounted on the facade of a building, then thermal insulation material must be laid. Both rolled and matte materials are suitable for this.
Depending on the purpose of the building and the climatic zone in which it is located, the thickness of the insulation may vary, but usually it is 50-100 mm. Thermal insulation material is laid between the sheathing on a vapor barrier.On the outside, the insulation must be protected with a wind-moisture-proof membrane and all its joints must be taped again.
After laying the moisture-proof film, it is necessary to install a counter-lattice on it; for this, beams with a cross-section of 25x50 mm are used; it is needed to create normal ventilation of the cladding material.
Now you can proceed to the installation of the panels, work starts from the bottom and moves up. The upper edge of the panel is attached to the sheathing using self-tapping screws, after which the groove of the next panel is put on the tenon of the previous one and it is again fixed using self-tapping screws.
If you purchased unpainted panels, then they must be treated with an antiseptic and varnish; it is better to do this before installation, since then it will be more difficult to paint the joints.
Depending on the width and thickness of the panels used, they can be fastened in several ways:
- anodized screws through the panel itself, but after that you will need to disguise their caps using wooden inserts or putty;
- at an angle of 45 degrees into the tenon panel, so that the material does not crack, it is first recommended to make a hole;
- using nails, in this case the panel will be able to move a little and will not crack. The length of the nail or self-tapping screw should be such that it can fit 2/3 of its length into the sheathing;
- using clamps, but this method is suitable for panels of small thickness, so it is usually used indoors.
There are several ways to join boards in the corners:
- by washing them down at an angle of 45 degrees;
- using a decorative wooden block, it must be purchased separately;
- using boards connected to each other by the letter “G”.
If there is a need to join the panels lengthwise, this can be done through a strip that is equal in thickness to the sheathing or by sawing down the edges at an angle of 45 degrees.
After completing the installation work, the imitation timber is coated with a deep penetration antiseptic, allowed to dry, and then a decorative protective coating of the desired shade is applied and the whole thing is covered with varnish, wax or paint.
When carrying out interior finishing, two layers of paint and varnish are sufficient; on the outside, three are needed.
How to properly install indoors
The peculiarity of these works is that the use of insulation is not necessary, so you can use thinner bars or a galvanized profile.
If the walls of the room are smooth, then imitation timber can be installed without sheathing, so you can save free space.
If the installation is carried out in a heated room, then the panels can be painted no earlier than a month after their installation; they need time to dry, after which small cracks will not form on the surface.
What is Bowrench?
This device can be used for arranging the floor of a car body or the base along the joists. Bowrench is a special device for tightening floorboards with uneven edges. The tool is made from a profile pipe with a square cross-section. It consists of three main parts:
- metal handle;
- support bar;
- tightening guide.
The support bar and the tension guide are fixed at a short distance from each other. In this case, metal rods are attached perpendicularly to the support bar, thanks to which the tool is securely fastened to the joists. As the handle turns, the tension guide creates pressure on the floorboard. As a result, the board is firmly pressed against the already fixed planks.
General tips for choosing fasteners
The self-tapping screw is selected based on the thickness of the floorboards being laid
There are general rules that should be followed when choosing fasteners for flooring. By following them, you are guaranteed to acquire reliable and durable self-tapping screws. So, when choosing fastenings for installing terrace flooring, follow these simple rules:
Pay attention to the dimensions of the element. The self-tapping screw is selected based on the thickness of the floorboards being laid
The thicker the board, the deeper the fasteners should go into the base frame. The diameter is selected depending on where the screw is screwed in. If the fastening is made into a thin tenon, then the diameter should be small; in order to screw the fastener through the entire thickness of the board, you will need to buy a self-tapping screw of a larger diameter. Characteristics of slot and thread. Based on these indicators, it is easy to distinguish high-quality fasteners from low-quality products. Reliable manufacturers, for example, Spax, have self-tapping screws with uniform threads with turns of the same thickness and angle of inclination. An even slot will ensure a good fit of the screwdriver and fast screwing. Self-tapping screw coating can be of different types:
without coating is the worst option, so it is not recommended to use it;
with an oxidized protective layer - such screws can be distinguished by their gray or blackish color. These are good fasteners with increased durability;
galvanized - these products have a silver or golden surface. They are marked with the designation A2. This type of fastening is considered the most durable and reliable. However, the cost of these hardware is quite high.
- A type of hat. For installation, this parameter is of great importance. Depending on the purpose of the self-tapping screw, the caps come in different configurations. Products with wide caps are suitable for fixing sheet material. For wood you need to buy elements with a standard head. However, to make a flush fastening, you will need hardware with a head beveled at an angle of 60°.