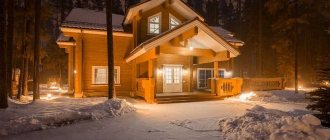
The veranda of a country estate is a place with a poetic history. On it, shaded with lilacs, under a fringed lampshade, they drank family tea, read magazines, knitted - and all these traditions are now returning, they have acquired value. Therefore, the veranda, as a rule, is included in the design of the house, then it stands on a common house foundation, and all the rules for house foundations apply to it. But if you got a house without a veranda, and you want to build it later, then there are some pitfalls in choosing a foundation that you need to understand well when developing a technical solution.
Do you need a veranda foundation?
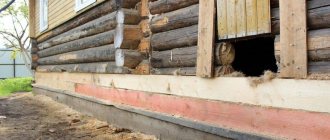
Of course, the veranda needs a foundation. A veranda is a very light building compared to a house. But it still has a certain weight and is subject to the effects of groundwater freezing, soil heaving and movement, and moisture penetration into the structure itself. Therefore, it needs at least the simplest foundation. It will protect your veranda from most of the listed troubles.
Foundation (from Latin fundamentum - base) is an underground or underwater part of a building (structure), which receives loads and transfers them to the base. There are strip foundations (including those made from cross strips), columnar, solid, and pile foundations. There are monolithic and prefabricated ones. Material: concrete, reinforced concrete, stone (rubble), wood.
Big Encyclopedic Dictionary (BED)
https://slovari.299.ru/enc.php
Veranda design
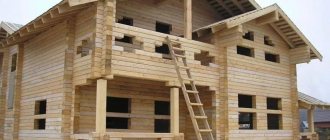
The veranda can be summer or winter. But it always has a floor, a full roof and a fence. And in the winter version, windows are added. Windows can be up to the floor - they are called “French”.
What kind of foundation does a veranda need?
The foundation is the fundamental part of any building. Any foundation is bad and does not perform its functions if it is built incorrectly. You can use any known types of foundations, the most reliable of which are monolithic and strip. But there is one small subtlety here. We need to combine the two foundations, while avoiding differences in height and cracks in the walls.
We have:
- difference in the weight of buildings (house and veranda);
- the difference in their height (not always, but in the thickness of the floor coverings is necessary).
There are several key points in combining foundations.
Technological junction
There is a law: the heavier the structure, the greater the load on the foundation. Even if you have fulfilled all the requirements for the construction of drainage systems, it still remains the greater the load on the foundation, the greater the load - no matter the soil! — it will sink, crushing this soil.
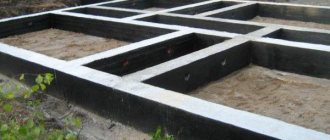
Therefore, even if the foundations of the house and the veranda are the same in design, in any case a gap of 20–40 centimeters should be left between them, which is called a technological joint. The ends of the reinforcement of the connected buildings are brought out into it.
The ends of the fittings of adjacent parts of the house are brought into the technological joint
In the first months after the construction of the veranda, especially in the spring on wet soil, the new foundation will sag much more than the old one. Therefore, the ends of the reinforcement are connected and the gap is closed with mortar and stone after at least a year.
Deepening
It is believed that no matter how different the foundation designs are, they should be buried in the same way. But practice shows that next to the deep capital foundation of the main house, a shallow or shallow veranda foundation can also exist perfectly well. And it’s even better if the design of the veranda foundation is chosen so that it better resists soil deformation.
From my own experience. The veranda rests on one side on the foundation of the house. The other, in the corners, on blocks in 2 rows in height. The lower block is recessed. It has been standing for many years. The foundation is in place. The soil is clayey. At the same time, a basement wall was built between the blocks on a cushion, and after 5 years it cracked - heaving in action. Replaced with siding.
Levonty
https://www.forumhouse.ru/threads/1465/
About the construction procedure
A wooden beam with a cross-section of 100 by 100 millimeters will become the main assistant in the construction of the frame. The grounds are already there, all that remains is to supplement the work with the following instructions:
Grooves are cut out in the beam of the lower trim, where vertical supports are placed. The main thing is to maintain a half-meter step.
Next we move on to the installation of vertical racks. The entire structure is attached to elements such as brackets with screws or nails.
Standard verandas are complemented by pitched sloping roof types. Therefore, compared to the opposite sides, the beam of the vertical plane should be lower, at least 50 centimeters.
Installation of timber connected to the top trim
This is important if you want to create truly beautiful verandas
Additional recommendations help in the case of installing lower supports. The strapping beam goes first, as a support for the connection along.
Then they move on to fixing the crossbars, at the height of the low racks they will connect the high racks with the low ones. Preliminarily, samples are created with nails that ensure fastening of high-type racks with crossbars.
The strapping at the top is prepared for this stage. The result is a slope, which makes it much easier to lay the rafters for the roof. The girder is attached next to the roof slope. Anchor bolts are needed for fastening between beams and all supports.
Installation of rafters, the standard pitch for which is 50 centimeters. The optimal solutions are wooden beams, whose cross-section will be 100 by 200 mm.
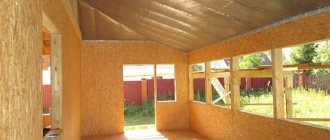
At one of the last stages, the frame is sheathed. Lining is most often chosen for cladding inside, and siding is most often used outside. Between the parts inside and outside it is necessary to place hydro and thermal insulation.
The frame is connected to the film. Cross slats make fixing the insulation easier. You can’t do without a connection with finishing
It is important not to forget about window and door openings
Types of foundations for verandas
There are, in fact, very few types of foundations. They all have a certain depth and lie on a bed of draining crushed stone, pebbles or sand. There is always waterproofing between the foundation and the structure erected on it. There are exceptions: pile foundations are made without a cushion (although sometimes a buried pile foundation grillage rests on the cushion). There are also foundations that are not buried, simply lying on a drainage bedding, and are used for the lightest buildings.
Since the main house has already been built, you already have in your hands a professional opinion on soils made before designing it. Moreover, you already know how buildings behave: what are the soil movements, the subsidence of the house, the flooding of the earth's surface in front of the house.
The choice of the type of foundation for the veranda will be based on the opinion of professionals and existing personal experience. In other words, the choice is strictly tied to several indicators specific to your site.
Soil characteristics
Textbook “Soils. Foundations. Choosing the optimal foundation" classifies soils as follows:
- Rocky soils are a homogeneous crystalline rock (in other words, a rock mass) and sedimentary (layered). These are dolomites, compressed sandstones, shales, shell rocks, and limestones. For rocky soils, any foundation is suitable except a screw foundation (it is difficult to screw piles into the rock).
- Conglomerates - contain more than half of the rock fragments. They do not erode or change volume when freezing, so any foundation is suitable here.
- Non-rocky soils:
- bound - clayey and loamy soils: they freeze deeply, sometimes up to two meters, they can “float” and shift; it is precisely such soils that are characterized by the presence of underground lenses of water. Concrete strip and heavy slab foundations are suitable for such soils;
- unbound - sandy and sandy loam soils: when wet they become mobile, freeze to about half a meter, screw pile and concrete foundations of any type are suitable for them.
Groundwater
The groundwater level is also the most important indicator on which the foundation model depends.
The structure of groundwater in your area has a huge impact on the choice of foundation type
If the groundwater level is low, then a shallow strip foundation will be sufficient. But if groundwater is close and the soil is prone to heaving, then a pile foundation with a grillage will be more reliable. The grillage can be made from a variety of materials. When the groundwater level is high, sometimes even a radical solution is necessary - a monolithic, durable concrete slab foundation.
Different foundations are suitable for areas with different ground levels.
Freezing depth
The freezing depth for our middle zone is on average from 0.8 to 1 meter, but deviations are also possible. If you are making a buried foundation of any type, then its lowest point should be below the freezing point of the soil.
The next most important factor is directly related to the level of soil water and soil type.
Water "lenses"
This phenomenon is observed where the soil is combined: permeable sand or sandy loam lies on a layer of clay. Rain and melt water penetrates through the upper soil and remains under it in the form of so-called “lenses” lying on a clayey, waterproof base. Such lenses can greatly damage any foundation, so you need to know for sure that they are not present at the construction site.
Diagram of soil permeable from above, in which internal “lenses” of water are formed
Types of foundations
Foundations are divided into buried, shallow and non-buried. Usually, a shallow and shallow foundation is sufficient for a veranda.
Based on their engineering design, they are divided into four main types.
Slab
It is used in the presence of quicksand, close-lying water, or subsiding soil. If the veranda is winter and heavy, it is better to build just such a foundation. Its main advantages are thoroughness and reliability. Disadvantages: it requires a lot of labor and a large amount of materials, eliminates the existence of an underground floor, and is expensive.
A slab foundation for a veranda is most often redundant
Tape
It is a shallow strip foundation that in most cases will be the best option for a veranda. There are many ways to build: buy ready-made concrete mortar, mix your own, lay a foundation of concrete, expanded clay or foam blocks. Advantages: reliability and relative ease of implementation. Disadvantages: not suitable for unstable soil and soil with high water content. Although these problems are often solved by strengthening the structure: the foundation on problematic soils is made deeper, wider and with a more powerful reinforcement frame.
Strip foundations are most often used in individual construction. On soft soils it is made deeper and more powerful
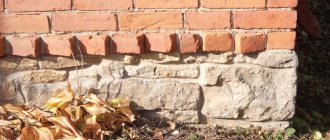
Columnar
The easiest foundation to implement. It can be recessed, shallowly recessed and not recessed. But the latter option is suitable only as a basis for very light or temporary structures - wooden, plywood, frame. The blocks are placed on a crushed stone or gravel bed, either directly on a cleared area or in pits. Advantages: extreme ease of execution, low cost, suitability for any soil. Disadvantages: not suitable for large and heavy houses, does not allow you to create an underground floor and completely insulate the space under the veranda.
A simple columnar foundation made of blocks with a wooden grillage
Pile
These are supports of small cross-section, deeply buried in the soil and well fixed in it - asbestos-cement or metal pipes. Rarely, but still sometimes, a pile foundation is made of wooden beams, but this requires special processing of the wood. Recently, factory-made metal screw piles have become widespread, which can be used on the weakest soils and with a large natural slope at the construction site. Advantages: a simple pile foundation does not depend on the type of soil, prevents deformation of the structure during soil subsidence, is inexpensive, especially when using piles from asbestos-cement pipes. Cons: requires labor and great care. And a foundation made of screw piles with a metal grillage is also very expensive and difficult to implement.
Screw pile foundation with concrete grillage
Photo gallery: types of verandas on various foundations
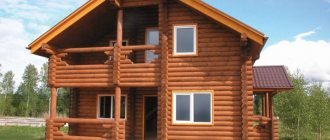
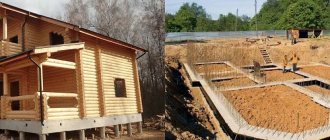
A veranda and a frame house on a single monolithic foundation. A veranda on a columnar stone foundation looks very beautiful. A small wooden veranda can be placed on concrete pillars
Piles help to build a foundation for a veranda on soft soil
A single foundation for a house and a veranda requires a technological gap
Monolithic foundation without a plinth in the Mediterranean style
Selecting a location
It is not practical to arrange a terrace as a recreation area separately from the house. Only as an addition to an artificial pond or swimming pool. But there it is better to make it open (without a roof), and use umbrellas or awnings to protect from the sun.
Making it as a free-standing area with a wooden floor, roof and light fencing is also impractical. In this case, it is better to build a full-fledged gazebo.
Therefore, they make a terrace either in the form of a large porch, or as an open veranda without glazing.
Note! Regarding terminology. The difference between a veranda and an attached terrace is not so significant. Even experts consider a veranda as a special case of a terrace (or vice versa). By definition, an open veranda (without glazing) is exactly the same building as a closed terrace (with a roof).
An example of a closed terrace or open veranda.
You can call it whatever you like Source kak-peresadit.ru The attached terrace can be of any size. Short or long, along the entire wall near the main door or at the exit from the house to the backyard. You can even make a terrace surrounding the entire building. And the type of foundation depends on where it is located.
At the front porch, the terrace is built on the same base and with the same decorative finishing of the base as on the “main” facade. And for the backyard, you can choose a simpler foundation - for example, a columnar or light pile foundation.
DIY foundation for a veranda
Let's say that after considering all types of foundations, we chose the most acceptable one for our veranda:
- shallow;
- monolithic;
- concrete;
- tape
This is what is most often used as the basis for lightweight residential structures - wooden and frame. This is a concrete “ribbon”, long and monolithic, its cross-section is the same everywhere, it is embedded shallowly (about half a meter) in the ground and protrudes above the surface by the same amount, and the protruding part serves as the base of the veranda.
Now we need to calculate the quantity and cost of the required materials. To do this, we will use any online calculator, which are abundantly available on the Internet.
Calculation of materials
The dimensions of our veranda are 6x8 meters. Enter all the numbers into the calculator.
At the first stage, enter the dimensions of the tape and the grade of concrete required
We click on “calculate” and get a full calculation of the materials, including a reinforcement diagram, which is very convenient.
The second sheet indicates all the technological parameters of the foundation
The final calculation sheet looks like this.
Detailed specification of materials for the manufacture of the foundation
Required Tools
- Construction mixer for mixing concrete (or a trough for mixing by hand).
- Bayonet shovel.
- Shovel
- Hand wheelbarrow.
- Tamping (manual or vibrating).
- Welding machine (if you need to weld reinforcement).
- Hammers of different weights.
- Pliers.
- Grinder for cutting reinforcing bars.
- Nail puller, crowbar.
- Hydro level (or laser level).
- Roulette.
- Circular saw (or hand saw, for cutting lumber for formwork construction).
- Electric drill, screwdriver, sawhorses (for installation of formwork).
What to use when building foundations
Sometimes, at the initial level of construction, some citizens ignore the process of preparing all the necessary tools. Subsequently, the period for completing the work increases to several months.
For example, if you need to compact a poured foundation, but you don’t have a vibrator or regular reinforcement. This can lead to serious problems with further installation and the entire construction campaign. It is for this purpose that in order to prevent irreparable things from happening, you need to prepare the following tools in advance:
- A shovel, two pieces - a shovel and a bayonet.
- Concrete mixer.
- Deep vibrator.
- Hammer.
- Apparatus for welding iron structures.
- Hacksaw saw.
- Water spirit level.
- A wheelbarrow for removing excess soil and garbage.
- Lacing.
This list can be continued for a very long time, it all depends on the working conditions and the complexity of the construction process.
Do not forget that some types of foundation, for example, strip foundation, must be poured in one go, so take care of the availability of concrete mortar or its components.
Installation of the floor part
For such work, it is important to decide on the choice of material.
It must have good performance qualities, not be exposed to moisture and sudden temperature changes. In this case, larch is best suited for installing a wooden veranda floor in a country house. It is different:
- ease of processing for protection and decoration;
- the beauty of wood texture;
- resistance to moisture, mold, harmful insects, fungal mold.
An alternative can be decking, the so-called artificial flooring material.
The boards are placed in one row on the logs, which are located in the middle part of the pair of crowns in the lower frame. Boards and joists are treated with an antiseptic. After which varnishing or painting is carried out. In order for the flooring to look most decorative, it is better to lay the parts diagonally. This installation will require a little more coverage. You can start the flooring from the center, moving diagonally. With this method it looks very original. However, the installation must be carried out without errors. Performed using miter saws.
If it is not possible to line the floor with larch, you can work with pine or spruce. Additional thorough treatment with an antiseptic composition will be required. It is this that will give the wood structure resistance and protective properties from harmful insects or decay processes.
On screw piles
This type of foundation is considered the youngest of all of the above. Its essence is that pile elements with special screw blades are “screwed” into the ground manually or mechanically, and then a house frame or terrace is installed on them. Such piles must be screwed in gradually, otherwise the soil around them will not be compacted well enough and the pile will not sit tightly.
The power of the structure directly depends on the diameter and material from which the piles are made. For light wooden terraces, any piles, even the simplest and cheapest, are suitable. But for massive buildings it is better to thoroughly calculate the power and degree of load.
The advantages of screw piles are that they can be used on absolutely any type of soil. This is the best option for the construction of overhanging extensions or terraces on moving or freezing soils. This type of foundation is ideal for building a terrace on a slope.
The service life of screw piles can be easily calculated in hundreds of years. Such a foundation will easily last 100 or even 150 years.
An integral part of any country building is the terrace. It is very important for the entire building because it is convenient for excellent leisure activities. As in any other construction, arranging a terrace is a fairly important process and it begins with laying the foundation.
The foundation for the terrace can be done with your own hands in order to spend as little money as possible. These works are paramount, since the overall service life of the load-bearing structures of the future building depends on them. Therefore, if the question arises - is a foundation needed for a terrace, then the answer will be clear - Yes. And in order for it to be durable and strong, you need to be very careful when laying it. You should not save too much, as you may end up with a poor-quality foundation later.
Video description
How to properly make a tape for an extension, watch the video:
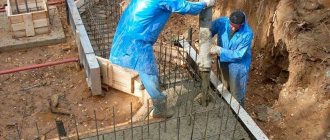
Next, the place of the ligament is drawn up. Let's look at how to properly pour a foundation for an extension to a house with your own hands, sequentially:
- Frame assembly. The reinforcement that protrudes from the old base is connected to the new frame by welding. Next, the connection of subsequent elements is made using a knitting wire. This will prevent cracking of the monolith from stress and natural changes.
- Installation of formwork. More often the molding structure is assembled from wooden boards. Supports can be selected from available materials. You can line the inside with polyethylene. This will make it easier to ensure the walls are sealed, dismantle the formwork, and keep the boards clean.
- Pouring concrete. There are several recipes for preparing foundation mortar. For example, for the M300 composite you will need 10 kg of Portland cement, 30 kg of dry purified sand, 40 kg of gravel and the same number of liters of tap (well) water. It is recommended to fill the entire mixture in one step to avoid separating the portions. Periodic wetting of the surface will help prevent cracking during the hardening process.
Pouring a strip foundationSource filartbel.by
Dismantling of removable formwork is done 2 weeks after pouring the solution. Subsequent construction work can be carried out after at least 28 days.
Open area around the pool
A terrace in a private house is often located next to or around the pool. This is especially useful for pools made from large, prefabricated fiberglass tanks. In this case, the terrace performs two functions at once - it provides a comfortable place to relax near the water and hides unaesthetic details (the side of the container, pipes for supplying and draining water, aeration, cleaning devices, and so on).
The principles of arranging the structure are the same as in previous cases: screw piles as a foundation, a cellular frame as a support for the flooring. In this case, the frame is made of metal; wooden elements near water require too serious and expensive protection from moisture
The installation process is discussed in more detail in the video below, but there are some nuances that are worth paying attention to:
- such large containers must be concreted, and the first row of piles (located closest to the side of the pool) may not be screw, but ordinary - installed in concrete;
- the metal frame is necessarily protected from corrosion, galvanized screw piles and stainless steel fasteners are used;
- the frame is positioned so that the flooring hangs over the water and at the same time it is possible to line the vertical fragments of the platform;
- For flooring, a special material is used - the so-called deck board (decking). It can be natural wood with special processing (usually larch), a composite material or pure polymer. A special feature of the board is its increased resistance to moisture and textured surface;
- Built-in lighting fixtures can be mounted flush with the sheathing in the decking.
It is also possible to install a deck below the edge of the pool, if this edge is properly designed.
For bowls of complex shape, the flooring is also usually made with a curved contour.
If the pool bowl is not completely buried in the ground, the terrace flooring is elevated, creating a kind of podium.
Rigid docking methods
There are three main methods for rigidly joining the base of an extension to the foundation of a house:
For joining to a strip foundation, the so-called “tape-to-tape” method is used. Pairing using this method occurs in several stages:
- First you need to dig a trench about 2 meters long along the base of the existing house. You should not open the entire foundation at once, this can lead to cracks along the walls of the house;
- Every half a meter in the foundation, holes are drilled in a checkerboard pattern for reinforcement with a depth of about three quarters of the thickness of the base and a diameter equal to the thickness of the reinforcement;
- reinforcement with specially prepared longitudinal slots is driven into all holes, except the outer ones. It is necessary to drive wooden wedges through these slots so that the reinforcement is held tightly in the concrete.
Reinforcement with a periodic profile is driven into the outer holes. For better driving, it would be correct to shape the edges of the reinforcement into a cone using a grinder. The optimal diameter of the selected material is 14-16 mm.
At the final stage, all pieces of reinforcement are tied into a single frame, along the edges of which it is necessary to make an extension of 30-40 centimeters for tying into the main foundation of the extension to the house. The reinforcement frames are welded together.
If the foundation is not closed, then the reinforcement is driven into the base of the house one and a half times more often.
The following method is suitable for houses built from gas silicate.
As a rule, when constructing such structures, builders leave slabs extending from the basement of the house by about 30 cm. This will allow the ends of the reinforcement in the slab to be exposed and joined to the slab foundation of the extension. This method is called "slab-slab".
Most often, it is customary to make a foundation for an extension to a house with the formation of an expansion joint or a separate foundation. When choosing this option, the base of the extension must be poured in close proximity to the foundation of the house.
Under the entire perimeter of the extension it is necessary to make a major tape (grillage). The intermediate space between the bases must be properly separated from each other with waterproofing and thermal insulation materials so that during shrinkage the old foundation is not subject to mechanical damage from the extension.
As waterproofing, you can use roofing felt as the cheapest of all possible options. To pour the foundation for an extension to a house correctly, you need to be guided by the same rules and regulations as when building a regular house.
Saving money when choosing materials to make a foundation may turn out to be imaginary and lead to unnecessary and considerable additional expenses during the operation of the building. It would be correct to buy only high-quality components, starting with the purchase of fittings and ending with the purchase of sand and cement.
But, of course, the most ideal option to achieve rigidity and real reliability of the house structure is to calculate everything from the very beginning of construction. It would be correct to pour the entire foundation monolithically.
And until the family budget has funds to build up the entire base area of the building, the area for an extension to the house can simply be covered with some kind of flooring. With this option, the foundation will shrink naturally, and the strength will be maximum.
Tape
Strip foundations are most often used for the construction of terraces. It is convenient to build cast structures made of concrete or brick boxes on it. Naturally, the load of a brick terrace is much greater than that of a wooden one, but the strip foundation is designed for this.
Strip foundations are cast walls buried underground over the entire area of the above-ground structure. In cross-section, it is a quadrangle with a slightly widened lower part, which makes it more stable.
In case of strong humidity or mobility of the soil, the lower part (“sole”) of the foundation can be further increased using masonry made of natural stone, brick or concrete mixture. However, the strip foundation has one controversial quality - it cannot be corrected or redone, so it is necessary to carefully consider all the nuances from the very beginning. Don't forget to leave openings for communications and ventilation.
Pile
An old, time-tested foundation construction technology, the main element of which is long pillars, or piles. This type is quite simple to set up and organize, so if you know how to build a foundation for a terrace with your own hands, at least in theory, this can easily be repeated in practice using a columnar base. In addition, this is one of the most economical and fastest methods.
It is necessary to begin construction by digging pits - holes where the pillars will be placed. The depth of the pits can vary from 35 to 50 centimeters. Using a construction drill, make a hole and place a roofing felt sleeve there.
The bottom of this well must be filled with crushed stone or gravel. They will act as drainage. Then the cavity is filled with concrete or a concrete mixture, and the supporting column is installed on top of the hardened structure.
Today, brick piles are more often used - this type of foundation is laid much faster and less expensive, but the soil on the site must be strong and stable.
Columnar
The columnar foundation for the terrace consists of in no way connected supporting elements, on top of which floors and walls will subsequently be installed. To build such a foundation, as a rule, pillars made of high-strength materials that can withstand heavy loads are used. This foundation is perfect for a wooden terrace.
Be sure to install posts in each corner of the building.
If you plan to build a large, wide terrace, install additional support pillars. Suitable materials include brick, concrete or rubble concrete. Waterproofing can be achieved using molten bitumen mastic.
Influence of soil freezing depth and groundwater level
Since the properties of frost heaving of soils appear during their seasonal freezing, the base of the foundations must be located at a depth exceeding the freezing depth by 150-200 mm, then the negative impact of heaving will manifest itself to a minimal extent.
If there is groundwater on the site, then special measures are used to drain water from the construction site and subsequently from the foundations of the constructed structure - closed drainages of various types - wall, trench or reservoir with laying drainage pipes and discharging water to a designated location.
Installation of load-bearing beams
Place the support for the attached outdoor porch on the brickwork. At the other end of the holder, place the support post on a flat, hard surface. Once you are sure the level is correct, mark the height on the support post. Use a nail gun to secure the support post. Install another support post on the other side of the support and secure it with a nail gun. Use a spirit level to make sure it is still level. We drill holes for the columnar foundation. Drill the beam at the center point above the hole you made for each foundation post. The hole in the holder is for a threaded rod.
Stage two - construction of the building frame
The structure frame is installed on the finished foundation. A wooden deck can be made quickly, even if done alone. For work you will need construction timber with a cross section of 150x150 and 100x100 mm. The first beam will fit on the lower frame - the base of the veranda floor, the second - on the racks and supports for the railings.
Laying the bottom trim
We lay the timber with a section of 150x150 on a foundation for the terrace pre-lined with roofing felt. If the dimensions of the extension exceed 6 meters - the standard length of lumber in our country - you will have to splice the strapping elements. The technology for corner and longitudinal connection of timber is as follows:
- Select the most even, undisturbed lumber.
- At the ends, mark cuts for half the thickness of the timber. The length of the future groove is in our case 150 mm.
- Saw the timber along the markings using a hand or mechanical tool - a hacksaw, circular saw or chain saw.
- Connect the parts groove to groove at an angle or lengthwise.
- Additionally strengthen the connection by driving in 2-3 nails No. 150.
To avoid possible displacement of the terrace frame relative to the base (this should be thought about at the stage of foundation construction), several scraps of steel reinforcement with a diameter of 8 or 10 mm and a free end length of 200-250 mm are left at the top of the pillars or tape. Before laying the strapping, holes of larger diameter are drilled at the exit points of the steel rods, and the timber is laid on the pins, which are then bent flush.
After completing the timber lining of the terrace floor around the perimeter, lay several transverse beams of the same section in the same way, installing them in pre-marked and cut grooves in increments of about 1 meter, fastening them with long nails.
Installing racks
To support the roof of a wooden veranda, it is necessary to install several vertical bars at the outer corners and along the long side parallel to the wall of the house. The length of which is chosen in such a way that the height of the terrace roof from the floor is at least 2 meters, and the slope of the roof from the main building is maintained.
Connection diagram of harness and racks
If the terrace framing timber is allowed not to be planed, then the racks must be pre-planed with an electric planer. This will give them a more aesthetic appearance and will simplify further finishing and processing of the veranda. The racks should be secured to the frame with self-tapping screws using reinforced steel corners. In the upper part, the ends of the beams are attached to the terrace frame, which is a frame element that serves to increase the strength of the veranda structure.
It is better to make the top trim from planed timber 100x100. Assembly is carried out on the ground in detail, after which it is installed on the ends of the racks and attached to them. In this case, it is necessary to ensure that the vertical parts are perpendicular in two planes. To do this, use a plumb line or a building level.
Grillage arrangement
A grillage is a framework for the foundation, or a kind of hard sole. Thanks to it, the weight of the terrace or veranda will be evenly distributed over all the supporting pillars of the base. The grillage is made of beams, metal profiles or reinforced concrete. The simplest option for a terrace is wood. And thanks to the reinforcement bars that were walled up in the supports, you can make a strong connection between the pillars and the frame.
But, before laying the boards, you should take care of waterproofing. To do this, you need to lay several layers of roofing felt on each post. Only after this can you engage in grillage. The connection of the beams is made in half a tree. In those places where the reinforcement will pierce the timber, holes must be made in advance. In the photo you can see exactly how everything looks when finished.
Construction of the foundation has been completed. Now everything is ready to start building a veranda or terrace.
Insulation of an attached building
In order for a frame extension to a house to be suitable for habitation, it must be insulated. The best insulation is ordinary mineral wool. It can be cut into the required squares and laid between sections of the frame. If the wool is laid in several layers, you need to move the slabs together so that there are no joining seams.
The insulation is sheathed inside and outside with a vapor barrier film so that moisture does not collect inside and spoil the material. After this, decorative finishing is done. From the inside of the extension, the frame walls can be sheathed with wood, plasterboard, chipboard, and on the outside - with siding, block house, and other decorative materials.
In total, the wall pie looks like this:
- interior decoration;
- vapor barrier layer;
- insulation;
- wind protection;
- external finishing.
Insulation of the floor in a frame extension is done in a similar way. Mineral wool is placed in the cracks between the subfloor joists, and the boards are covered with a layer of waterproofing film. Once the insulation is in place, the waterproofing is placed back on top of it, and then the floor is covered with plywood and the final covering is installed.
If you are planning to add an additional room to your house using frame technology, it is extremely important to follow all safety measures. This means that you should not save on personal protective equipment; it is better to purchase a high-quality tool that will not let you down in a critical situation
Then the construction will be a successful event.
Video description
The video shows 14 mistakes that you should not make:
Installation of a columnar foundation
Before pouring a columnar foundation for an extension to a house, you need to form a seat. Wells must be deep below the groundwater flow level. Sand and gravel are compacted at the bottom in layers. The reinforcement for the reinforcing frame can be made of metal or fiberglass. The formwork is assembled and dismantled, concrete is poured by analogy with the construction of a monolithic foundation.
Installation of a pile-screw foundation
Before attaching a pile foundation to an existing foundation, to simplify the process, you can dig a seat up to 30 cm deep. Next, it is enough to find an assistant to screw the piles into the ground to the required level. In this case, the deviation from the vertical can be no more than two degrees. Concrete is poured into the cavity to ensure reliable anti-corrosion protection of the inside of the piles.
Do-it-yourself pile installationSource wp.com
How to make calculations
Calculating material consumption is very important. This will help not only not to make a mistake in the number of tools purchased for the job, but will also provide an opportunity to save money when purchasing everything you need. We recommend using special online calculators. Modern programs have simplified the calculation process to the point of automation.
For example, there is an extension size of 6x8 m. Let's enter the dimensions of the veranda strip and the brand of concrete. We carry out the calculation. The calculator shows us a complete list of materials, and even a reinforcement diagram that we need in our work.
There are many ways to build a foundation for extensions. The foundations presented in the material gave you the opportunity to familiarize yourself in detail not only with their varieties, specifics, advantages and disadvantages, but also with the methods of constructing each of them.
Wood
Although this type of foundation is used extremely rarely, it is sometimes used when building a wooden house. This is the most environmentally friendly option of all those presented above. The work can be done in the following way:
- We dig holes.
- We pour 10–15 cm of concrete onto the bottom and, without waiting for it to harden, install wooden piles.
- To install corner posts, you need to use wood at least 30 cm in diameter.
- For installation of auxiliary ones – 15–20 cm in diameter.
- The installation of piles must be carried out below the freezing point.
- The top should rise 30 cm above the ground.
- For greater strength, you can make a tenon connection between the pile and a horizontal log.
- After installation, the piles can be filled with concrete or covered with sand.