Installation of lining on a wooden sheathing You can learn how to install lining from numerous articles and videos on the Internet.
There is a lot of information and it is systematized in different ways. We have also talked about this more than once, but the topic is very large and interesting. And today we again found something to focus on - the type of frame for the lining. We also discussed this issue, but somehow in passing. Today we will devote more space and time to it, and will tell everything in detail, without hiding any nuances.
What is the best way to sheathe the inside of a frame house?
When the frame house is fully assembled, sheathed on the outside and equipped with all the necessary communications, all that remains is to complete the interior finishing of the building in order to obtain the finished look of the house. But at this stage, developers are often lost and don’t know how to cover the inside of a frame house. After all, the variety of modern building materials often drives the master into a stupor. In our material we will understand what types of material are suitable for rough cladding of a frame house from the inside, what materials are used for finishing and what are the general principles for performing finishing work.
We decorate the walls and ceilings of a wooden house with plasterboard
A warm, oxygen-rich wooden house provides an environmentally friendly microclimate and an aesthetically pleasing appearance. Walls made of wood, even after final shrinkage, continue to “breathe”, changing in size. This property of natural material is associated with some difficulties in interior decoration. The best option for a wooden house is to cover the walls with plasterboard. Light weight, simple installation and availability of pressed sheets allow you to level the surfaces of walls and ceilings without the involvement of specialists.
Requirements for interior finishing
Before deciding on the material for cladding the interior of a frame house, let us understand that both rough and final cladding of rooms is carried out only after the final installation of electrical communications and water supply. Otherwise, all work will be nullified. By rough finishing of a frame house we mean covering the frame of the walls with a material suitable for the subsequent unhindered application of decorative cladding. Finishing is the final decorative design of the walls in accordance with the chosen interior design of the cottage. And in order for the work to proceed without a hitch, you should adhere to the basic rules:
- The walls are covered with rough material from the back room of the house, moving towards the exit. In this case, installation is carried out from the ceiling, along the walls and then to the floor. Finishing is carried out in the same order in order to be able to close the already decorated room and prevent construction dust from getting on the surface of the finished walls and ceiling.
- It is better to cover window blocks and other parts of the premises not involved in finishing with a protective film.
- Before carrying out work, it is necessary to calculate the exact amount of wall material in order to avoid downtime in the work. In addition, it is recommended to buy materials with a 10% reserve in case of cutting, etc. There is a principle here - the more complex the wall cladding is (complexity of the configuration), the more you can increase the percentage of the reserve.
Work technology
Cladding the balcony with clapboard is done in a certain sequence. You just need to follow all the tips in order to cope with the job even without experience. It is important to remember a simple rule: you need to use only high-quality materials, since the attractiveness of the final result directly depends on this.
The metal frame maintains ideal geometry throughout the entire period of operation
Materials for rough cladding
To initially prepare the walls of a frame house for finishing, it is necessary to cover the frame of the walls with even panels. They will become the subsequent springboard for the manifestation of the creative potential of the owners. Most often, plasterboard, OSB or lining boards are used for these purposes.
Drywall is a slab made from a gypsum mixture with the addition of fibers. The result is a durable panel with a small thickness of 1-1.5 cm. Such panels are very convenient to use, although they have a relatively large weight for each slab. Drywall is very easy to work with. The material can be cut without problems and does not crumble. And if necessary, you can even bend the panels, creating sloping corners or wall turns in the house. There are three types of drywall:
- Moisture resistant (GKLV). Designed for covering rooms with high humidity, such as a bathroom or kitchen. If you neglect this purpose of the panels and use ordinary plasterboard slabs, the finishing of such rooms will fade over time.
- Fireproof (GKLO). Designed for cladding fireplace portals and other objects in the house exposed to direct fire.
- Standard drywall. Designed for covering the walls of living rooms of a frame house.
- Acoustic drywall. Acts as a sound insulator in the house. Can also be used as a rough finish for room walls.
- Gypsum fiber sheet. This panel is characterized by increased wear resistance and strength. Wall finishing with plasterboard is the most commonly used.
OSB boards
Or oriented strand board. This panel is made from wood chips and fibers glued into a board using resins and adhesives. The result is a strong and impact-resistant material that can withstand high mechanical and load-bearing loads. OSB boards are classified as follows:
- OSB-1. The panels are suitable for use in standard humidity conditions or in furniture production.
- OSB-2. Such slabs are used as a basis for finishing indoors under standard humidity conditions.
- OSB-3. The panels are suitable for use in rooms with high humidity levels.
- OSB-4. A material suitable for external cladding of premises as a base for subsequent façade finishing.
- There is also varnished OSB board, laminated and tongue-and-groove. The latter has special grooves and ridges for easier assembly of the skin into a single structure.
Important: OSB-3 and OSB-4 boards can also be used as a base for the floor. Their strength can withstand significant mechanical loads.
When installing OSB boards, it is necessary to take into account the following points and subtleties of the work:
- It is necessary to fasten OSB panels to the frame only using spiral nails, the length of which is 5 cm;
- The spacing of nails along the frame should be 15 cm;
- Between the OSB panels and against the wall, it is necessary to leave technical gaps of 1-2 cm for the linear expansion of the slabs under the influence of temperature changes;
- If the slabs are mounted on the floor, then they should be laid perpendicular to the joists;
- On the walls, after installation, panels can be additionally treated with fine-grained emery and varnished in several layers;
- If the panels were installed with paint or plaster, they must first be primed.
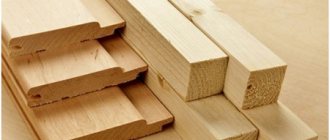
Lining
This type of wood cladding can be used simultaneously as both rough and finishing cladding for the interior walls of a frame house. If the owners want to decorate the interior of the house in a colorful natural style, then it is appropriate to use lining, which can simply be placed on the mounted frame on top of the insulation. That is, when covering the frame, we immediately get a clean finish of the premises.
Lining is a thin, long wooden panel that has a groove and a tongue for easier assembly of the covering into a single sheet. As a rule, lining is made from coniferous wood such as spruce, pine, larch. More expensive types of lining can be made from cedar, teak and more valuable wood species. The final finishing of this type of cladding involves coating the wood with varnish.
The advantages of such cladding of the walls of a frame house are as follows:
- There is no need to perform wet work in the house;
- The finished cladding is breathable, which ensures optimal air exchange in the house;
- The colorful and attractive material creates a cozy atmosphere in the premises;
- With proper care, wood can last for 30 years or more.
Important: for beautiful cladding of the premises of a frame house, it is better to use “Extra” or “A” class lining. Such lamellas are free of visible wood defects. If you intend to clap only auxiliary premises, such as a balcony or vestibule, with clapboard, then you can save money and purchase class “B” or even “AB” clapboard. Here, resin pockets, traces of knots, etc. are allowed on the lamellas.
Final stage
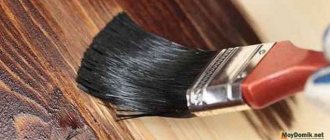
When all the boards have been installed, it is necessary to carry out the cladding. It is recommended to varnish the material for better resistance to moisture. All joints must be covered with special decorative elements. Thanks to this, the appearance will improve significantly. Wooden panels can be painted, stained and varnished. You can choose the method of protection at your discretion.
Finishing materials
If you are selecting finishing cladding material, then everything is as simple as possible. In accordance with the intended design, the coatings presented below can be applied to smooth walls made of plasterboard or OSB boards.
Which is better: heated floors or radiators?
Warm floorBatteries
The most familiar finishing material. Moreover, if previously only paper rolls of material were called wallpaper, today the market is full of their variety for every taste and color. So, wallpapers are:
- Standard paper. Environmentally friendly material that allows walls to breathe. At the same time, he is afraid of water, mechanical influences and sunlight.
- Vinyl coverings. Wallpaper is characterized by increased resistance to moisture and mechanical stress. With modern technologies for their production, vinyl wallpapers also provide breathing space to the walls in the house.
- Acrylic wallpaper. They are resistant to moisture and mechanics, but are not recommended for covering a child’s room or bedroom.
- Non-woven fabrics. Due to their foamed structure, such coatings are often used instead of plaster for painting.
- Fiberglass coatings. They are also used for painting and are characterized by increased durability.
Plastering walls
An acceptable option for finishing the interior of a frame house. Especially when you consider that decorative paint can be repeatedly applied to the plaster, which will allow you to change the interior of the rooms.
The only disadvantage of plastering walls is the lengthy process of “wet finishing work.” That is, the final decoration of the premises can take 1-2 months, provided such finishing is done in all rooms of the cottage.
Ceramic tile
This material is ideal for the kitchen, bathroom and area adjacent to the fireplace. In addition, tiles (porcelain stoneware) can be successfully laid on the floor. The strength of the material is beyond doubt. A wide range of colors and design solutions allow you to implement the most daring ideas in your home. The tiles are mounted both on a plasterboard base with special glue, and on OSB panels.
Plastic lining
Another finishing option for “wet rooms.” This cladding looks good in the kitchen and bathroom. The material is easy to install and maintain. And with a wide variety of panel colors, you can create a bright or unusual interior design on a budget.
PVC lining is attached in the same way as wooden one. Moreover, such cladding will act as additional thermal insulation of the walls due to its cellular structure.
Important: if you do not know how to sheathe the interior of a house correctly with the chosen material, then it is better to invite professionals to do the work. Specialists use the material wisely, ensuring the durability of the interior decoration of the frame house.
Reply to reader
Great question. You can immediately see a person who is used to working not only with his hands, and this is always pleasant. Let's tackle the task together.
What you need to know about drywall
Those who have ever worked with drywall know for sure that this material is quite fragile and it is practically impossible to hang anything on it without organizing preliminary mortgages. The exception is light objects, such as paintings or mirrors, which can be held by special dowels that open behind the material, like umbrellas.
How is it possible to attach the lining to such a surface?
Not really! The fact is that wood is a fairly mobile material that reacts to the slightest changes in humidity and temperature, especially if the lining you have chosen has not undergone normal drying. This reaction is expressed in a change in geometry - the lining, as they say, leads.
There are often cases when this material swells when mounted even on a full-fledged wooden frame. We frankly don’t understand what kind of talk there is about mounting on brackets, with the sacred hope that the structure of the material is not disturbed. The person who posted such information on the Internet clearly does not fully understand the meaning of his words.
You can limit yourself to such measures, perhaps by installing plastic lining, which does not react to humidity at all, and even then, you should think carefully before doing this.
So, such a solution cannot exist? In fact, implementation is possible, and we will now tell you how to do it correctly.
Lathing for lining, installation of profiles and frames
Installation of the lining should be carried out on a pre-leveled base made of plywood or fiberboard sheets. It is not always possible to use such materials as a base surface, so many builders use leveled lathing made of wood, metal profiles or plastic to fasten the panels. In our article we will get acquainted with the purpose of the frame and the nuances of its installation.
Why do you need lathing under the lining? Using fiberboard sheets or plywood to level the base is not always cost-effective. In addition, such products will not be able to smooth out all the irregularities. It is also impossible to attach the lining even to perfectly leveled concrete or brick walls. In this case, you need to use dowels to secure the panels, which will only complicate the work.
The way out of this situation is to pre-install a frame made of wooden slats or a metal profile. The lathing is a mesh with a certain distance between the guides. With its help, you can not only reduce material consumption, but also perfectly level the surface.
Should you choose a wooden or metal profile?
In modern construction, several types of material are used to make lathing, but we will get acquainted with the most common products. The first place in popularity is occupied by a tree known to everyone.
To make a frame for the lining, square bars with a side size of 2.5 to 5 centimeters are used. When choosing such a material, you should remember that the slats must withstand the load from the coating and not take up the usable space of the room. Therefore, to fix light planks, select slats with a small cross-section.
Despite the prevalence of wooden guides, such products have their drawbacks:
- flammability;
- insufficient resistance to moisture;
- possibility of surface damage by fungus and mold.
The technical characteristics of wood can be improved by impregnating products with antiseptics and fire retardants.
The metal profile has improved properties. It is made in the form of a galvanized corner, is not afraid of moisture and sudden temperature changes, does not rot or warp. The only drawback of such products is the high cost.
Required Tools
To simplify the installation of wooden or steel sheathing, you need to prepare the appropriate tools and materials:
- wooden slats of a certain section or galvanized metal beams;
- self-tapping screws (dowels);
- a hacksaw or jigsaw for cutting lining;
- grinder, used for trimming metal profiles;
- axe;
- electric drill for drilling holes for dowels;
- tape measure and pencil;
- cord;
- building level;
- a screwdriver or screwdriver on the battery;
- antiseptics and fire retardants for treating wood against rotting, fungus and mold.
When using wooden beams for lathing under the lining, choose only high-quality products. There should be no chips, knots or cracks on their surface. The durability of the entire coating will depend on the quality of the frame material. Humidity is considered the decisive factor here. This figure for wood should not exceed 16%, otherwise the material will be deformed during operation, which will lead to the appearance of unevenness on the skin.
The frame guides are fixed to a brick or concrete wall using dowels. For fixing to a wooden base, self-tapping screws will be sufficient. To simplify the work of installing the sheathing under the lining, it is necessary to use screws of the required length, and also place wooden wedges under the slats in places where there is sagging.
Marking the surface for the frame
At the initial stage of installing the frame, it is necessary to mark the walls for installing a metal profile or wooden slats. For this, a pencil (chalk) and a building level are usually used. First, the location of the lining is determined; it can be horizontal or vertical. In accordance with the chosen method of fastening the planks, a method of fixing the frame is selected. In any case, the guides are mounted perpendicular to the fixation of the trim.
Now you need to treat the wooden slats and walls with antifungal drugs and mark the base surface. The pitch of the frame guides is selected as a multiple of 40...60 centimeters. The more elements there are in the sheathing, the stronger the structure.
To obtain a high-quality, perfectly leveled frame, a building level is used. This device allows you to accurately align the slats along the marking lines. To align the guides in one plane in the lower and upper parts of the wall, pull the fishing line according to the readings of the building level. Subsequently, the bars are adjusted to fit the cord; in places where the products sag, wooden wedges are installed, which are attached to the base with self-tapping screws.
How to prepare the base
It is allowed to attach the lining directly to the wall or ceiling only under the following conditions:
if the surface is very flat and strictly level. This can be a wall made of timber, lined with OSB boards, plywood or other sheet material;
if the temperature and humidity in the building being finished is stable throughout the year. That is, it should be a dry, heated room with a normal microclimate.
In all other cases, before attaching the lining to the wall, a frame of parallel wooden blocks is installed on it. The distance between them is 40-60 cm. This frame allows you to solve several problems at once:
level out level differences;
create an air gap between the base and the cladding to ventilate the rear surface of the lining.
Also, the space between the wall and the finish can be filled with heat-insulating materials, which is often resorted to before installing the lining in a bathhouse or sauna.
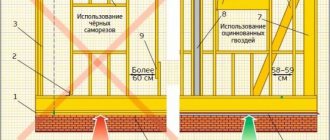
The thickness of the bars for the sheathing is selected taking into account the thickness of the insulation and the ventilation gap Source board.bau.com.ua
The frame is secured to the base with self-tapping screws or dowel nails, depending on the wall material. When installing it, the level is constantly monitored - all bars must be in the same horizontal (ceiling) or vertical (walls) plane.
Installation of wooden sheathing for lining
The process of installing wooden sheathing under the lining proceeds according to the following algorithm:
- We treat wooden products with an antiseptic.
- We draw marking lines on the wall.
- To create a flat plane, we fix the profiles at the top and bottom of the wall, then at the corners of the room.
- When all the elements are fixed, we proceed to the installation of horizontal or vertical slats.
We install each of the elements according to the building level indications.
If necessary, place pieces of plastic under the guides in places where there are significant gaps with the wall. You can also use wood chips for this, but they will not withstand prolonged use. To securely fasten the frame, it is recommended to use self-tapping screws of different lengths. All electrical wiring under the frame is laid in corrugation, which will prevent possible fire of the material.
To make the wooden sheathing resistant to moisture, all profiles are impregnated with a water-repellent solution.
Rules for calculating gluers and their use when fastening
Experience in using clamps shows that for reliable and durable fastening of one square meter it is quite enough to select about ten pieces.
- For a more accurate calculation, it is necessary to measure the length of one panel. After this, we measure the pitch of the sheathing frame. Typically this distance ranges from 40 to 60 centimeters. Divide the length of the panel by the pitch of the sheathing and add one. We multiply the result by the number of panels. This will be the required amount for fastening.
- When choosing the type of product used for fastening the panels, it is necessary to take into account that each element must be fastened with two or three self-tapping screws. It is not worth saving on their quantity, as this may affect the reliability and quality of installation as a whole. To fasten heavy panels, thicker reinforced elements with a large number of attachment points are used.
- After calculating the number of gluers, you can begin installing the panels. The wall on which installation is planned is pre-treated with special antiseptic solutions to eliminate the possibility of fungus formation. Subsequently, clamps are installed on the wall or installed sheathing using nails or self-tapping screws. In this case, nails are used only if lathing is used.
- Since the use of lining requires a flat surface, if there are uneven walls, you should calculate the best way to level them. Perhaps leveling the wall surface using a special solution or installing sheathing.
- Very often in such cases, lathing is used, which is installed on the wall surface quickly, and installation can be carried out on it immediately. Usually the sheathing is made of wooden beams of the same thickness, which are fixed at a distance of about one meter from each other. When installing wooden lining, this distance is somewhat smaller and is about 50-60 cm.
- When installing the sheathing beam, you need to constantly monitor the plane of the resulting surface, which should be flat. If necessary, to obtain a flat surface, plates of the required thickness are placed under the beams.
- Applying leveling solutions takes a lot of time, after which they also need time to dry. Therefore, this option is used much less frequently and when such work is necessary.
- Having installed the fasteners for the first panel, they begin to install it and then attach the clamps for the next one. The first board is tightly inserted into the hooks of the clamps, the rest are mounted in the same way. This method ensures that each panel fits accurately and securely against each other.
- To ensure high-quality installation with natural further ventilation, it is necessary to take into account that the boards should not touch the wall surface. Otherwise, this will lead to limited ventilation, moisture accumulation, and the formation of mold and mildew.
- When working with lining and clamps, it should be noted that work should be carried out at an ambient temperature of at least 10 degrees, since deformation of the panels may occur at lower temperatures. The clamps must be made of stainless materials and are treated with a special protective coating, since rust can spread over the surface of the lining.
- Liquid sealant cannot be used at the joints of wooden panels, but it is better to choose a moisture-proof film for this. Its use during temperature changes can lead to cracking of the panels. After installation is completed, the surface of the lining should be treated with special protective antiseptic materials that increase its resistance to precipitation and ultraviolet radiation.
- Taking into account all the requirements for choosing clamps for lining will ensure reliable and durable installation, as well as a long service life of the installed coating.
Installation of a metal frame for lining
The technology for installing metal sheathing under the lining is similar to installing a wooden frame.
- First, we stretch a cord at the top and bottom of the wall, which will serve as a guide for the guides.
- We apply marking lines on the wall every 40-60 centimeters and install metal hangers in their direction.
- These parts are fixed to the base surface using dowels or self-tapping screws.
- Now you can proceed to installing the metal profile for the frame. The upper and lower sides of each element are adjusted to the cord and secured to the girths with screws.
- Now you need to check the position of the guide with a building level and fix it in the places where the hangers are installed.
To simplify the work of leveling the sheathing frame, it is recommended to use a laser level. The beams of this device will serve as a guide for installing profiles.
Fastening the lining to the sheathing
Fastening the lining to the frame depends on the type of material and type of guides. Thus, the finishing is fixed to a metal profile using self-tapping screws.
Plastic products are secured to wooden parts with staplers, and wooden materials are fixed with nails.
To obtain an ideal surface, clamps are used. Such parts are fixed in wooden or steel guides with screws. The protruding part of the clamp securely holds the groove of the lining. The more fasteners that hold a particular product, the stronger the coating will be.
Additional information on the topic:
- Plasterboard ceilings in the living room with kitchen and hallway
- Ceilings made of plasterboard: how to make an oval on the ceiling from
- Photos of plasterboard ceilings for a bedroom, two-level with lighting
- What can be made from leftover drywall for a child?
- What putty to putty on a plasterboard ceiling video
How to treat the surface → Room decoration → How to choose the right paint → Surface treatment technologies → Leveling and finishing the walls → Selecting and applying a primer → Removal from the surface → Stretch ceilings and technologies → Reviews and testimonials
Useful tips
And finally, a few tips that will ensure the reliability, durability and aesthetic appeal of wood cladding:
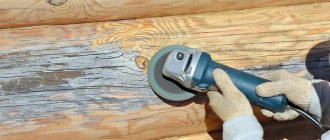
Before installation, it is advisable to treat all wooden surfaces, including sheathing, with antiseptic impregnation, especially if clapboard is used to finish a wet room or external walls. This will prevent the spread of mold.
When finishing interior spaces, materials must be kept in them for two to three days for acclimatization.
The lined surface can be painted, coated with oil, wax, varnish, or stain. Pre-priming will reduce the consumption of varnish or paint.