From the author: Hello, dear readers! Today I will tell you how to level the floor in a wooden house. This topic is close to me, since I myself had to carry out similar work. I will be happy to share my experience in this matter with you.
People began to live in apartment buildings relatively recently. By historical standards, of course. Before the invention of such housing, people lived in houses built primarily from wood. This material is still widely used in construction today.
Circumstances were such that I moved from an apartment in a nine-story building to the private sector in order to be able to move tenants into my previous home. My new house wasn't that new, built around the late 1970s or early 1980s. However, the structure was in relatively good condition, but still required repair work. This old house with wood floors definitely needed some leveling.
Wooden flooring is durable and reliable. But wood is a material that is susceptible to moisture and temperature. Simply put, when humidity is high, it expands, as happens in autumn and spring, and when humidity is low, it shrinks, as happens in summer and winter.
If most of the floorboards and joists have become unusable, the best option would be to eliminate the old boards and then install a new, durable and reliable floor. But it is expensive, time-consuming, labor-intensive - that is, it is not at all easy. but not everything is so hopeless. There are other ways to properly align without completely replacing the entire structure.
The floor should be leveled for two main reasons:
- to preserve future flooring, since an uneven base can ruin laminate, parquet, linoleum,
- so that the room looks aesthetically attractive, and the furniture stands level and does not wobble.
Therefore, it is necessary to level the base. Now let's look at simple ways to carry out repair work.
Leveling the floor with plywood
You can level the wooden floor surface with thick plywood, OSB or other particle boards, in other words, create an additional layer. This is one of the popular methods, and it is also a fairly easy way to adjust the base with your own hands. This method is quite simple and does not require enormous financial costs.
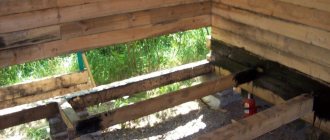
There is one most important point: you need to check all the boards for rot. If you hit a board with a hammer and hear a dull sound, the floorboard is most likely rotten inside. Therefore, you should get rid of such a board.
Rusty heads of nails securing floorboards also serve as a signal of the presence of rotten areas. The joists to which the floorboards are nailed also need to be checked. Pierce it along its entire length with a long-pointed awl. If you find rot, be sure to replace that area. In “clinical” cases, it may be necessary to replace the entire joist.
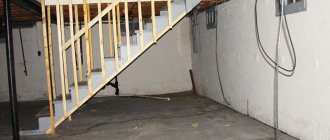
If you had to change boards/fragments of joists, then the new boards must be treated with an antiseptic. If a rough concrete screed is poured under the floor, make sure there are no cracks in it. If you find any, be sure to take measures to eliminate them.
Plywood/OSB/other rigid material can be laid on the joists, but this will take away quite a bit from the ceiling height. But on the other hand, insulation can be laid in the resulting underground space. Nobody forbids simply pulling the sheets to the surface using self-tapping screws. It would be useful to remind you that at all stages of work it is necessary to use a building level.
Reviews
Nikolai Petrovich, 58 years old, Krasnoyarsk
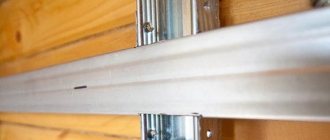
I was thinking about how to build floors along the joists on the terrace. Our climate is humid, so we cannot do without an underground that would not operate here. I made holes in the brick foundation for vents - this is ventilation. But then I ran into a problem. The bricks were laid so-so unevenly, so the laid logs even visually stood crooked on it. I didn’t know how to do the alignment, so I went my own way. I laid a 50 mm thick board along the entire perimeter of the foundation. I fastened them all together with metal plates with holes. There are two plates for each joint. And so I tried to level these boards by placing pieces of cut boards of small thickness under them. It turned out to be difficult, but after suffering for two whole days, I solved the problem. And I easily installed the logs on the boards. Probably it would be necessary to align the logs themselves as you described. I would have done it faster.
Ivan, 31 years old, Podolsk
We leveled the beams. Logs were used as them. This process cannot be carried out alone without assistants. The logs are heavy, requiring two helpers to lift each end. And since we lifted each end several times, we got tired quickly. It is better to carry out the alignment on the logs themselves. Moreover, for this we used 70x50 timber. They were simply attached to the beams with self-tapping screws.
Olga, 40 years old, Perm
Aligning the floor joists was not so easy. My husband made the floors in the summer kitchen himself. I was tormented myself; I was constantly being torn away from my work. Either give it to him, then hold it, then pick it up. In the end, the padded floor turned out to be uneven. I read your article and showed it to my husband, it turns out he was aligning the joists one by one, laying one next to the other. But it turns out that it was necessary to first align two located and opposite walls. That is, a small difference between the first two gave a large difference at the very end.
Using a self-leveling agent
There is another effective way to adjust the base, the result of which will be a perfectly flat surface. A self-leveling mixture will help achieve this result. Here's what work needs to be done:
- clean and sand the floor surface,
- apply a primer layer,
- lay a waterproofing film over the wooden flooring,
- check possible leak locations,
- lay and fix the reinforcing mesh on the polyethylene,
- prepare a self-leveling mixture,
- apply the mixture to the floor surface,
- after pouring the floor, level the mixture using a spiked roller and remove air bubbles,
- leave the room until the mixture is completely dry, and then begin laying the flooring.
What can you use for repairs?
Dismantling and reassembling a plank surface is a complex, long, labor-intensive process. Therefore, not every apartment owner will decide to do this work. But the longer a faulty floor is in use, the more difficult and expensive it is to fix.
Among the ways to level the floor in an apartment with your own hands:
- looping;
- local alignment;
- dry screed;
- use of self-leveling compounds;
- leveling with lags or pads.
It is necessary to measure the differences with a laser level 2000 mm long. If their indicator is higher than 2 mm per 1 sq. m, then alignment is required. If it’s less, then you can put up with it. But it’s still not worth delaying the repairs.
Adjusting the lag
This method is used to control large differences in height. Be prepared for the fact that this is a rather labor-intensive procedure. In addition, due to the alignment of the floor joists, the ceiling may “become lower” by ±10 cm. Therefore, this method is not suitable for houses with low ceilings. Although, everything is at the discretion of the owner.
Using this leveling method, it is possible (and in some cases even necessary) to put insulation into the underground space. The method of leveling the floor by adjusting the joists is that the floorboards are removed from the joists and anchor bolts are inserted into them. This is how the position of the entire structure is adjusted.
By the way, experienced repairmen, when re-attaching old floorboards in their place, recommend laying them with the wrong (unworn) side up - that is, turning them over. And completely worn out, broken or rotten boards should be sent to a landfill without regret. And yes, do not forget about using an antiseptic - this will protect the structure for a long time.
Reasons for the formation of irregularities
Wood is a living material that is sensitive to changes in external conditions. Wood fibers sometimes swell and sometimes decrease in volume. Such vibrations lead to uneven deformations of the boards, cracking, warping, and the appearance of cracks between them. The floors begin to creak, sag, individual floorboards become loose, and in some places the fasteners come out.
This often happens if the quality of the lumber was initially low, the boards were too wet or of unequal cross-section. For flooring, it is recommended to use lumber with a thickness of 40 mm or more, with a moisture content of no more than 18%. Blue discoloration, rot, falling or tobacco knots, and deep end cracks are not allowed. The geometry must be correct, without bending or torsion.
The second reason for the fragility of wooden floors is that the thickness of the board does not correspond to the distance between the joists. Because of this, large deflections occur, the floorboards become unsteady and “shaky.” Even an initially flat wooden floor can become warped due to high humidity in the room, lack of ventilation between the boards, irregular protective treatment, improper installation, and incorrectly selected fasteners.
Cycling method
This leveling method is considered the most difficult. This work is carried out using a scraping (grinding) machine. This method certainly has its pros and cons.
Pros:
- minimum tools and materials,
- the opportunity to subsequently do without any floor covering at all - sanded boards can be covered with stain or varnish - it looks very aesthetically pleasing, believe me.
Minuses:
- quite a labor-intensive process (what did you think),
- if the base is significantly uneven, the grinding machine will remove a large layer - the floorboards will become somewhat thinner.
Step-by-step instructions for leveling the floor with a sanding machine:
- remove small debris from the surface,
- inspect the floor, if it is old, then perhaps there will be nails that have become loose and come out - they need to be “drowned.” If you find rotten boards, they should be replaced.
- treat the surface with a sanding machine, start with coarse sandpaper and finish more “delicately”,
- in the corners you will have to sand by hand, since the machine will not penetrate there. You can also use the so-called “boot” - a device designed specifically for grinding in hard-to-reach places. You can rent it in the same place where you rent the grinding machine itself,
- If after sanding defects are discovered, they can be corrected with acrylic wood putty.
How to level a wooden floor without tearing it down: do-it-yourself dry screed
When additional thermal insulation is needed, the best solution is to install a dry screed, or “floating floor”:
- Insulation is laid on old boards, and damper tape is placed along the walls.
- Rack beacons are installed.
- A layer of loose insulation (expanded clay, vermiculite, etc.) is poured.
- The backfill is leveled between the beacons.
- 1-2 layers of sheet materials are placed on top, which are fastened together with self-tapping screws with the joints in the rows offset by 1/3-1/2 the width.
Laminate, linoleum and other flooring can be laid over a “floating” screed. Its advantages are good sound insulation, which is ensured by the absence of contact between the floor and walls. Impact noise transmitted between structures is almost completely damped.
Wood putty method
Another method of leveling the surface that we inherited from our ancestors. The process is quite labor-intensive, but it has a couple of significant advantages. One of them is that it does not require large investments. And the second thing is that you can re-level the floor, just add more putty in the right place.
But this method also has disadvantages: after puttying, you still need to level the floor with plywood. But this does not make the method economical, and all the above advantages are neutralized. Putty is a simple mixture invented by cunning folk craftsmen. It consists of ordinary PVA glue and sawdust. There is one tricky secret in preparing putty, which I will, of course, share with you: first soak the sawdust in water, then squeeze it out, and then mix it with glue. The consistency of the mixture should be like sour cream. This little secret will allow you to save on PVA - sawdust will draw less moisture from the glue.
The work process according to this method begins with the installation of wooden planks (beacons). Putty is poured into the resulting compartments. The mixture of glue and sawdust shrinks when it dries, so places where there are large differences in height need to be filled in several layers. As soon as the mixture is completely dry, you can lay plywood on the floor, after which you can lay the “finish” floor covering - linoleum/laminate/parquet.
That's all, I shared with you all my knowledge and experience. I am sure that you will choose something just for you, because the above leveling options will suit any wooden floor. Almost all methods are universal, but you should still take into account the characteristics of the house and specifically the floor you are dealing with.
This article is purely advisory in nature and is not a call to action. These are just my ideas and judgments regarding such repair work.
In conclusion, for visualization, I will add a video, thanks to which you can clearly see the process.
Insulation and sound insulation
Soundproofing and insulating floors on beams is quite simple. For example, you can cut TECHNONICOL into strips and lay it between the beams. In this case, the self-adhesive side section that overlaps the beam must be rolled with a roller. For additional insulation of the floor, you can place mineral wool on top of the TECHNONICOL. This sound insulation allows you to protect your living space from noisy neighbors downstairs.
The height should not exceed the bars. In those places where it is higher than the log, its thickness must be reduced. To do this, the cotton wool needs to be cut lengthwise with a knife. If the result is rags, this will not affect the properties of the material.
Leveling mixtures
In some cases, special self-leveling compounds can be used. But this can only be done if the rough wooden floors can withstand the additional load.
One of the disadvantages of this method is the different thermal expansion of the leveling mixtures and wood. Therefore, it can only be used for rooms with a small area. It is also important to do the preparatory work correctly. It is not recommended to use a classic concrete composition, as it will have a significant mass. It is best to purchase special mixtures.
Work order.
- Cleaning the base, priming.
- Installation of a putty layer that seals the cracks.
- Installation of waterproofing. 200 micron polyethylene film is used. The strips are overlapped, the joints are sealed using double-sided tape. It is important to secure the waterproofing to the subfloor to prevent movement.
- Installation of reinforcing mesh.
- Pouring self-leveling mixture.
During the last step, remove all air bubbles as much as possible. In this way, you can level curved wooden floors that have sufficient mechanical strength. However, if there are significant level differences, the use of another technology is recommended.
Adjustable joists
Adjustable joists are quite effective, but expensive. These are ordinary logs into which special adjusting pins and support screws are screwed. Insulation is laid between the joists. Horizontal position is ensured by screwing in and out the support screws. Adjustable floors are not always possible. In addition to being expensive, they have a significant drawback - raising the floor height to at least 10 cm, even without taking into account the thickness of the final coating.
The work is performed according to the following algorithm.
- First you should make sure that the level difference depends specifically on the lag. Then the floorboards are dismantled and the condition of the beams is checked. If necessary, replacement of defective ones is made.
- To level their level, you can use mounting elements. A support is first installed under the joists. Then, using a drill, a hole is drilled into which the screw pin is mounted. After passing through the material, a support and height lock are attached to the bottom of the screw. Using this technology, the wooden floor under the laminate is leveled over the entire plane.
We recommend
An alternative option is to purchase and install special self-regulating logs. They can be mounted on a concrete base or wooden surface. The advantage is the reduction in labor intensity.
Beam arrangement
It is worth noting that replacing the floor in a wooden house with your own hands is quite possible, you just need to understand the principle of performing the work. In order for the floor to be of high quality and last a long time, you should decide on the number of beams.
To do this, you can use special programs, but developers take a different path, relying on standard approaches:
As a rule, pine is chosen as the most inexpensive and accessible construction wood. Depending on whether the building is brick or wooden, the floor beams are fastened. In a brick house they are embedded in the brickwork. In a wooden structure, they are laid on a wooden base and secured with metal brackets.
This process requires a special approach, which may be based on certain rules:
As mentioned above, installation of floor beams is carried out depending on the structural features of the building.
In what cases is it recommended to lay cold floors on the second floor?
To answer this question convincingly, we need to recall a few elementary rules of heating engineering.
Subfloor in a wooden house
Wooden floor design options
Most professional builders strongly do not recommend installing insulated floors on the second floor if its premises are used as residential premises. You need to know that in addition to unnecessary losses of money and thermal energy, another problem may arise. If the technology is violated, the heat-insulating material increases its humidity, and all wooden elements are used in very difficult conditions. Heat plus moisture is an excellent environment for the development of fungi and rot on load-bearing wooden elements, and no modern impregnation can protect them for a long time. Over time, you have to deal with very unpleasant premature repairs. We hope that this information will help you make the best decisions in each specific case.
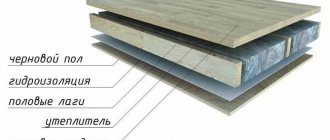
Wooden floor insulation scheme