Lining is a universal wood cladding material. They are used to decorate vertical fences, both indoors and on the facades of houses. In addition to the aesthetic value, lining from the lining performs the function of thermal insulation of walls. Wood products form a dense relief surface that can withstand temperature changes, exposure to precipitation and wind loads.
Cladding from lining
What is lining
The first passenger cars were sheathed using thin boards. Subsequently, the profiled finishing board began to be called lining. For the manufacture of lining, enterprises use five types of profiles:
- standard;
- calm;
- Europrofile;
- American.
Standard
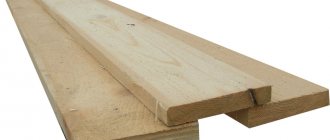
The trapezoidal section of the lining with beveled edges at an angle of 300, has two longitudinal grooves on the back side. The rear grooves serve as ventilation vents. One side of the lining has a longitudinal groove. The other side of the board is equipped with a protrusion (spike). The cladding elements are connected to each other by inserting the tenon of one strip of lining into the groove of another board.
For external use, the tenon is made slightly narrower than the groove. Under the influence of moisture from atmospheric precipitation, the tenon inserted into the groove swells. The connection becomes almost inseparable.
Calm
The boards of this lining model have rounded longitudinal edges. This is a distinctive feature from the “Standard”. The stem also has grooves, tenons and longitudinal ventilation channels.
Section of the lining "Calm"
Europrofile
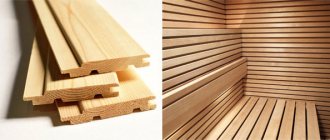
The Europrofile style came to our country from Western European countries. A distinctive feature is a wider spike. Lined facades made from this material have a beautiful appearance with relief differences in the thickness of the wood. Europrofile is often called Eurolining.
Eurolining
American
The profile name indicates the country of origin. The beveled edges of the lining give the impression that the boards are laid overlapping. The profile is used for cladding the facades of houses and garden buildings.
Peculiarities
Before we begin describing the manufacturing process, it is necessary to understand what this product is.
Lining is a type of facing material that is a product of processing natural wood. It is used to design both simple (linear) and complex structures. Depending on the technical characteristics, the products are used for exterior or interior decoration. Externally, these are flat panels with special connections at the edges.
In the production of lining, various types of wood are used, both deciduous and coniferous: alder, cedar, ash, pine, beech and much more.
Wooden finishing combines excellent performance and aesthetic qualities. Due to these characteristics, finishing has become widespread. Lining is used for external and internal cladding.
Advantages of lining:
- aesthetic appearance;
- a wide range of products, differing in color, texture and performance characteristics;
- it is an environmentally friendly product, safe for health and the environment;
- high-quality material has excellent practicality and wear resistance;
- finishing material made of wood is a classic that is always relevant and in demand;
- simple installation process;
- natural finishes create a comfortable atmosphere in the room.
Flaws:
- high price;
- requires careful care.
This is interesting: Features of polyurethane sealants for external seams: let’s look at them from all sides
Types of wood for making lining
To decide what material to make the lining from, you need to study the characteristics of the types of wood. Whatever the quality of raw material processing, the finished product will have the same quality. Boards for lining are made from deciduous and coniferous wood.
Hardwood
Linden
According to its properties, linden is classified as a soft wood. Boards made from this material are very light and easy to process.
Birch
Birch blanks are easy to make lining. Birch has moderate hardness, uniform density, and is easy to process. Because of its textured surface, birch is preferable in the manufacture of lining for cladding walls indoors.
Alder
Softwood is used mainly for making furniture. Alder in the form of lining has proven itself to be excellent for finishing walls in bathhouses and in rooms with high levels of humidity.
Aspen
Softwood contains a small amount of knotty inclusions. Aspen boards are resistant to deformation and retain their strength properties in a humid environment. The quality of the lining made from this material is very high.
Conifers
Spruce
Wood is widely used in construction. Spruce boards are a priority raw material for the production of lining. Spruce is a universal wood - easy to saw, drill and mill.
Larch
Larch has all the qualities of spruce. Do-it-yourself lining is used mainly for cladding walls inside the house.
Pine
Cladding made of pine lining has a long service life and practically does not lose its original appearance. Like all types of coniferous wood, at high temperatures it can release tree resin. Therefore, pine needs to be painted or coated with moisture-resistant varnish.
It should be noted that there are a large number of wood species. The above list shows those types of wood that are most accessible and suitable for making lining.
Equipment and raw materials
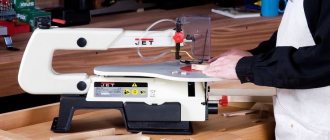
We see an example of a woodworking machine for making lining.
So, we have decided on the premises, and it’s time to figure out what equipment we will need. First of all, these are, of course, machines for the production of lining, and here the question arises, which one to give preference to: homemade or factory-made.
Of course, the price of a factory professional machine will be much higher, but one cannot ignore the high efficiency and productivity. It will take at least 10 minutes to produce one panel of lining on a homemade machine, while with professional equipment this process will take no more than one minute.
One thing that can also be said in favor of factory machines is that when purchasing them, the set of additional tools will be minimal. As a rule, such equipment is multifunctional, that is, it is capable of performing several actions simultaneously. While a handicraft machine only gives the workpiece the shape of a lining, additional cleaning and preparation of the workpieces is a separate task that you will have to perform yourself.
Prices
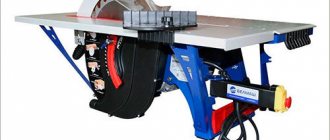
To make lining, you need different tools, for example, in the photo, a circular saw.
Now a few words about prices. The cost of a homemade machine can start from 20 thousand rubles, but in addition to it you will have to purchase the following set of tools:
- Manual jointer. From 2000
- Reismus. From 7000
- Jigsaw. From 2000
- Stationary type circular saw. From 10000
- Hand-held circular saw. From 3000
In total, for a total amount of approximately 24,000 rubles, that is, together with the machine, about 50 thousand will be spent on everything, and this is at the most modest and optimistic prices.
We see an example of another small machine for making lining.
The cost of a professional machine starts from 150,000 rubles, and in addition you do not need any equipment at all. The machine will be completely self-sufficient. Simply plug it in and you can start working.
It is also necessary to take into account that we produce the lining with our own hands, that is, hiring employees is undesirable, and this is another factor that speaks in favor of purchasing factory equipment, which can be handled by one person. While working on a handicraft machine requires at least two people: one person to service the machine itself, and one assistant to perform additional functions for preparing raw materials and for final processing.
And at the end of this section, we recommend that you watch the production of eurolining video, which shows the operating instructions for a multifunctional woodworking machine.
We select raw materials
The quality of your products will depend on what raw materials you choose for making lining.
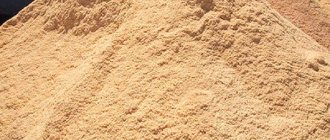
Timber can be divided into three main categories: edged, unedged and slab. The cost of raw materials and the time spent on manufacturing the lining directly depend on the quality of primary processing. That is, the lower the quality of wood processing, the cheaper it is, and the longer the production cycle will take.
Here everyone calculates profitability on their own. For example, if there is already a developed market for finished lining, then it is more expedient to purchase edged timber and receive the main income through large production volumes.
The same is true and vice versa, if the market is not yet debugged, it is more profitable to save on raw materials and spend more time on production, which is not magnetized as an investment in business. That is, you invest less in development, and pay for it with your own time.
In the photo we see an example of eurolining.
We will not give any recommendations on this matter, since everyone has their own approach to doing business, but we can give some practical advice on choosing high-quality raw materials for production.
So:
- The forest should be as dry as possible. It is best to purchase it from a supplier who has indoor storage facilities.
- The boards should lie flat and not scattered. This will prevent them from bending as a result of long-term storage in the warehouse.
- Carefully select each board for knots. Sometimes they even look attractive, but there are through knots that will simply fall out during processing and leave behind an unflattering hole.
- Select boards without cracks. Outwardly, this may be a barely noticeable chip, but after processing on a machine, such a board can simply split into pieces.
Dimensions of blanks for lining
A homemade machine for making lining must be configured to process wooden blanks of certain sizes. Do-it-yourself lining usually has the following dimensions:
Width
The width of lumber varies quite widely. The standard width of the cross-section of the board when clean, excluding the protrusion of the tenon, ranges from 8 cm to 15 cm.
Length
The maximum length of the board reaches 6 meters. In a home workshop, such long workpieces are not used. Basically, facing strips are made from 1 m to 1.5 m long.
Thickness
The thickness of the boards is usually 13 - 24 cm. It is not advisable to make the planks thinner or thicker. Thick boards will significantly weigh down the cladding, which can lead to damage to the integrity of the coating. Products made of thin material will cause difficulties during its installation and will significantly increase the fragility of the cladding. It is also necessary to take into account the conditions for milling wood.
Start-160
Start-160 is a representative of the domestic machine tool industry.
Another unit with an affordable price and wide functionality, which any novice master will appreciate. But this time it is domestically produced.
Specifications:
| Parameter | Meaning |
| Allowable blank width | 3-16 cm |
| Permissible blank thickness | 1-6 cm |
| Minimum blank length | 50 cm |
| Speed capabilities of the feeding mechanism | 0-30 m for 60 seconds |
| Number of revolutions made by the spindle | 5800 for 60 seconds |
| Total equipment power | 16700 W |
| Number of spindles | 4 |
| Weight | 0.7 t |
| approximate price | 330000-360000 rubles |
Advantages:
- Stepless adjustment , allowing you to quickly change the size of the product;
- High gearbox power , ensuring the reliability and accuracy of the manufactured lining;
- Backflow protection system for
Selecting a machine for lining
The choice of equipment for making profiled boards depends on two factors:
- Machine performance.
- Economic expediency.
Machine performance
Professional equipment is designed for processing raw materials from unedged boards. The machine, equipped with 5 spindles (drive axes with cutting heads), simultaneously performs 4 wood processing operations:
- removing bark and subbark from unedged boards;
- planing the board on both sides (thicknesser function):
- milling the sides of the workpiece - forming grooves and tenons;
- milling the back side for installing ventilation ducts.
The productivity of professional units reaches from 1800 linear meters. up to 3600 l.m. finished products during the work shift. Such equipment is installed at large enterprises.
Models with 4 spindles process calibrated lumber. Inexpensive equipment performs 2 operations - milling only grooves and tenons. Their productivity is small - 200 - 300 linear meters. per work shift.
Economic expediency
It is worth purchasing expensive equipment (from 100 thousand rubles to 500 thousand rubles) in order to sell lining in large volumes. In a small enterprise, they purchase a 2-operational machine (50 - 60 thousand rubles). For a home workshop, it is advisable to assemble milling equipment yourself.
ZMM Haskovo 4PM 180/4
ZMM Haskovo 4PM 180/4 has all the qualities to please a person taking his first steps in woodworking.
The Austrian machine ZMM Haskovo 4PM 180/4 is an ideal choice for beginners due to a number of the following advantages:
- Convenient and easy-to-learn control system;
The photo shows a simple and clear interface of the Haskovo machine, which is quickly mastered by the operator
- Relatively light weight and size;
ZMM Haskovo 4PM 180/4 does not require large free space
- High quality of manufactured products , not inferior to more expensive and bulky models.
Specifications:
| Parameter | Meaning |
| Allowable blank width | 0.7-18 cm |
| Minimum blank length | 35 cm |
| Speed capabilities of the feeding mechanism | 12 m for 60 seconds |
| Number of revolutions made by the spindle | 6000 within 60 seconds |
| Main engine power | 7500 W |
| Table length | 1.7 m |
| Sound level | 87 dB |
| Weight | 1.9 t |
| approximate price | 300,000-350,000 rubles |
Homemade machine for the production of lining
Why are many home craftsmen interested in how to make lining themselves? It's all about the economic side of things. Purchasing finished products at a hardware store will be very expensive compared to making the cladding yourself.
Before reading the article further, you should definitely watch a video about how a machine for producing wooden wall cladding works:
Requirements for the design of a machine for the production of lining
- The standard height of the working surface of the table is 800 mm. The workshop owner can change this size according to his height.
- The table surface is made of polished material. This will ensure easy and unhindered movement of the wooden workpiece. Usually the tabletop is made of polished steel or aluminum sheet. Sometimes, MDF sheets are used to cover the table, but in this case the tabletop quickly wears out with intensive use. The machine can be covered with textolite.
- The power device consists of an electric motor equipped with an elevator lift. Often a manual router is installed, which is already equipped with an elevator. The head of the router axis must be adapted to change cutters of different sizes.
- A nozzle for suctioning wood dust must be installed in the work area. Accordingly, the nozzle is connected with a hose to the vacuum cleaner.
- From the bottom of the table, the router is attached to a mounting plate installed on the underside of the table top. The maximum offset of the cutter above the work table surface largely depends on the thickness of the plate.
- Pressing devices (parallel, cross stop and pusher) must protect the operator’s hands from accidental contact with the cutting surface of the cutter during operation.
Machine design
Homemade machines for making lining are milling equipment. An industrial machine for this purpose is quite complex and expensive equipment designed for mass production of facing material.
There are many options for making your own machines for the production of lining. The equipment consists of 3 main parts:
- 1. Bed.
- 2. Desk.
- 3. Fraser.
bed
The supporting part of the desktop is best made from welded metal parts. The supports are made from corners 50 x 50 mm. The sides of the workbench are sheathed with steel sheet 2 mm thick. The frame is also assembled from construction plywood. If the machine will not be used intensively, then any durable material will be suitable for making the frame.
The table must have an opening to accommodate the power unit and free positioning of the operator’s feet during operation of the machine.
In some cases, they try to use an old wooden table as a bed. But it's better not to do this. Old wooden structures are extremely unreliable. During operation, the machine is subject to dynamic loads. Therefore, all loose table components must be strengthened.
It is necessary to provide for situations when the machine needs to be moved to another location. Therefore, the bed should not be extremely heavy.
Desktop
The process of making lining with your own hands involves milling the board on both sides. The work table must ensure the sliding of raw materials over its surface. In addition, the lining you make yourself must be accurately guided by stops.
Tabletop
A round opening is made in the tabletop for the cutter to pass through. To prevent chips and wood dust from falling down onto the power unit, the free space around the cutter axis is covered with special liners. By combining the inserts, select the required diameter of the through hole for the cutter.
Guides
Two guide strips are installed on the sides of the hole. The planks are installed vertically on movable supports. They are moved both along the table and in the transverse direction. The boards are set in such a way as to obtain the exact size of the protruding part of the width of the board subject to processing by the cutting head.
If the machine needs to be used only for the production of wooden cladding, then the guide plane is made solid with a cutout for the cutting head. Movable levers are secured to the plank with the help of which the board is kept from moving vertically.
Stops
Opposite the bar, a parallel stop is attached, which keeps the workpiece from lateral displacement. The parallel stop is a bracket with a bar. To fix the stop in a certain position, the protrusions of the lower part of the device are inserted into the mounting holes of the table top. Using two screw clamps, the bar is adjusted to the width of the workpiece. As a result, the board, clamped on both sides, will directly follow into the working area of the cutter.
Construction plywood machine
Switch
A switch is usually installed under the tabletop on the right side of the frame. The machine must be equipped with a switch with a safety unit. Making such a device with your own hands is difficult. It is better to take a block from an old machine or buy one. The switch has two keys: stop and start. The safety unit reacts to wood jamming in the work area and instantly turns off the power to the engine.
Power block
The power equipment consists of an electric motor and an axial mounting of the cutting head. An electric motor with a power of at least 2 kW is mounted on the elevator rack.
Elevator
If the machine is equipped with a manual milling cutter, then the tool is already equipped with a lift. In cases where it is necessary to use a separate engine, a special lift is installed. Craftsmen on the Internet offer a lot of options for this device.
Lift for hand router
One such example is an elevator based on a car steering rack. The engine is mounted on a vertical axis on movable support rings next to the rack. The electric motor housing is connected to the steering wheel axle, the splines of which fit into the splines of the steering rack. By turning the wheel, the motor with the cutting head is moved vertically.
Milling cutters
To ensure that the quality of the lining does not suffer, professional cutters are used. Cutting heads should not produce snatches (gouges) in the wood. In machines for producing lining, it is necessary to use two cutters. One cutter is designed to create a longitudinal groove on one side of the board, the second head cuts out a protrusion on the other side of the workpiece.
The production process of profiled planks is divided into 2 stages. First, the wood is driven through one cutter, and then the boards are processed on the other side with a second cutting head.
To visually understand what a cutter for lining is, you must watch this video:
Sales of finished products
The production of lining is a fairly common business and you will have to make a lot of effort to attract buyers. It is recommended to devote time to advertising at the initial stage of work. Ads, leaflets in construction stores, outdoor advertising and a website on the Internet are suitable.
Buyers can be private clients, construction stores and companies. Separately, it is worth paying attention to companies professionally engaged in the construction of saunas and baths, and companies providing services for country construction and finishing of private houses.
Making lining from unedged boards
There is the easiest way to make profile boards for cladding vertical fences of buildings.
Using a circular saw, remove the bark and underbark from the unedged board. The board is sawn with a circular saw on both sides, creating longitudinal grooves. Make or take ready-made planks with a thickness corresponding to the size of the grooves.
The cladding is done by inserting one plank into two boards at once. This primitive cladding is used for finishing the facades of outbuildings.
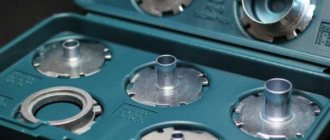
Wood cutter sets
Buying cutters individually is expensive; it’s easier to buy a whole set. Of course, it is more expensive than one cutter, but if you buy the same cutters separately, it is much cheaper to buy a whole set. We will talk about such sets today.
What sets of wood cutters exist and how much do they cost - video
offers a variety of carbide cutter sets. We'll talk about five.
- Includes six edge cutters with radii of 3, 4, 5, 6, 8 and 10 mm, which are equipped with a lower support bearing. Shank - 8 mm.
- This set includes 12 cutters:
- two edges with radii 6.35 and 9.5 mm and with a support bearing; one figured with two radii 4 mm and with a support bearing;
- three end diameters of 6, 12 and 16 mm; one end with a diameter of 12.7 mm; one angled (90 degrees) with an outer diameter of 12.7 mm;
- one groove with a radius of 6.35 mm;
- one end radius with a radius of 6.35 mm and a support bearing;
- one end angular (45 degrees) with support bearing;
- one grooved (dovetailed) with an end diameter of 12.7 mm and an angle of 14 degrees. This set of cutters will be useful for a novice carpenter, as they can perform many jobs on the manufacture of simple pieces of furniture.
- The third set consists of 16 items and is similar to the reinforced second one. Added end mills with a diameter of 3 and 12.7 mm; groove with a radius of 3.2 mm and a special drill with a diameter of 6.3 mm.
- The set is aimed at professionals - it consists of 12 cutters of a reinforced design with all the functions of the second set.
- Finally, the fifth set is similar to the fourth, but consists of 20 cutters of a reinforced design with a greater variety of parameters and the addition of a 9.5 mm wide and 32 mm diameter groove end mill. It is also aimed at the “pros”. In addition to those indicated, Diold has 10 more sets, which are equipped with cutters in various combinations.
Details of working with panel cutters.
A machine for making lining is a profitable business
A milling machine appeared in the home workshop, and all volumes of production of profiled wooden cladding for our own needs have been completed. The question arises - why should the equipment be idle? After all, now you can organize your own business for the production and sale of finished products to the public.
Any business aims to make a profit. To determine the profitability of your business, you need to have a rough business plan. Using the Internet, you can analyze the following data:
- cost of 1 m3 of unedged board = 5000 rubles;
- electricity consumption – 10 kW/hour. = 5.38 x 10 = 54 rubles;
- sale of homemade lining – 1 m3 = 8,000 rubles.
- profitability of manufacturing 1 m3 of wooden cladding = 8000 – (5000 + 54) = 2946 rubles.
You must understand that this business plan represents an approximate calculation of income from this type of activity. It is necessary to take into account the payment of taxes from self-employment and many other small expenses. Profitability must be determined on a case-by-case basis.
The main thing is that a homemade machine will always be a useful aid in running a garden and household, and will also be able to generate profit.
Stages of work
Let's take a closer look at a common option for producing cladding at home using a circular saw.
Work begins with preparing consumables and cleaning the workspace. It is necessary to accurately determine the amount of lumber. For production, you need planed boards, the width of which does not exceed 10 centimeters, and the thickness is from 1.5 to 2 centimeters. The use of larger boards is not recommended due to the type of connection between the linings.
As you work, position the lumber on one side of the circular saw and the finished product on the other. This will help maintain order and cleanliness in the room.
All boards must be the same length. If this is not the case, the material must be trimmed. Also carefully inspect the boards and evaluate the condition of their surface. If there are rotten, black knots, throw the raw materials in the trash. There is no way to get rid of such defects at home.
Pay special attention to the storage of workpieces. Monitor not only the direction of the wood fibers, but also the location of various defects in the natural material
Every specialist will say that these are the most difficult elements to process.
When working, place the material so that the location of the fibers and flaws coincides with the rotation of the cutting device. If this rule is not followed, the surface cleanliness of the material will be unsatisfactory.
It's time to put out the circular saw. If there is a discrepancy in the width of the boards, it is necessary to align the lumber. To carry out this procedure, place the saw ruler at the required distance from the teeth and securely fix the element.
The standard lining is equipped with a quarter joint. You can make such a clutch using a regular circular saw. It is necessary to adjust the height of the table and the distance to the ruler. The fastening of the second element must be lowered and moved towards the saw. When working, carefully ensure that the planes are parallel. Distance – 1 centimeter. The ruler must be fastened firmly and securely.
Adjust the position of the table so that the teeth of the circular saw are placed at a height of one centimeter at the maximum point. As a result, the height of the saw and its distance to the ruler should be 10 millimeters. Check that the settings are correct using part of the board. Adjust the position of the elements if necessary.
Next you need to make the above type of connection. The first pass is carried out - the board is placed flat, the side plane is pressed against the ruler as tightly as possible. If everything is done correctly, then a characteristic type of cut should appear along the entire length of the product.
Never press down lumber by hand. Use a separate wooden block for this, otherwise it may cause injury. It is also prohibited to lean on the end of the board.
Then place the material on the edge. The cut is made from the side of the ruler. This way you cut out the “quarter” needed to connect the panels. Remove cut pieces from the work surface immediately to avoid cluttering the work space.
To finalize the connections, rotate the board 180° and perform the above procedure on the other side. The “quarters” on the lining should be placed mirror-like, that is, on one side of the panel the recesses are at the top, and on the opposite side, at the bottom. When installing the finishing material, the connections are overlapped, overlapping the joints with each other.
Craftsmen recommend processing the visible side edges of the lining using a hand router. The equipment you need is a standard milling machine.
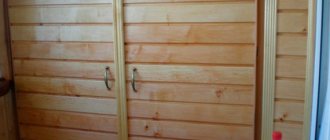
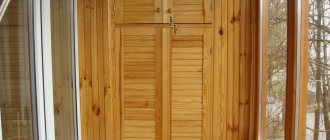
DIY installation
Before proceeding with installation, it is necessary to dry the lining. This will take several weeks. But then you won’t worry that the material will deform.
If drying did not take place inside the room where the finishing work will take place, the material needs a day to adapt to external conditions. After these recommendations have been completed, you can proceed directly to the cladding.
The lining fabric has a tenon on one side and a groove on the other. The latter should be located at the bottom during installation. This is necessary to prevent accumulated moisture from entering the structure.
The interior decoration of a house with clapboard can be carried out both from the ceiling and from the floor. But the first option is still desirable. Although the undercut can be hidden in the future using a plinth.
The slats can be secured in a hidden way using a clamp, or directly by nailing them to the lathing slats. The first option is more aesthetic.
Video - interior upholstery of a country house:
Varnishing or painting
To give the interior a finished look, you need to varnish or paint the lining. What is the difference between these procedures? Which composition should you choose?
The varnishes are based on several components. The appearance and application depend on them. There are varnishes:
- Acrylic;
- Polyurethane;
- Alkyd;
- Acrylic-polyurethane;
- Water based.
Video - painting wood:
Acrylic varnish dries quickly. It is suitable for both indoor and outdoor work. The varnish is not afraid of moisture and high temperatures. There are many colors and shades available for sale. Such a surface will be easy to clean from accumulated dust and dirt.
Alkyd varnishes take a very long time to dry. To speed up the process, you can use a special solution designed just for this purpose.
Another disadvantage is the unpleasant pungent odor. It is very difficult to remove it from the room.
The advantage is that after coating it forms a protective film against moisture.
The price for this varnish is higher, but its properties are much safer and more functional than other categories. The surface coated with this composition is very easy to clean.
Cost of work
Finishing with clapboard inside the house is a simple matter. It does not require special skills or years of training. You can perform this procedure yourself.
But if, due to some circumstances or other reasons, you cannot do this work yourself, you can hire a team of professionals.
The average price for interior cladding is 350 rubles per sq.m. This primarily depends on the complexity of the work, volume and premises. Rough finishing of utility rooms will be cheaper.
But for finishing work on an uneven surface you will have to pay a lot of money! The average price for the material itself ranges from 8 to 12 thousand rubles per cubic meter. m.
Figurine cutters
Using cutters for paneling (or figurine), thin planks of a certain configuration are made, which are used to frame various decorative elements. Panels are most often used for the manufacture of decorative frames, as well as for the design of furniture facades. A paneled element used exclusively for decorative purposes can be cut along the contour of the product. Using milling cutters for panels, it is possible to produce products that simultaneously perform two functions: they act as a decorative element and fix the connected elements together using the “tenon and groove” principle.
On the modern market, various cutters for infill are offered, which involve the production of such a decorative element in one or several passes. When making a panel in several passes, at each stage of the technological process, a layer of material is removed for which the tool used is designed. As a rule, in such cases, not one paneling tool is used, but a whole set of them.
Panel cutters can work in vertical and horizontal planes. Vertical cutters for infill are used to process baseboards and the edges of cornices, which involves processing to a greater depth. Horizontal cutters for infill are distinguished by a larger diameter of the cutting part. They are used to process furniture facades, shelves and door panels. Although cutters of this type can improve processing productivity, they are significantly inferior to vertical cutters in terms of cutting depth. It should be noted that almost no production can do without panel-type cutters.
Edge cutters
Designed for processing the edges of the product. All edge cutters are characterized by the presence of a bearing, which during operation rolls around the edge of the part. In this case, the working (cutting) part is located above or below the bearing.
Straight edge cutters
Straight edge cutters are most in demand when working with templates, and they have an upper or lower bearing. The latter are cheaper, but when they are used, the workpiece is located between the template and the router, which does not allow processing in two passes in depth (with an upper bearing this is possible).
Techniques for working with edge cutters - video
Such cutters are characterized by a working length, a working diameter, and also a bearing diameter (it is not always equal to the working one). For most cases, it is more convenient to choose cutters in which these diameters coincide, which makes it easier to manufacture and attach the template to the workpiece.
Shaped, or molding, edge cutters
They have a great variety. The choice of such cutters is dictated only by the desired edge profile, which is chosen based on the appearance of the product.
Their size, as a rule, is determined by the height of the working part, as well as the largest diameter and radius of curvature that they make. If there are several curves in a profile, then the profile of the largest of them is usually indicated. It is extremely rare, but there are adjustable molding edge cutters. They can adjust the distance between working parts.
Disc edge cutters
They are intended for making a rebate, but unlike straight groove ones, they are based on the edge with a bearing, which is why the groove they select is more accurately located relative to the edge of the workpiece. True, they are also more expensive than straight grooved ones. Often, such cutters are made adjustable to select grooves of different depths or widths. In this case, the set includes bearings of different diameters or a stack of thin cutters on an axis, so that the height is changed by disassembling the cutter and removing excess disks.
How to choose the right cutter. Tips for beginner millers in this video
Shaped edge cutters
They may have a bearing at the end, but the shape of their edges is much more complex than that of shaped edges, and the height is greater. Suitable for making baguettes and processing the edges of panels, skirting boards, and façade frames. Such cutters are also produced without bearings. In this case, they must be worked using a rip fence or a copying sleeve and a template.
Combined frame, or counter-profile, cutters. They are used when processing adjacent edges to create frame joining parts. Such cutters can also be assembled.
Horizontal figurine cutters
Designed for decorative milling of panel edges. Due to their large diameter, weight and cutting force, they are produced exclusively with a 12 mm shank and can only be used on a table, that is, with a stationary mounting of the router. Sometimes such equipment consists of two cutting discs and is capable of processing both sides of the panel in one pass. Such cutters have the largest diameter of all, so when choosing a milling machine you should immediately think about whether you will be making panels. This consideration directly affects the choice of tool based on the diameter of the hole in its base.