Wood is one of the most popular materials for building houses. This is due to the large number of advantages that wood has. However, along with this, a number of difficulties arise associated with the interior decoration of buildings made of timber or logs. The main problem with wooden houses is the natural shrinkage of the walls. To reduce the impact of this phenomenon, sliding plasterboard fasteners are used.
Features of installing drywall in a wooden house
Wood is a natural material that not only has positive properties, but also some disadvantages. To avoid negative consequences during the construction and operation of a wooden house, it is important to take into account its features. The question of how to sheathe the inside of a wooden house with plasterboard correctly and complete the interior finishing can be solved by following the rules for its installation:
- Before installing drywall sheets, wooden walls are treated with antiseptic agents that will protect against the appearance of rot, mildew and mold.
- The wood is coated with fire retardants to protect the log or timber house from fire. These can be two-in-one antiseptic-fire retardant products.
- Plasterboard finishing is carried out after partial shrinkage of a wooden house - a year after construction.
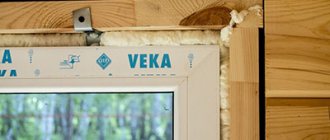
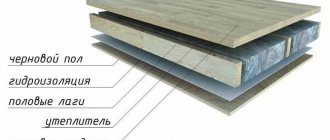
- In case of additional insulation from the inside, a vapor barrier film is laid under the plasterboard sheets. The vapor barrier film prevents the formation of condensation in the insulation.
- Caulking cracks in the crown of the house and sealing cracks in logs and beams will help prevent the appearance of moisture on drywall.
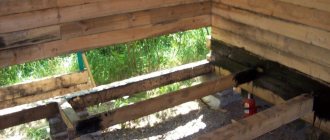
- After the building shrinks, the building material is mounted on a frame that is not rigidly connected to the ceiling and floor of the house.
A deformation gap of 30-50 mm is left between the plasterboard and the floor or ceiling. To do this, pads made of any building materials are placed on top and bottom of the plasterboard sheets. Then they are removed. After finishing, the gaps are closed with decorative skirting boards. The frame must also be independent of the supporting foundation of the house so that the drywall does not deform during operation.
It is very important that the frame is secured to the “slippers” and is floating
Sliding frame made of wooden blocks
It is better to make a wooden frame for drywall from dense wood, such as pine or oak. Regardless of the type of tree, the frame elements must be treated with antiseptic solutions to prevent the formation of mold and rot and fire retardants to prevent the wood from burning.
The algorithm for performing the work is as follows:
- The outline of the future frame is drawn on the floor and a projection is made onto the ceiling;
- Next, mark the places where you plan to install sliding guides for drywall. It should be remembered that from the corner to the near post it is necessary to maintain a distance of about 0.6 meters. The edges of the drywall must rest on the bars;
- For additional strength, intermediate slats are installed between the main bars in increments of 0.2 meters;
- Metal corners are used as fastenings for vertical frame elements, on one side of which there is a vertical oval groove. Direct fixation is performed with a screw and washer. The corners are attached at a distance of 0.2-0.3 meters from each other;
- The outer bars are placed first, between which a fishing line or cord is pulled to install intermediate elements;
- The fixation of the bars should not be strong so that the bolts can move along the mounting angle when the house shrinks;
- After installing all the vertical supports, proceed to the installation of horizontal struts; their location can be arbitrary. However, experts recommend installing the jumper so that the corner of the plasterboard sheet rests simultaneously on the vertical and horizontal frame element.
Advantages and disadvantages
- low cost. To cover the walls of a house with plasterboard, you will need a much smaller amount than when finishing with clapboard;
- easy and quick installation. Drywall sheets are large in size, so they can sheathe large surface areas of walls and ceilings in a fairly short time;
- plastic. The material bends easily. It can be given any shape from rectangular cascades to semicircular arches;
- has good thermal insulation properties, which allows you to save on energy costs and heating;
- has light weight. You can make the interior lining with plasterboard alone, with your own hands, without anyone’s help;
- During installation, free space is created under the drywall in which utility lines can be hidden;
- environmentally friendly material. It does not contain toxic or synthetic additives and is safe for human health;
- The constituent element of gypsum board is gypsum. It is fireproof. Only the cardboard part of the material can ignite, but only from the side of the fire. There are also fire-resistant plasterboard sheets that are not afraid of fire;
- fragility. Drywall can break off during transportation, operation, or installation. Therefore, it must be handled with care. To hang a heavy item on a plasterboard box, you need to use special fasteners. They will help avoid damage to the material;
- cannot withstand temperature changes. It is mounted at a temperature not lower than -10 degrees;
- It occupies a significant area, so it is not used in small rooms.
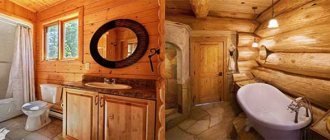
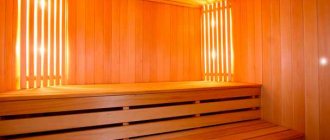
Useful information for those who want to have their own wooden sauna
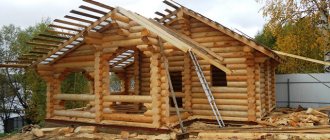
Despite the abundance of modern building materials, characterized by a long service life and affordable cost, natural wood has not lost its leading position in private housing construction for centuries, thanks to its environmental safety and exceptional energy efficiency.
However, when building timber or log houses, one problem arises - strong shrinkage of the structure, which does not allow it to be covered immediately after construction. Because of this feature of the material, it is impossible to immediately begin interior decoration and move into a new home.
A special device will help to avoid roof deformation during shrinkage - sliding rafters, the design of which we will discuss in our article.
Sliding supports for rafters are special devices that are necessary to connect the elements of the rafter frame to each other, but leave them a small reserve of movement, which prevents deformation of the structure during the shrinkage process. In everyday life, these fasteners are often called sliders or slides. They consist of two parts, one of which is stationary, and the other is capable of sliding. Sliding bearings are made of durable, corrosion-resistant metal that can withstand significant loads. The advantages of this method of fastening rafters are:
- The ability of the roof to change its geometry during the shrinkage process, thanks to which the construction of the roof can be carried out immediately after the completion of the construction of a wooden house, without waiting for the wood to completely dry.
- Facilitating the process of attaching rafters. The use of special movable fasteners reduces the share of manual labor when assembling the rafter frame and reduces the time spent on roofing work.
- Provides reliable fastening. Sliding supports, manufactured in the factory, undergo several stages of quality checks, therefore they are guaranteed to withstand the snow and wind loads to which the rafters are exposed during operation.
Please note that movable fasteners for rafters are subject to intense loads during operation, so they are made only from high-strength, low-carbon steel with a thickness of at least 2 mm.
Functions
Shrinkage is the process of changing the size of wooden buildings due to a decrease in wood moisture content, which lasts for 1-3 years from the date of construction. The most active shrinkage occurs in the first year, during which the house may become 1-2 heights lower. It is because of this property of wood that it is not recommended to re-roof immediately after construction. A sliding support for rafters solves this problem by performing the following functions in the structure of the rafter frame:
- Preventing deformation of rafters during the shrinkage of a wooden house. Thanks to such a movable system, the rafter legs adapt to the size and geometry of the structure, compensating for the thrusting loads to which load-bearing walls are subjected.
- Ensuring frame mobility during operation. Wood is a natural material, which during use, even after the shrinkage process is completed, can change its humidity and size. They say about wooden houses that they “breathe”, so the roof rafter frame must adapt to them, also changing dimensions when humidity increases or decreases.
Note! Many people believe that if the rafters and frame of the house are made of the same material, then the rafter system will not be deformed during the shrinkage process. In fact, the shrinkage of different structural components occurs unevenly. In this case, the dimensions and geometry of the frame elements change in several planes at once.
Feasibility of reinforced structure
Today, there are very different opinions from builders and specialists about the construction of houses using double frame technology. Considering that the cost of such construction is quite high, it makes sense to first study the relationship between cost and quality.
Useful: High-tech frame houses
Some experts are of the opinion that, thanks to the use of this technology, the customer can receive a structure that will be durable, reliable and aesthetically pleasing. Interior and exterior decoration of a house can be done in a variety of ways. These features can be considered the main advantages of construction.
Other experts believe that the savings that can be obtained during the operation of the house will reimburse the amount of construction costs only after 10-15 years. It is worth noting that the single-type frame fully complies with the requirements for the thermal insulation qualities of houses in the northern regions.
Types of drywall
According to the intended purpose, plasterboard can be:
- arched. This material is thin 6.5 mm thick;
- ceiling It is intended for arranging suspended structures and finishing ceilings in dry rooms with humidity up to 70%. Its thickness is 9.5 mm;
- wall It is used for cladding walls and arranging interior partitions. Its thickness is 12.5mm.
According to technological features, plasterboard is divided into:
- standard or regular plasterboard;
- moisture-resistant gypsum board;
- fire-resistant gypsum plasterboard;
- moisture-resistant and fire-resistant;
- acoustic. It is used in rooms where increased sound insulation is required.
The material varies according to the type of edge. The edge is:
- straight. Gaps between straight-edged sheets are not sealed. Designated PC;
- Refined edge of the UK. The joints between sheets with such an edge should be puttied, reinforced with sickle mesh;
- the semicircular edge is sealed with putty, but not reinforced (HRK);
- rounded edge of the lock.
Appearance of different drywall
Installing drywall on the frame
This stage is the most critical. Before installing drywall on the frame , you need to check the communications again, whether the insulation is laid (if you use it), and whether there are any cracks at the joints. Next, you need to install the waterproofing film; it should also be noted that it should go on top of the rest of the material, and not end-to-end. The preparation is complete, you can begin installing drywall on the frame . Mark the place for the cut on the cardboard and begin the process. Using a construction knife, cut the cardboard along the marked line, and then simply break the sheet. After carrying out this procedure, cut the cardboard from the reverse side and here are two pieces of gypsum board in your hands. Chamfers may form on the edges; in order to remove them, you will need to purchase a plasterboard plane. Also, if you want to cut out a complex piece, you should use a jigsaw to avoid breaking the material. The work must be done with an assistant who will hold the sheet, and you screw it accordingly in increments of 20-25 cm. Thus, we cover all the walls with plasterboard .
GVL
GCR is a material consisting of a gypsum core and 2 sheets of cardboard. The elements are connected using glue. Cardboard is used as a reinforcing element. It also gives shape to the material.
GVL are gypsum fiber sheets. They consist of a mixture of gypsum and fluff pulp. Waste paper is mixed with water and sheets are made under a press, which are then dried. They are used to level surfaces and frame frames. GVL is a more durable material. Unlike drywall, it can be used to finish floors.
Finishing gypsum fiber board walls in a wooden house is more labor-intensive. Before screwing the screws into the gypsum fiber, you need to drill holes.
Otherwise, it is impossible to tighten the hardware due to the high density and strength of the sheets. Heavy objects can be hung on a wall covered with gypsum plasterboard: shelves, mirrors. This material is suitable for finishing a bathroom in a wooden house. GVL is not flexible, so it cannot be used for arranging shaped elements.
Finishing rules
I counted three such rules that are not found when facing brick or concrete walls.
The first is preventive treatment
It is associated with the instability of wood to moisture, insects, fire and other aggressive factors. If bugs or mold appears under the sheathing, we simply won’t know about it until the walls begin to rot and crumble.
Therefore, the first thing to do is:
- It is good to caulk cracks and large cracks in which bugs can appear and moisture can accumulate;
- Treat the walls with fire retardant (fireproof) and antiseptic (antifungal) compounds;
Treatment with special means will prevent many problems
- And the insulation under plasterboard in a wooden house must be covered with a vapor barrier film so that moisture from the house does not penetrate the wood. Although it is recommended to do this even when insulation is not used.
The second is the sliding frame device
The fact that new wooden houses experience significant shrinkage during the first one and a half to two years, I think, is not worth explaining.
- This is natural, since the tree dries, loses moisture, and with it its original size. It "shrinks".
Shrinkage of one floor can reach 15-20 centimeters
- At the same time, it also leads to it: the beam can bend in one direction or another, and the initially smooth walls become far from smooth. Of course, this cannot be pleasing, so the walls need to be leveled.
- Dry profiled timber is subject to much less shrinkage, but houses made from it are more expensive. And in those that we can afford, the instructions do not recommend starting finishing until complete shrinkage , either inside or outside.
- But even after the drying process is completed, the wooden walls continue to “walk”, since, depending on the air humidity, they either absorb moisture or lose it. The scale, of course, is not the same, but if the frame for plasterboard is firmly fixed to the walls, then the seams between the individual sheets may crack.
Therefore, the frame must be independent and not move with the supporting base . And the ceiling cladding should not be rigidly connected to the wall cladding. This is precisely the main feature of the finishing of wooden houses. The installation of the drywall itself, as well as its putty, is carried out in a standard way.
Third - electrical safety measures
There is one more nuance related to the electrical wiring. Finishing a log house with plasterboard allows you to hide it behind the cladding. But this is fraught with a fire in the walls due to the slightest damage to the wire caused by a screw screwed into it or a short circuit. I’ve seen how quickly such houses burn down.
Ceiling distribution in metal sleeves
That is why the wiring in them is made open, hidden in cable channels. But there is another solution: tighten all the cables into special metal sleeves. Not into plastic corrugations or plastic water pipes, as is often done, but only into metal ones.
Which to choose
To choose the right material, it is important to know the operating conditions of the premises.
For rooms, standard plasterboard is usually used; for rooms with high humidity: kitchen, toilet, bathroom - moisture-resistant.
If possible, you can buy fire-resistant drywall for the entire house. In this case, for the interior decoration of the kitchen and bathroom, the material must also be moisture resistant. Therefore, moisture-resistant GKLVO plasterboard sheets are chosen.
You should pay attention to the quality of the material.
It is better to buy drywall from a well-known brand to be sure of its strength characteristics, for example Knauf.
When choosing, you should determine for what purposes it will be used: for walls, for finishing the ceiling or for creating curly elements. Based on the purpose of the material, you need to select sheets of a certain thickness.
Description of work
In order for the lathing for the lining to be strong and durable, it is necessary to follow a certain work technology.
It consists of three stages:
- Calculation and purchase of materials.
- Preparing the bar for use.
- Installation of the structure.
Each stage is important, so carefully read the entire review to avoid errors during operation.
To get the perfect result, you need to secure the frame correctly
Common mistakes
The most common errors include:
- laying sheets of drywall with the front side facing the wall. They should be positioned with the front side inward. When the front sides of the sheets are combined, a recess is formed at the joints, which is convenient for treating them with putty;
- the formation of cross-shaped seams leads to a deterioration in the strength of the material. Plasterboard sheets must be installed with offset seams;
- the location of the screws is close to the edge. When temperature changes occur, the metal expands and breaks the plaster. The fasteners should be located at a distance of 10-15 cm from the edge and always not opposite each other on adjacent sheets, but offset;
- The screws are screwed in incorrectly. The cap should not stick out from the sheet, this will make it difficult to putty the seams. The level of the hardware can be checked with a spatula. If, when passing the spatula along the surface of the sheet, the head touches the canvas, then the self-tapping screw must be tightened;
- the absence of a compensation gap from the floor and ceiling can lead to the formation of cracks at the joints. The gap should be 30-50 mm.
How to install the frame
The frame is the basis of the entire wall cladding structure - its spine, so if you make mistakes in its calculation and installation, you risk getting curved, unreliable vertical surfaces of the building.
In most cases, sheets of drywall are attached to a prepared frame. The sheathing for plasterboard is made from a wooden beam or metal profile. The second option, called a floating frame for drywall in a wooden house, is used much more often. To implement it you need to prepare:
- profile;
- self-tapping screws, dowel-nails;
- screwdriver and drill;
- sliding hangers for drywall and “crabs”.
Select the required profile type. Typically, two types are used to create lathing - guide and load-bearing. The first, in the standard version, has a width of 25 mm and a length of 3 meters. The main task of the load-bearing profile is to bear the main load of the facing material. It is responsible for the strength and reliability of the frame. When carrying out work on arranging the frame, use a level, it will help create an even structure.
Installation of drywall is carried out as follows and has its own characteristics:
- Having previously calculated the step, mark the installation of horizontal profiles on the wall, retreating from the ceiling by 10-15 cm and vertical ones, respectively;
- horizontal racks are fastened, fixing on both sides;
- then, in pre-marked places, sliding fasteners are installed in a wooden house for vertical profiles and mounted with “crabs”;
- Then horizontal jumpers are attached between the vertical supports using self-tapping screws.
The second stage - preparation of the bar
The finished material must be prepared accordingly.
The work instructions look like this:
- STEP 1: the material should be placed for a couple of days in the room that will be finished. This will allow the bar to acclimatize so that its temperature and humidity are the same as in the room.
- STEP 2: the elements are treated with an antiseptic composition. This can be done using a regular brush, treating all surfaces in order. You can do it differently and make a trough from the boards, which is covered with film. An antiseptic is poured there, and the block is simply dipped; this option provides the highest quality protection.
Sequence of installation of a wood-frame partition
Important! Often, partitions do not require special foundation preparation. However, if they are installed over significant spans of floors or a massive structure is installed, it may be necessary to strengthen its base. In this case, an additional beam is laid with its ends supported on the foundations of the walls.
Frame making
- The projection lines of the frame partition are marked along the ceiling, floor and load-bearing walls.
- Rigid fastening of the end beam is allowed only to the floor. The horizontal load-bearing element can be immediately installed on a thick damper pad, for example, made of felt; or fix it on steel brackets with a gap, which will subsequently be filled with foam.
- Vertical end beams are installed, securing them with temporary rigid connections to the walls.
- Two post beams are also installed at the location of the future doorway. Their vertical position is controlled by a float level, and temporary fixation is carried out by oblique struts to the floor.
- Install the upper horizontal end element. It is often made up of several parts connected by steel plates. The plates are placed on the upper and lower planes of the beams. It is recommended to calculate the locations of such connections in advance so that they are above the vertical posts.
- After assembling the frame of the frame partition, internal vertical posts are installed with a pitch of 600 mm. It is optimal for laying mineral wool thermal and sound insulation with a standard slab width of 610 mm.
- It is recommended to make horizontal jumpers from short bars inside the formed cells in a checkerboard pattern (taking into account the height of the cladding material, if it is sheet). This will not only make it easier to fix the lintels and sheets, but will also give the frame additional rigidity.
- At the location of the doors, a horizontal element is mounted to the vertical bars, limiting the top of the opening. It is strengthened with an additional short vertical post to the upper horizontal beam.
- Rigid temporary connections with walls are replaced with floating ones. They are made in the same way as for the frames of decorative wall cladding in wooden houses.
Important! Having a certain professional skill, you can avoid establishing temporary connections. The end vertical bars are initially secured with floating elements, similar to those shown in the figure below.
Infill and lining
- After the cells are filled with mineral wool, the interior partition made of wood is sheathed on both sides with a vapor barrier membrane (striped with a stapler). At the same time, it is important not to confuse the direction of vapor diffusion - it must be provided with an exit in the direction from the insulation, i.e. from inside the partition. The membrane strips are secured with overlaps, and the puncture sites with staples, damage and joints are taped with tape intended for this purpose.
- If the frame is sheathed with plasterboard, OSB or plywood, then their sheets are fixed with offset joints, which are then puttied. The resulting surfaces can play the role of rough or semi-finish and are subject to further processing in accordance with the selected technology. If lining or blockhouse is used as cladding, then they only need to be coated with paints and varnishes.
The first stage – calculation and purchase of material
To work we need a very simple set of materials:
- Wooden block.
- Fasteners See article nails or clamper.
- Insulation (if necessary).
The block is the main material that we will use.
But in order to calculate the required quantity of all components, you should know several important features:
- FEATURE 1: step of frame location. The optimal distance between the sheathing elements is from 40 to 60 cm. If the lining is thin, then it is better to place the bars more often, this will give the structure additional rigidity. The distance may be different if the length of the walls does not allow maintaining the same pitch of the elements.
- FEATURE 2: If there are openings, a block must be secured around the perimeter. If we are talking about doorways, then it is better to mount two racks at a time to strengthen the system. It is advisable to mount guides at the top and bottom.
It is important to strengthen the openings well
- FEATURE 3: when using insulation, the thickness of the block must be no less than the thickness of the heat-insulating material. The most commonly used option is 50x50 mm or 50x40 mm.
- FEATURE 4: When purchasing material, pay attention to its moisture content. It should be no more than 15%. Raw elements may become deformed or crack when dry, so they should not be used.
Draw an approximate diagram of the sheathing with the pitch of the elements and their location. This will allow you to accurately calculate the required amount of material and not buy an extra bar.
- FEATURE 5: the insulation is calculated based on the area on which it will be mounted;
- FEATURE 6: fasteners are selected based on the type of base. For concrete and brick, quick installation dowels are needed; for wood, self-tapping screws or nails are used.
The length of the dowels depends on the thickness of the bar