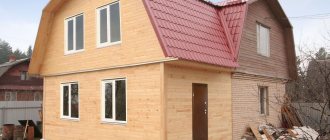
Often there is a need to expand the existing space. This usually happens in cases where a house is being built gradually: they built the main room, wanted to add a terrace, then a veranda, then a canopy, a canopy, etc.
In this article you will find step-by-step instructions on how to make extensions to your house with your own hands.
Building an extension is similar to building the house itself. Here, as everywhere else, there is a foundation or foundation, walls, a roof.
To comply with all construction rules, you should order an extension project from the designers. Such a project consists of an architectural part with the layout of the premises and facades of part of the building, strength calculations of all structures, geology, construction plans, sections, plans for electrical, plumbing, etc. Such a project may even contain a section on landscape design of the adjacent territory, which will fully ensure reliability and beauty of the building.
This option has only one, but very significant drawback - the high price. Yes, such a project is very expensive.
Therefore, people save on designers and build without any projects. The result is collapsed roofs, rickety walls, cracks in the walls the size of a fist, extending from the main building of the extension...
I suggest you choose the golden mean - make small buildings yourself, such as extensions, without a project, but relying on the experience of people who have already done this. The main thing to remember is that it is better to play it safe and choose a more reliable structure than to then cry over a roof that has collapsed under the weight of snow.
Under the weight of snow, a roof structure made without appropriate calculations may collapse.
When building an extension, we advise you to choose all structures with a safety margin, remembering that we save by not having to make calculations.
Using a minimum of construction skills, you can make an extension to your house with your own hands quickly and cheaply.
After completion of construction, it is necessary to make appropriate changes to the state cadastre, that is, to legalize the extension.
How to legalize an extension to a house
The construction of an extension requires serious consideration, just like the construction of a “full-fledged” house. First of all, you need to obtain permission to add an extension to the house. Many owners of private houses, believing that there is no need to register an attached premises, make a big mistake.
- A part of a house that has been added illegally cannot be sold.
- In the process of resolving a land issue with neighbors, it may turn out that the extension to the house is located on the boundary or extends into the adjacent territory. In this scenario, the extension must be demolished.
Construction of an extension to the house
Features of insulation
Features of insulation
Insulation of a building is one of the most important factors for a comfortable stay in it in the future. In fact, all the nuances concerning the insulation of a frame extension completely coincide with the insulation features of full-fledged houses built using frame technology. For insulation, you can use a variety of materials, both traditional and more modern: ecowool, sawdust, basalt mineral slabs, extruded polystyrene foam and much more. From the point of view of speed and ease of installation work, perhaps, mineral slab insulation is optimal. Such insulation must be tightly laid between the frame racks in several layers, but without kinks or pinches, which over time can lead to the formation of “cold bridges.” An important feature during the work is the need to shift the joints between the slabs relative to each other in adjacent layers. This principle must be observed not only when insulating walls, but also ceilings and floors.
How to build an extension to a house
Extension to a brick house
When planning construction, it is important to unambiguously determine the functionality of the attached room, so that later “not to redo what has been remade.”
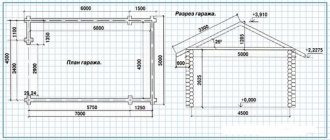
- The garage space must be planned with a solid concrete floor in mind. There is no need to raise the floor level in the garage to the floor level in the house.
- Before laying the foundation of a room intended for a bathroom, communications must be installed inside - water supply and sewerage. The material for the walls in this case is brick or foam concrete. It is not recommended to use wood building materials for the construction of rooms with high humidity.
- In the additional living room, it is necessary to create all the conditions for comfortable living - high-quality insulation and waterproofing.
Note! Foundation waterproofing is necessary for all types of individual buildings and extensions.
Despite its “frivolous” name, the extension to the house is a full-fledged part of the house with all the functional and operational characteristics. All stages of building an extension and a house are repeated, but the technologies have some differences.
Floor arrangement
Smaller cross-section bars are installed to the bottom of the horizontal beams attached to the foundation of the extension. A rough floor made of boards is laid on top. Then the subfloor is covered with a waterproofing film and vapor barrier.
Insulation is laid on top. For these purposes, it is better to use expanded clay stone or polystyrene foam; it can be insulated with mineral wool. A second layer of vapor barrier is laid on top of the insulation. The resulting pie is covered with a layer of plywood, which will serve as the basis for laying the final floor covering of the frame extension.
Foundation for an extension to a house
Foundation for an extension to a house
Construction of the foundation is the most critical stage of any construction - the future behavior of the building structure depends on the quality of the work. Experts recommend constructing a foundation for the extension that matches the type of foundation of the main building.
You should not make a strip foundation for an extension when the house is on a pile foundation. The impact of soil on different types of foundations is not the same, resulting in different shrinkage.
There are two options for constructing a foundation for an extension in relation to the base of the house:
- Combine the foundation of the extension with the main one into a fixed rigid structure. To do this, the design of the foundation of the extension must be similar to the foundation of the house. The bases are connected using reinforcement pre-hammered into the drilled holes. The solution is relevant for stable, non-heaving soils, if it is possible to predict the shrinkage of the extension.
- Make a separate foundation. In the case where the main building is much more massive than the extension (or is located on unfavorable soil), their shrinkage is noticeably different. To minimize possible damage to the building, a sedimentary expansion joint is installed between the foundations.
In the construction of an extension, as in the technology of building houses, all types of foundations are used - strip, pile and slab.
Legal requirements
For the construction of additional structures, properly executed documentation and compliance with legislative acts in the relevant area are required. Even adding a porch to a house without permission can cause conflict with the authorities and, worse, a state of emergency. Therefore, it is important to take into account all ideas already at the design stage.
The process of completing all documents for the construction of an extension to an already finished house is one-time in nature. Step-by-step instructions will help you go through all stages of the legal path :
- First, get consent from your neighbors in writing.
- Order a soil survey in the area where you plan to build a new structure.
- Prepare a project for the extension.
- Organize an assessment of the condition of the house that has already been built on the site.
- Confirm the legality of your project by obtaining permits from all necessary government agencies: utilities, electricians, fire safety, licensed construction company.
- Apply for a permit for new construction from a local architectural firm.
- When you have completed all construction work, pass the object through all the services that authorized its installation. They accept the object and allow it to be used.
- Register the building with the cadastral service and the tax office.
- Re-sign agreements with utility services, which will now record changes in area.
It is easier to entrust the development of the project to the relevant organizations in order to be sure of its correctness.
Construction of a rigid strip foundation structure for an extension to a house
The technology for making a strip foundation does not require special knowledge - it is not difficult to arrange it yourself. It is more difficult to make a high-quality connection to obtain an overall rigid structure.
- We dig a trench along the entire perimeter of the walls of the extension along the marking line. The depth of the trench should match the depth of the main foundation. Width – 10 cm more than the planned wall thickness.
- We lay a crushed stone cushion for the foundation and compact it well.
- We install roll waterproofing along the bottom of the trench. In private construction, roofing felt is mainly used.
- At the junction of the foundation of the extension with the base of the house, we drill holes with a diameter similar to the diameter of the reinforcement (12-14 mm) and a depth of at least 50 cm. The number of holes depends on the number of rods of working reinforcement in the foundation frame - for a strip foundation of medium depth (70 - 100 cm .) 6 rods are enough, running in pairs in three levels.
- We prepare pieces of reinforcement of the required size (hole depth + 25-30 cm for outlet) - we make a longitudinal cut 4-5 cm deep, into which we insert a wedging liner - metal, but it can be made of wood.
- We hammer the reinforcement into the hole. In the process, the liner decompresses the body of the reinforcing bar and jams it, creating a reliable connection. Now the reinforcement outlets can be used as a structural element of the extension base.
- We arrange a reinforcement frame and install it in the trench. We weld the edges of the frame to the outlets of the reinforcement fixed in the main foundation.
- We install the formwork to the entire height of the foundation. In private construction, removable formwork made of wooden or metal panels is mainly used. If you plan to insulate the foundation, then polystyrene foam slabs can be used as formwork.
- We prepare a concrete mixture in the ratio 1:2.5:5 (1 part M-400 cement + 2.5 parts sand + 5 parts fine or medium crushed stone).
- We pour concrete into the formwork. Concrete should be laid in layers around the perimeter. Ideally, pour the entire foundation in one day. You cannot make sharp breaks in the concrete, but if you had to stop the work, then the cut of the “tape” must be arranged in “steps”.
- After the concrete has set, after 2-3 days, remove the formwork and backfill.
I would like to draw your attention to the fact that under normal weather conditions, concrete needs 28 days to fully mature. Within 5-7 days, the concrete intensively gains strength up to 70% of the calculated value, but this is not enough to continue construction work.
Wall “pie”: characteristics
Wall “pie”: characteristics
The ultimate goal of any construction work is the creation of a durable structure, in which living will be comfortable and cozy. The quality of the wall “pie” has the most direct and decisive influence on achieving this goal. When insulating the walls of a frame house or extension, you need to remember that properly installed vapor and wind insulation is the key to long service without loss of performance characteristics of any type of insulation. If you forget about this, the insulation will very quickly absorb moisture from the environment and become unusable.
If we consider the layers of the wall “pie” from the inside of the frame extension, then they should go in this order:
1. Internal lining,
2. Air gap (10–20 mm),
3. Vapor barrier,
4. A layer of insulation,
5. Windproofing,
6. Exterior finishing.
Traditional roofing felt or glassine can be used as wind protection.
The second option is more preferable, since it does not deform when exposed to high ambient temperatures. When installing vapor barrier membrane materials, you need to place their smooth surface towards the thermal insulation layer, and the fleecy surface towards the room. The fibers prevent condensation from forming on them, which prevents excessive wetting of the insulation.
Installation of a separate strip foundation for an extension to the house
The technology for constructing a separate foundation is no different from constructing a rigid structure. The only difference is that the foundation of the extension is separated from the base of the house by an expansion joint. The expansion joint passes through the entire structure of the extension - foundation, walls, roof. There are several types of expansion joints, divided by functionality:
- Sedimentary;
- Seismic;
- Temperature;
- Shrinkage.
Let's consider the simplest version of an expansion joint that will be useful to us - a shrinkage joint.
- We dig a trench, arrange a crushed stone cushion, lay down roofing material and install a reinforcement frame - we do everything as when installing a rigid structure, but we do not attach the frame to the existing foundation.
- If the wall of the main foundation is flat and oriented strictly vertically, then when pouring between the fresh foundation and the existing one, we lay roofing felt or linoleum, or any material that does not prevent vertical shrinkage.
- If the formwork of the existing foundation was poorly done - there are unevenness on the wall, there is no vertical line, then the shrinkage joint will have to be filled with an elastic synthetic material, for example, polystyrene foam or polyethylene foam. The thickness of the seam depends on the degree of deviation of the foundation wall from the vertical value.
Note! When planning a shrinkage expansion joint, count on the fact that it will pass through the entire structure - from the foundation to the roof.
By cooperating with us you get
Guarantee of meeting deadlines
- Delivery of the project is always on time
- In case of delay, we incur a penalty of 3% per day
Transparent, fixed estimate
- No hidden extra work
- You pay only for what you need, and you choose what you need yourself!
Daily photo and video reports
- Work progress reports via WhatsApp or email
- You will be in the know, even if you cannot be present on site.
Construction of a pile foundation for an extension to a house
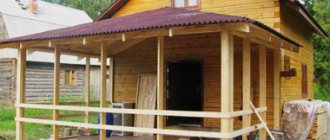
Extension to a house at the construction stage
The design of a pile foundation is noticeably different from a monolithic strip - the base of the extension rests on separate concrete supports buried in the ground. Pile foundations are mainly used for extensions of lightweight frame-panel construction.
Let's get acquainted with the process of constructing a pile foundation:
- We drill the estimated number of wells. To construct a foundation for an extension, a well 50 x 50 cm deep is sufficient. We calculate the number of piles based on the area of the building.
- We install an improvised roofing felt formwork in the well - it does not allow cement “milk” to go into the soil, which has a positive effect on the quality characteristics of concrete. In addition, the formwork serves as waterproofing.
- We lower a reinforcement cage of 3-4 rods into the well. The upper part of the reinforcement bars may protrude above the soil level, or may be flush with the ground (if the outer part of the pile is made of brick).
- We make concrete using the proportion 1:2.5:5 (1 part M-400 cement + 2.5 parts sand + 5 parts medium or fine crushed stone).
- We pour concrete into the well. During the pouring process, we seat it with a reinforcing rod or small diameter pipe.
Construction of a slab foundation for an extension to a house
This type of foundation is in demand mainly in areas with increased seismic activity and unstable floating soils. On deeply frozen and moist soils with a high groundwater level, it is most reliable to make one monolithic slab under the entire building.
The lower side of the slab is in contact only with the upper part of the soil, so soil deformations (heaving, shifts) do not affect the stability of the structure.
In a situation where a garage or extension to a house is attached to a house with a floor level lower than in the house itself, a slab foundation has certain advantages:
- Separate solid foundation. Reduces pressure on the soil due to the distribution of the weight of the structure over its entire surface area - accordingly, there is less shrinkage of the extension.
- Serves as a finished floor in a garage.
The structure of a slab foundation looks like this:
- We install formwork around the perimeter of the entire extension. The height of the formwork depends on the massiveness of the future building. For an extension, 40-50 cm is enough.
- We arrange a frame inside the formwork. The reinforcing frame must have at least two layers of working reinforcement rods. The first row (layer) is placed 5-6 cm from the ground, the second - not reaching 5-6 cm to the top of the planned slab.
- Prepare and pour concrete, preferably in layers.
When laying the foundation, one should not forget about waterproofing. When installing a strip foundation, roll waterproofing can be arranged even before pouring concrete. When laying roofing felt at the bottom of the trench, place the strips on the walls and formwork. In this case, after removing the formwork, the roofing material will remain glued to the concrete - all that remains is to process the seams and joints.
Why does deformation occur?
Deformation during foundation shrinkage
Different foundations behave differently when in contact with soils susceptible to heaving. Therefore, if the base is strip, then the new one should be the same. Another important rule: you cannot lower the new foundation below the main one.
How to determine the width of the sole of the strip base:
- You need to take a metal rod, the end of which is bent at a right angle.
- We push the rod under the structure so that the hook is positioned horizontally.
- After the rod passes the base, we unfold it so that the hook is positioned vertically, with the tip up.
- Pull the rod towards you until it stops.
- Let's make a mark.
- Unfold and pull out the rod.
- The segment from the mark to the fold is equal to the width of the sole.
Reasons for shrinkage of the extension:
- The main building has usually already settled down, but the new extension is just beginning to sink.
- Part of the attached foundation rests on imported soil, and part on “native” soil. This leads to complex deformation displacements, causing the formation of cracks in the most unpredictable places.
The consequences of natural shrinkage can be minimized by extending the construction period. To do this, we allow the foundation to stand for at least one season. The extra weight will cause some shrinkage, but not as much.
Walls of a house extension: choice of material
Wall of an extension to a house
Let's consider the most popular building materials for an extension, let's simplify the solution to the question of how to make an extension to a house with your own hands?
- Brick.
Thanks to such qualities as strength and durability, brick is still in demand in the building materials market. Brick is a cold material, so additional insulation is necessary. The large weight of brick walls requires a reliable and durable foundation. Another “disadvantage” of using brick for the walls of an extension is the high cost of the material and work. Working with brickwork requires a professional approach. Small sizes require more time spent than building walls made of foam concrete or cinder block. - Blocks
of various types - cinder block, foam block and aerated concrete blocks. In the southern regions, natural porous material from sedimentary rocks - shell rock - is used for construction. All block-type materials are united by affordable cost and short construction period. Due to its porous structure, the material has high thermal insulation characteristics and is much lighter in weight compared to brick. A building made of blocks does not require a powerful reinforced foundation. “Minus” - the surface of block walls is not resistant to negative environmental influences, so their external finishing is necessary. - Beam.
All timber – glued, planed and rounded – has high environmental and thermal insulation characteristics. Affordable cost involves the use of wooden beams in the construction of extensions for various purposes. Wooden beams are widely used in frame construction, which stands out from the general background due to its fast pace and simple technology. Despite all the advantages of an extension to a house made of timber, the fragility of the structure remains in the shade, although with proper construction and proper care it can last for quite a long time. - Plywood, chipboard and OSB
are used for constructing walls in frame construction; they have an affordable price and good noise and heat insulation properties. Residential extensions require additional insulation.
To all the materials and technologies considered, monolithic construction of the extension should be added. Many people do not take monolithic technology into account, considering concrete to be a very heavy and cold material.
What is overlooked is that instead of crushed stone, porous, and therefore lightweight materials, such as expanded clay and slag, can serve as filler for concrete. The process of monolithic construction of an extension is quite labor-intensive, but economical owners will be pleased with its availability of materials and cost.
Extension to a house made of foam blocks
Let's consider one of the popular technologies for building an extension to a house with your own hands - walls made of foam blocks on a strip foundation.
- We check the upper part of the foundation “ribbon” for compliance with the horizontal level. If there was a deviation along the horizon when laying the foundation, do not despair - everything can be corrected, although additional “movements” will be required.
- We install waterproofing on the surface of the foundation. It’s up to you to choose the type of insulation; we can only recommend roll insulation, proven by time and generations of developers – roofing felt. A positive feature of this material is that you don’t have to wait for it to dry and set. It is enough to spread the roofing material along the foundation strip, press it down with bricks so that it does not blow away, and you can begin work.
- We begin laying the wall by arranging the corners. No matter how you explain it. One thing is important - the angle must be strictly vertical and maintain 90 ° at the base. It will not be difficult for anyone who has an understanding of “brick” masonry with its dressings, grooves, pokes and spoons to arrange a corner. For a person who is far from all this, but is ready to make an extension to the house with his own hands, it is advisable to get advice from a specialist. For a small extension, there is no need to raise the corners to their full height - it is enough to arrange 3-4 rows of each, then lay a gap between them, evenly distributing the load on the foundation.
- First, even before installing the corners, lay out the blocks on the foundation “dry”, calculate their number in a row - this will eliminate the need to lay halves or even smaller pieces of blocks in the most inappropriate places for this in the wall structure - under door and window lintels, at corners . Otherwise, the dressing may be damaged, resulting in weakening of the entire structure.
- We lay the first row on cement mortar, all subsequent rows on a special adhesive mixture. The advantage of the adhesive mixture is that its plasticity allows you to obtain a horizontal seam less than 1 cm thick. The cement mortar is not so plastic, but it is perfectly suited for leveling the first row.
- We repeat the process of laying blocks until the required height is reached.
- To further strengthen the structure, we insert reinforcement into the masonry every 4-5 nearby. To do this, we make a longitudinal groove along the entire row, including the corners, place a reinforcing rod in it, and cover it with the next row of blocks. Now the reinforcement is inside the masonry, connects the entire structure, and gives additional strength.
- Along the last row of the entire perimeter we install a monolithic reinforced concrete belt. For detached buildings made of foam blocks, the installation of a belt, in some cases more than one, is a prerequisite. For a small extension, provided there is a high-quality foundation, the installation of a monolithic belt is not necessary, but is desirable.
Note! If the deviation is less than 2 cm, then we will cancel it by changing the thickness of the horizontal seam when laying the first row of blocks. If there is a discrepancy with the horizontal level of more than 2 cm, we make a screed along the top of the concrete.
Methods of connecting an extension to a house: general structure and expansion joint
The foam block almost does not shrink, but so that this “almost” does not spoil our mood, we will analyze ways to connect the main wall of the house and the walls of the extension using the example of a block extension to a brick house.
In the case when the foundation of the extension is combined with the main one into a common rigid structure, the walls must be permanently connected. The principle of joining walls is the same as joining foundations.
At the level of the horizontal row of masonry, we drill holes in the existing wall - two are enough. The diameter of the holes depends on the size of the reinforcement - 10-12 mm, depth 25-30 cm.
We prepare pieces of reinforcing rod (embeds) 50 cm long.
We hammer the reinforcement into the holes. To secure reinforcement in a dense base, two methods are used:
- We make a longitudinal cut of 5-6 cm along the edge of the rod and fix the wedging element in it. During the driving process, the wedge works to expand, firmly fixing the reinforcement in the brick wall;
- We fill the hole with an adhesive mixture or cement mortar, preferably to the full depth, and hammer in the reinforcement. In this case, the hole diameter should be 4-5 mm. greater than the diameter of the embedded rod.
We overlap the embeds with the block of the next row - to be able to manipulate the thickness of the horizontal seam in the block, we make a longitudinal groove in the place where the embed will be located. Mortgages are placed every 2 rows of masonry.
Note! The upper reinforced concrete belt is connected to the wall in the same way as the foundation frame - the reinforced concrete frame is welded to the mortgages installed in the wall.
If the project provides for an expansion joint, then the joint arrangement is technologically somewhat different.
- Drill a hole in the wall.
- In the foam block we make a groove 5-6 cm deep.
- We lay the block into the structure. When installing, do not fill the groove with mortar. This connection design does not allow the wall to deflect horizontally, but leaves free vertical movement within the depth of the groove.
- We fill the joint between the wall of the house and the wall of the extension with polyurethane foam.
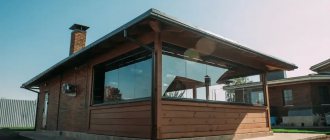
We looked at the most common technology for adding to a house, which allows you to add any type of premises to the total area - living and utility rooms, bathrooms and garages. If there is no need for an additional living room, and the plan is to add a veranda to the house, the next chapter is for you.
Application of rigid connection
When constructing brick or concrete extensions, a rigid connection is practiced, where the mass of the structure per unit area is high. This connection is not used for wooden houses. A rigid connection means that the extension is connected to the house by existing partitions, ceilings or roof.
To make the base, you need to drill a hole with a diameter of a reinforcing bar and ensure a immersion depth of about 1 meter. Then reinforcement is driven into the hole, connected with anchors or welding and fixed with concrete mortar.
With a closed contour of the structure without visible or load-bearing elements of the reinforcing belt, holes must be drilled in a checkerboard pattern. The required amount of reinforcement, drilling interval and method of connecting the rods is calculated individually.
For a wooden house, less reinforcement is used due to the low mass of the house, for brick houses - several times more. On average, a closed loop needs reinforcement at the rate of 20 rods with a diameter of up to 9 mm per 1 m². For an open contour, the calculation of the amount of reinforcement is carried out individually.
Roofing for an extension to a house
To facilitate the construction, the construction technology of the extension provides for the ceiling and roof truss system made of wood. The vast majority of roofs on extensions are pitched. The design of a pitched roof allows even a novice craftsman to install it himself.
- We arrange a mauerlat - a support board fixed around the perimeter of the walls. The Mauerlat serves as the basis for fastening the floor beams and rafter system. Considering that the extension to the house has three walls, the part of the Mauerlat intended for the fourth is attached directly to the existing wall of the house. For fastening we use anchor bolts.
- We lay floor beams on the Mauerlat - a small block or frame extension to the house requires beams measuring at least 150 x 50 mm. We take the step between the beams arbitrarily, but not more than 1 m.
- We install vertical posts on the part of the Mauerlat fixed to the main wall and fasten them with metal corners.
- We arrange the rafters, not forgetting about the cornice outlet above the plane of the extension wall, and tie them together with lathing.
- We arrange roofing material along the sheathing. When installing a roof on an extension, it is advisable to choose lightweight materials - ondulin, metal tiles, profile sheets.
Consideration of the case
In Russia, a fairly extensive judicial practice has developed regarding the recognition of ownership rights to unauthorized extensions. And it is not always possible to legitimize it in fact. This is due to various reasons. One of them is the lack of documents confirming that the owner tried to register the extension according to the law.
During the consideration of the case, the court appoints a construction examination. The plaintiff pays for the examination. It is necessary to verify compliance with building regulations. If the expert opinion indicates that the extension violates SNiPs or urban planning regulations, it will be impossible to legitimize it. A decision will be made to restore the house to its original condition.
When all the standards are met, the conclusion of an independent examination will be an important argument in your favor. After studying the case materials, the court makes a decision.
Finishing work in the extension to the house
Previously, when planning to build an extension to a house, they tried not to break the rule of what the house is made of. The extension was made from the same material. This was the case before – the choice of building materials was limited to blocks, bricks and cement.
Modern construction technologies make it possible to ignore the heterogeneity of the material. An extension to a brick house can be lined with siding and get an excellent architectural ensemble.
In addition, the siding - and all the slatted finishing materials installed on the frame - perfectly hide the gap in the expansion joint, which nevertheless forms at the junction of the walls of the extension and the main wall of the house.
Selecting a construction team and the secrets of strict control
When choosing a team of workers to build an extension, it is important to immediately clarify the timing, cost and quality of the work. It is better to use the recommendations of friends and see with your own eyes the result of the work of this team. It is important to draw up an estimate and approve it, establish stage-by-stage payments, and not pay an advance (or give the minimum).
Selection of a construction team
To control the work, you can hire an independent foreman, carry out unexpected checks yourself, and pay for the work only after drawing up a handover certificate.