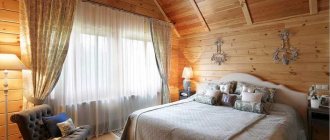
Tools for grinding timber
The question of what is the best way to sand timber inside a house is far from idle. The speed and quality of work largely depends on the correct choice of grinding devices. Previously, sanding was carried out only by hand using a chisel and sandpaper of different grits. But manual sanding is a rather long and tedious process. Today, manual grinding is practiced only for processing hard-to-reach places in the corners of logs, and grinding the entire area, as a rule, is done with different power tools.
- The most common method of grinding beams is using an angle grinder or grinder with attachments in the form of grinding wheels of different numbers. For initial processing and surface cleaning, nozzles with coarse abrasive No. 30-60 are used. Fine sanding of the wooden surface is carried out using an abrasive attachment with fine grain No. 80-120. An angle grinder is also suitable for processing the internal walls of a log house made of planed logs.
- A belt sanding machine, which processes the surface using a rotating abrasive belt, does an excellent job of sanding a house made of profiled timber. The machine is well suited for removing old paintwork from a large area. The functionality of the device largely depends on the length of the working blade. It is better to process a large area with a machine designed for a belt length of 610 mm. Most models are equipped with a bag to collect shavings and sawdust, which allows for dust-free sanding.
- To sand the interior walls of a log house, you can use an orbital sander with a rectangular base. Machines of this type are distinguished by high quality grinding, so they are most often used for fine finishing and polishing of wooden walls. Models with a triangular platform are suitable for processing hard-to-reach areas - corners and grooves of a log house.
During sanding, a large amount of dust is generated. If wood processing is carried out with tools without a dust collector, then it is necessary to take care of body and respiratory protection: a respirator, goggles, gloves.
Grinding technology and necessary equipment
Stages of sanding walls inside a timber house:
- rough processing with a grinding machine to level out unevenness and remove external defects;
- fine grinding using fine-grained sandpaper (up to No. 100);
- polishing by hand using abrasive no. 120 – 180.
Necessary equipment:
- a belt sanding machine with a power of at least 1 kW with a set of sanding belts of varying degrees of grain or a grinder with sanding attachments for rough cleaning. For finishing, vibrating grinding equipment is used. Some models of sanders are equipped with a dust collector. For rough sanding use sandpaper No. 40 - 60, for removing lint - No. 190 - 220, for finishing work - No. 90 - 120. During reconstruction, sandpaper No. 100 - 140 is used to remove old paintwork;
- a special angle grinder or “grinder” for sanding corners with a set of abrasive discs of different parameters;
- sandpaper (several types with different grain sizes) for cleaning hard-to-reach places where it is impossible to work with a sander;
- a construction vacuum cleaner to remove dust (if the sanding equipment is not equipped with a built-in dust collector). It is impossible to do without a thorough cleaning of the house after sanding the timber before applying impregnations, as well as before painting or varnishing. Otherwise, high-quality coverage will not work;
- auxiliary equipment: chisel,
- stepladder (stand, ladder, construction trestles),
- extension cord for electrical wire.
Don't forget about safety precautions. To prevent pieces of wood chips or wood dust from getting into your eyes, you should protect them with special glasses made of unbreakable plastic. And the respiratory organs - with a professional respirator.
Log grinding technology: stages of work
Do-it-yourself sanding of profiled timber or logs is carried out in several stages:
- Rough grinding (rough).
- Processing grooves and corners.
- End processing.
- Final sanding (fine).
- Decorative treatment of log house with protective compounds and impregnations.
The process of external and internal grinding of a log house requires frequent changes of working attachments due to the formation of a large amount of wood dust. To clean the nozzles from dirt, you can use a steel brush treated with an antiseptic.
When working with wood, do not forget about basic safety rules, using personal protective equipment - goggles, gloves, mask and overalls.
Sanding timber walls inside and outside the house is carried out in the following order:
Personal means of protection against the negative effects of wood dust are used. Sanding is carried out from top to bottom. The wall area is divided into equal sections, which will allow for better grinding. The material is checked for problem areas - old loose pieces are removed, and the affected areas are cleaned of mold and mildew. The quality of the caulk is checked, and any defects in the form of cracks and gaps are eliminated with wood sealant. Rough grinding of the surface is carried out using large nozzles. This will help get rid of existing unevenness and roughness. When using a grinder, it is recommended to grind disc attachments on remote areas of the log house - above window and door openings, near corners. In this way, possible sparking of the nozzle and damage to the wood can be prevented. In addition, when processing surfaces, it is better to move the tool with the shoulder joint, rather than with the hands, in order to obtain the most even surface possible. Next, fine-grain attachments are used to remove wood lint.
Processing the material with the tool is carried out carefully at medium speed, which will help avoid damage to the wood and the formation of grooves on the walls. The ends and grooves of the frame must be thoroughly polished, since they are more susceptible to the negative effects of external factors. To process the ends, you can use attachments with a grain size from 40 to 120. Hard-to-reach places, as well as internal and external corners, are ground with a chisel with a blade width of 25 mm. The surface is cleaned of dust with a vacuum cleaner and a brush with nylon bristles. The sanded walls of a timber or log house are treated with antiseptic compounds to protect against fungus and mold, glazing agents to refine the wood, fire retardants to increase resistance to combustion, acrylates to protect against the negative effects of precipitation
To prevent darkening of the wood, sanded surfaces are treated with protective compounds no later than 2 days after sanding. Painting of the log house is carried out 36-72 hours after completion of sanding and impregnation with protective compounds.
Sanding logs is a long and rather painstaking process, the organization of which will require high-quality equipment and minimal experience in working with wood.
Purpose of grinding a log frame
1There is a whole range of problems that can be solved by sanding a wooden house. First of all, it is an important condition for high-quality painting, as it allows you to smooth the surface of the log, removing all roughness and dust that appeared during shrinkage. As a result of high-quality sanding of a log house, the paint will apply more evenly, will better protect the surface of the log, and most importantly, it will simply look much neater and more attractive. In addition, this stage is necessary to remove the darkened layer of wood in order to return it to its natural color and expressiveness. Thus, you can significantly improve the appearance of the log house walls.
2Also, sanding the frame with fine sandpaper will be necessary as a preparatory step before applying varnish. Bleached logs are also processed in this way. It’s worth noting right away that, given the need for high results and quality of the prepared surface, you should not refuse the offers of professional craftsmen. Moreover, the price of polishing a log frame is quite reasonable.
3One of the key factors causing the need to sand a log house is fungal damage to the wood. Unfortunately, the spores of the fungus that causes wood to turn blue are spread by the bark beetle and penetrate the material while still in the forest, during its growth stage. As a result, the wood turns an unpleasant, sickly color even before the forest is cut down. In addition, non-compliance with drying technologies, improper storage of logs, high humidity, etc. can lead to wood contamination with mold, which will appear in the form of spots of various sizes and colors. Fortunately, these fungi in no way affect the strength characteristics of the material and only spoil its appearance.
- The main thing is that this problem is easily solved: in order to get rid of infection and unattractive color of the wood, the logs must first be dried.
- After installation, mandatory sanding of the log house is carried out, which removes the affected layers of wood and returns the material to its original beauty.
- Within 2-3 days after this procedure, the sanded surface is treated with antiseptics and other broad-spectrum chemical compounds, which will avoid relapse.
- It is worth remembering that before sanding a wooden house and applying the composition, you must wait until the moisture content of the log decreases to a level of less than 20%.
Preparatory stage
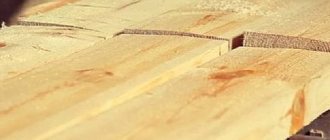
During planing, a so-called radial structure can form on the timber, which threatens the wood to peel off. Therefore, the first task is to carefully inspect the tree.
The solution must dry completely, for this you need to wait a day. As a result, small particles will stop “ruffling”. This will help prevent failure of the grinding wheels and protect normal areas of the timber from defects.
You can deal with this problem at the ends using a blowtorch. With its help, the pile is burned and removed. In addition, it makes the wood stronger and more durable. Since the ends are the weakest link of the structure, this approach provides better subsequent grinding and additional polishing with fine sandpaper.
Correctly carried out preparation and grinding of the ends will lead to the following:
- the wood will dry quite slowly, due to which the shrinkage will be uniform;
- painting and varnishing the timber will require much less material, which will make their consumption more economical.
Useful recommendations also cover other important points.
- It makes sense to start sanding work only after the roof has been erected. After this, new irregularities and defects may appear.
- It happens that the timber turns blue. Then, before sanding, you must first clean the walls with sandpaper and then polish.
- The beams may darken 6-7 days after treatment if they were not previously coated with protective agents.
Recommendations from experts
Knowing the intricacies of the technological process, you can sand laminated or profiled timber with your own hands. Below are some tips from professionals from EXIMA.
- Sanding is performed after the cottage has finished shrinking and dried. Processing wet wood will cause scoring. This advice applies to buildings made of profiled lumber. Buildings made from thermo-glued material practically do not shrink, so you can start finishing immediately after constructing the frame of your future home.
- How and when to properly sand a house made of timber? This should be done after the roof is built, but before the windows, doors, finished floors and ceilings are installed. This is due to excessive dust in the grinding process.
- When sanding laminated wood, do not use excessive physical force. This may cause damage to the outer slats.
- Work should be carried out at low or medium speed of the grinder. Otherwise, deep cuts are possible.
- The surface to be sanded must first be thoroughly cleaned of any exposed resin. This is done manually using a metal scraper and solvent. It clogs the pores and dissolves the resin liquid that has already appeared.
- If there is a so-called radial structure (“eye”), this zone must first be prepared. To do this, cover the “eye” with several layers of glue (so that it does not fall out during electric grinding). You can start processing when the glue has dried completely, i.e. in about a day.
- When sanding timber, you need to ensure that the direction of the wood fibers and the movement of the sander coincide. This is the only way to get a high-quality result.
- The nozzle on the equipment should be changed whenever it becomes clogged (clogged with wood dust and resin). The abrasive can be cleaned with a metal brush and alcohol, but this will significantly deteriorate the result.
- It is easy to check the quality of the work done. It is enough to run your hand along the finished wall. It should be perfectly smooth.
- The treated surface must be coated with varnish or paint in the shortest possible period of time. Otherwise, the wood will quickly darken and lose its attractive appearance.
Technology
It is necessary to grind the dry timber; if it is not dry enough, you will have to wait until it dries and the walls shrink. If you work with damp wood, then scratches will form on the surface of the walls and there will be no effect from the specified work.
The work can be done either with a grinder or with a grinder, using attachments with different grain sizes. The first time the wall is rough processed, for this purpose sandpaper with a roughness of 40-50 is used.
The speed of work will depend on many factors: the skill of the craftsman, how resinous the wood is, the characteristics of the tool used, and the quality of the surface.
In hard-to-reach places where it is impossible to approach with a power tool, work is performed with a wooden block onto which sandpaper is attached.
Glued laminated timber is initially smooth, so it does not need to be sanded with coarse-grained sandpaper; sanding is done with fine-grained sandpaper, starting with a grit of 120 and higher.
It is most convenient to process grooves and ends with a grinding attachment for an angle grinder or a circular sander; in hard-to-reach places, grinding is done manually.
When sanding walls, a lot of dust is generated, so it is necessary to use safety glasses and a respirator.
Sanding the walls of a log house is carried out in stages and includes three types of processing: rough, fine and finishing.
- At the first stage, rough processing of the timber is performed, the task of which is to remove all significant irregularities from the surface and prepare it for finer grinding. For this work, the abrasive with the largest grain size is selected. During initial processing, the nozzles very quickly become clogged with dust, and they have to be changed frequently.
- For basic sanding, fine-grain sandpaper is used. After processing, the result should be a flat and smooth surface, ready for subsequent painting.
- Final sanding is not always performed, but in cases where it is necessary to bring the surface into ideal condition for the subsequent application of a transparent varnish coating. The walls are polished using the finest abrasive to make the surface as smooth as possible.
Building a house from laminated veneer lumber involves sanding immediately after assembly. If it is natural humidity, then you need to wait until shrinkage and drying are completed. Otherwise, the wood fibers will lift up and you won’t get a smooth surface.
To work with your own hands you will need the following tools:
- Nozzles with different coarse sandpaper.
- Tape train - machine or grinder.
The first time sanding is done with sandpaper No. 40. It will remove all the unevenness. In the future, No. 80-100 is taken to obtain a smooth surface (for example, domestically produced Fera paper).
Do-it-yourself processing moves on average 60 cm in 5-10 minutes. The speed depends on the skill, the type of timber (building a house from profiled timber from coniferous trees takes longer due to the high resin content), and the power of the tools.
You can sand it the old-fashioned way using a block wrapped in sanding paper. But your hand will get tired quickly, and such grinding of a room of 15-20 m2 will take more than a month. This method is good to use when you need to sand small parts and areas where the tool cannot reach.
We invite you to familiarize yourself with Do-it-yourself shelves for a bath in a steam room
All work is carried out in a respirator, since there is a lot of wood dust and it easily gets into the worker’s nasopharynx. You can use tools with special bag attachments, but these are more expensive.
After sanding, the timber walls must be treated with antiseptics and glazing compounds, or simply painted with varnish or paint. The coating work is not difficult and you can do it yourself. You can find out more about how to do this here.
The main mistakes that a beginner makes when doing the work with his own hands:
- It puts too much pressure on the machine, which leaves grooves on the beam.
- The work is carried out at high speeds, the grinding is uneven.
- If you leave the walls uncovered for a long time after sanding, they will darken and you will have to start the work all over again.
Without sanding, the timber looks untidy even after painting. And a real owner loves his home and takes care of it.
Benefits of grinding
What benefits will a house made of timber that has been sanded receive:
- Revealing the natural beauty of wood. After removing the top layer by sanding a simple or profiled timber, the wood is transformed for the better.
- Long-term protection of the material and removal of fungus, including mold.
- Sanding is performed before finishing work, which means that there will be improved absorption of various antiseptics.
- Do not despair if the timber receives the slightest damage, because grinding eliminates the defects received by the timber.
- The wall becomes smooth, and this is the ideal moment for applying varnish or paint.
Sanding timber before or after shrinkage
The main question that beginners ask is “When to grind the wall of timber, before or after shrinkage.” Usually, when building a house from laminated veneer lumber, sanding is started after assembly, but if the wood has natural moisture, then you should wait for the completion of shrinkage and drying. If you neglect this, then you can only dream of a smooth surface.
Stage-by-stage work
During planing, a so-called radial structure can form on the timber, which threatens the wood to peel off. Therefore, the first task is to carefully inspect the tree.
The solution must dry completely, for this you need to wait a day. As a result, small particles will stop “ruffling”. This will help prevent failure of the grinding wheels and protect normal areas of the timber from defects.
You can deal with this problem at the ends using a blowtorch. With its help, the pile is burned and removed. In addition, it makes the wood stronger and more durable. Since the ends are the weakest link of the structure, this approach provides better subsequent grinding and additional polishing with fine sandpaper.
Correctly carried out preparation and grinding of the ends will lead to the following:
- the wood will dry quite slowly, due to which the shrinkage will be uniform;
- painting and varnishing the timber will require much less material, which will make their consumption more economical.
Useful recommendations also cover other important points.
- It makes sense to start sanding work only after the roof has been erected. After this, new irregularities and defects may appear.
- It happens that the timber turns blue. Then, before sanding, you must first clean the walls with sandpaper and then polish.
- The beams may darken 6-7 days after treatment if they were not previously coated with protective agents.
Sanding is carried out in strict sequence and involves several main stages.
First, you need to process it with a coarse abrasive with a grit size of No. 40. This helps eliminate unevenness and roughness. You need to be prepared for the fact that the nozzle will quickly become clogged with small particles of wood and will have to be constantly replaced. The main thing is to position the grinding tool correctly. The machine should be at an angle of 45 degrees to the direction of travel. You should not press it hard or sharply; you should work without delay in one place. With rough processing, up to 1 mm of thickness can be removed in the most prominent areas.
- Finer sanding, which removes lint and precedes painting, is done using sanding wheels with sizes 80-120. Ideally, the surface of the beams should be leveled with the general plane of the wall. For a beginner in this business, the processing process may take a long time, since in 10 minutes you can polish only about 60 cm of area. But speed depends not only on skill and experience. It is often influenced by the type of timber, the resin content of the wood, and the power of the grinding equipment.
- Then, using a grinder, they polish the ends and grooves down to the deepest recessed beams, eliminating all remaining errors from the previous work. For these purposes, abrasive No. 180 is used. The goal is to make the wall as even and smooth as possible.
We invite you to familiarize yourself with the construction of bathhouse walls from laminated veneer lumber, analysis of assembly and finishing technologies
Corners and hard-to-reach places are processed manually at the very end. To do this, leave a strip of the required width (from 3 to 10 cm). The work is carried out using a chisel or a wooden block with abrasive paper wound on it.
It should be noted that working with profiled softwood timber is the most difficult, as it requires a lot of time due to its hardness and high resin content. Sanding of glued material should be carried out immediately after the construction of the house, because compared to a solid product, it is more susceptible to atmospheric influences.
Grinding, despite the apparent ease of the process, has its own subtleties and requires some effort. Therefore, in some cases it is better not to carry out the work yourself, but to use the services of qualified craftsmen.
To learn how to sand timber inside a house, watch the following video.
Glued laminated timber grinding technology
The grinding process has been worked out to the smallest detail and, with a detailed study of the technology, will allow you to complete the work yourself, without involving specialists in the work.
It should be immediately noted that laminated veneer lumber does not require processing with coarse sandpaper during sanding. It is better to use fine-grained abrasives for secondary processing. It would be appropriate to say that it will not be possible to treat the entire house using electric tools. This is simply due to technical difficulties. In hard-to-reach places, manual work will be required.
During grinding, special attention must be paid to the end part of the beam. This part is the weakest of this building material. The ends are constantly exposed to precipitation and sunlight. The end part will need to not only be sanded again with special care, but also treated with special compounds based on wood resins. Such thoroughness in work will ultimately ensure smooth shrinkage of the house and savings in paint and varnish materials during the subsequent finishing of house structures.
Regarding the turning of the main wooden massif, there are a number of recommendations that should be followed:
- First, grinding is carried out instrumentally using 120-grit sandpaper;
- the ends and grooves are processed using a grinder equipped with a special attachment;
- corners and hard-to-reach places are cleaned manually or using a drill equipped with an attachment;
- After completing mechanical work, dust must be removed from all treated surfaces.
When grinding, do not set the maximum speed on power tools. A high rotation speed leads to the fact that visible radial defects remain on the surface of the beam, which will be more difficult to get rid of.
Why is timber sanding necessary?
Today, in suburban construction, profiled timber with natural humidity is often used. Being part of a log house, the initially smooth (planed) surface of this material ceases to be so - a decrease in its humidity affects it, as a result of which not only shrinkage of the house occurs, but also a change in the quality of the surface of the timber. Simply put, the walls are no longer as smooth as they used to be. To a lesser extent, such processes are typical for log houses made of glued material. But if your plans include a spectacular design for a house made of laminated veneer lumber, sanding the laminated veneer lumber simply cannot be avoided. The following work is required:
- to give the walls a smooth surface, which has a positive effect not only on the aesthetics of the building, but also on reducing the consumption of paints and varnishes applied when painting the walls of a log house;
- to reveal the wood texture. By “cutting off” the top layer of the timber, it is possible to emphasize the natural beauty of the pattern of this material;
- for better penetration of coatings into wood, thereby increasing the service life of the coating and providing the necessary degree of protection for the walls
In some cases, sanding is used to remove layers of wood damaged by fungus.
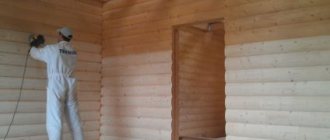
A little about the technology of sanding the walls of a wooden house
It is optimal to carry out such work before installing windows and doors, because The sanding process is very dusty. For the same reason, workers must use respirators and safety glasses. Only the dry surface of the lumber, as well as the ends of the timber, are processed. For these purposes, special grinding machines are used, as well as sandpaper with different grain sizes, which is selected based on the current state of the wall surface. Some models of sanding equipment can be connected to a vacuum cleaner, thereby reducing the amount of dust. Usually start with a grit of 40-60 and end with 90-120. All work is carried out before caulking the timber, if this is required by the technology of constructing a wooden house. Experienced workers can use a grinder as the main tool; it is most often used to process the ends of the material. Hard-to-reach places, as a rule, are processed without the use of power tools.
Obtaining a perfectly smooth surface - polishing a timber - is a process similar to grinding, only in this case an even finer-grained abrasive is used, up to 180. The complexity of the work and the price of sanding walls made of timber depend on the initial state of the log house, as well as the planned result.
Cost of sanding timber
Average market prices for polishing timber vary between 200-350 rubles. for 1 sq. m. wall surface. As a rule, the same area is processed twice (first with coarse, then with fine sandpaper) - all this is included in the above cost of sanding walls made of timber. Prices for polishing services range from 170-250 rubles. for 1 sq. m. In this case, the surface is processed once with sandpaper 180 or even smaller grain.
What determines the prices for grinding? Let's figure it out together:
- from the initial state of the wall surface. The most expensive service will be if they were once covered with paintwork - you will have to remove the coating layer;
- on the result that the developer needs. The ideal here is difficult to achieve, and everything depends on the number of “passes” and changes in abrasive grain size. In addition, the cost of services does not include the cost of “consumables”;
- on the height of the building and the need to install scaffolding;
- from the total area of the walls. Discounts are available for sanding large logs;
- from related services. Complete finishing services, such as sanding + painting, are cheaper than individual jobs
Finally
On average, work on polishing the walls of a timber house, the area of which (internal and external) does not exceed 300 m, is carried out within 1-3 weeks. As you already understand, they can be very expensive. So think again, maybe it’s better to just sheathe the walls with imitation timber?
What tools are recommended for grinding?
Sanding walls is a long and monotonous process. Don't panic right away. It is enough to use proven technologies and acquire the necessary tools for these purposes. To achieve the desired result you will need:
- belt sander (the best option among existing tools);
- grinder equipped with a special attachment for working with corners;
- electric drill complete with grinding wheel.
Almost everyone has a set of working tools, except for a grinding machine, so there should not be any particular difficulty with subsequent work. To make the work go faster and better, you will need to purchase additional tools for equipping tools and protective accessories.
It is necessary to have a respirator and safety glasses for grinding.
Regardless of what tools will be used for sanding laminated veneer lumber, properly selected sandpaper will allow you to achieve high quality sanding. To work with the end parts, it is better to use 80-grit sandpaper. Sanding large areas of walls is carried out using 120-grit sandpaper.
Grinding
Why is this necessary?
The difference between treated and untreated areas is very noticeable
Reasons for the need for grinding:
- Currently, glued material is often used for the construction of country houses, treated with antiseptics. But, nevertheless, even it darkens and loses its original beauty if it is not immediately varnished;
- in addition, even laminated veneer lumber, not to mention a solid profile, after the construction of the box has a shrinkage of up to 1-2% of the total height (for a solid one - more than 5%), therefore, the surface is deformed;
- It follows from this that it is not advisable to carry out painting work immediately after construction - the instructions recommend doing this only 1-1.5 years after the construction of the walls. But a deformed surface requires a very large waste of materials;
- in addition, if you remove the darkened layer, the texture of the wood “reveals” - its natural pattern becomes visible, and covering the wood with colorless varnish only accentuates its charm;
- also, sanded timber (solid or glued) adheres better to paint and varnish materials, therefore, its service life increases.
How it's done
Sanding set
You can use different tools for grinding timber with your own hands - it depends mainly on their availability.
So, for this you can use:
- a grinding machine that processes the entire part at once, but can only be used for single profiles;
- belt machine - it is used quite often and it is very productive for such work, angle grinder (grinder);
- electric drill;
- in most cases, sandpaper is used as an abrasive;
- although you can also use a turtle disk and a metal brush for a grinder and drill.
For the most part, windows and doors in a wooden house are installed only after the building has settled, that is, after 1-1.5, and sometimes 2 years. Therefore, it is best to carry out such work before their installation, since sanding the timber inside the house means getting a large amount of dust in the room.
As we have already said, the process is very labor-intensive and harmful to health - wood dust can get into the respiratory tract and eyes, so it is strictly forbidden to work without protective equipment! Only dry timber with a moisture content of no more than 19% is processed. The end part of the profile, which is most susceptible to deformation and darkening, is also ground.
Draw machine
It is noteworthy that some models of belt and angle machines can be connected to a vacuum cleaner. Consequently, there will be much less dust, but most often a drill and grinder are used, as the most common and cheapest options.
The grit of sandpaper used for such work is usually from 40-60 to 90-120, but in any case, such processing should be carried out before caulking the timber, if this is provided for by the project or necessity.
But there is one more question - what is the best way to sand walls made of timber at the ends, and a grinder is very suitable for this, but here, instead of sandpaper, it is often more convenient to use a metal brush to properly process the cut. In addition, there are hard-to-reach places, for example at the corners, when timber or logs are connected to the rest - here you cannot reach everywhere with a disk (brush), so you will have to use a chisel for processing.
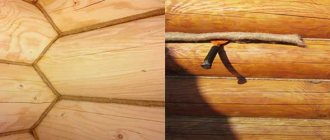
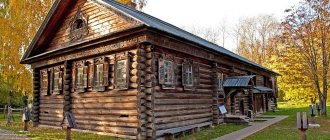
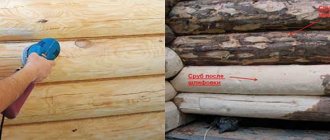
In the photo on the left is a two-year log house, on the right is an eight-month one
The age of construction of a timber or log building is of great importance when processing - the more it costs, the more difficult it is to polish it. In addition, a long period of operation affects the quality.
In the top photo you see two examples - on the left is a log house that is 2 years old, and on the left is 8 months old and after removing the top layer, the wood structure looks different - on the right it is much better, so you should not postpone such work for long after building the house. Of course, a certain tone to the structure of wood can be given with the help of varnish for a wooden surface, but its natural structure still looks more beautiful, and it is almost impossible to imitate it.
Perfect walls
As always, the choice is simple regarding grinding - either order it or do it yourself. The first option should guarantee high-quality work, and the second always guarantees it, plus it allows you to save money. Therefore, the consideration of the grinding process will take place precisely from the point of view of independent work.
It is also worth considering the points that determine the need for mechanical processing of wood.
Why is this work needed:
- Allows you to return the timber to its original fresh look, emphasizing the texture of the wood.
- Ensures complete removal of mold and mildew from the surface.
- It serves as an excellent moment for improving the absorption of walls when treating with antiseptic and primer paint.
- Serves as a basis for painting and applying varnish to wood.
- Removes all defects that the timber receives during wall installation.
Timber without defects
When to carry out work
Here the main question is only how to sand the timber after the log house has completely dried and shrinked, or almost immediately after the construction of the frame.
There is no universal answer to this question.
Opinion is divided, and this is due to simple points:
- Firstly, waiting several months for a house to shrink is quite a long time.
- Secondly, many experts believe that if the walls and roof are erected, then the basic conditions for grinding have already been met.
- Thirdly, the timber for construction should initially not be completely damp, so that it does not lead.
In addition, there is a simple example of what happens when painting relatively raw and unsanded wood - all the paint begins to crack and peel off. Thus, you can take the side of supporters of timely wood processing.
The wood in a log house needs to be protected immediately after installation, which is why sanding a log house is recommended almost the next day after installing the roof. And after the “operation” you can let the log house dry normally and evenly.
Required Tools
In principle, all the tools that can be used relate specifically to the timber processing process:
- Quite often a manual belt sanding machine is used. Plus, you can work with it without carpentry skills.
- Angle grinder, the well-known grinder with a disc attachment.
- Brusadrill with grinding attachment.
Belt Sanding Machine
Important! Rarely, but still, factory equipment is used, on which the entire part is completely processed by the manufacturers at the factory. In this case, simply after installation it will be necessary to process defects, if any.
At the same time, most often sanding a house made of timber involves the use of two of the simplest and most common tools: a drill and an angle grinder. In addition, almost any owner has these tools.
Naturally, you will need some more accessories that are difficult to classify as tools; rather, it is equipment, without which work will not only be difficult, but also dangerous, we are talking about glasses and a respirator.
It is best to take glasses from unbreakable plastic, and quite wide. A respirator can be anything, the main thing is that it protects the respiratory tract.
Important! Regardless of which tools will be used for the job, the quality of the entire process depends directly on what kind of sandpaper is used. We can recommend a sanding setting of 80 for the end and a serious defect of the timber, and 120 for finishing the walls.
The simplest and most popular tool is the grinder.
Technology
The first step is to carefully examine the log house for the presence of a radial structure in the wood. What does this mean?
The radial structure is formed in the form of a kind of “pile”, which is obtained, for example, during planing. At the same time, whole petals of wood begin to peel off from the timber.
The instructions for detecting such a defect are quite simple; it will be necessary to treat areas of the radial structure with an adhesive solution. And not just process it, but apply it in several layers, generously lubricating the entire area.
After the glue is applied, you need to leave it for 24 hours to dry completely. This will not only “pacify” the radial structure, but also protect the adjacent wood tissue from ruffling during sanding.
Important! In addition to the fact that the operation of applying glue protects the wood, it also allows you to extend the life of the tool and grinding wheels.
Then there is the problem of lint at the ends. You can solve this using a blowtorch. The flame burns quite well and removes all the lint.
Moreover, the secret of this technology is that under the simple influence of fire, the polished timber acquires additional strength, which will affect its service life.
Visual demonstration of the ends before and after grinding
You should definitely pay extra attention to grinding the end. The fact is that it is the end that remains the weakest point in the entire log house. It is subject to cracking, constantly gets wet, and the end receives the most sunlight.
Therefore, the end should not just be sanded, but additionally polished with fine sandpaper so that as little lint remains on it as possible.
This attitude towards the end will allow:
- The shrinkage should be uniform.
- The wood dries slowly and evenly.
- Reduce paint or varnish consumption. Unpolished timber absorbs paint and varnish materials in huge quantities, and this increases the cost of processing.
Basic steps and recommendations
The technology has been disassembled, and now it’s time to decide how the work will proceed.
It can be broken down into the following recommendations:
- At the first stage, grinding is done with coarse sandpaper with a fraction of 40. The top layer of the timber is removed.
- Next, the pile is removed; for this, paper with a fraction of 100-120 is used.
- A grinder is perfect for ends and grooves, and this is where a beginner should start in order to get used to handling the tool.
- After sanding the timber with your own hands has come to an end, dust must be removed from the walls immediately, otherwise it will interfere with the normal application of paints and varnishes.
“Additional sanding” with delicate material
Errors
It is equally important to immediately identify the main mistakes that should be avoided.
In this case, the rule will work: informed means armed:
- High revs will leave rough marks on the timber.
- Sanding timber without removing resin residue from the surface of the wood.
- Work on a radial structure without first gluing the defect.
Conclusion
Despite the apparent ease of the grinding process, before grinding the timber, you also need to calculate your own forces. The fact is that beginners often use large grinders for work with inexperienced hands (
Peculiarities
This process solves several problems:
- removal of mold and mildew stains;
- elimination of minor damage to timber received during installation;
- lightening the wood surface;
- removing lint after using antiseptic impregnations;
- giving freshness to the pattern and texture of wood.
We invite you to familiarize yourself with Cleaning products for composite pools. Polishing also involves the removal of a layer damaged as a result of external influences, renewal after several years of operation of the premises. In addition, this removes old varnish and antiseptic impregnation from the surface, which are no longer relevant. Sanding helps restore the timber to the look and color of fresh wood.
The process of building a house from any material is always very labor-intensive and includes several steps.
Sanding is one of the important stages of finishing logs, allowing you to protect the wood from such factors as:
- rotting;
- the appearance of mold and fungi that destroy natural building materials;
- darkening;
- uneven logs;
- exposure to moisture and insects.
It is worth noting that sanding is needed regardless of the type of log. Thus, rounded and chopped logs must be sanded, despite the aesthetic and presentable original appearance.
Sanding a log frame has the following advantages:
- additional material protection;
- improving the penetration of antiseptics and paints into logs;
- savings in paint and varnish consumption;
- removing dirt from wood that invariably accompanies transportation.
And yet, some unscrupulous craftsmen neglect grinding, because this process is quite labor-intensive, time-consuming and energy-consuming. In addition, it can be carried out only after complete shrinkage of the logs, which on average ranges from six months to a year, depending on the type of structure. You can reduce time costs by purchasing laminated veneer lumber, which is thoroughly dried during the manufacturing process, so it practically does not shrink. Sanding wet wood will certainly cause scuffing and damage.
So, having decided to build a house according to all the rules, you should refuse tempting offers to build turnkey log houses. As a rule, they are not aimed at long-term quality, but at speed of implementation, which, one way or another, affects unpleasant surprises during the operation of the building. And you shouldn’t skimp on the services of professional log sanding craftsmen, because it requires not only the proper skills, but also special tools and means to protect your health.
Do I need to sand profiled timber?
When transporting a wooden beam and its subsequent unloading, various contaminants may fall on it, which cannot always be wiped off with a regular damp cloth.
It is worth noting that the drying process of the wood mass occurs unevenly. Since summer trunk rings are looser, they lose moisture much faster than winter ones, whose density is much higher and humidity is lower. Even on surfaces treated by planing, this feature will certainly appear after just one year of use of the log. The smoothness of the wood material is significantly reduced.
The destruction of wood by insects, fungi and various microorganisms always manifests itself superficially at first. Therefore, removing the top layer of material can be regarded as an additional protective measure.
During the process of sanding the wood surface, the cellular structure in this place is significantly disrupted. This is both an advantage and a disadvantage. Thanks to the use of this technology, fire retardants and antiseptics used to process wood penetrate as deeply as possible into its structure, which allows for the highest quality protection of the material.
Recognized advantages and disadvantages of a log house
Wooden design
- environmental friendliness;
- security;
- durability;
- wear resistance;
- resistance to deformation;
- low thermal conductivity;
- frost resistance;
- excellent sound insulation;
- natural ventilation;
- ease of care;
- healing aroma;
- amazing appearance;
- favorable energy.
A wooden structure also has disadvantages - these are:
- change in natural shade;
- biological activity;
- flammability.
The disadvantages are quite serious, however, proper processing of raw materials will not allow them to overshadow your life in such a beautiful structure.
When should you sand timber inside your home?
Nowadays, there are different opinions about when to sand wood. Some believe that this should be done after the house has settled, others - immediately after installing the roof. There is still a consensus on wood moisture content, which should be no more than 20%. In all other cases, there will be no benefit from grinding the surface.
The first option is considered correct here, but supporters of the second argue its advantage as follows:
- during the shrinkage process, the wooden beam may become infected with fungus;
- By waiting for the frame to shrink, the shade of the wood may change significantly during this time.
The latter will, of course, happen, but the material will quickly recover after sanding.
Shrinkage of the frame of a wooden house occurs for one reason - due to loss of moisture from the wood mass. If the estimated rate of shrinkage of a structure is in the double digits and measured in centimeters, then the moisture level of the wood was at least 20%.